目录:
Maven的安装
Eclipse安装Maven插件
Nexus私服搭建
Maven+Nexus配置
发布自己的构件(至Nexus)
创建maven多模块工程group
整理中[...]
先放一个概要图:

Maven的安装
Eclipse安装Maven插件
Nexus私服搭建
1)下载、安装(最新的Nexus需要jdk1.7及以上)
2)配置Nexus
a)安全性设置
b)仓库配置(Repository)
如下图:

从上图可知,仓库分成proxy、hosted、group等几类。
proxy可以理解为代理库,例如Central中央仓库,Nexus从中央仓库拉下jar包,作为二级缓存方便团队实用。

如上图,设置Download Remote Indexes会从中央仓库下载索引文件(lucene索引),团队开发时从该索引中检索jar包,下载后保存在
http://localhost:8081/nexus/content/repositories/central/
其他连个proxy仓库也可以打开Download Remote Indexes。
对于group类型的Public Repositories可以理解为是多个仓库的合集,如图:

Maven+Nexus配置
修改~/.m2/setting.xml
如下:(摘抄自http://blog.linguofeng.com/archive/2012/08/10/maven-nexus-install.html)
<?xml version="1.0" encoding="UTF-8"?>
<settings xmlns="http://maven.apache.org/SETTINGS/1.0.0"
          xmlns:xsi="http://www.w3.org/2001/XMLSchema-instance"
          xsi:schemaLocation="http://maven.apache.org/SETTINGS/1.0.0 http://maven.apache.org/xsd/settings-1.0.0.xsd">

  <!-- 配置central镜像地址为本地仓库,加速索引速度 -->
  <mirrors>
    <mirror>
      <id>central</id>
      <mirrorOf>central</mirrorOf>
      <name>central</name>
      <url>http://127.0.0.1:8081/nexus/content/repositories/central</url>
    </mirror>
  </mirrors>

  <!-- 配置发布仓库,第一个为正式版仓库,第二个为快照版仓库。 -->
  <profiles>
    <!-- 执行:$ mvn release:prepare 命令时会打包并发布到该仓库。 -->
    <profile>
      <id>nexus</id>
      <repositories>
        <repository>
          <id>nexus</id>
          <name>local private nexus</name>
          <url>http://127.0.0.1:8081/nexus/content/groups/public</url>
        </repository>
      </repositories>
    </profile>
    <!-- 执行:$ mvn deploy 命令时会打包并发布到该仓库。 -->
    <profile>
      <id>nexus-snapshots</id>
      <repositories>
        <repository>
          <id>nexus-snapshots</id>
          <name>local private nexus snapshots</name>
          <url>http://127.0.0.1:8081/nexus/content/groups/public-snapshots</url>
        </repository>
      </repositories>
    </profile>
  </profiles>

  <!-- servers节点的属性是在向仓库发布时使用 -->
  <servers>
    <server>
      <id>nexus-releases</id>
      <username>admin</username>
      <password>admin123</password>
    </server>
    <server>
      <id>nexus-snapshots</id>
      <username>admin</username>
      <password>admin123</password>
    </server>
  </servers>

  <!-- 激活配置 -->
  <activeProfiles>
    <activeProfile>nexus</activeProfile>
    <activeProfile>nexus-snapshots</activeProfile>
  </activeProfiles>
</settings>
Eclipse中队Maven User Settings进行配置,如图:
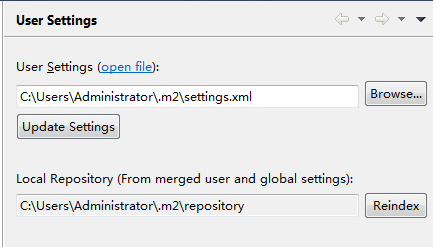
Update Settings,然后就快在Maven项目中引入依赖。

如果是第一次加载,Nexus将从中央仓库下载,下载完毕后可以在
http://localhost:8081/nexus/content/groups/public/org/springframework/spring-core/
下找到相应的spring-core文件。

发布自己的构件(至Nexus)
配置settings.xml
  <servers>
    <server>
      <id>releases</id>
      <username>admin</username>
      <password>***</password>
    </server>
    <server>
      <id>snapshots</id>
      <username>admin</username>
      <password>***</password>
    </server>
  </servers>
在项目pom.xml文件中添加:
<distributionManagement>
	<repository>
		<id>releases</id>
		<name>Nexus Release Repository</name>
		<url>http://localhost:8081/nexus/content/repositories/releases/</url>
	</repository>
	<snapshotRepository>
		<id>snapshots</id>
		<name>Nexus Snapshot Repository</name>
		<url>http://localhost:8081/nexus/content/repositories/snapshots/</url>
	</snapshotRepository>
</distributionManagement>
必须保证:settings.xml和pom.xml中id是一一对应的。
然后mvn deploy即可。
在Nexus中可以search到自己的构件:

在配置的仓库中也可以找到具体文件的位置:
http://localhost:8081/nexus/content/repositories/snapshots/cn/fox/test/

创建maven多模块工程group
1)先创建父工程
创建一个maven工程(Maven project,选择quickStart),除了pom.xml文件其他都删掉,然后修改pom.xml。
将<packaging>jar</packaging>修改成<packaging>pom</packaging>。
如果提示有错,用maven-》update project。
2)创建子模块
创建一个maven模块(Maven module)。
父工程的pom文件自动添加了以下内容:
<modules>
<module>children1-demo</module>
</modules>
3)优化、调整配置
父子项目有继承关系,如果子项目的一些属性都一样,可以上移到父项目中设置,子项目无需重复设置。
还有几个注意点:
统一指定版本号 <properties>
统一依赖管理 <dependencyManagement>
统一插件管理 <pluginManagement>
相关参考资料
http://juvenshun.iteye.com/blog/349534 [Nexus入门指南]
----------------------------------------------------
1.从svn中迁出maven项目
a)从svn资源库“迁出”(指定的workspace)
b)import-》Existing Maven Projects
上传java项目时忽略eclipse项目配置文件(.settings/.classpath/.project/target等) (svn ignore)