一、准备工作
首先创建一个空工程,然后在该空工程创建一个模块(选择Spring Initializal),选择Spring Data Redis依赖。

pomx.xml
<?xml version="1.0" encoding="UTF-8"?>
<project xmlns="http://maven.apache.org/POM/4.0.0" xmlns:xsi="http://www.w3.org/2001/XMLSchema-instance"
         xsi:schemaLocation="http://maven.apache.org/POM/4.0.0 https://maven.apache.org/xsd/maven-4.0.0.xsd">
    <modelVersion>4.0.0</modelVersion>
    <parent>
        <groupId>org.springframework.boot</groupId>
        <artifactId>spring-boot-starter-parent</artifactId>
        <version>2.2.4.RELEASE</version>
        <relativePath/> <!-- lookup parent from repository -->
    </parent>
    <groupId>com.spring.boot.example</groupId>
    <artifactId>spring-boot-redis</artifactId>
    <version>0.0.1-SNAPSHOT</version>
    <name>spring-boot-redis</name>
    <description>Demo project for Spring Boot</description>

    <properties>
        <java.version>1.8</java.version>
    </properties>

    <dependencies>

    <!-- redis依赖 -->
        <dependency>
            <groupId>org.springframework.boot</groupId>
            <artifactId>spring-boot-starter-data-redis</artifactId>
        </dependency>

        <dependency>
            <groupId>org.springframework.boot</groupId>
            <artifactId>spring-boot-starter-test</artifactId>
            <scope>test</scope>
            <exclusions>
                <exclusion>
                    <groupId>org.junit.vintage</groupId>
                    <artifactId>junit-vintage-engine</artifactId>
                </exclusion>
            </exclusions>
        </dependency>
    </dependencies>

    <build>
        <plugins>
            <plugin>
                <groupId>org.springframework.boot</groupId>
                <artifactId>spring-boot-maven-plugin</artifactId>
            </plugin>
        </plugins>
    </build>

</project>
下载redis
链接: https://pan.baidu.com/s/1w4Ka6ehyGI1cp9hHBwQZUw 提取码: zrvs

解压后这个文件夹,在windows下运行redis-server,就启动了redis服务。
运行redis-cli.ext就运行了客户端,客户端中可直接使用redis原生的各种命令。
也可使用下载的redis管理软件。

二、配置
在applicatin.properties中配置reids地址和端口
#redis地址和端口
spring.redis.host=127.0.0.1
spring.redis.port=6379
现在我们来测试下:
在test文件夹下一直点,找到创建SpringBoot模块时生成的测试类。
package com.spring.boot.example.springboot.redis;

import org.junit.jupiter.api.Test;
import org.junit.runner.RunWith;
import org.springframework.beans.factory.annotation.Autowired;
import org.springframework.boot.test.context.SpringBootTest;
import org.springframework.data.redis.core.RedisTemplate;
import org.springframework.data.redis.core.ValueOperations;
import org.springframework.test.context.junit4.SpringJUnit4ClassRunner;

@SpringBootTest
//没有RunWith解决方法在下面
@RunWith(SpringJUnit4ClassRunner.class)
class SpringBootRedisApplicationTests {

    @Autowired
    private RedisTemplate redisTemplate;

    @Test
    void testRedis() {
        ValueOperations valueOperations = redisTemplate.opsForValue();
        valueOperations.set("key","value");
        String key = (String)valueOperations.get("key");
        System.out.println(key);
    }

}
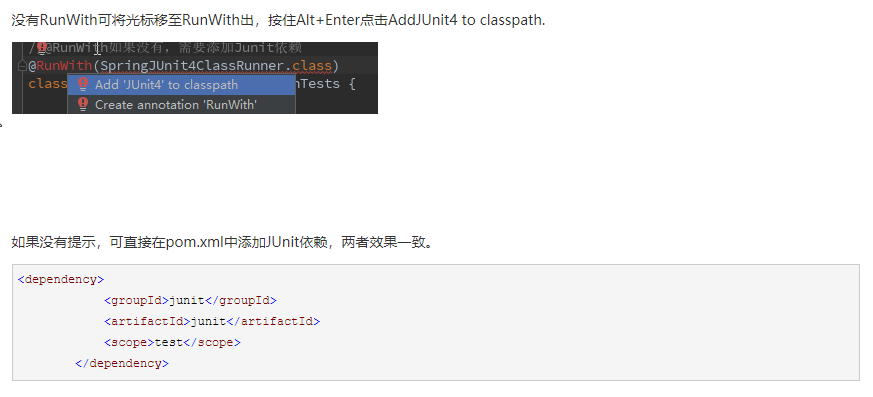
运行 testRedis方法,成功将值存入redis,并将其取出。

再来看下redis有没有数据

虽然值有点奇怪,但依稀可见key和value。
存入redis时,未配置序列化方法的情况下默认使用jdk的序列化方式,存入的结果是jdk序列化之后的结果就会这样显示。