Redis 的客户端请参考 http://redis.io/clients 。
- Jedis 客户端
- phpredis 客户端
- redis-py 客户端
- C/C++ 客户端
- .net 客户端
- node-redis 客户端
- C# 客户端 StackExchange.Redis
- Jedis 客户端
Jedis 客户端访问云数据库 Redis 版服务,有以下两种方法:
Jedis单链接
JedisPool连接池连接
操作步骤如下:
下载并安装Jedis客户端:单击下载地址。
Jedis 单连接示例
打开 Eclipse 客户端,创建一个 Project,输入如下代码段:
import redis.clients.jedis.Jedis;
public class jedistest {
public static void main(String[] args) {
try {
     String host = "xx.kvstore.aliyuncs.com";//控制台显示访问地址
     int port = 6379;
     Jedis jedis = new Jedis(host, port);
     //鉴权信息
     jedis.auth("password");//password
     String key = "redis";
     String value = "aliyun-redis";
     //select db默认为0
     jedis.select(1);
     //set一个key
     jedis.set(key, value);
     System.out.println("Set Key " + key + " Value: " + value);
     //get 设置进去的key
     String getvalue = jedis.get(key);
     System.out.println("Get Key " + key + " ReturnValue: " + getvalue);
     jedis.quit();
     jedis.close();
}
catch (Exception e) {
 e.printStackTrace();
 }
}
}
运行上述 Project,在 Eclipse 的控制台输出如下运行结果则表示您已成功连接云数据库 Redis。
Set Key redis Value aliyun-redis
Get Key redis ReturnValue aliyun-redis
接下来您就可以通过自己的本地客户端 Jedis 操作您的云数据库 Redis。您也可以通过 JedisPool 连接池来连接您的云数据库 Redis。
JedisPool 连接池示例
打开 Eclipse 客户端,创建一个 Project,配置 pom 文件,具体配置如下所示:
<dependency>
<groupId>redis.clients</groupId>
<artifactId>jedis</artifactId>
<version>2.7.2</version>
<type>jar</type>
<scope>compile</scope>
</dependency>
在 project 中添加如下应用:
import org.apache.commons.pool2.PooledObject;
import org.apache.commons.pool2.PooledObjectFactory;
import org.apache.commons.pool2.impl.DefaultPooledObject;
import org.apache.commons.pool2.impl.GenericObjectPoolConfig;
import redis.clients.jedis.HostAndPort;
import redis.clients.jedis.Jedis;
import redis.clients.jedis.JedisPool;
import redis.clients.jedis.JedisPoolConfig;
如果您的 Jedis 客户端版本是 Jedis-2.7.2,在 Project 中输入如下代码:
JedisPoolConfig config = new JedisPoolConfig();
//最大空闲连接数, 应用自己评估,不要超过ApsaraDB for Redis每个实例最大的连接数
config.setMaxIdle(200);
//最大连接数, 应用自己评估,不要超过ApsaraDB for Redis每个实例最大的连接数
config.setMaxTotal(300);
config.setTestOnBorrow(false);
config.setTestOnReturn(false);
String host = "*.aliyuncs.com";
String password = "密码";
JedisPool pool = new JedisPool(config, host, 6379, 3000, password);
Jedis jedis = null;
try {
jedis = pool.getResource();
/// ... do stuff here ... for example
jedis.set("foo", "bar");
String foobar = jedis.get("foo");
jedis.zadd("sose", 0, "car");
jedis.zadd("sose", 0, "bike");
Set<String> sose = jedis.zrange("sose", 0, -1);
} finally {
if (jedis != null) {
jedis.close();
}
}
/// ... when closing your application:
pool.destroy();
如果您的 Jedis 客户端版本是 Jedis-2.6、Jedis-2.5,在 Project 中输入如下代码:
JedisPoolConfig config = new JedisPoolConfig();
//最大空闲连接数, 应用自己评估,不要超过ApsaraDB for Redis每个实例最大的连接数
config.setMaxIdle(200);
//最大连接数, 应用自己评估,不要超过ApsaraDB for Redis每个实例最大的连接数
config.setMaxTotal(300);
config.setTestOnBorrow(false);
config.setTestOnReturn(false);
String host = "*.aliyuncs.com";
String password = "密码";
JedisPool pool = new JedisPool(config, host, 6379, 3000, password);
Jedis jedis = null;
boolean broken = false;
try {
     jedis = pool.getResource();
     /// ... do stuff here ... for example
     jedis.set("foo", "bar");
     String foobar = jedis.get("foo");
     jedis.zadd("sose", 0, "car");
     jedis.zadd("sose", 0, "bike");
     Set<String> sose = jedis.zrange("sose", 0, -1);
}
catch(Exception e)
{
     broken = true;
} finally {
if (broken) {
     pool.returnBrokenResource(jedis);
} else if (jedis != null) {
     pool.returnResource(jedis);
 }
}
运行上述 Project,在 Eclipse 的控制台输出如下运行结果则表示您已成功连接云数据库 Redis。
Set Key redis Value aliyun-redis
Get Key redis ReturnValue aliyun-redis
接下来您就可以通过自己的本地客户端Jedis操作您的云数据库 Redis。
phpredis 客户端
操作步骤如下所示:
下载并安装phpredis客户端:单击 下载地址。
在任何一款可以编辑 php 的编辑器中输入如下代码:
 <?php
 /* 这里替换为连接的实例host和port */
 $host = "localhost";
 $port = 6379;
 /* 这里替换为实例id和实例password */
 $user = "test_username";
 $pwd = "test_password";
 $redis = new Redis();
 if ($redis->connect($host, $port) == false) {
         die($redis->getLastError());
   }
 if ($redis->auth($pwd) == false) {
         die($redis->getLastError());
  }
  /* 认证后就可以进行数据库操作,详情文档参考https://github.com/phpredis/phpredis */
 if ($redis->set("foo", "bar") == false) {
         die($redis->getLastError());
 }
 $value = $redis->get("foo");
 echo $value;
 ?>
执行上述代码,您就可以通过自己的本地客户端 phpredis 访问您的云数据库 Redis,详情文档参考 https://github.com/phpredis/phpredis 。
redis-py 客户端
操作步骤如下:
下载并安装 redis-py 客户端:单击 下载地址。
在任何一款可以编辑 Python 的编辑器中输入如下代码,即可建立连接通过本地客户端 redis-py 进行数据库操作。
#!/usr/bin/env python
#-*- coding: utf-8 -*-
import redis
#这里替换为连接的实例host和port
host = 'localhost'
port = 6379
#这里替换为实例password
pwd = 'test_password'
r = redis.StrictRedis(host=host, port=port, password=pwd)
#连接建立后就可以进行数据库操作,详情文档参考https://github.com/andymccurdy/redis-py
r.set('foo', 'bar');
print r.get('foo')
C/C++ 客户端
操作步骤如下所示:
下载并编译安装C客户端,编译安装代码如下所示:
     git clone https://github.com/redis/hiredis.git
     cd hiredis
     make
     sudo make install
在 C/C++编辑器中编写如下代码:
     #include <stdio.h>
     #include <stdlib.h>
     #include <string.h>
     #include <hiredis.h>
     int main(int argc, char **argv) {
     unsigned int j;
     redisContext *c;
     redisReply *reply;
     if (argc < 4) {
             printf("Usage: example xxx.kvstore.aliyuncs.com 6379 instance_id password
");
             exit(0);
     }
     const char *hostname = argv[1];
     const int port = atoi(argv[2]);
     const char *instance_id = argv[3];
     const char *password = argv[4];
     struct timeval timeout = { 1, 500000 }; // 1.5 seconds
     c = redisConnectWithTimeout(hostname, port, timeout);
     if (c == NULL || c->err) {
     if (c) {
             printf("Connection error: %s
", c->errstr);
             redisFree(c);
     } else {
             printf("Connection error: can't allocate redis context
");
     }
     exit(1);
     }
     /* AUTH */
     reply = redisCommand(c, "AUTH %s", password);
     printf("AUTH: %s
", reply->str);
     freeReplyObject(reply);
     /* PING server */
     reply = redisCommand(c,"PING");
     printf("PING: %s
", reply->str);
     freeReplyObject(reply);
     /* Set a key */
     reply = redisCommand(c,"SET %s %s", "foo", "hello world");
     printf("SET: %s
", reply->str);
     freeReplyObject(reply);
     /* Set a key using binary safe API */
     reply = redisCommand(c,"SET %b %b", "bar", (size_t) 3, "hello", (size_t) 5);
     printf("SET (binary API): %s
", reply->str);
     freeReplyObject(reply);
     /* Try a GET and two INCR */
     reply = redisCommand(c,"GET foo");
     printf("GET foo: %s
", reply->str);
     freeReplyObject(reply);
     reply = redisCommand(c,"INCR counter");
     printf("INCR counter: %lld
", reply->integer);
     freeReplyObject(reply);
     /* again ... */
     reply = redisCommand(c,"INCR counter");
     printf("INCR counter: %lld
", reply->integer);
     freeReplyObject(reply);
     /* Create a list of numbers, from 0 to 9 */
     reply = redisCommand(c,"DEL mylist");
     freeReplyObject(reply);
     for (j = 0; j < 10; j++) {
             char buf[64];
             snprintf(buf,64,"%d",j);
             reply = redisCommand(c,"LPUSH mylist element-%s", buf);
             freeReplyObject(reply);
         }
     /* Let's check what we have inside the list */
     reply = redisCommand(c,"LRANGE mylist 0 -1");
     if (reply->type == REDIS_REPLY_ARRAY) {
             for (j = 0; j < reply->elements; j++) {
             printf("%u) %s
", j, reply->element[j]->str);
     }
     }
     freeReplyObject(reply);
     /* Disconnects and frees the context */
     redisFree(c);
     return 0;
     }
编译上述代码。
gcc -o example -g example.c -I /usr/local/include/hiredis -lhiredis
测试运行。
example xxx.kvstore.aliyuncs.com 6379 instance_id password
至此完成通过 C/C++ 客户端连接云数据库 Redis。
.net 客户端
操作步骤如下所示:
下载并使用.net 客户端。
git clone https://github.com/ServiceStack/ServiceStack.Redis
在.net 客户端中新建 .net 项目。
添加客户端引用,引用文件在库文件的 ServiceStack.Redis/lib/tests 中。
在新建的.net 项目中输入如下代码来连接云数据库 Redis。详细的接口用法请参见 https://github.com/ServiceStack/ServiceStack.Redis 。
 using System;
 using System.Collections.Generic;
 using System.Linq;
 using System.Text;
 using System.Threading.Tasks;
 using ServiceStack.Redis;
 namespace ServiceStack.Redis.Tests
 {
         class Program
 {
 public static void RedisClientTest()
 {
         string host = "127.0.0.1";/*访问host地址*/
         string password = "password";/*密码*/
         RedisClient redisClient = new RedisClient(host, 6379, password);
         string key = "test-aliyun";
         string value = "test-aliyun-value";
         redisClient.Set(key, value);
         string listKey = "test-aliyun-list";
         System.Console.WriteLine("set key " + key + " value " + value);
         string getValue = System.Text.Encoding.Default.GetString(redisClient.Get(key));
         System.Console.WriteLine("get key " + getValue);
         System.Console.Read();
 }
 public static void RedisPoolClientTest()
 {
         string[] testReadWriteHosts = new[] {
         "redis://password@127.0.0.1:6379"/*redis://密码@访问地址:端口*/
 };
 RedisConfig.VerifyMasterConnections = false;//需要设置
 PooledRedisClientManager redisPoolManager = new PooledRedisClientManager(10/*连接池个数*/, 10/*连接池超时时间*/, testReadWriteHosts);
 for (int i = 0; i < 100; i++){
         IRedisClient redisClient = redisPoolManager.GetClient();//获取连接
         RedisNativeClient redisNativeClient = (RedisNativeClient)redisClient;
         redisNativeClient.Client = null;//ApsaraDB for Redis不支持client setname所以这里需要显示的把client对象置为null
 try
 {
         string key = "test-aliyun1111";
         string value = "test-aliyun-value1111";
         redisClient.Set(key, value);
         string listKey = "test-aliyun-list";
         redisClient.AddItemToList(listKey, value);
         System.Console.WriteLine("set key " + key + " value " + value);
         string getValue = redisClient.GetValue(key);
         System.Console.WriteLine("get key " + getValue);
         redisClient.Dispose();//
 }catch (Exception e)
 {
         System.Console.WriteLine(e.Message);
 }
 }
         System.Console.Read();
 }
 static void Main(string[] args)
 {
         //单链接模式
         RedisClientTest();
         //连接池模式
         RedisPoolClientTest();
 }
 }
 }
node-redis 客户端
操作步骤如下所示:
下载并安装 node-redis。
npm install hiredis redis
在 node-redis 客户端中输入如下代码并执行以此连接云数据 Redis 版。
var redis = require("redis"),
client = redis.createClient({detect_buffers: true});
client.auth("password", redis.print)
使用云数据 Redis 版。
// 写入数据
client.set("key", "OK");
// 获取数据,返回String
client.get("key", function (err, reply) {
console.log(reply.toString()); // print `OK`
});
// 如果传入一个Buffer,返回也是一个Buffer
client.get(new Buffer("key"), function (err, reply) {
console.log(reply.toString()); // print `<Buffer 4f 4b>`
});
client.quit();
C# 客户端 StackExchange.Redis
操作步骤如下所示:
下载并安装 StackExchange.Redis。
添加引用。
using StackExchange.Redis;
初始化 ConnectionMultiplexer。
ConnectionMultiplexer 是 StackExchange.Redis 的核心,它被整个应用程序共享和重用,应该设置为单例,它的初始化如下:
 // redis config
 private static ConfigurationOptions configurationOptions = ConfigurationOptions.Parse("127.0.0.1:6379,password=xxx,connectTimeout=2000");
  //the lock for singleton
 private static readonly object Locker = new object();
  //singleton
 private static ConnectionMultiplexer redisConn;
 //singleton
 public static ConnectionMultiplexer getRedisConn()
 {
     if (redisConn == null)
     {
         lock (Locker)
         {
             if (redisConn == null || !redisConn.IsConnected)
             {
                 redisConn = ConnectionMultiplexer.Connect(configurationOptions);
             }
         }
     }
     return redisConn;
 }
说明:ConfigurationOptions 包含很多选项,例如 keepAlive、connectRetry、name,具体可以参考StackExchange.Redis.ConfigurationOptions。
GetDatabase()返回的对象是轻量级的,每次用的时候从 ConnectionMultiplexer 对象中获取即可。
redisConn = getRedisConn();
var db = redisConn.GetDatabase();
下面给出5种数据结构的 demo,它们的 API 和原生略有不同,分别用 String、Hash、List、Set、SortedSet 开头代表5种数据结构。
string:

//set get
string strKey = "hello";
string strValue = "world";
bool setResult = db.StringSet(strKey, strValue);
Console.WriteLine("set " + strKey + " " + strValue + ", result is " + setResult);
//incr
string counterKey = "counter";
long counterValue = db.StringIncrement(counterKey);
Console.WriteLine("incr " + counterKey + ", result is " + counterValue);
//expire
db.KeyExpire(strKey, new TimeSpan(0, 0, 5));
Thread.Sleep(5 * 1000);
Console.WriteLine("expire " + strKey + ", after 5 seconds, value is " + db.StringGet(strKey));
//mset mget
KeyValuePair<RedisKey, RedisValue> kv1 = new KeyValuePair<RedisKey, RedisValue>("key1", "value1");
KeyValuePair<RedisKey, RedisValue> kv2 = new KeyValuePair<RedisKey, RedisValue>("key2", "value2");
db.StringSet(new KeyValuePair<RedisKey, RedisValue>[] {kv1,kv2});
RedisValue[] values = db.StringGet(new RedisKey[] {kv1.Key, kv2.Key});
Console.WriteLine("mget " + kv1.Key.ToString() + " " + kv2.Key.ToString() + ", result is " + values[0] + "&&" + values[1]);
hash

string hashKey = "myhash";
//hset
db.HashSet(hashKey,"f1","v1");
db.HashSet(hashKey,"f2", "v2");
HashEntry[] values = db.HashGetAll(hashKey);
//hgetall
Console.Write("hgetall " + hashKey + ", result is");
for (int i = 0; i < values.Length;i++)
{
  HashEntry hashEntry = values[i];
  Console.Write(" " + hashEntry.Name.ToString() + " " + hashEntry.Value.ToString());
}
Console.WriteLine();
list

//list key
string listKey = "myList";
//rpush
db.ListRightPush(listKey, "a");
db.ListRightPush(listKey, "b");
db.ListRightPush(listKey, "c");
//lrange
RedisValue[] values = db.ListRange(listKey, 0, -1);
Console.Write("lrange " + listKey + " 0 -1, result is ");
for (int i = 0; i < values.Length; i++)
{
 Console.Write(values[i] + " ");
}
Console.WriteLine();
set

//set key
string setKey = "mySet";
//sadd
db.SetAdd(setKey, "a");
db.SetAdd(setKey, "b");
db.SetAdd(setKey, "c");
//sismember
bool isContains = db.SetContains(setKey, "a");
Console.WriteLine("set " + setKey + " contains a is " + isContains );
sortedset

string sortedSetKey = "myZset";
//sadd
db.SortedSetAdd(sortedSetKey, "xiaoming", 85);
db.SortedSetAdd(sortedSetKey, "xiaohong", 100);
db.SortedSetAdd(sortedSetKey, "xiaofei", 62);
db.SortedSetAdd(sortedSetKey, "xiaotang", 73);
//zrevrangebyscore
RedisValue[] names = db.SortedSetRangeByRank(sortedSetKey, 0, 2, Order.Ascending);
Console.Write("zrevrangebyscore " + sortedSetKey + " 0 2, result is ");
for (int i = 0; i < names.Length; i++)
{
  Console.Write(names[i] + " ");
}
Console.WriteLine();
Redis公网连接
前提条件
如果您需要从本地 PC 端访问 Redis 实例进行数据操作,可以通过在 ECS 上配置端口映射或者端口转发实现。但必须符合以下前提条件:
-
若 Redis 实例属于专有网络(VPC),ECS 必须与 Redis 实例属于同一个 VPC。
-
若 Redis 实例属于经典网络,ECS 必须与 Redis 实例属于同一节点(地域)。
-
若 Redis 实例开启了 IP 白名单,必须将 ECS 的内网地址加入白名单列表内。
ECS Windows 篇
目前云数据库 Redis 版需要通过 ECS 的内网进行连接访问,如果您需要本地通过公网访问云数据库 Redis 版,可以在 ECS Windows 云服务器中通过 netsh 进行端口映射实现。
-
登录 ECS Windows 服务器,在 cmd 执行以下命令:
netsh interface portproxy add v4tov4 listenaddress=ECS服务器的公网IP地址 listenport=6379 connectaddress=云数据库Redis的连接地址 connectport=6379
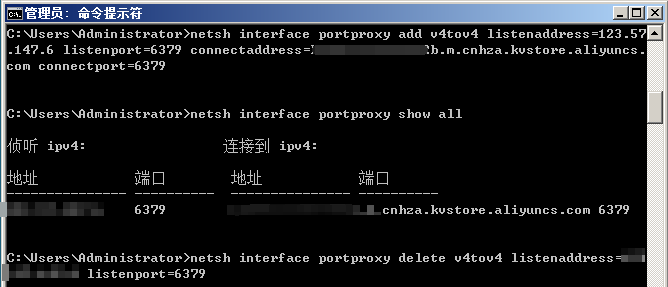
如果需要查看当前服务器存在的映射,可用
netsh interface portproxy show all命令。 -
设置完成后在本地进行验证测试。
-
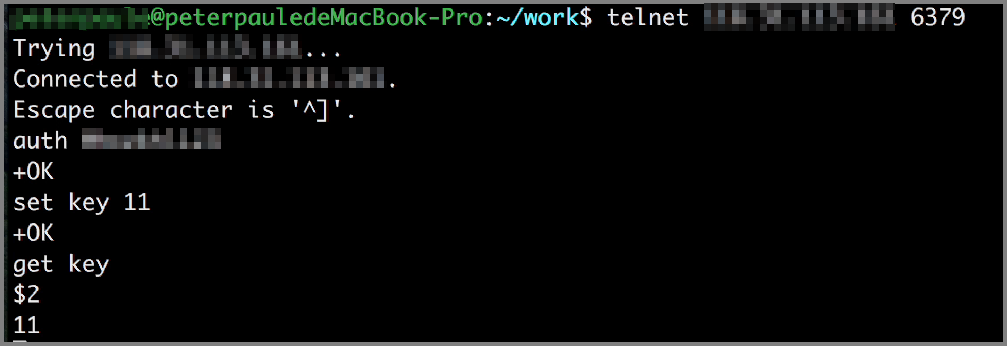
在本地通过 redis-cli 连接 ECS Windows 服务器。假设 ECS Windows 服务器的 IP 是 1.1.1.1,即
telnet 1.1.1.1 6379。 -
连接上 ECS windows 服务器后,输入连接 Redis 的密码:
auth Redis的连接密码。 -
进行数据写入及查询验证。
通过上述步骤即可实现:您本地 PC 或服务器通过公网连接 ECS Windows 6379端口,对云数据库 Redis 进行访问。
注意:因 portproxy 由微软官方提供,未开源使用,您如果配置使用过程中遇到疑问,可参看 netsh 的 portproxy 使用说明或向微软官方咨询确认。或者您也可以考虑通过其他的方案实现,比如通过 portmap 配置代理映射。
-
-
完成相关操作后,如需删除公网转发,可用
netsh interface portproxy delete v4tov4 listenaddress=ECS公网服务器的私网IP地址 listenport=6379删除不需要的映射。
ECS Linux 篇
目前云数据库 Redis 版需要通过 ECS 进行内网连接访问。如果您本地需要通过公网访问云数据库 Redis,可以在 ECS Linux 云服务器中安装 rinetd 进行转发实现。
-
在云服务器 ECS Linux 中安装 rinetd。
wget http://www.boutell.com/rinetd/http/rinetd.tar.gz&&tar -xvf rinetd.tar.gz&&cd rinetdsed -i 's/65536/65535/g' rinetd.c (修改端口范围)mkdir /usr/man&&make&&make install
注意:rinetd 安装包下载地址不确保下载可用性,您可以自行搜索安装包进行下载使用。
-
打开配置文件 rinetd.conf。
vi /etc/rinetd.conf
-
在配置文件中输入如下内容:
0.0.0.0 6379 Redis 的链接地址 6379logfile /var/log/rinetd.log
说明:您可以使用
cat /etc/rinetd.conf命令来检验配置文件是否修改正确。
-
执行如下命令启动 rinetd。
rinetd
注意
-
您可以通过
echo rinetd >>/etc/rc.local将 rinetd 设置为自启动。 -
若遇到绑定报错,可以执行
pkill rinetd结束进程,再执行rinetd启动进程 rinetd。 -
rinetd 正常启动后, 执行
netstat -anp | grep 6379确认服务是否正常运行。

-
在本地进行验证测试。
-
您可以在本地通过 redis-cli 连接 ECS Linux 服务器后进行登录验证,比如安装了 rinetd 的服务器的 IP 是 1.1.1.1,即
redis-cli -h 1.1.1.1 -a Redis的实例ID:Redis密码。或者通过 telent 连接 ECS Linux 服务器后进行操作验证。假设 ECS Linux 服务器的 IP 是 1.1.1.1,即telnet 1.1.1.1 6379。 -
连接上 ECS Linux 服务器后,输入连接 Redis 的密码:
auth Redis的连接密码。 -
进行数据写入及查询验证。
-
通过上述步骤即可实现:您本地的 PC 或服务器通过公网连接 ECS Linux 6379 端口,对云数据库 Redis 进行访问。
https://help.aliyun.com/document_detail/43848.html?spm=5176.11065259.1996646101.searchclickresult.57f17f2dz4kMTq#5
https://help.aliyun.com/document_detail/43850.html
注意:您可以通过该方案进行测试使用,因 rinetd 为开源软件,如在使用过程中存在疑问,您可以参看其官方文档或与 rinetd 官方进行联系确认。