一、介绍
ntopng 高速的基于Web的流量分析与集流工具。ntopng是NTOP的新一代版本,官方原先版本的NTOP已经不再更新。ntopng是原ntop下一代版本,网络流量实时监控显示。ntop是基于Libpcap和它被写在一个可移植的方式来运行在UNIX平台上,MacOSX和Win32一样。再稍微具体点的自行上网查,下面连接是github和官网。
二、安装
在官网中和github上面这些其实都有,简单重复下:
我使用的是Centos平台,需要安装一些依赖的软件包,首先是开发工具的一大堆包
yum groupindatll 'Development Tools'
随后安装各种依赖的小包,github上有详细的介绍,每个ntopng的版本可能依赖不同,但是大体上没什么具体的变化,前提我安装了 epel-release,下面这些包都有
yum install git autoconf automake autogen bison flex libpcap-devel libmaxminddb-devel hiredis-devel redis glib2-devel libxml2-devel sqlite-devel gcc-c++ libtool wget libcurl-devel pango-devel cairo-devel libpng-devel mysql-devel libnetfilter_queue-devel zlib-devel which libcap-devel readline-devel zeromq-devel json-c-devel geoipupdate
在github上是给出了 yum 安装 redis 数据库,但这里我想使用编译来安装redis,使用的版本是redis-4.0.11.tar,将软件包放在/usr/local目录下,如下:
cd /usr/local
tar -xvf redis-4.0.11.tar
cd redis-4.0.11.tar
make
make install      #提示缺什么软件包就安什么,干就完了
简单的配置一下redis,如下:
cd /usr/local/redis-4.0.11/utils      #这个下面有些好东西,会用到
cp -ra redis_init_script /etc/init.d/redis
#可以简单的扫一眼这个文件内容,看依赖哪个文件夹下面的配置
如图可以看到,依赖一个/etc/redis/6379.conf 的文件,那就安排上
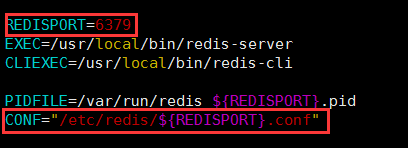
cd /usr/local/redis-4.0.11/utils
cp -ra redis.conf /etc/redis/6379.conf
redis启动的时候默认是在前台启动的,咱们可以改下配置文件放到后台,编辑它的配置文件,改一个yes 就可以的

然后就可以chkconfig --add redis , service redis start 之类的
下面回到 ntopng
cd /usr/local/
mkdir ntopng
cd ntopng
git clone git://github.com/ntop/ntopng.git           #有点慢,等一等就好
git clone git://github.com/ntop/nDPI.git               #nDPI是ntopng依赖的,我可能解释有误,可以自行到官网看一看
#下载完成后
cd nDPI/
./autogen.sh
./configure
make
#到此为止,这一块就完了,下面重头戏,你会发现你缺少好多的依赖包
cd /usr/local
下载一个libmaxminddb-1.4.2.tar.gz,geoIP会用到该包
tar -xvf libmaxminddb-1.4.2.tar.gz
cd libmaxminddb-1.4.2
./configure
make
make install
ldconfig
这里有一个坑,在后面编译 ntopng 的时候 才会报出来,是关于集成在ntopng的tar包中的一个问题,在 /usr/local/ntopng/third-party/zeromq-4.1.7 下面,这个zeromq是有问题的,缺少一些东西,
问题如下所示:
cd /root/ntopng/third-party/zeromq-4.1.7; ./configure --without-documentation --without-libsodium; make
configure: error: cannot find install-sh, install.sh, or shtool in config "."/config
make[1] : on entre dans le répertoire ? /root/ntopng/third-party/zeromq-4.1.7 ?
Makefile:2497: tweetnacl/src/.deps/libzmq_la-tweetnacl.Plo: Aucun fichier ou dossier de ce type
make[1]: *** Aucune règle pour fabriquer la cible ? tweetnacl/src/.deps/libzmq_la-tweetnacl.Plo
我查找了论坛的一些评论才发现问题所在,解决方法如下
查找GitHub:

Seems install-sh, install.sh, or shtool is not present in /root/ntopng/third-party/zeromq-4.1.7

解决方法:
wget https://github.com/zeromq/zeromq4-1/releases/download/v4.1.7/zeromq-4.1.7.tar.gz -O /tmp/zeromq-4.1.7.tar.gz
tar xf /tmp/zeromq-4.1.7.tar.gz -C /root/ntopng/third-party/
还有就是Geoip的用法,发现是仅仅把他们放在特定目录下即可
Maxmind has changed its databases and library and ntopng has been updated as well to keep this into account.

GeoLite2-ASN.mmdb GeoLite2-City.mmdb are the new file databases:
?if you are installing a packaged version of ntopng, those files will be pulled in automatically
?if you are building ntopng from sources, you can run make geoip to download them

Then, just place them under httpdocs/geoip/ and ntopng will automatically pick them.
所以你可以自行去maxmind的网站上下载这些,GeoLite2-ASN_20200225.tar.gz GeoLite2-City_20200225.tar.gz GeoLite2-Country_20200225.tar.gz
解压后放在目录中,继续进行编译ntopng
cd /usr/local/ntopng
./autogen.sh
./configure
make
make install
就这样完成了,下面进行一些基本的配置,但需要参考说明,https://www.ntop.org/guides/ntopng/cli_options.html
在安装包中这里有点好东西,contrib/NST 目录下,可以看到:

所以我们可以简单的配置一下:
cp -ra ntopng /etc/sysconfig/
cp -ra ntopng.service /usr/lib/systemd/system/
mkdir -pv /etc/ntopng
cp -ra ntopng.conf /etc/ntopng
随后我们还要配置一下环境变量,找到/root/.bash_profile 进行添加 ,如下:

然后执行 source /root/.bash_profile 命令,这样 环境变量也配置完成了。
创建 组 和 用户 ,要不然默认使用nobody用户运行
groupadd ntopng
useradd -g ntopng ntopng
su - ntopng    #切换用户过去 ,创建文件和目录
mkdir /home/ntopng/data
mkdir -pv  /home/ntopng/var/;touch /home/ntopng/var/pid
再来看一下ntopng的配置文件,cat /etc/ntopng/ntopng.conf | grep -v "#"
--interface bond0
--http-port 3000
--local-networks 192.168.32.0/24
--data-dir /home/ntopng/data
--dns-mode 1
--disable-autologout
--disable-alerts
--sticky-hosts none
#--daemon                #如果用systemctl进行控制的话,就不需要添加这行,如果手动控制的话,需要添加
--user ntopng
--pid /home/ntopng/var/pid #这是一个目录下的文件
暂时就弄这么多,具体的解释及需要自行看看说明文档
随后需要修改systemctl 的脚本信息,需要满足 咱们自己搭建的系统 环境,如下:
vim /usr/lib/systemd/system/ntopng.service     #刚刚从utils中复制过来的文件,需要修改下


[Unit]
Description=ntopng Service
Requires=redis.service
After=syslog.target network.target redis.service

[Service]
TimeoutStopSec=10s
EnvironmentFile=/etc/sysconfig/ntopng
WorkingDirectory=/home/ntopng/data              #主要是工作目录需注意
ExecStart=/usr/local/bin/ntopng $OPTIONS       #启动命令在什么位置也需要注意

[Install]
WantedBy=multi-user.target
随后执行命令:
systemctl enable ntopng
systemctl start ntopng
连接3000短裤就可以看到界面了,一些小的细节可以自行进行微调。

