一、简介
1、Spring Boot
首先,spring的诞生是Java企业版(Java Enterprise Edition,JEE或J2EE)的轻量级替代品。无需开发重量级的EJB(Enterprise JavaBean),spring为企业级Java开发提供了一种相对简单的方法,通过依赖注入IOC和面向前面编程AOP,用简单的Java对象(POJO,Plain Old Java Object)实现了EJB的功能。
缺陷:虽然spring的组件代码是轻量级的,但它的配置确是重量级的。
由此,SpringBoot应运而生,SpringBoot简化了spring的应用开发,只需要*run*就能创建一个独立的,生产级别的spring应用。SpringBoot为spring平台和第三方库提供了开箱即用的设置(即:提供默认设置),只需要很少的spring配置。
可以使用SpringBoot创建Java应用,*jar部署*方式,使用java -jar启动,也可以采用传统的war部署方式
2、shiro
全称为Apache Shiro,一个强大且易用的*java安全框架*,执行身份验证,授权,密码学和会话管理。使用shiro API,可以快速,轻松地获得任何应用程序。包括移动应用程序或网络和企业应用程序。
Shiro六大体系结构
Authentication认证 ——用户登录
Authorization授权 ——用户具有哪些权限
Cryptography 安全数据加密
Session Management 会话管理
Web Integration web系统集成
Interations 集成其他应用,spring,缓存框架等。
3、thymeleaf /taim.li:f/
项目所用到的页面模板,Spring Boot之前spring应用程序通常使用的都是jsp
Spring Boot推荐使用thymeleaf,thymeleaf在html页面的基础上添加特定标签,来实现页面模板的渲染。
Thymeleaf是⾯向Web和独⽴环境的现代服务器端Java模板引擎,能够处 理HTML,XML,JavaScript,CSS甚⾄纯⽂本。 Thymeleaf旨在提供⼀个优雅的、⾼度可维护的创建模板的⽅式。
为了实 现这⼀⽬标,Thymeleaf建⽴在⾃然模板的概念上,将其逻辑注⼊到模板 ⽂件中,不会影响模板设计原型。 这改善了设计的沟通,弥合了设计和 开发团队之间的差距。 Thymeleaf从设计之初就遵循Web标准——特别是HTML5标准 ,如果需 要,Thymeleaf允许您创建完全符合HTML5验证标准的模板
二、快速入门
1、Spring Boot快速入门
1.1、建立maven项目,继承Spring Boot父工程

继承Spring Boot父工程
<!-- 1、创建maven项目,继承Spring Boot父工程 -->
  <parent>
    <groupId>org.springframework.boot</groupId>
    <artifactId>spring-boot-starter-parent</artifactId>
    <version>1.5.4.RELEASE</version>
  </parent>
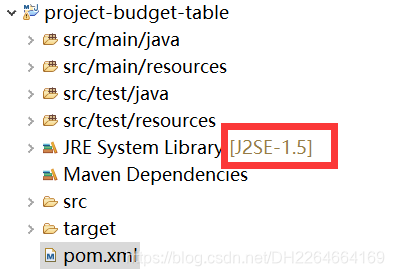
1.1.1、附加:Spring Boot可以方便的修改项目jdk的版本(只需要修改pom.xml的参数即可)
原始jdk
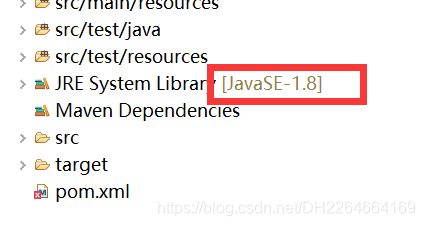
修改pom.xml的参数
  <!-- 附加:Spring Boot可以方便的修改项目jdk的版本 -->
  <!-- 修改参数 -->
  <properties>
    <java.version>1.8</java.version>
  </properties>
ctrl+s保存 , 右键项目--maven--Update Project

修改后的项目jdk
1.2、导入依赖——导入web支持:SpringMVC开发支持,Servlet相关程序支持等
  <!-- 2、导入依赖 -->
  <dependencies>
    <!-- 2.1、导入web支持:SpringMVC开发支持,Servlet相关程序支持等 -->
    <dependency>
        <groupId>org.springframework.boot</groupId>
        <artifactId>spring-boot-starter-web</artifactId>
    </dependency>
  </dependencies>
1.3、编写Controller测试类:TestController(注意controller注解)
import org.springframework.stereotype.Controller;
import org.springframework.web.bind.annotation.RequestMapping;
import org.springframework.web.bind.annotation.ResponseBody;
@Controller
public class TestController {
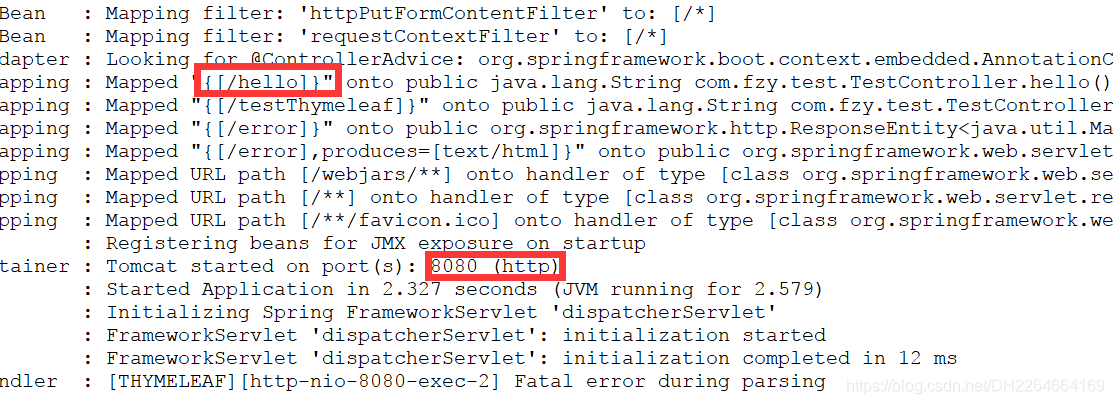
@RequestMapping("/hello") //访问地址映射
@ResponseBody //相应体 ——return "success";
public Object hello() {
System.out.println("test------");
return "success";
}
}
1.4、编写Spring Boot启动类:Application——(@SpringBootApplication)SpringApplication.run(Application.class,args);
import org.springframework.boot.SpringApplication;
import org.springframework.boot.autoconfigure.SpringBootApplication;
@SpringBootApplication //启动类注解
public class Application {
public static void main(String[] args) {
SpringApplication.run(Application.class, args);
}
}
访问形式:(即 localhost:8080/hello )
1.5、导入thymeleaf页面模块(引入thymeleaf依赖)
<!-- 2.2、导入thymeleaf页面模块依赖 -->
    <dependency>
        <groupId>org.springframework.boot</groupId>
        <artifactId>spring-boot-starter-thymeleaf</artifactId>
    </dependency>
1.5.1、测试thymeleaf(在controller中添加测试方法)
/*
* 测试thymeleaf页面模块是否可用
*/
@RequestMapping("/testThymeleaf")
public String testThymeleaf(Model model) {
//把数据存入model中
model.addAttribute("test", "thymeleaf");
//返回test.html (return "test";)与return的值一致
return "test";
}
1.5.2、建立前端测试页面test.html
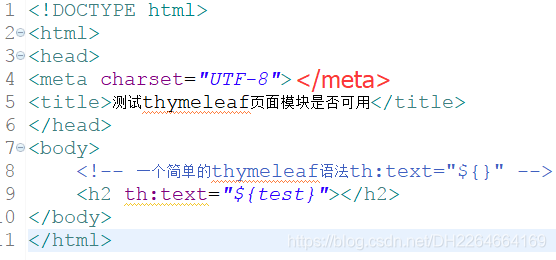
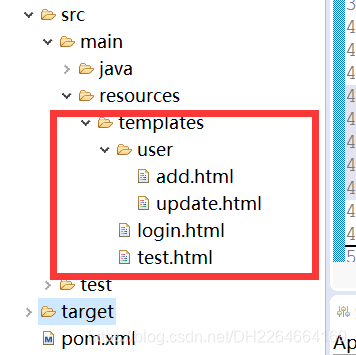
创建的Spring Boot是jar项目,Spring boot存放页面的地方,在src/main/resources下创建一个web页根目录(相当于webapp)——:templates,在此目录下创建test.html页面。
<!DOCTYPE html>
<html>
<head>
<meta charset="UTF-8">
<title>测试thymeleaf页面模块是否可用</title>
</head>
<body>
<!-- 一个简单的thymeleaf语法th:text="${}" -->
<h2 th:text="${test}"></h2>
</body>
</html>
问题:


原因:在thymeleaf3.0以前对页面标签语法要求比较严格,开始标签必须有对应的结束标签。
解决:1、将页面中标签语言严谨化
2、如果希望页面语法不严谨,但是也能够运行成功,可以把thymeleaf升级为3.0或以上版本。
任何版本的更改都可以通过<properties>属性进行修改
        <!-- 2.2.1、修改thymeleaf的版本 -->
        <thymeleaf.version>3.0.2.RELEASE</thymeleaf.version>
        <!-- 2.2.2、附带的版本修改 -->
        <thymeleaf-layout-dialect.version>2.0.4</thymeleaf-layout-dialect.version>
注意:在2.2.2、附带的版本修改中,没有RELEASE
访问:localhost:8080/testThymeleaf
2、Spring boot与Shiro整合实现用户认证
2.1、Shiro的核心API,三个核心类
Subject:用户主体(包括用户登录,注销等方法,还有一些判断授权的方法) (关联SecurityManager,把操作交给它)
SecurityManager:安全管理器 (关联Realm)
Realm:Shiro连接数据库的桥梁
2.2、导入shiro和spring的整合依赖
    <!-- 导入shiro和spring的整合依赖 -->
    <dependency>
        <groupId>org.apache.shiro</groupId>
        <artifactId>shiro-spring</artifactId>
        <version>1.4.0</version>
    </dependency>
2.3、在编写Shiro配置类之前,要先自定义Realm类(用来编写查询的一些方法方式,或者是完成一些认证与授权的逻辑)
继承 AuthorizingRealm(实现两个方法,执行授权和认证逻辑)TestRealm.java
import org.apache.shiro.authc.AuthenticationException;
import org.apache.shiro.authc.AuthenticationInfo;
import org.apache.shiro.authc.AuthenticationToken;
import org.apache.shiro.authz.AuthorizationInfo;
import org.apache.shiro.realm.AuthorizingRealm;
import org.apache.shiro.subject.PrincipalCollection;
/**
* 自定义Realm类
* @author fzywhy
*
*/
public class TestRealm extends AuthorizingRealm {
/*
* 执行授权逻辑
* @see org.apache.shiro.realm.AuthorizingRealm#doGetAuthorizationInfo(org.apache.shiro.subject.PrincipalCollection)
*/
@Override
protected AuthorizationInfo doGetAuthorizationInfo(PrincipalCollection arg0) {
System.out.println("执行授权逻辑");
return null;
}
/*
* 执行认证逻辑
* @see org.apache.shiro.realm.AuthenticatingRealm#doGetAuthenticationInfo(org.apache.shiro.authc.AuthenticationToken)
*/
@Override
protected AuthenticationInfo doGetAuthenticationInfo(AuthenticationToken arg0) throws AuthenticationException {
System.out.println("执行认证逻辑");
return null;
}
}
2.4、编写Shiro配置类(spring中配置文件是ContextApplication.xml) ShiroConfig.java
(创建ShiroFilterFactoryBean,创建DefaultWebSecurityManager,创建Realm(连接数据库)
package com.fzy.shiro;
import org.apache.shiro.spring.web.ShiroFilterFactoryBean;
import org.apache.shiro.web.mgt.DefaultWebSecurityManager;
import org.springframework.beans.factory.annotation.Qualifier;
import org.springframework.context.annotation.Bean;
import org.springframework.context.annotation.Configuration;
/**
* Shiro的配置类
* @author fzywhy
*
*/
@Configuration
public class ShiroConfig {
/*
* 创建ShiroFilterFactoryBean
*/
@Bean
public ShiroFilterFactoryBean getShiroFilterFactoryBean(@Qualifier("securityManager")DefaultWebSecurityManager securityManager) {
ShiroFilterFactoryBean shiroFilterFactoryBean = new ShiroFilterFactoryBean();
//设置安全管理器
shiroFilterFactoryBean.setSecurityManager(securityManager);
return shiroFilterFactoryBean;
}
/*
* 创建DefaultWebSecurityManager——关联realm(连接数据库)
*/
@Bean(name="securityManager")
public DefaultWebSecurityManager getDefaultWebSecurityManager(@Qualifier("testRealm")TestRealm testRealm) {
DefaultWebSecurityManager securityManager = new DefaultWebSecurityManager();
//关联realm
securityManager.setRealm(testRealm);
return securityManager;
}
/*
* 创建Realm——自定义Realm类
*/
@Bean //添加到spring容器中
public TestRealm getRealm() {
return new TestRealm();
}
}
2.5、使用Shiro内置过滤器实现页面拦截(在ShiroConfig.java中)
/*
* 创建ShiroFilterFactoryBean
*/
@Bean
public ShiroFilterFactoryBean getShiroFilterFactoryBean(@Qualifier("securityManager")DefaultWebSecurityManager securityManager) {
ShiroFilterFactoryBean shiroFilterFactoryBean = new ShiroFilterFactoryBean();
//设置安全管理器
shiroFilterFactoryBean.setSecurityManager(securityManager);
/*
* 使用Shiro内置过滤器实现页面拦截:拦截url链接请求
*
* shiro内置过滤器,可以实现权限相关的拦截器
* 常用的过滤器:
* anon:无需认证(登录)可以访问
* authc:必须认证才可以访问
* user:如果使用rememberMe的功能可以直接访问 (记住用户和密码)
* perms:该资源必须得到资源权限才可以访问 (密码验证)
* role:该资源必须得到角色权限才可以访问 (VIP会员)
*
*/
//创建集合——充作拦截器集合
Map<String,String> filterChainDefinitionMap = new LinkedHashMap<>();
/*
* 单个url拦截,
*/
/*
filterChainDefinitionMap.put("/add", "authc");
filterChainDefinitionMap.put("/update", "authc");
*/
//批量url拦截
filterChainDefinitionMap.put("/*", "authc");
//url放行
filterChainDefinitionMap.put("/testThymeleaf", "anno");
/*
* shiro拦截器拦截成功后,会返回一个默认的地址login.jsp
* 可以自定义修改调整的登录页面
*/
shiroFilterFactoryBean.setLoginUrl("/toLogin");
//设置拦截器map集合
shiroFilterFactoryBean.setFilterChainDefinitionMap(filterChainDefinitionMap);
return shiroFilterFactoryBean;
}
2.5.1、在TestController.java中添加以下请求路径映射(请求全部都要经过Controller,来跳转到我们自定义的页面模板)
//add.html用户添加
@RequestMapping("/add")
public String add() {
return "/user/add";
}
//update.html用户更新
@RequestMapping("/update")
public String update() {
return "/user/update";
}
//login.html自定义的登录页面
@RequestMapping("/toLogin")
public String login() {
return "login";
}
2.5.2、页面结构
2.5.3、在test.html中
<!DOCTYPE html>
<html>
<head>
<meta charset="UTF-8">
<title>测试thymeleaf页面模块是否可用</title>
</head>
<body>
<!-- 一个简单的thymeleaf语法th:text="${}" -->
<h2 th:text="${test}"></h2>
用户添加页面<a href="add">用户添加</a><br>
用户更新页面<a href="update">用户更新</a>
</body>
</html>
2.5.4、访问测试:localhost:8080/add或者是/update,都会被拦截,被转发到toLogin,而/testThymeleaf可正常访问。
2.5.5、遇到的错误

第一个红框错误:getShiroFilterFactoryBean方法前,未加@Bean注解
第二个红框错误:filterChainDefinitionMap.put("/testThymeleaf","ann"); 代码错误,是anon不是ann
2.6、实现用户认证(登录)操作
2.6.1、登录页面login.html
<!DOCTYPE html>
<html>
<head>
<meta charset="UTF-8">
<title>用户登录</title>
</head>
<body>
<hr>
<h1>用户登录</h1>
<form method="post" action="login">
用户名<input type="text" name="name"/><br/>
密 码<input type="password" name="password"/><br/>
<input type="submit" value="登录"/>
</form>
</body>
</html>
2.6.2、在Controller中编写登录逻辑(TestController.java)
    /*
     * 登录逻辑处理
     */
    @RequestMapping("/login")
    public String login(String name,String password,Model model) {      //name和password也可以封装到一个user对象中,model用来返回错误信息
        /*
         * 使用Shiro编写认证操作
         * 1.获取Subject
         * 2.封装用户数据
         * 3、执行登录方法
         */
        //1.获取Subject
        Subject subject = SecurityUtils.getSubject();
        //2.封装用户数据
        UsernamePasswordToken token = new UsernamePasswordToken(name,password);
        //3.执行登录方法
        try {
            subject.login(token);
            /*
             * 无任何异常,则登录成功
             * 跳转到test.html页面
             */
            return "redirect:/testThymeleaf";       //redirect:重定向(不带数据),而非转发请求(带数据)
        } catch (UnknownAccountException e) {
            //UnKnownAccountException登录失败:用户名不存在
            model.addAttribute("msg", "用户名不存在");
            //带着msg数据,转发请求
            return "login";
        } catch (IncorrectCredentialsException e) {
            //IncorrectCredentialsException登录失败:密码错误
            model.addAttribute("msg", "密码错误");
            return "login";
        }
    }
访问问题:localhost:8080/testThymeleaf跳转到toLogin请求中,输入用户名和密码,点击登录,此时是不成功的
问题原因:Shiro内置拦截器将login.html的资源拦截(批量拦截)
解决方案:在ShiroConfig.java即shiro配置类中,放行login请求
//放行login.html页面,即放行login请求 filterChainDefinitionMap.put("/login", "anon");
2.6.3、在Realm中编写判断逻辑(TestRealm.java)
    /*
     * 执行认证逻辑
     * @see org.apache.shiro.realm.AuthenticatingRealm#doGetAuthenticationInfo(org.apache.shiro.authc.AuthenticationToken)
     */
    @Override
    protected AuthenticationInfo doGetAuthenticationInfo(AuthenticationToken arg0) throws AuthenticationException {
        System.out.println("执行认证逻辑");
        /*
         * 认证逻辑
         */
        //给定用户名和密码
        String name = "fzy";
        String password = "fzy";
        /*
         * 编写shiro的判断逻辑,判断用户名和密码
         */
        //1.判断用户名
        UsernamePasswordToken token = (UsernamePasswordToken)arg0;      //将形参强制转换为TestController.java中封装的数据类型
        //如果用户名不存在
        if(!token.getUsername().equals(name)) {
            return null;        //shiro底层会抛出UnknownAccountException
        }
        //2.判断密码
        return new SimpleAuthenticationInfo("", password, "");
    }
2.7、与Mybatis整合实现登录
2.7.1、导入mybatis的相关依赖(连接池,数据库驱动,springBoot的mybatis启动器)
    <!-- 3、导入mybatis相关依赖 -->
    <!-- 3.1、数据库导入连接池 -->
    <dependency>
        <groupId>com.alibaba</groupId>
        <artifactId>druid</artifactId>
        <version>1.0.9</version>
    </dependency>
    <!-- 3.2、导入MySQL数据库驱动 -->
    <dependency>
        <groupId>mysql</groupId>
        <artifactId>mysql-connector-java</artifactId>
    </dependency>
    <!-- 3.3、导入spring boot的mybatis的启动器 -->
    <dependency>
        <groupId>org.mybatis.spring.boot</groupId>
        <artifactId>mybatis-spring-boot-starter</artifactId>
        <version>1.1.1</version>
    </dependency>
2.7.2、在web资源根目录下配置application.properties(web资源根目录src/main/resources)
spring.datasource.driverClassName=com.mysql.jdbc.Driver
spring.datasource.url=jdbc:mysql://localhost:3306/springboot
spring.datasource.username=root
spring.datasource.password=123456
#连接池
spring.datasource.type=com.alibaba.druid.pool.DruidDatasource
#mybatis包扫描
mybatis.type-aliases-package=com.fzy.domain
2.7.3、编写User实体类
package com.fzy.domain;
/**
* tablename=user
* @author fzywhy
*
*/
public class User {
private Integer id;
private String name;
private String password;
public Integer getId() {
return id;
}
public void setId(Integer id) {
this.id = id;
}
public String getName() {
return name;
}
public void setName(String name) {
this.name = name;
}
public String getPassword() {
return password;
}
public void setPassword(String password) {
this.password = password;
}
}
2.7.4、编写UserMapper接口(即dao接口)
package com.fzy.mapper;
import com.fzy.domain.User;
public interface UserMapper {
public User findUserByName(String name);
}
2.7.5、编写UserMapper.xml接口映射文件
<?xml version="1.0" encoding="UTF-8"?>
<!DOCTYPE mapper
PUBLIC "-//mybatis.org//DTD Mapper 3.0//EN"
"http://mybatis.org/dtd/mybatis-3-mapper.dtd">
<!-- 该文件存放CRUD的sql语句 -->
<mapper namespace="com.fzy.mapper.UserMapper"> <!-- namespace:UserMapper.java的全限定类名 -->
<!-- id:接口方法名,parameterType:参数类型,resultType:方法返回类型 -->
<select id="findUserByName" parameterType="string" resultType="user">
select id,name,password
from user
where name = #{value}
</select>
</mapper>
2.7.6、编写业务接口UserService.java
package com.fzy.service;
import com.fzy.domain.User;
public interface UserService {
public User findUserByName(String name);
}
2.7.7、编写业务接口实现类UserServiceImpl.java(注意添加业务实现类注解@Service)
package com.fzy.service.impl;
import org.springframework.beans.factory.annotation.Autowired;
import org.springframework.stereotype.Service;
import com.fzy.domain.User;
import com.fzy.mapper.UserMapper;
import com.fzy.service.UserService;
@Service //业务实现类注解
public class UserServiceImpl implements UserService {
//实现类要使用mapper(即dao)接口中的方法,所以要注入mapper接口
@Autowired
private UserMapper usermapper;
@Override
public User findUserByName(String name) {
//用mapper接口对象,调用mapper接口中的方法
return usermapper.findUserByName(name);
}
}
2.7.8、在启动类中添加mabatis扫描包注解@MapperScan("com.fzy.mapper")
package com.fzy;
import org.mybatis.spring.annotation.MapperScan;
import org.springframework.boot.SpringApplication;
import org.springframework.boot.autoconfigure.SpringBootApplication;
@SpringBootApplication //启动类注解
@MapperScan("com.fzy.mapper") //添加mapper扫描包注解
public class Application {
public static void main(String[] args) {
SpringApplication.run(Application.class, args);
}
}
2.7.9、改写自定义Realm类的执行认证逻辑
//需要调用业务层service接口中的方法得到页面中的数据,注入UserService
@Autowired
private UserService userService;
/*
* 执行认证逻辑
* @see org.apache.shiro.realm.AuthenticatingRealm#doGetAuthenticationInfo(org.apache.shiro.authc.AuthenticationToken)
*/
@Override
protected AuthenticationInfo doGetAuthenticationInfo(AuthenticationToken arg0) throws AuthenticationException {
System.out.println("执行认证逻辑");
// /*
// * 认证逻辑
// */
// //给定用户名和密码
// String name = "fzy";
// String password = "fzy";
// /*
// * 编写shiro的判断逻辑,判断用户名和密码
// */
// //1.判断用户名
// UsernamePasswordToken token = (UsernamePasswordToken)arg0; //将形参强制转换为TestController.java中封装的数据类型,即controller中传递来的数据
// //如果用户名不存在
// if(!token.getUsername().equals(name)) {
// return null; //shiro底层会抛出UnknownAccountException
// }
// //2.判断密码 返回返回类型AuthenticationInfo的一个子类SimpleAuthenticationInfo(参数1:需要返回给login方法的数据,参数2:数据库密码,参数3:shiro名字)
// return new SimpleAuthenticationInfo("", password, "");
/*
* 与mybatis整合后的认证逻辑
*/
//判断用户名
UsernamePasswordToken token = (UsernamePasswordToken)arg0;
//得到用户在页面上填写的用户名
User user = userService.findUserByName(token.getUsername());
//如果用户名不存在
if(user == null) {
return null; //shiro底层抛出UnknownAccountException
}
//判断密码 返回返回类型AuthenticationInfo的一个子类SimpleAuthenticationInfo(参数1:需要返回给login方法的数据,参数2:数据库密码,参数3:shiro名字)
return new SimpleAuthenticationInfo("", user.getPassword(), "");
}
注意:得到用户名 User user = userService.findUserByName(token.getUsername()); token.
判断密码 return new SimpleAuthenticationInfo("",user.getPassword(),""); user.
2.7.10、注意:建立相对应的数据库,并保存数据
3、Spring Boot与Shiro整合实现用户授权
3.1、使用shiro内置拦截器拦截资源ShiroConfig.java
        //授权过滤器     注意:当前授权拦截后,shiro会自动跳转到默认的未授权页面
        filterChainDefinitionMap.put("/add", "perms[user:add]");    //perms[user:add]中user:add是授权的自定义字符串
        //设置未授权的提示页面
        shiroFilterFactoryBean.setUnauthorizedUrl("noAuth");
注意:授权过滤器需要添加到批量url资源拦截之前 (不然,程序流程走不到授权认证)
/*
* 创建ShiroFilterFactoryBean
*/
@Bean
public ShiroFilterFactoryBean getShiroFilterFactoryBean(@Qualifier("securityManager")DefaultWebSecurityManager securityManager) {
ShiroFilterFactoryBean shiroFilterFactoryBean = new ShiroFilterFactoryBean();
//设置安全管理器
shiroFilterFactoryBean.setSecurityManager(securityManager);
/*
* 使用Shiro内置过滤器实现页面拦截:拦截url链接请求
*
* shiro内置过滤器,可以实现权限相关的拦截器
* 常用的过滤器:
* anon:无需认证(登录)可以访问
* authc:必须认证才可以访问
* user:如果使用rememberMe的功能可以直接访问 (记住用户和密码)
* perms:该资源必须得到资源权限才可以访问 (密码验证)
* role:该资源必须得到角色权限才可以访问 (VIP会员)
*
*/
//创建集合——充作拦截器集合
Map<String,String> filterChainDefinitionMap = new LinkedHashMap<>();
/*
* 单个url拦截,
*/
/* filterChainDefinitionMap.put("/add", "authc");
filterChainDefinitionMap.put("/update", "authc");*/
//url放行
filterChainDefinitionMap.put("/testThymeleaf", "anon");
//放行login.html页面,即放行login请求
filterChainDefinitionMap.put("/login", "anon");
//授权过滤器 注意:当前授权拦截后,shiro会自动跳转到默认的未授权页面
filterChainDefinitionMap.put("/add", "perms[user:add]"); //perms[user:add]中user:add是授权的自定义字符串
//批量url拦截
filterChainDefinitionMap.put("/*", "authc");
/*
* shiro拦截器拦截成功后,会返回一个默认的地址login.jsp
* 可以自定义修改调整的登录页面
*/
shiroFilterFactoryBean.setLoginUrl("/toLogin");
//设置未授权的提示页面
shiroFilterFactoryBean.setUnauthorizedUrl("noAuth");
//设置拦截器map集合
shiroFilterFactoryBean.setFilterChainDefinitionMap(filterChainDefinitionMap);
return shiroFilterFactoryBean;
}
    //noAuth.html——未授权提示页面
    @RequestMapping("noAuth")
    public String noAuth() {
        return "/noAuth";
    }
3.1.2、创建noAuth.html页面
<!DOCTYPE html>
<html>
<head>
<meta charset="UTF-8">
<title>未授权提示页面</title>
</head>
<body>
    <h2>未授权,不可访问</h2>
</body>
</html>
3.2、完成shiro的资源授权TestRealm.java
    /*
     * 执行授权逻辑
     * @see org.apache.shiro.realm.AuthorizingRealm#doGetAuthorizationInfo(org.apache.shiro.subject.PrincipalCollection)
     */
    @Override
    protected AuthorizationInfo doGetAuthorizationInfo(PrincipalCollection arg0) {
        System.out.println("执行授权逻辑");
        /*
         * 给资源进行授权
         */
        SimpleAuthorizationInfo info = new SimpleAuthorizationInfo();
        //添加资源的授权字符串
        info.addStringPermission("user:add");   //参数字符串与资源授权过滤器的参数值一致
        return info;
    }
3.3、关联数据库动态授权
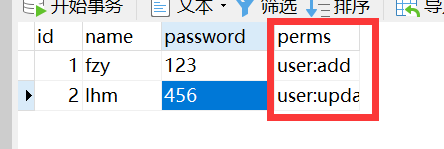
3.3.1、修改数据库——添加perms字段,并保存user:add和user:updata授权字符串
3.3.2、修改User实体类
3.3.3、添加一个mapper接口方法,根据id找到user findUserById
3.3.4、UserMapper.xml中添加对应的sql映射
3.3.5、在UserService业务接口中,添加对应的方法 findUserById
3.3.6、在UserServiceImpl业务接口实现类中,添加实现新增的方法
3.3.7、修改Realm中的授权逻辑硬编码
/*
* 执行授权逻辑
* @see org.apache.shiro.realm.AuthorizingRealm#doGetAuthorizationInfo(org.apache.shiro.subject.PrincipalCollection)
*/
@Override
protected AuthorizationInfo doGetAuthorizationInfo(PrincipalCollection arg0) {
System.out.println("执行授权逻辑");
/*
* 给资源进行授权
*/
SimpleAuthorizationInfo info = new SimpleAuthorizationInfo();
//添加资源的授权字符串
// info.addStringPermission("user:add"); //参数字符串与资源授权过滤器的参数值一致
/*
* 改造授权字符串硬编码
* 到数据库中查询当前登录用户的授权字符串
*/
//获取当前用户
Subject subject = SecurityUtils.getSubject();
//获取执行认证返回的principal的参数
//执行认证逻辑时判断密码返回的第一个参数user
User user = (User)subject.getPrincipal();
//得到user的id
User userId = userService.findUserById(user.getId());
//获取当前用户数据库中给定的授权字符串,并将其添加为资源的授权字符串
info.addStringPermission(userId.getPerms());
return info;
}
注意:在执行认证逻辑判断密码时,要返回一个principal的参数user
//判断密码 返回返回类型AuthenticationInfo的一个子类SimpleAuthenticationInfo(参数1:需要返回给login方法的数据,参数2:数据库密码,参数3:shiro名字)
return new SimpleAuthenticationInfo(user, user.getPassword(), "");
若忘记添加,会出现以下错误

3.3.8、补充:在ShiroConfig中为update.html添加权限过滤
filterChainDefinitionMap.put("/update", "perms[user:update]");
4、Thymeleaf和shiro标签整合使用
4.1、导入Thymeleaf扩展坐标
        <!-- 4、导入Thymeleaf扩展坐标 -->
        <dependency>
            <groupId>com.github.theborakompanioni</groupId>
            <artifactId>thymeleaf-extras-shiro</artifactId>
            <version>2.0.0</version>
        </dependency>
4.2、在ShiroConfig中配置ShiroDialect——在ShiroConfig类里面添加getShiroDialect方法
    /*
     * 配置ShiroDialect,用于Thymeleaf和Shiro标签配合使用
     */
    @Bean
    public ShiroDialect getShiroDialect() {
        return new ShiroDialect();
    }
4.3、修改test.html页面中的内容(在页面上使用shiro标签)
功能实现:用户只能看到自己权限允许的标签
admin用户登录只能看到用户添加
lhm用户登录只能看到用户更新
请求全部都要经过Controller,来跳转到我们自定义的页面模板
guest标签 shiro:guest /shiro:guest 用户没有身份验证时显示相应信息,即游客访问信息。
user标签 shiro:user /shiro:user 用户已经身份验证/记住我登录后显示相应的信息。
authenticated标签 shiro:authenticated /shiro:authenticated 用户已经身份验证通过,即Subject.login登录成功,不是记住我登录的。
notAuthenticated标签 shiro:notAuthenticated /shiro:notAuthenticated 用户已经身份验证通过,即没有调用Subject.login进行登录,包括记住我自动登录的也属于未进行身份验证。
principal标签 <shiro: principal/> <shiro:principal property="username"/> 相当于((User)Subject.getPrincipals()).getUsername()。
lacksPermission标签 <shiro:lacksPermission name="org:create"> /shiro:lacksPermission 如果当前Subject没有权限将显示body体内容。
hasRole标签 <shiro:hasRole name="admin"> /shiro:hasRole 如果当前Subject有角色将显示body体内容。
hasAnyRoles标签 <shiro:hasAnyRoles name="admin,user"> /shiro:hasAnyRoles 如果当前Subject有任意一个角色(或的关系)将显示body体内容。
lacksRole标签 <shiro:lacksRole name="abc"> /shiro:lacksRole 如果当前Subject没有角色将显示body体内容。 hasPermission标签 <shiro:hasPermission name="user:create"> /shiro:hasPermission