作业一:部署samba
每个用户有自己的目录,可以浏览内容,也可以删除
所有的用户共享一个目录,只能浏览内容,不能删
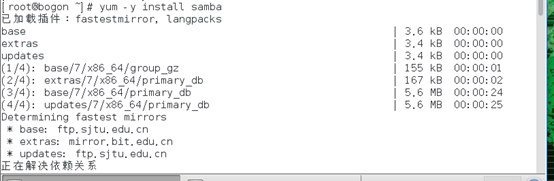
安装samba服务
1、准备环境


setenforce 0
2、安装软件包
yum -y install samba
3、修改配置文件
/etc/samba/smb.conbf #先建立共享目录 mkdir /share

4、启动服务
systemctl start smb
5、测试
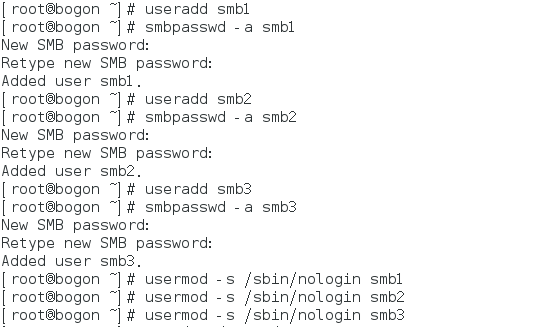
samba用户必须是系统用户,登录类型为/sbin/nologin不可登录型
作业二:nginx服务
二进制安装nginx包,作为web服务修改配置文件
让配置生效,验证配置
1、准备环境
iptables –F 临时清除防火墙
systemctl stop firewalld
systemctl disable firewalld 关闭开机自启
setenforce 0
/etc/sysconfig/selinux
#SELINUX=disabled
====》part2:配置ip arping ip地址 ping通时返回ip地址
2、安装软件包
二进制方式安装
yum install epel-release -y
yum install nginx -y
源码安装
yum –y install gcc-*
yum –y install glibc-*
yum –y install pcre -y
# ./configure --prefix=/usr/local/nginx --with-pcre=/usr/lib64
./configure --prefix=/usr/local/nginx --with-http_rewrite_module
make
make install
安装完成后:

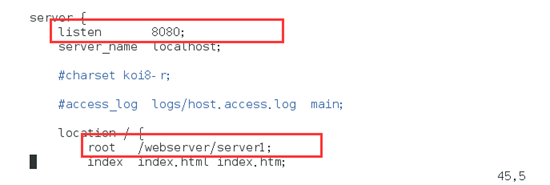
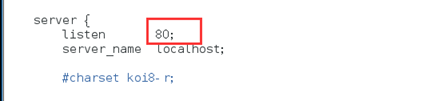
3、修改配置文件
vim /usr/local/nginx/conf/nginx.conf
#user nobody;
worker_processes 3;
4、启动服务
/usr/local/nginx/sbin/nginx -c /usr/local/nginx/conf/nginx.conf
ps aux | grep nginx
#/usr/local/nginx/sbin/nginx -s stop 关闭
#/usr/local/nginx/sbin/nginx -s reload 重新加载配置文件
补充:
状态码:
200 访问成功
3开头,重定向
4开头,客户端的问题
5开头,服务端的问题
5 测试

作业三:nginx反向代理三台web
1、模拟三台web服务
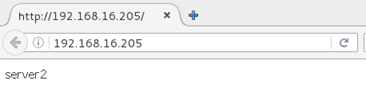
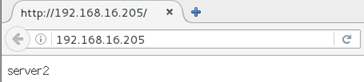
 1 [root@www nginx]# vim conf/nginx.conf
 2
 3  [root@www nginx]# vim conf/nginx.conf
 4
 5  [root@www nginx]# mkdir -p /webserver/server1
 6
 7  [root@www nginx]# mkdir -p /webserver/server2
 8
 9  [root@www nginx]# mkdir -p /webserver/server3
10
11  [root@www nginx]# echo 'server1' > /webserver/server1/index.html
12
13  [root@www nginx]# echo 'server2' > /webserver/server2/index.html
14
15  [root@www nginx]# echo 'server3' > /webserver/server3/index.html
16
17  [root@www nginx]# mkdir /webserver/nginx_conf
18
19  [root@www nginx]# cp /usr/local/nginx/conf/nginx.conf /webserver/nginx_conf/web1.conf
20
21  [root@www nginx]# cp /usr/local/nginx/conf/nginx.conf /webserver/nginx_conf/web2.conf
22
23  [root@www nginx]# cp /usr/local/nginx/conf/nginx.conf /webserver/nginx_conf/web3.conf
24
25  [root@www nginx]# cd /webserver/nginx_conf/
26
27  [root@www nginx_conf]# vim web1.conf
28
29  [root@www nginx_conf]# vim web2.conf
30
31  [root@www nginx_conf]# vim web3.conf
2、修改conf文件,以web1.conf为例

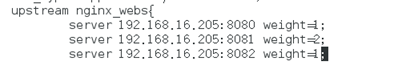
3、配置lb服务


4、重启服务:
1  [root@www nginx_conf]# pkill -9 nginx
2
3  [root@www nginx_conf]# /usr/local/nginx/sbin/nginx -c /webserver/nginx_conf/lb.conf
4
5  [root@www nginx_conf]# /usr/local/nginx/sbin/nginx -c /webserver/nginx_conf/web3.conf
6
7  [root@www nginx_conf]# /usr/local/nginx/sbin/nginx -c /webserver/nginx_conf/web2.conf
8
9  [root@www nginx_conf]# /usr/local/nginx/sbin/nginx -c /webserver/nginx_conf/web1.conf
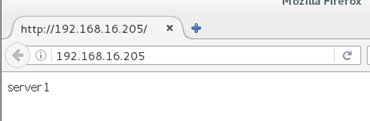
实现基于轮询的方式调度三台web,并验证结果

实现基于权重的方式调度三台web,并验证结果
结果:


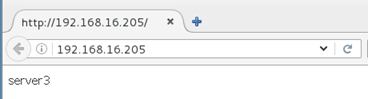
实现基于hash的方式调用三台web,并验证结果

结果: