本次要在折线图上添加一个功能:选择不同日期,展示对应的图表
需求拆解:
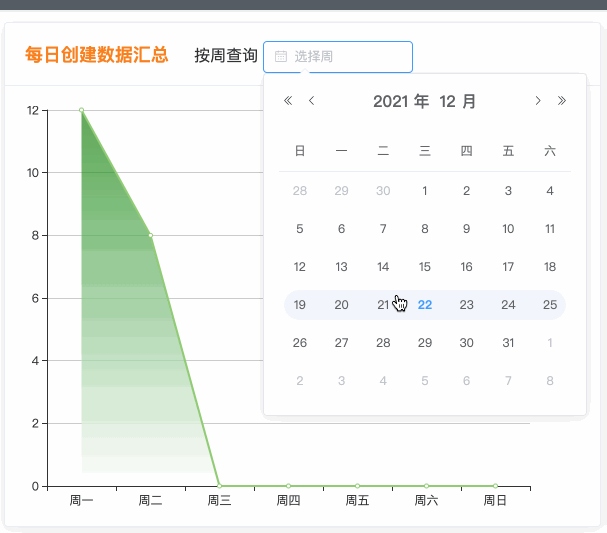
1、前端增加一个日期筛选框,按照【周】进行切换;
2、前端切换日期后即触发请求,向后端重新请求一次数据;
3、后端根据日期返回对应一周内的数据;
1、前端新增日期筛选框
前端使用的element-ui,在组件库里找到了一个按【周】切换的日期组件

html代码如下
<span>按周查询</span>
            <el-date-picker style=" 150px;height: 20px"
                v-model="value1"
                type="week"
                format="yyyy 第 WW 周"
                placeholder="选择周"
                value-format="yyyy-MM-dd"
                @change="query_value_statistics">  <!--使用@change绑定事件,当日期变化后,触发请求 -->
            </el-date-picker>
因为我希望切换日期后能重新够触发请求
所以这里使用@change绑定了之前写好的query_value_statistics方法
接下来要改造一下 query_value_statistics方法,让它接收日期参数,发送请求时,携带日期
query_value_statistics(val) {
      console.log(val) # val表示@change监测到的日期参数

      console.log(typeof this.value1)
      this.$http.get("http://10.237.x.xx:8000/data_factory/query_value_statistics",
          {
            // timeout: 10000,
            params:{
              now_date: val  # 日期参数,传递给后端
            }

          })
          .then(response =>{
           let datas= response.data.data;
            console.log("<<<<<<<<<<<<<<<<<<<<<<<<<<<<<<<<<<<<<<<<<<>>>>>>>>>>>>>>>>>>>>>>>>>>>>>>>>>>>>>>>>>>")
            console.log(datas)
            // console.log(datas[0]["name"])
            // console.log(datas[0].name)
            //通过接口返回的数据,用一个for循环把返回数据的数量加起来,返给前端
            let result = 0;
            for (let i=0;i<datas.length; i++) {
              result += datas[i].value
            }
            console.log("***********")
            console.log(result)
            this.week_count = result
            this.week_time = response.data.week_time

            this.echarts_test(response.data.data)

          }).catch((reason)=>{
            console.log(reason)

        this.$message({
          message: '接口调用失败,请检查系统是否正常',
          type: 'warning'
        });
      })
    },
2、后端折线图视图方法修改
后端也要做一下修改,接收前端传递的日期参数,并且结合sql查询
def query_value_statistics(request):
    """折线图数据"""
    # values = []
    now_date = request.GET.get("now_date")  # 获取页面输入的日期
    if now_date is None:
        now_date = get_now_date()

    conn = pymysql.connect(host="localhost", user="root", password="12345678", port=3306, db="data_factory",
                           charset='utf8')  # 链接数据库
    cursor = conn.cursor()  # 不能共用一个线程池,一个方法链接一个mysql
    sql = "select case dayofweek(date_format(start_time, '%Y-%m-%d')) " \
          "when 1 then '周日' " \
          "when 2 then '周一' " \
          "when 3 then '周二' " \
          "when 4 then '周三' " \
          "when 5 then '周四' " \
          "when 6 then '周五' " \
          "when 7 then '周六' " \
          "end as week, " \
          "count(*) as count " \
          "from app_datafactory " \
          "where yearweek(date_format(start_time, '%Y-%m-%d'))=yearweek('{}') group by week;".format(now_date) # yearweek(xx,mode=1),表示周一是一周的第一天;默认周日是第一天
    # print(sql)
    conn.ping(reconnect=True)
    cursor.execute(sql)
    t = cursor.fetchall()

    cursor.close()  # 关闭游标
    conn.close()  # 关闭连接

    dict_value = {}
for i in t:
        # print(i)
        j = {i[0]: i[1]}
        # print(j)
        dict_value.update(j)

    week = {"周一": 0, "周二": 0, "周三": 0, "周四": 0, "周五": 0, "周六": 0, "周日": 0}

    week.update(dict_value)

    statistics_data = []
    for t in week.items():
        statistics_data.append({
            "name": t[0],
            "value": t[1]
        })

    # print(statistics_data)

    data = {
        "code": "200",
        "data": statistics_data
    }

    return JsonResponse(data, json_dumps_params={'ensure_ascii': False})
这样即可实现切换周后,自动显示对应周的报表~