直接看图:
实现此功能,会用到属性动画;
但是具体做起来,有两种途径:
1)纯java代码来写:
  1 package com.example.cardrotation;
  2
  3 import android.animation.Animator;
  4 import android.animation.AnimatorListenerAdapter;
  5 import android.animation.AnimatorSet;
  6 import android.animation.ObjectAnimator;
  7 import android.os.Bundle;
  8 import android.support.v7.app.AppCompatActivity;
  9 import android.view.View;
 10 import android.widget.FrameLayout;
 11
 12 /**
 13  * 旋转卡片特效
 14  * 第1种写法
 15  * <p>
 16  * 用纯java代码来写动画特效以及 执行动画
 17  */
 18 public class MainActivity2 extends AppCompatActivity {
 19
 20     private FrameLayout mFlCardBack, mFlCardFront, mFlContainer;
 21
 22     @Override
 23     protected void onCreate(Bundle savedInstanceState) {
 24         super.onCreate(savedInstanceState);
 25         setContentView(R.layout.activity_main);
 26
 27         mFlCardBack = findViewById(R.id.fl_back);
 28         mFlCardFront = findViewById(R.id.fl_front);
 29         mFlContainer = findViewById(R.id.main_fl_container);
 30         mFlContainer.setOnClickListener(new View.OnClickListener() {
 31             @Override
 32             public void onClick(View v) {
 33                 flipCard();
 34             }
 35         });
 36
 37         initAnimatorSet();
 38         setCameraDistance(); // 设置镜头距离
 39     }
 40
 41     // 改变视角距离, 贴近屏幕,这个必须设置,因为如果不这么做,沿着Y轴旋转的过程中有可能产生超出屏幕的3D效果。
 42     private void setCameraDistance() {
 43         int distance = 16000;
 44         float scale = getResources().getDisplayMetrics().density * distance;
 45         mFlCardFront.setCameraDistance(scale);
 46         mFlCardBack.setCameraDistance(scale);
 47     }
 48
 49     private boolean mIsShowBack = false;
 50
 51     // 翻转卡片
 52     public void flipCard() {
 53         // 正面朝上
 54         if (!mIsShowBack) {
 55             inSet.setTarget(mFlCardBack);
 56             outSet.setTarget(mFlCardFront);
 57             mIsShowBack = true;
 58         } else { // 背面朝上
 59             inSet.setTarget(mFlCardFront);
 60             outSet.setTarget(mFlCardBack);
 61             mIsShowBack = false;
 62         }
 63         inSet.start();
 64         outSet.start();
 65     }
 66
 67     AnimatorListenerAdapter animatorListenerAdapter = new AnimatorListenerAdapter() {
 68         @Override
 69         public void onAnimationStart(Animator animation) {
 70             super.onAnimationStart(animation);
 71             mFlContainer.setClickable(false);//在动画执行过程中,不许允许接收点击事件
 72         }
 73
 74         @Override
 75         public void onAnimationEnd(Animator animation) {
 76             super.onAnimationEnd(animation);
 77             mFlContainer.setClickable(true);//在动画执行过程中,不许允许接收点击事件
 78         }
 79     };
 80
 81     private AnimatorSet inSet, outSet;
 82
 83     private void initAnimatorSet() {
 84         inSet = new AnimatorSet();
 85         ObjectAnimator animator = ObjectAnimator.ofFloat(null, "rotationY", -180f, 0f);
 86         animator.setDuration(500);
 87         animator.setStartDelay(0);
 88         ObjectAnimator animator2 = ObjectAnimator.ofFloat(null, "alpha", 0.0f, 1f);
 89         animator2.setStartDelay(250);
 90         animator2.setDuration(0);
 91         inSet.playTogether(animator, animator2);
 92         inSet.addListener(animatorListenerAdapter);
 93
 94         outSet = new AnimatorSet();
 95         ObjectAnimator animator_ = ObjectAnimator.ofFloat(null, "rotationY", 0, 180f);
 96         animator_.setDuration(500);
 97         animator_.setStartDelay(0);
 98         ObjectAnimator animator2_ = ObjectAnimator.ofFloat(null, "alpha", 1f, 0f);
 99         animator2_.setStartDelay(250);
100         animator2_.setDuration(0);
101         outSet.playTogether(animator_, animator2_);
102         outSet.addListener(animatorListenerAdapter);
103     }
104
105 }
2) 用 animator.xml来配置动画特效,然后在java代码中执行动画
 1 package com.example.cardrotation;
 2
 3 import android.animation.Animator;
 4 import android.animation.AnimatorInflater;
 5 import android.animation.AnimatorListenerAdapter;
 6 import android.animation.AnimatorSet;
 7 import android.support.v7.app.AppCompatActivity;
 8 import android.os.Bundle;
 9 import android.view.View;
10 import android.widget.FrameLayout;
11
12 /**
13  * 旋转卡片特效
14  * 第2种写法
15  *
16  * 用animator.xml的配置来描述动画特效
17  * 在代码中,执行动画
18  *
19  */
20 public class MainActivity extends AppCompatActivity {
21
22     private FrameLayout mFlCardBack, mFlCardFront, mFlContainer;
23
24     @Override
25     protected void onCreate(Bundle savedInstanceState) {
26         super.onCreate(savedInstanceState);
27         setContentView(R.layout.activity_main);
28
29         mFlCardBack = findViewById(R.id.fl_back);
30         mFlCardFront = findViewById(R.id.fl_front);
31         mFlContainer = findViewById(R.id.main_fl_container);
32         mFlContainer.setOnClickListener(new View.OnClickListener() {
33             @Override
34             public void onClick(View v) {
35                 flipCard();
36             }
37         });
38
39         initAnimatorSet(); // 设置动画
40         setCameraDistance(); // 设置镜头距离
41     }
42
43     // 改变视角距离, 贴近屏幕,这个必须设置,因为如果不这么做,沿着Y轴旋转的过程中有可能产生超出屏幕的3D效果。
44     private void setCameraDistance() {
45         int distance = 16000;
46         float scale = getResources().getDisplayMetrics().density * distance;
47         mFlCardFront.setCameraDistance(scale);
48         mFlCardBack.setCameraDistance(scale);
49     }
50
51     private boolean mIsShowBack = false;
52
53     // 翻转卡片
54     public void flipCard() {
55         // 正面朝上
56         if (!mIsShowBack) {
57             mRightOutSet.setTarget(mFlCardFront);
58             mLeftInSet.setTarget(mFlCardBack);
59             mIsShowBack = true;
60         } else { // 背面朝上
61             mRightOutSet.setTarget(mFlCardBack);
62             mLeftInSet.setTarget(mFlCardFront);
63             mIsShowBack = false;
64         }
65         mRightOutSet.start();
66         mLeftInSet.start();
67     }
68
69     private AnimatorSet mRightOutSet, mLeftInSet;
70     AnimatorListenerAdapter animatorListenerAdapter = new AnimatorListenerAdapter() {
71         @Override
72         public void onAnimationStart(Animator animation) {
73             super.onAnimationStart(animation);
74             mFlContainer.setClickable(false);//在动画执行过程中,不许允许接收点击事件
75         }
76
77         @Override
78         public void onAnimationEnd(Animator animation) {
79             super.onAnimationEnd(animation);
80             mFlContainer.setClickable(true);//在动画执行过程中,不许允许接收点击事件
81         }
82     };
83
84
85     private void initAnimatorSet() {
86         mRightOutSet = (AnimatorSet) AnimatorInflater.loadAnimator(this, R.animator.anim_out);
87         mLeftInSet = (AnimatorSet) AnimatorInflater.loadAnimator(this, R.animator.anim_in);
88
89         // 设置点击事件
90         mRightOutSet.addListener(animatorListenerAdapter);
91         mLeftInSet.addListener(animatorListenerAdapter);
92     }
93 }
这里用到了xml配置,所以必须在res中写xml
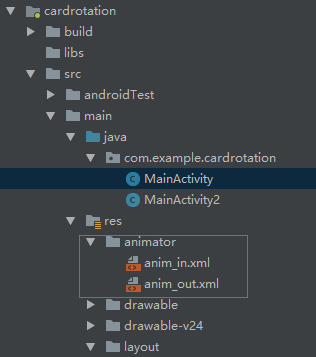
下面贴出anim_in.xml
<?xml version="1.0" encoding="utf-8"?>
<set xmlns:android="http://schemas.android.com/apk/res/android">

    <!-- 这里做个说明- 用XML来配置动画效果,下面这种平行的写法其实是让旋转,和透明动画 同时执行,
    startOffset是执行延时,对应ObjectAnimator的 setStartDelay(long startDelay) 方法 -->

    <!--旋转-->
    <objectAnimator
        android:duration="500"
        android:propertyName="rotationY"
        android:valueFrom="-180"
        android:valueTo="0" />

    <!--出现-->
    <objectAnimator
        android:duration="0"
        android:propertyName="alpha"
        android:startOffset="250"
        android:valueFrom="0.0"
        android:valueTo="1.0" />
    <!-- 所以说这个startOffSet的意思就是,这个动画延迟多久ms以后执行 -->
</set>
和anim_out.xml
<?xml version="1.0" encoding="utf-8"?>
<set xmlns:android="http://schemas.android.com/apk/res/android">
    <!--旋转-->
    <objectAnimator
        android:duration="500"
        android:propertyName="rotationY"
        android:valueFrom="0"
        android:valueTo="180" />

    <!--消失-->
    <objectAnimator
        android:duration="0"
        android:propertyName="alpha"
        android:startOffset="250"
        android:valueFrom="1.0"
        android:valueTo="0.0" />
</set>
OK,关键代码上面已经给出。
下面是公共部分布局的代码:

activity_main.xml
<?xml version="1.0" encoding="utf-8"?>
<FrameLayout xmlns:android="http://schemas.android.com/apk/res/android"
    xmlns:tools="http://schemas.android.com/tools"
    android:id="@+id/main_fl_container"
    android:layout_width="match_parent"
    android:layout_height="match_parent">

    <include layout="@layout/cell_card_back" />

    <include layout="@layout/cell_card_front" />

</FrameLayout>
卡片反面cell_card_back.xml
<?xml version="1.0" encoding="utf-8"?>
<FrameLayout xmlns:android="http://schemas.android.com/apk/res/android"
    android:id="@+id/fl_back"
    android:layout_width="match_parent"
    android:layout_height="match_parent"
    android:layout_margin="20dp">

    <TextView
        android:layout_width="match_parent"
        android:layout_height="match_parent"
        android:background="@color/colorPrimary"
        android:gravity="center"
        android:text="反面"
        android:textColor="@color/colorAccent"
        android:textSize="30sp" />

</FrameLayout>
卡片正面 cell_card_front.xml
<?xml version="1.0" encoding="utf-8"?>
<FrameLayout xmlns:android="http://schemas.android.com/apk/res/android"
    android:layout_width="match_parent"
    android:layout_height="match_parent"
    android:layout_margin="20dp"
    android:id="@+id/fl_front">

    <TextView
        android:layout_width="match_parent"
        android:layout_height="match_parent"
        android:background="@android:color/darker_gray"
        android:gravity="center"
        android:text="正面"
        android:textColor="@color/colorPrimary"
        android:textSize="30sp" />
</FrameLayout>
OK,完事。
所有的动画特效基本都有这两种写法。
具体用什么,看心情吧。
用纯java,可能api查起来方便一点,毕竟xml写配置,不能alt点进去看属性说明。
用xml的话,可能在代码端就简洁一点,属性,自己想办法上网查好了。
就这样了·····