---恢复内容开始---
模板引擎的思想
模板是为了将显示与数据分离,模板技术多种多样,但其本质都是将模板文件和数据通过模板引擎生成最终的HTML代码。

Thymeleaf介绍
Thymeleaf是适用于Web和独立环境的现代服务器端Java模板引擎。
Thymeleaf的主要目标是为您的开发工作流程带来优雅的自然模板 -HTML可以在浏览器中正确显示,也可以作为静态原型工作,从而可以在开发团队中加强协作。
Thymeleaf拥有适用于Spring Framework的模块,与您喜欢的工具的大量集成以及插入您自己的功能的能力,对于现代HTML5 JVM Web开发而言,Thymeleaf是理想的选择-尽管它还有很多工作要做。
Thymeleaf使用
1、新建一个SpringBoot项目,并且引入thymeleaf依赖
1 <dependency>
2     <groupId>org.springframework.boot</groupId>
3     <artifactId>spring-boot-starter-thymeleaf</artifactId>
4 </dependency>
最终pom文件如下:


 1 <?xml version="1.0" encoding="UTF-8"?>
 2 <project xmlns="http://maven.apache.org/POM/4.0.0"
 3          xmlns:xsi="http://www.w3.org/2001/XMLSchema-instance"
 4          xsi:schemaLocation="http://maven.apache.org/POM/4.0.0 http://maven.apache.org/xsd/maven-4.0.0.xsd">
 5     <modelVersion>4.0.0</modelVersion>
 6
 7     <groupId>com.test</groupId>
 8     <artifactId>test-springboot-web</artifactId>
 9     <version>1.0-SNAPSHOT</version>
10
11
12     <parent>
13         <groupId>org.springframework.boot</groupId>
14         <artifactId>spring-boot-starter-parent</artifactId>
15         <version>2.1.8.RELEASE</version>
16     </parent>
17
18     <properties>
19
20         <project.build.sourceEncoding>UTF-8</project.build.sourceEncoding>
21         <project.reporting.outputEncoding>UTF-8</project.reporting.outputEncoding>
22         <java.version>1.8</java.version>
23     </properties>
24
25     <dependencies>
26         <dependency>
27             <groupId>org.springframework.boot</groupId>
28             <artifactId>spring-boot-starter-web</artifactId>
29         </dependency>
30
31         <dependency>
32             <groupId>org.springframework.boot</groupId>
33             <artifactId>spring-boot-starter-thymeleaf</artifactId>
34         </dependency>
35
36         <dependency>
37             <groupId>org.springframework.boot</groupId>
38             <artifactId>spring-boot-starter-test</artifactId>
39             <scope>test</scope>
40         </dependency>
41
42     </dependencies>
43
44
45     <!-- SpringBoot打包插件,可以将代码打包成一个可执行的jar包 -->
46     <build>
47         <plugins>
48             <plugin>
49                 <groupId>org.springframework.boot</groupId>
50                 <artifactId>spring-boot-maven-plugin</artifactId>
51             </plugin>
52         </plugins>
53     </build>
54 </project>
2、编写controller,在controller中将数据绑定到页面(success.html)
 1 package com.test.springboot.web.controller;
 2
 3 import org.springframework.stereotype.Controller;
 4 import org.springframework.web.bind.annotation.RequestMapping;
 5 import org.springframework.web.bind.annotation.ResponseBody;
 6
 7 import java.util.Arrays;
 8 import java.util.Map;
 9
10 @Controller
11 public class HelloController {
12
13     @RequestMapping("/success")
14     public String success(Map<String, Object> map){
15         map.put("hello", "<span style="color: red;">hello!</span>");
16         map.put("users", Arrays.asList("张三", "李四", "王五"));
17         return "success";
18     }
19
20 }
3、编辑页面resources/templates/success.html,在页面上获取数据
 1 <!DOCTYPE html>
 2 <!--
 3  xmlns:th="http://www.thymeleaf.org" 的作用是增加thymeleaf的语法提示
 4 -->
 5 <html lang="en" xmlns:th="http://www.thymeleaf.org">
 6 <head>
 7     <meta charset="UTF-8">
 8     <title>Title</title>
 9 </head>
10 <body>
11     test page
12     <h4 th:text="${hello}"></h4>
13     <h4 th:utext="${hello}"></h4>
14     <h4 th:each="user:${users}" > [[${user}]] </h4>
15 </body>
16 </html>
4、重启项目,在浏览器中使用地址 :http://localhost:8080/success,进行访问,效果如下

小技巧:springboot上修改thymeleaf页面,想要不重启项目就生效,需要做2点
1、关闭thymeleaf的缓存 ,在属性文件中设置:spring.thymeleaf.cache=false ,默认是开启的
2、ctrl + F9 重新编译界面
Thymeleaf语法
1、获取变量值
a、行内表达式 [[...]] or [(...)]
在Thymeleaf中,[[...]]或之间的表达式[(...)]被认为是内联表达式,在它们内部,我们可以使用在th:text 或 th:utext属性中也有效的任何类型的表达式。
[[...]]:表示th:text,会转义特殊字符
[(...)]:表示th:utext,不会转义特殊字符
1 Hello, [[${session.user.name}]]!
b、变量表达式 ${…}
使用方法:直接使用th:xx="${}" 获取对象属性,通过${…}进行取值,这点和ONGL表达式语法一致!
1 <p>Today is: <span th:text="${today}">13 february 2011</span>.</p>
c、选择变量表达式 *{...}
使用方法:首先通过 th:object 获取对象,然后使用th:xx = "*{}"获取对象属性
1 <div th:object="${session.user}">
2     <p>Name: <span th:text="*{firstName}">Sebastian</span>.</p>
3     <p>Surname: <span th:text="*{lastName}">Pepper</span>.</p>
4     <p>Nationality: <span th:text="*{nationality}">Saturn</span>.</p>
5 </div>
d、消息表达
即通常的国际化属性:#{msg} 用于获取国际化语言翻译值
1 <title th:text="#{user.title}"></title>
e、链接表达式
使用方法:通过链接表达式@{}直接拿到应用路径,然后拼接静态资源路径。
1 <script th:src="@{/webjars/jquery/jquery.js}"></script>
2 <link th:href="@{/webjars/bootstrap/css/bootstrap.css}" rel="stylesheet" type="text/css">
f、片段表达式
片段表达式是Thymeleaf的特色之一,细粒度可以达到标签级别,这是JSP无法做到的。片段表达式拥有三种语法
~{ viewName } 表示引入完整页面~{ viewName ::selector} 表示在指定页面寻找片段 其中selector可为片段名、jquery选择器等~{ ::selector} 表示在当前页寻找
1 <div th:insert="~{commons :: main}">...</div>
g、其他表达式
在基础语法中,默认支持字符串连接、数学运算、布尔逻辑和三目运算等。
1 <input name="name" th:value="${'I am '+(user.name!=null?user.name:'NoBody')}"/>
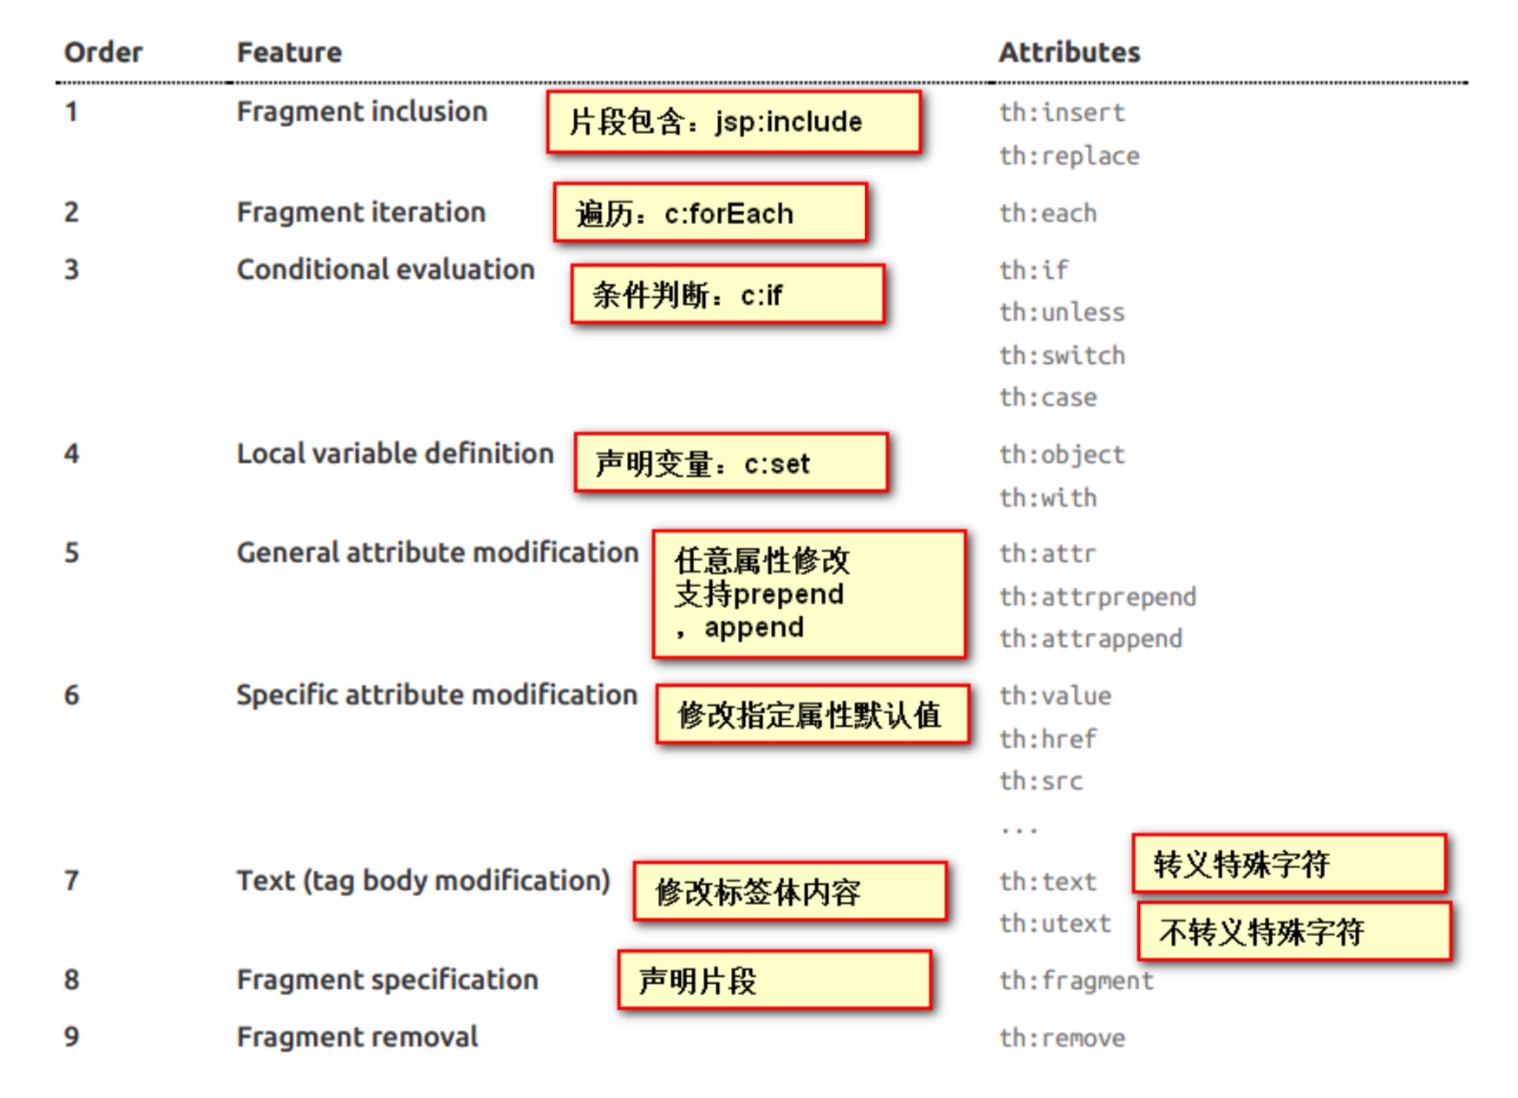
2、设置标签属性
th:text;改变当前元素里面的文本内容;
th:任意html属性;来替换原生属性的值
3、常用的内置对象
一、ctx :上下文对象。
二、vars :上下文变量。
三、locale:上下文的语言环境。
四、request:(仅在web上下文)的 HttpServletRequest 对象。
五、response:(仅在web上下文)的 HttpServletResponse 对象。
六、session:(仅在web上下文)的 HttpSession 对象。
七、servletContext:(仅在web上下文)的 ServletContext 对象
4、常用的内置方法
一、strings:字符串格式化方法,常用的Java方法它都有。比如:equals,equalsIgnoreCase,length,trim,toUpperCase,toLowerCase,indexOf,substring,replace,startsWith,endsWith,contains,containsIgnoreCase等
二、numbers:数值格式化方法,常用的方法有:formatDecimal等
三、bools:布尔方法,常用的方法有:isTrue,isFalse等
四、arrays:数组方法,常用的方法有:toArray,length,isEmpty,contains,containsAll等
五、lists,sets:集合方法,常用的方法有:toList,size,isEmpty,contains,containsAll,sort等
六、maps:对象方法,常用的方法有:size,isEmpty,containsKey,containsValue等
七、dates:日期方法,常用的方法有:format,year,month,hour,createNow等
5、迭代循环
想要遍历List集合很简单,配合th:each 即可快速完成迭代。例如遍历用户列表:
1 <div th:each="user:${userList}">
2     账号:<input th:value="${user.username}"/>
3     密码:<input th:value="${user.password}"/>
4 </div>
集合的迭代过程还可以获取状态变量,只需在变量后面指定状态变量名即可,状态变量可用于获取集合的下标/序号、总数、是否为单数/偶数行、是否为第一个/最后一个。
1 <div th:each="user,stat:${userList}" th:class="${stat.even}?'even':'odd'">
2     下标:<input th:value="${stat.index}"/>
3     序号:<input th:value="${stat.count}"/>
4     账号:<input th:value="${user.username}"/>
5     密码:<input th:value="${user.password}"/>
6 </div>
xxStat, 例如:
1 <div th:each="user:${userList}" th:class="${userStat.even}?'even':'odd'">
2     下标:<input th:value="${userStat.index}"/>
3     序号:<input th:value="${userStat.count}"/>
4     账号:<input th:value="${user.username}"/>
5     密码:<input th:value="${user.password}"/>
6 </div>