我是Mike Ash的Let’s Build…系列文章的忠实粉丝,在这一系列文章中他从头设计Cocoa的控件来解释他们的工作原理。在这里我要做一点类似的事情,用几行代码来实现我自己的滚动试图。不过首先,让我们先来了解一下UIKit中的坐标系是怎么工作的。如果你只对滚动试图的代码实现感兴趣可以放心跳过下一小节。UIKit坐标系每一个View都定义了他自己的坐标系统。如下图所示,x轴指向右方,y轴指向下方:

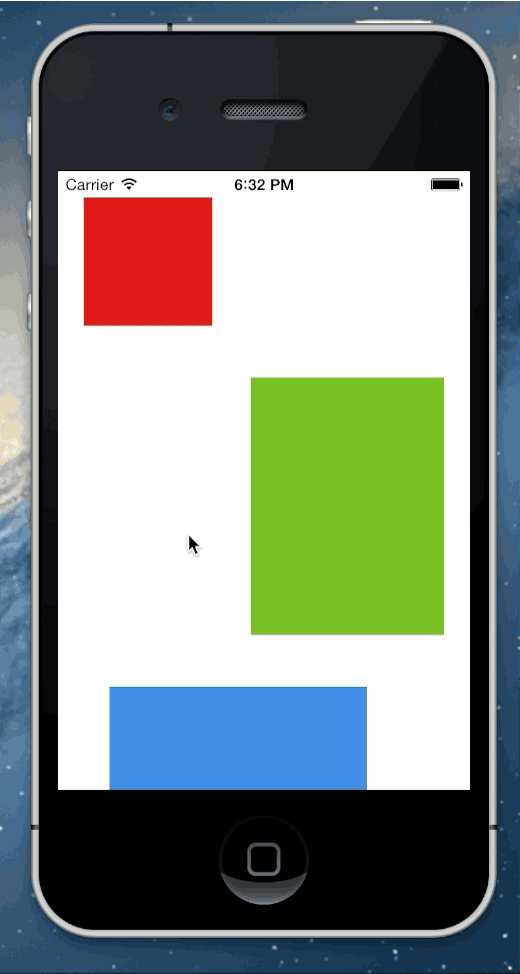
注意这个逻辑坐标系并不关注包含在其中View的宽度和高度。整个坐标系没有边界向四周无限延伸.我们在坐标系中放置四个子View。每一次色块代表一个View:
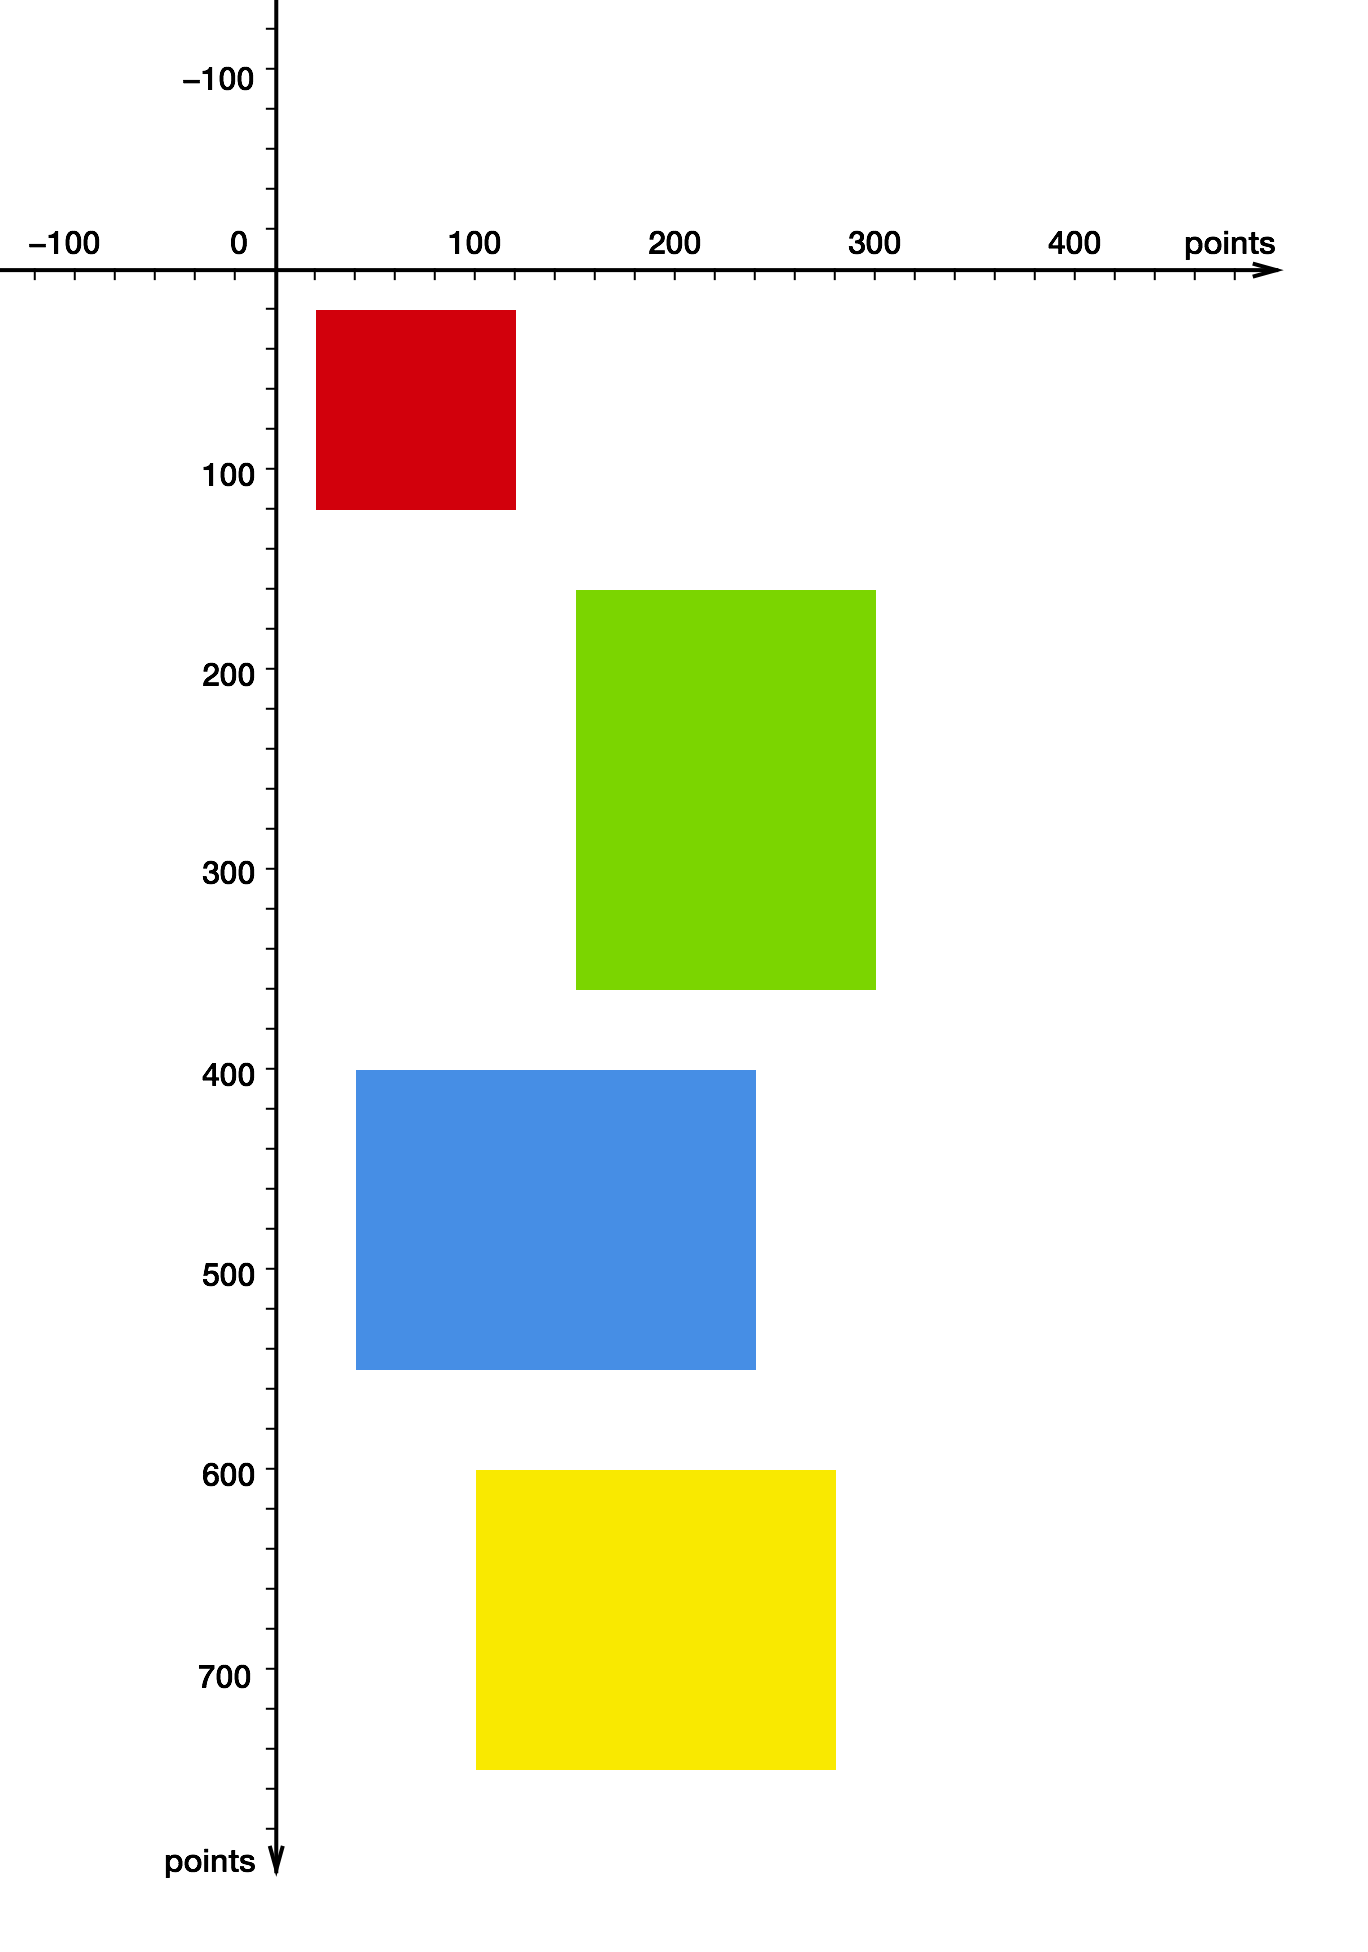
添加View的代码实现如下:
|
1
2
3
4
5
6
7
8
9
10
11
12
13
14
15
16
17
18
19
20
|
UIView *redView = [[UIView alloc] initWithFrame:CGRectMake(20, 20, 100, 100)];redView.backgroundColor = [UIColor colorWithRed:0.815 green:0.007 blue:0.105 alpha:1];UIView *greenView = [[UIView alloc] initWithFrame:CGRectMake(150, 160, 150, 200)];greenView.backgroundColor = [UIColor colorWithRed:0.494 green:0.827 blue:0.129 alpha:1];UIView *blueView = [[UIView alloc] initWithFrame:CGRectMake(40, 400, 200, 150)];blueView.backgroundColor = [UIColor colorWithRed:0.29 green:0.564 blue:0.886 alpha:1];UIView *yellowView = [[UIView alloc] initWithFrame:CGRectMake(100, 600, 180, 150)];yellowView.backgroundColor = [UIColor colorWithRed:0.972 green:0.905 blue:0.109 alpha:1];[mainView addSubview:redView];[mainView addSubview:greenView];[mainView addSubview:blueView];[mainView addSubview:yellowView]; |
bounds
Apple关于UIView的文档中是这样描述bounds属性的:
bounds矩形…描述了该视图在其自身坐标系中的位置和大小。
一个View可以被看作是定义在其所在坐标系平面上的一扇窗户或者说是一个矩形的可视区域。View的边界表明了这个矩形可视区域的位置和大小。
假设我们的View宽320像素,高480像素,原点在(0,0)。那么这个View就变成了整个坐标系平面的观察口,它展示的只是整个平面的一小部分。位于该View边界外的区域依然存在,只是被隐藏起来了。
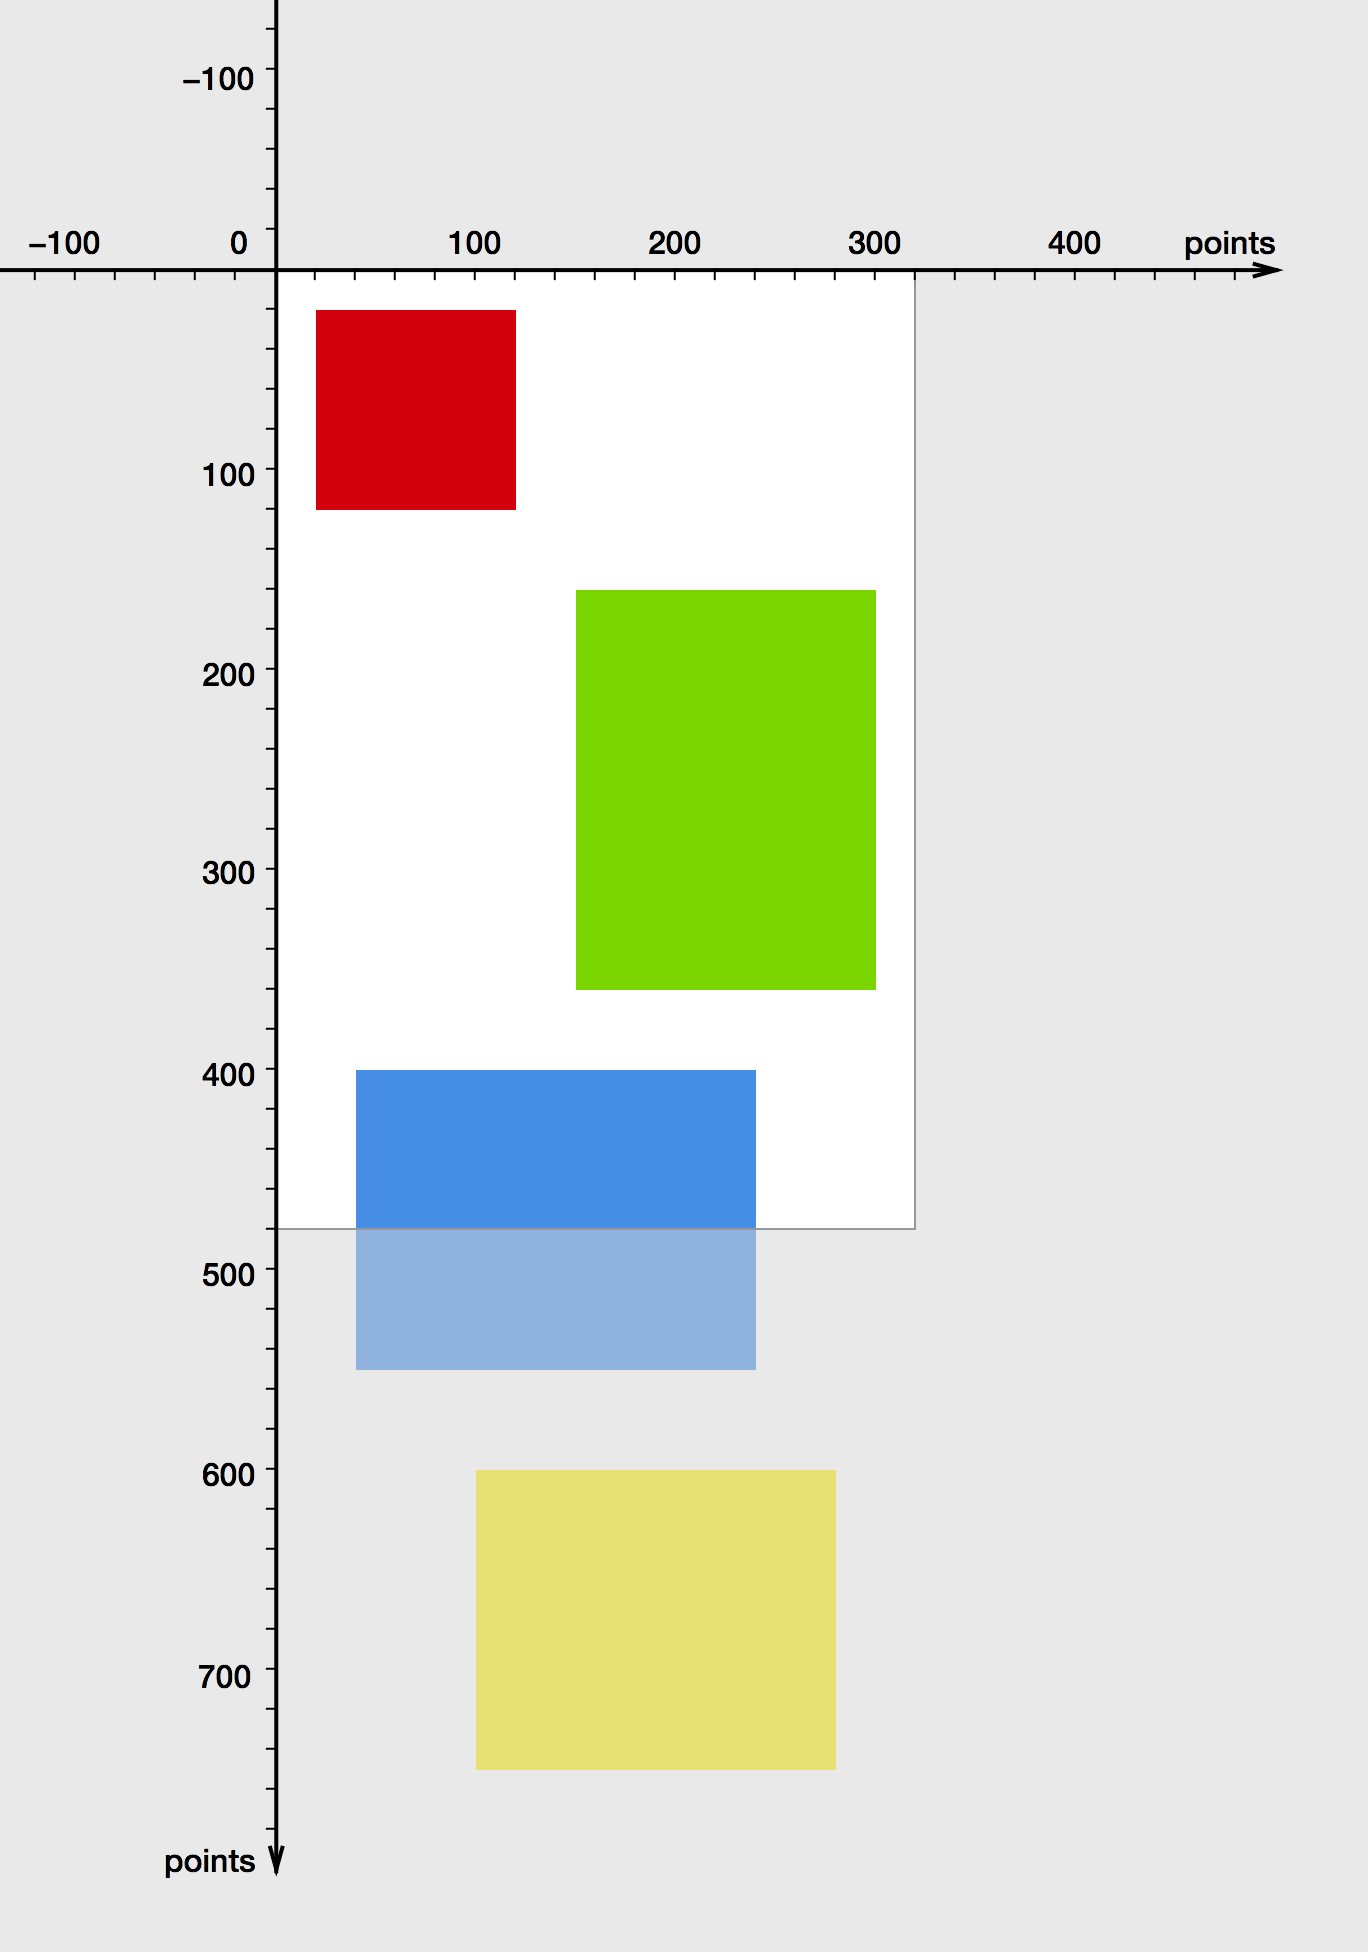
一个View提供了其所在平面的一个观察口。View的bounds矩形描述了这个可是区域的位置和大小。
Frame
接下来我们来试着修改bounds的原点坐标:
|
1
2
3
|
CGRect bounds = mainView.bounds;bounds.origin = CGPointMake(0, 100);mainView.bounds = bounds; |
当我们把bound原点设为(0,100)后,整个画面看起来就像这样:
修改bounds的原点就相当与在平面上移动这个可视区域。
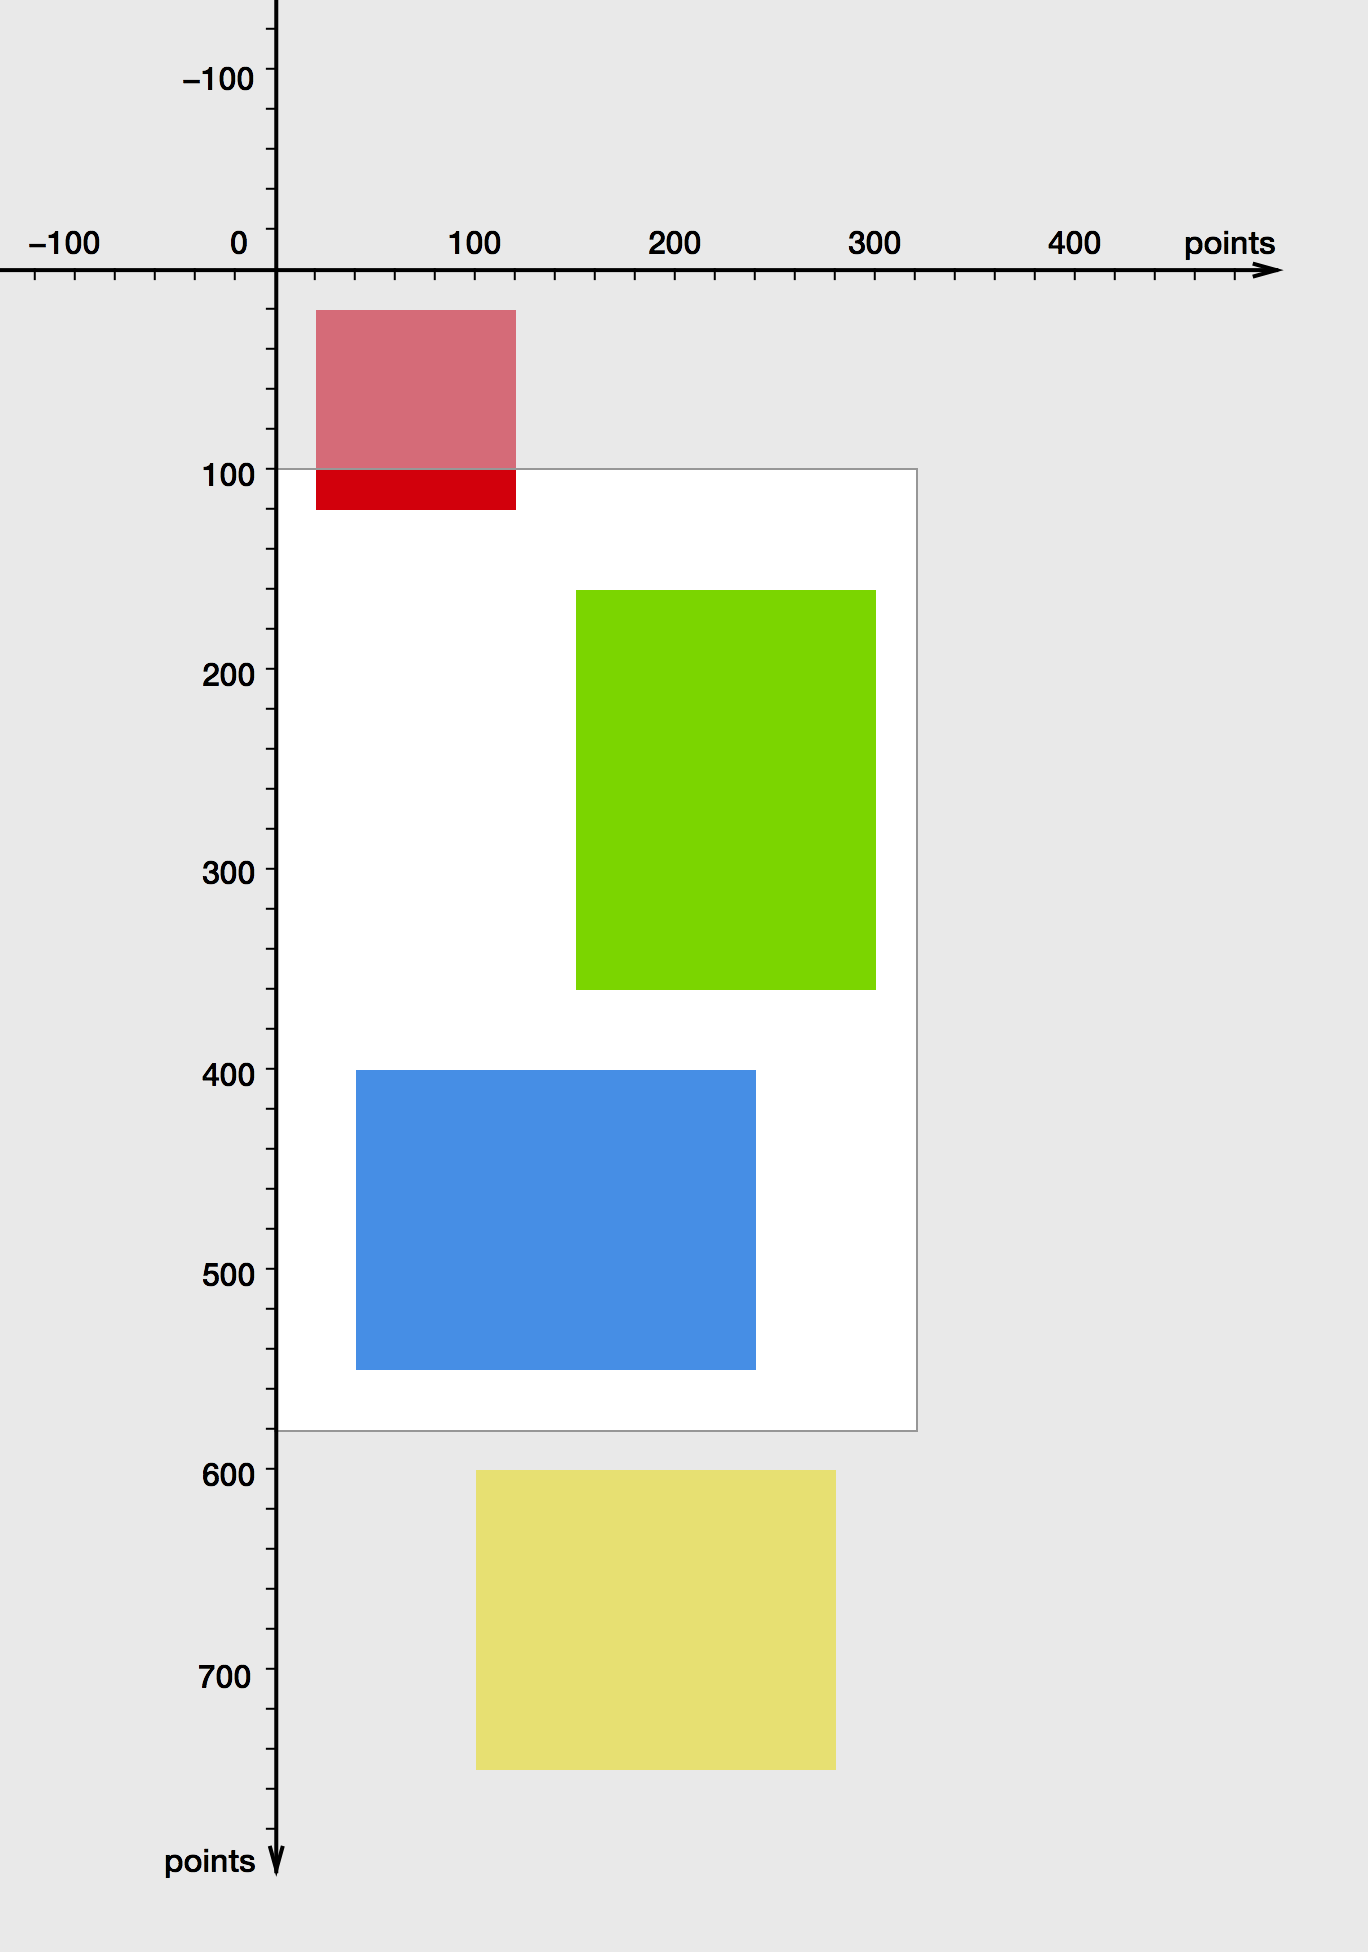
看起来好像是这个View向下移动了100像素,在这个View自己的坐标系中这确实没错。不过这个View真正位于屏幕上的位置(更准确的说在其父View上的位置)其实没有改变,因为这是由View的frame属性决定的,它并没有改变:
frame矩形…定义了这个View在其父View坐标系中的位置和大小。
由于View的位置是相对固定的,你可以把整个坐标平面想象成我们可以上下拖动的透明幕布,把这个View想象成我们观察坐标平面的窗口。调整View的Bounds属性就相当于拖动这个幕布,那么下方的内容就能在我们View中被观察到:
Since the view’s position is fixed (from its own perspective), think of the coordinate system plane as a piece of transparent film we can drag around, and of the view as a fixed window we are looking through. Adjusting the bounds’s origin is equivalent to moving the transparent film such that another part of it becomes visible through the view:
修改bounds的原点坐标也相当于把整个坐标系向上拖动,因为View的frame没由变过,所以它相对于父View的位置没有变化过。
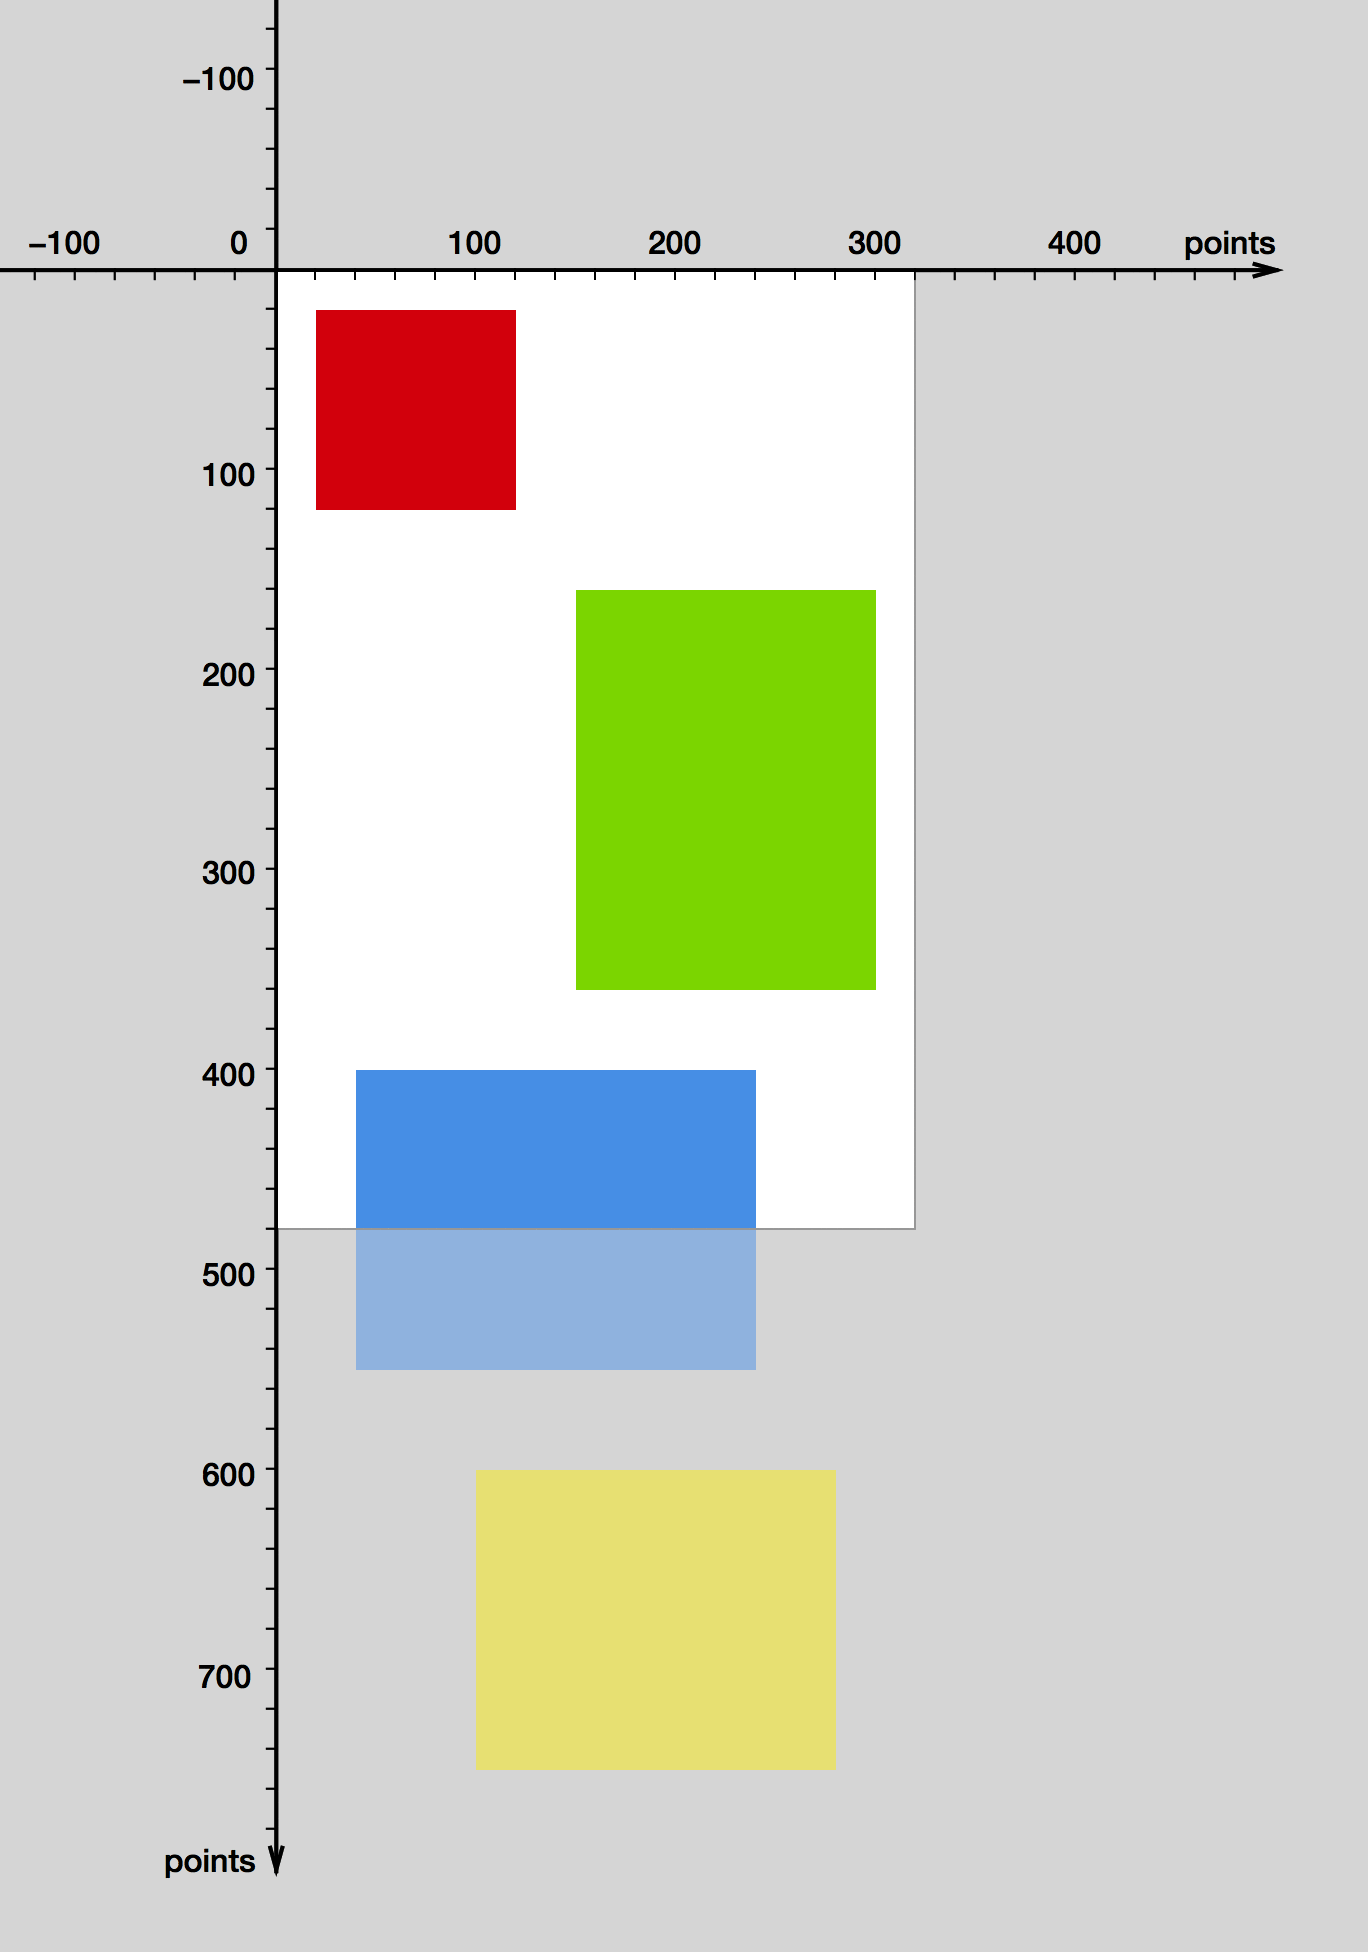
其实这就是UIScrollView滑动时所发生的事情。注意从一个用户的角度来看,他以为时这个View中的子View在移动,其实他们的在坐标系中位置(他们的frame)没有发生过变化。
打造你的UIScrollView
一个scroll view并不需要其中子View的坐标来使他们滚动。唯一要做的就是改变他的bounds属性。知道了这一点,实现一个简单的scroll view就没什么困难了。我们用一个gesture recognizer来识别用户的拖动操作,根据用户拖动的偏移量来改变bounds的原点:
|
1
2
3
4
5
6
7
8
9
10
11
12
13
14
15
16
17
18
19
20
21
22
23
24
25
26
27
28
29
30
31
32
33
34
35
36
37
38
39
40
41
42
43
44
45
46
47
|
// CustomScrollView.h@import UIKit;@interface CustomScrollView : UIView@property (nonatomic) CGSize contentSize;@end// CustomScrollView.m#import "CustomScrollView.h"@implementation CustomScrollView- (id)initWithFrame:(CGRect)frame{ self = [super initWithFrame:frame]; if (self == nil) { return nil; } UIPanGestureRecognizer *gestureRecognizer = [[UIPanGestureRecognizer alloc] initWithTarget:self action:@selector(handlePanGesture:)]; [self addGestureRecognizer:gestureRecognizer]; return self;}- (void)handlePanGesture:(UIPanGestureRecognizer *)gestureRecognizer{ CGPoint translation = [gestureRecognizer translationInView:self]; CGRect bounds = self.bounds; // Translate the view's bounds, but do not permit values that would violate contentSize CGFloat newBoundsOriginX = bounds.origin.x - translation.x; CGFloat minBoundsOriginX = 0.0; CGFloat maxBoundsOriginX = self.contentSize.width - bounds.size.width; bounds.origin.x = fmax(minBoundsOriginX, fmin(newBoundsOriginX, maxBoundsOriginX)); CGFloat newBoundsOriginY = bounds.origin.y - translation.y; CGFloat minBoundsOriginY = 0.0; CGFloat maxBoundsOriginY = self.contentSize.height - bounds.size.height; bounds.origin.y = fmax(minBoundsOriginY, fmin(newBoundsOriginY, maxBoundsOriginY)); self.bounds = bounds; [gestureRecognizer setTranslation:CGPointZero inView:self];}@end |
和真正的UIScrollView一样,我们的类也有一个contentSize属性,你必须从外部来设置这个值来指定可以滚动的区域,当我们改变bounds的大小时我们要确保设置的值是有效的。
结果:
我们的scroll view已经能够工作了,不过还缺少动量滚动,反弹效果还有滚动提示符。
总结
感谢UIKit的坐标系统特性,使我们之花了30几行代码就能重现UIScrollView的精华,当然真正的UIScrollView要比我们所做的复杂的多,反弹效果,动量滚动,放大试图,还有代理方法,这些特性我们没有在这里涉及到。
更新 5/ 2, 2014: 本文的代码在https://github.com/ole/CustomScrollView。
更新 5/ 8, 2014:
1.坐标系并非无限延伸的。坐标系的范围由CGFloat的长度来决定,根据32位和64位系统有所不同,通常来讲这是一个很大的值。
2.事实上,除非你设置clipToBounds == YES,所有子View超出的部分其实仍然是可见的。只是View不会再去检测超出部分的触摸事件而已。