前面在讨论关键帧动画的时候,我有意把几个带缓动动画的关键帧动画忽略掉,如EasingColorKeyFrame、EasingDoubleKeyFrame和EasingPointKeyFrame,其实为数不多,就这么几个。因为我希统一放到这节课程来吹一下缓动函数。
所谓缓动函数,就是我们在代数里面说的函数,说白了嘛,就是根特定的函数规则,用输入的值算出最终值,使得动画在两个关键帧之间不再是均衡过度,而是带有加/减速或其他效果,当然,还要取决于算法。
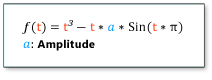
比如函数
所以,我们看出来了,缓动函数涉及复杂的数学运算,不过,灰常幸运的是,常用的缓函数MS已经为我们封装好了,这也是从WPF/Silverlight中迁移到WP的,集成性兼容性MD的好,所以,在使用的时候,大家可以轻松一大把了,因此,当你在练习的时候,记得冲一杯咖啡放在桌上,一边写代码一边品尝吧。呵呵,编程快乐,快乐编程。
如果你干过WPF或SL,这些东西你会觉得灰常Easy,我不是第一次强调了,所以说,基础很重要,把基础扎实了,无论你学习什么新玩意儿,都可以一通百通的,不管你信不信,反正我信了。
如何你对缓动函数没有一个直观的认识也不要紧,下面推荐大家一个游戏,很好玩的,不玩你学WP会后悔的。游戏地址:http://samples.msdn.microsoft.com/Silverlight/silverlight_next/Animations/easing_functions_gallery/testpage.html
记住要认真玩,这样你才会熟悉缓动函数与相关的类。
某致理名言说得好,“自己动手,丰衣足食”,还是老规矩,实例决定一切,动手干活吧。
演练一、请参考以下XAML代码构建你的UI。
- <Grid Loaded="gridLoaded">
- <Ellipse HorizontalAlignment="Left"
- VerticalAlignment="Top"
- Fill="Orange"
- Width="100"
- Height="100"
- x:Name="elp">
- <Ellipse.RenderTransform>
- <TranslateTransform x:Name="trm"/>
- </Ellipse.RenderTransform>
- </Ellipse>
- <Grid.Resources>
- <Storyboard x:Name="std">
- <DoubleAnimationUsingKeyFrames Duration="0:0:8"
- Storyboard.TargetName="trm"
- Storyboard.TargetProperty="Y"
- RepeatBehavior="30">
- <LinearDoubleKeyFrame KeyTime="0:0:0" Value="0"/>
- <EasingDoubleKeyFrame KeyTime="0:0:8" Value="485">
- <EasingDoubleKeyFrame.EasingFunction>
- <BounceEase Bounciness="3" Bounces="3"/>
- </EasingDoubleKeyFrame.EasingFunction>
- </EasingDoubleKeyFrame>
- </DoubleAnimationUsingKeyFrames>
- </Storyboard>
- </Grid.Resources>
- </Grid>
后台C#代码启用动画。
- private void gridLoaded(object sender, RoutedEventArgs e)
- {
- this.std.Begin();
- }
现在,运行上面的示例,你会发现圆在下落的过程发生了两次回弹,动画才结束,而且一开始较慢,后来渐渐加速,这就是缓动函数所产生的效果。
演练二。
参考以下XAML代码创建UI界面。
- <Grid Loaded="gridLoaded">
- <Rectangle Margin="35" x:Name="rec">
- <Rectangle.Fill>
- <LinearGradientBrush x:Name="brs" StartPoint="0,0.5" EndPoint="1,0.5">
- <GradientStop Color="Blue" Offset="0"/>
- <GradientStop Color="Yellow" Offset="0.5"/>
- <GradientStop Color="Blue" Offset="1"/>
- </LinearGradientBrush>
- </Rectangle.Fill>
- </Rectangle>
- <Grid.Resources>
- <Storyboard x:Name="std">
- <DoubleAnimationUsingKeyFrames Duration="0:0:10"
- Storyboard.TargetName="brs"
- Storyboard.TargetProperty="(LinearGradientBrush.GradientStops)[1].(GradientStop.Offset)"
- RepeatBehavior="35"
- AutoReverse="True">
- <EasingDoubleKeyFrame KeyTime="0:0:0" Value="0.2"/>
- <EasingDoubleKeyFrame KeyTime="0:0:10" Value="0.8">
- <EasingDoubleKeyFrame.EasingFunction>
- <ElasticEase Oscillations="4" Springiness="1"/>
- </EasingDoubleKeyFrame.EasingFunction>
- </EasingDoubleKeyFrame>
- </DoubleAnimationUsingKeyFrames>
- </Storyboard>
- </Grid.Resources>
- </Grid>
在gridLoaded上右击,从弹出的菜单中选择“导航到事件处理程序”,在生成的方法中完成以下C#代码。
- private void gridLoaded(object sender, RoutedEventArgs e)
- {
- std.Begin();
- }
运行程序后,你会看到渐变填充中间黄色的色块在左右来回移动。
演练三:
请参照以下XAML建立UI。
- <phone:PhoneApplicationPage
- x:Class="Sample.Page3"
- xmlns="http://schemas.microsoft.com/winfx/2006/xaml/presentation"
- xmlns:x="http://schemas.microsoft.com/winfx/2006/xaml"
- xmlns:phone="clr-namespace:Microsoft.Phone.Controls;assembly=Microsoft.Phone"
- xmlns:shell="clr-namespace:Microsoft.Phone.Shell;assembly=Microsoft.Phone"
- xmlns:d="http://schemas.microsoft.com/expression/blend/2008"
- xmlns:mc="http://schemas.openxmlformats.org/markup-compatibility/2006"
- FontFamily="{StaticResource PhoneFontFamilyNormal}"
- FontSize="{StaticResource PhoneFontSizeNormal}"
- Foreground="{StaticResource PhoneForegroundBrush}"
- SupportedOrientations="Portrait" Orientation="Portrait"
- mc:Ignorable="d" d:DesignHeight="768" d:DesignWidth="480"
- shell:SystemTray.IsVisible="True">
- <!--LayoutRoot 是包含所有页面内容的根网格-->
- <Grid x:Name="LayoutRoot" Background="Transparent">
- <Grid.RowDefinitions>
- <RowDefinition Height="Auto"/>
- <RowDefinition Height="*"/>
- </Grid.RowDefinitions>
- <!--TitlePanel 包含应用程序的名称和页标题-->
- <StackPanel x:Name="TitlePanel" Grid.Row="0" Margin="12,17,0,28">
- <TextBlock x:Name="ApplicationTitle" Text="我的应用程序" Style="{StaticResource PhoneTextNormalStyle}"/>
- <TextBlock x:Name="PageTitle" Text="页面名称" Margin="9,-7,0,0" Style="{StaticResource PhoneTextTitle1Style}"/>
- </StackPanel>
- <!--ContentPanel - 在此处放置其他内容-->
- <Grid x:Name="ContentPanel" Grid.Row="1" Margin="12,0,12,0">
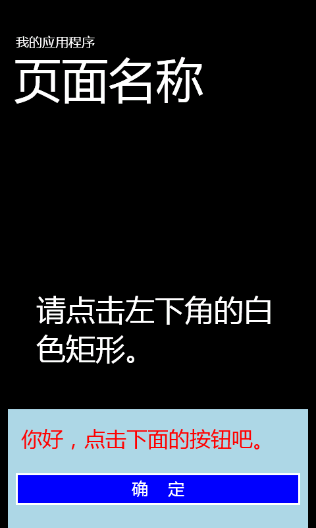
- <Rectangle HorizontalAlignment="Left" VerticalAlignment="Bottom"
- Width="60" Height="45" Fill="White"
- MouseLeftButtonDown="onShow"/>
- <TextBlock HorizontalAlignment="Center"
- VerticalAlignment="Center"
- Text="请点击左下角的白色矩形。"
- TextWrapping="Wrap"
- Margin="30,0,40,0"
- FontSize="45"/>
- <StackPanel x:Name="sp" Background="LightBlue"
- Height="180"
- VerticalAlignment="Bottom">
- <TextBlock Foreground="Red"
- Margin="20,22,20,20"
- FontSize="32"
- Text="你好,点击下面的按钮吧。"/>
- <Button Content="确 定" Background="Blue"
- Click="onHide"/>
- <StackPanel.RenderTransform>
- <TranslateTransform x:Name="trm"
- Y="180"/>
- </StackPanel.RenderTransform>
- </StackPanel>
- <Grid.Resources>
- <Storyboard x:Name="stdShow">
- <DoubleAnimationUsingKeyFrames
- Storyboard.TargetName="trm"
- Storyboard.TargetProperty="Y"
- Duration="1">
- <EasingDoubleKeyFrame
- KeyTime="0:0:0" Value="180"/>
- <EasingDoubleKeyFrame
- KeyTime="0:0:1" Value="0">
- <EasingDoubleKeyFrame.EasingFunction>
- <PowerEase Power="10"/>
- </EasingDoubleKeyFrame.EasingFunction>
- </EasingDoubleKeyFrame>
- </DoubleAnimationUsingKeyFrames>
- </Storyboard>
- <Storyboard x:Name="stdHide">
- <DoubleAnimationUsingKeyFrames
- Duration="0:0:1"
- Storyboard.TargetName="trm"
- Storyboard.TargetProperty="Y">
- <EasingDoubleKeyFrame KeyTime="0:0:0"
- Value="0"/>
- <EasingDoubleKeyFrame KeyTime="0:0:1"
- Value="180">
- <EasingDoubleKeyFrame.EasingFunction>
- <PowerEase Power="10"/>
- </EasingDoubleKeyFrame.EasingFunction>
- </EasingDoubleKeyFrame>
- </DoubleAnimationUsingKeyFrames>
- </Storyboard>
- </Grid.Resources>
- </Grid>
- </Grid>
- </phone:PhoneApplicationPage>
分别在onShow和onHide方法上右击,从弹出的菜单中选择“导航到事件处理程序”,完成后台代码逻辑。
- private void onShow(object sender, MouseButtonEventArgs e)
- {
- if (stdHide.GetCurrentState() != ClockState.Stopped)
- {
- stdHide.Stop();
- }
- stdShow.Begin();
- }
- private void onHide(object sender, RoutedEventArgs e)
- {
- if (stdShow.GetCurrentState() != ClockState.Stopped)
- {
- stdShow.Stop();
- }
- stdHide.Begin();
- }
现在,运行程序,单击屏幕左下方的白色矩形,这时候屏幕下方会弹出一个面板,再点击面板上的按钮,面板会缩下去。
这样,使用动画,我们就做出了一个类似工具条的效果。