SpringSecurity是一个安全框架,主要用于授权和认证,在普通项目中,我们使用过滤器和拦截器也可以实现,但是使用SpringSecurity更加简单。
一、spring security 简介
spring security 的核心功能主要包括:
- 认证 (你是谁)
- 授权 (你能干什么)
- 攻击防护 (防止伪造身份)
其核心就是一组过滤器链,项目启动后将会自动配置。最核心的就是 Basic Authentication Filter 用来认证用户的身份。在spring security中一种过滤器处理一种认证方式。
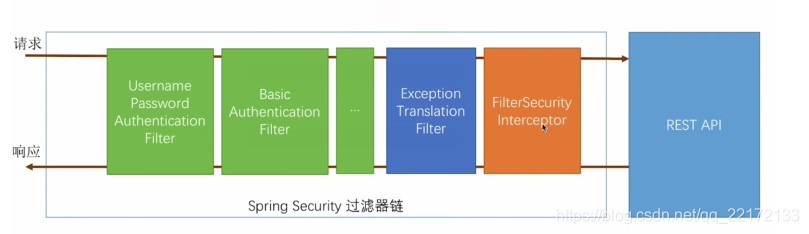
比如,对于username password认证过滤器来说,会检查是否是一个登录请求;是否包含username 和 password (也就是该过滤器需要的一些认证信息),如果不满足则放行给下一个。
下一个按照自身职责判定是否是自身需要的信息,basic的特征就是在请求头中有 Authorization:Basic eHh4Onh4 的信息。
中间可能还有更多的认证过滤器。最后一环是 FilterSecurityInterceptor,这里会判定该请求是否能进行访问rest服务,判断的依据是 BrowserSecurityConfig 中的配置,如果被拒绝了就会抛出不同的异常(根据具体的原因)。
Exception Translation Filter 会捕获抛出的错误,然后根据不同的认证方式进行信息的返回提示。
注意:绿色的过滤器可以配置是否生效,其他的都不能控制。
二、整合SpringSecurity
1、在pom文件中导入依赖
<dependencies>
    ...
        <dependency>
            <groupId>org.springframework.boot</groupId>
            <artifactId>spring-boot-starter-security</artifactId>
        </dependency>
    ...
</dependencies>
2、新建配置类
package com.opengauss.exam.security;

import org.springframework.context.annotation.Configuration;
import org.springframework.security.config.annotation.authentication.builders.AuthenticationManagerBuilder;
import org.springframework.security.config.annotation.web.builders.HttpSecurity;
import org.springframework.security.config.annotation.web.configuration.EnableWebSecurity;
import org.springframework.security.config.annotation.web.configuration.WebSecurityConfigurerAdapter;
import org.springframework.security.crypto.bcrypt.BCryptPasswordEncoder;

@Configuration
@EnableWebSecurity
public class WebSecurityConfig  extends WebSecurityConfigurerAdapter {
  // 授权
    @Override
    protected void configure(HttpSecurity http) throws Exception {
        http.authorizeRequests().antMatchers("/test").permitAll()
            .anyRequest().authenticated().and()
            .formLogin();
    }
  // 认证
    @Override
    protected void configure(AuthenticationManagerBuilder auth) throws Exception {
        auth.inMemoryAuthentication().passwordEncoder(new BCryptPasswordEncoder())
                .withUser("gwf").password(new BCryptPasswordEncoder().encode("123456")).roles("vip1");
    }
}
该配置类的意思是:直接访问 /test 可以访问,但是若访问 /hello 则需要先登录。
WebSecurityConfig类使用了@EnableWebSecurity注解 ,以启用SpringSecurity的Web安全支持,并提供Spring MVC集成。它还扩展了WebSecurityConfigurerAdapter,并覆盖了一些方法来设置Web安全配置的一些细节。
configure(HttpSecurity)方法定义了哪些URL路径应该被保护,哪些不应该。具体来说,“/test”路径被配置为不需要任何身份验证,所有其他路径必须经过身份验证。
当用户成功登录时,它们将被重定向到先前请求的需要身份认证的页面。有一个由 loginPage()指定的自定义“/登录”页面,每个人都可以查看它。
对于configure(AuthenticationManagerBuilder) 方法,它将单个用户设置在内存中。该用户的用户名为“gwf”,密码为“123456”,角色为“vip1”。
3、下面我们看下其他详细拦截规则:
// 案例1
http.authorizeRequests()
    //请求路径“/test”容许访问
    .antMatchers("/test").permitAll()
  //其它请求都需要校验才能访问
  .anyRequest().authenticated()
  .and()
  // 定义登录的页面为“/login”,容许访问
  .formLogin().loginPage("/login").permitAll()
  .and()
  //默认的“/logout”,容许访问
  .logout().permitAll();

// 案例2
@Override
protected void configure(HttpSecurity http) throws Exception {
  http.authorizeRequests()
    .antMatchers("/").permitAll()
    //必须有“USER”角色的才能访问
    .antMatchers("/user/**").hasAuthority("USER")
    .and()
    //登陆成功以后默认访问路径/user
    .formLogin().loginPage("/login").defaultSuccessUrl("/user")
    .and()
    //注销以后默认访问路径/login
    .logout().logoutUrl("/logout").logoutSuccessUrl("/login");

  http.addFilterAt(customFromLoginFilter(), UsernamePasswordAuthenticationFilter.class);
}

// 案例3
@Override
public void configure(WebSecurity web) throws Exception {
  // 设置下面为忽略地址
  web.ignoring().antMatchers("/js/**","/css/**","/img/**","/webjars/**");
}
4、自定义页面
前面我们的登录页面都是使用的SpringSecurity默认的,我们可以在配置类中修改成我们自定义的登录页面
(1)自定义登录页面:resources/templates/login.html
SpringSecurity的name属性默认是username和password,这里我们采用自定义的方式,改成:user 与 pwd,/login是SpringSecurity默认的处理登录的Controller
<!DOCTYPE html>
<html lang="en">
<head>
    <meta charset="UTF-8">
    <title>login</title>
</head>
<body>
<form action="/login" method="post">
    用户名:<input type="text" name="user"><br>
    密码:<input type="password" name="pwd"><br>
    <input type="radio" name="remember">记住我
    <button type="submit">提交</button>
</form>
</body>
</html>
(2)修改SecurityConfig配置类
在configure(HttpSecurity http)方法中添加如下内容,(注意这里我们要禁止csrf,否则登录会被拦截):
// 开启登录页面,即没有权限的话跳转到登录页面,对应地址:/login
http.formLogin()
        // 登录页面
        .loginPage("/toLogin")
        // 用户名的name
        .usernameParameter("user")
        // 密码的name
        .passwordParameter("pwd")
        // 处理登录的Controller
        .loginProcessingUrl("/login");
http.csrf().disable();
// 开启记住我功能,默认保存两周
http.rememberMe()
        // name属性
        .rememberMeParameter("remember");
(3)编写Controller
@GetMapping("/toLogin")
public String toLogin(){
    return "login";
}
此时,我们就可以使用自定义登录页面了。
三、参数详解
1、注解 @EnableWebSecurity
在 SpringBoot 应用中使用 Spring Security,用到了 @EnableWebSecurity 注解,官方说明为,该注解和 @Configuration 注解一起使用,注解 WebSecurityConfigurer 类型的类,或者利用@EnableWebSecurity 注解继承 WebSecurityConfigurerAdapter的类,这样就构成了 Spring Security 的配置。
2、抽象类 WebSecurityConfigurerAdapter
一般情况,会选择继承 WebSecurityConfigurerAdapter 类,其官方说明为:WebSecurityConfigurerAdapter 提供了一种便利的方式去创建 WebSecurityConfigurer的实例,只需要重写 WebSecurityConfigurerAdapter 的方法,即可配置拦截什么URL、设置什么权限等安全控制。
3、方法 configure(AuthenticationManagerBuilder auth) 和 configure(HttpSecurity http)
Demo 中重写了 WebSecurityConfigurerAdapter 的两个方法:
/**
* 通过 {@link #authenticationManager()} 方法的默认实现尝试获取一个 {@link AuthenticationManager}.
* 如果被复写, 应该使用{@link AuthenticationManagerBuilder} 来指定 {@link AuthenticationManager}.
*
* 例如, 可以使用以下配置在内存中进行注册公开内存的身份验证{@link UserDetailsService}:
*
* // 在内存中添加 user 和 admin 用户
* @Override
* protected void configure(AuthenticationManagerBuilder auth) {
* auth
* .inMemoryAuthentication().withUser("user").password("password").roles("USER").and()
* .withUser("admin").password("password").roles("USER", "ADMIN");
* }
*
* // 将 UserDetailsService 显示为 Bean
* @Bean
* @Override
* public UserDetailsService userDetailsServiceBean() throws Exception {
* return super.userDetailsServiceBean();
* }
*
*/
protected void configure(AuthenticationManagerBuilder auth) throws Exception {
this.disableLocalConfigureAuthenticationBldr = true;
}
/**
* 复写这个方法来配置 {@link HttpSecurity}.
* 通常,子类不能通过调用 super 来调用此方法,因为它可能会覆盖其配置。 默认配置为:
*
* http.authorizeRequests().anyRequest().authenticated().and().formLogin().and().httpBasic();
*
*/
protected void configure(HttpSecurity http) throws Exception {
logger.debug("Using default configure(HttpSecurity). If subclassed this will potentially override subclass configure(HttpSecurity).");
http
.authorizeRequests()
.anyRequest().authenticated()
.and()
.formLogin().and()
.httpBasic();
}
4、final 类 HttpSecurity
HttpSecurity 常用方法及说明:
openidLogin()    // 用于基于 OpenId 的验证
headers()    // 将安全标头添加到响应
cors()    // 配置跨域资源共享( CORS )
sessionManagement()    // 允许配置会话管理
portMapper()    // 允许配置一个PortMapper(HttpSecurity#(getSharedObject(class))),
  其他提供SecurityConfigurer的对象使用 PortMapper 从 HTTP 重定向到 HTTPS 或者从 HTTPS 重定向到 HTTP。默认情况下,
  Spring Security使用一个PortMapperImpl映射 HTTP 端口8080到 HTTPS 端口8443,HTTP 端口80到 HTTPS 端口443
jee()    // 配置基于容器的预认证。 在这种情况下,认证由Servlet容器管理
x509()   //  配置基于x509的认证
rememberMe    // 允许配置“记住我”的验证
authorizeRequests()    // 允许基于使用HttpServletRequest限制访问
requestCache()    // 允许配置请求缓存
exceptionHandling()    // 允许配置错误处理
securityContext()    // 在HttpServletRequests之间的SecurityContextHolder上设置SecurityContext的管理。
  当使用WebSecurityConfigurerAdapter时,这将自动应用
servletApi()    // 将HttpServletRequest方法与在其上找到的值集成到SecurityContext中。
  当使用WebSecurityConfigurerAdapter时,这将自动应用
csrf()   //  添加 CSRF 支持,使用WebSecurityConfigurerAdapter时,默认启用
logout()   //  添加退出登录支持。当使用WebSecurityConfigurerAdapter时,这将自动应用。
  默认情况是,访问URL”/ logout”,使HTTP Session无效来清除用户,清除已配置的任何#rememberMe()身份验证,
  清除SecurityContextHolder,然后重定向到”/login?success”
anonymous()    // 允许配置匿名用户的表示方法。 当与WebSecurityConfigurerAdapter结合使用时,这将自动应用。
  默认情况下,匿名用户将使用org.springframework.security.authentication.AnonymousAuthenticationToken表示,
  并包含角色 “ROLE_ANONYMOUS”
formLogin()    // 指定支持基于表单的身份验证。如果未指定FormLoginConfigurer#loginPage(String),则将生成默认登录页面
oauth2Login()    // 根据外部OAuth 2.0或OpenID Connect 1.0提供程序配置身份验证
requiresChannel()   //  配置通道安全。为了使该配置有用,必须提供至少一个到所需信道的映射
httpBasic()    // 配置 Http Basic 验证
addFilterAt()   //  在指定的Filter类的位置添加过滤器
5、类 AuthenticationManagerBuilder
/**
* {@link SecurityBuilder} used to create an {@link AuthenticationManager}. Allows for
* easily building in memory authentication, LDAP authentication, JDBC based
* authentication, adding {@link UserDetailsService}, and adding
* {@link AuthenticationProvider}'s.
*/
意思是,AuthenticationManagerBuilder 用于创建一个 AuthenticationManager,让我能够轻松的实现内存验证、LADP验证、基于JDBC的验证、添加UserDetailsService、添加AuthenticationProvider。
四、校验流程图
五、源码解析
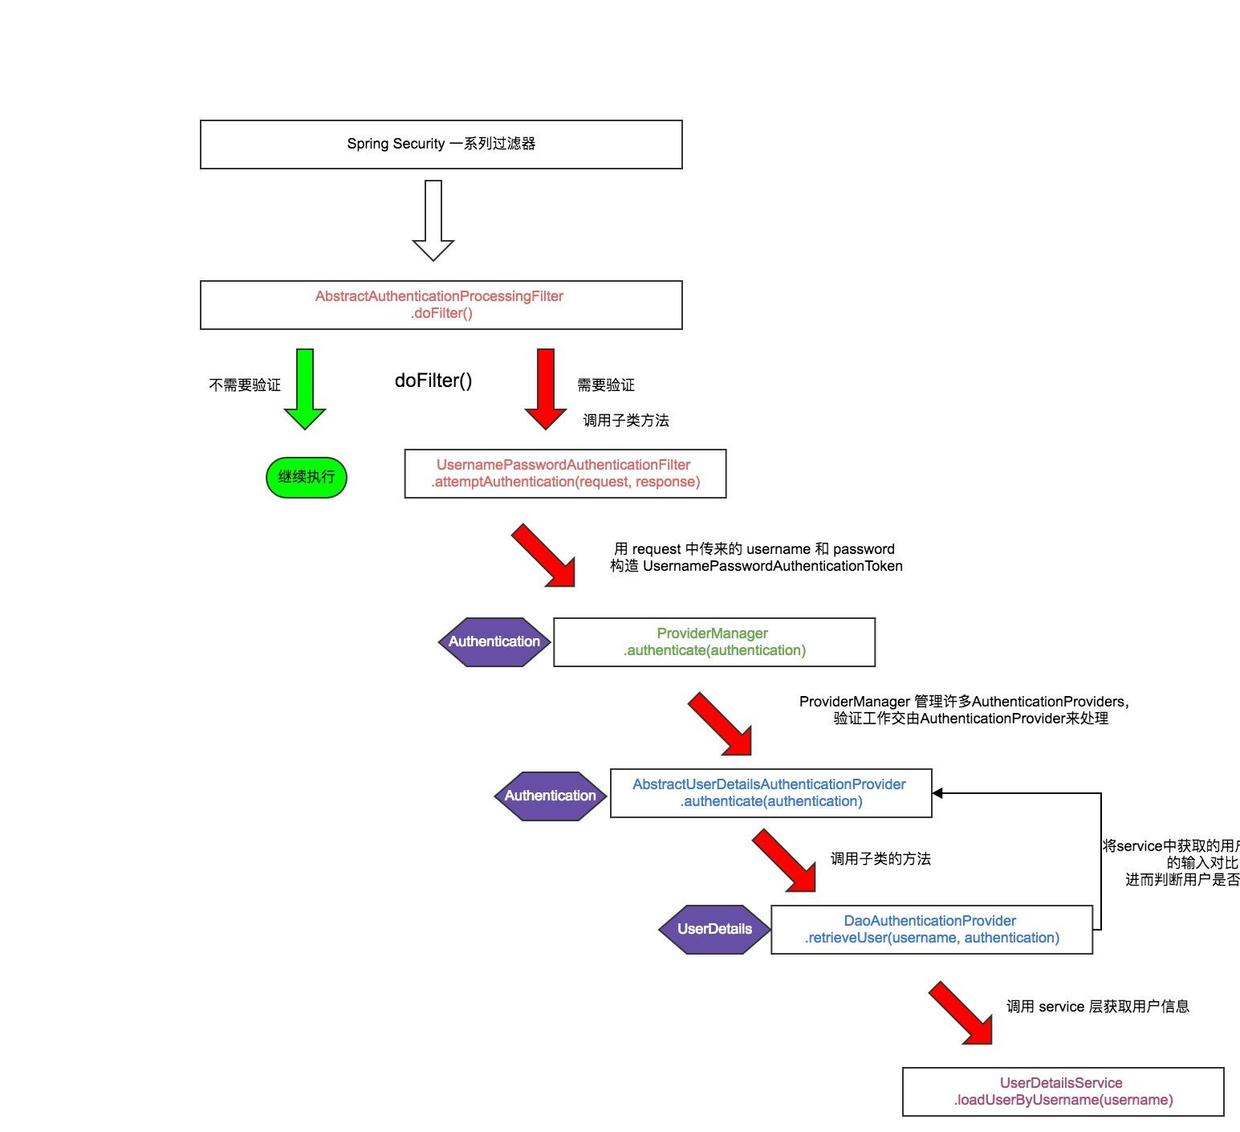
上面的流程图就是spring security的整体验证流程!
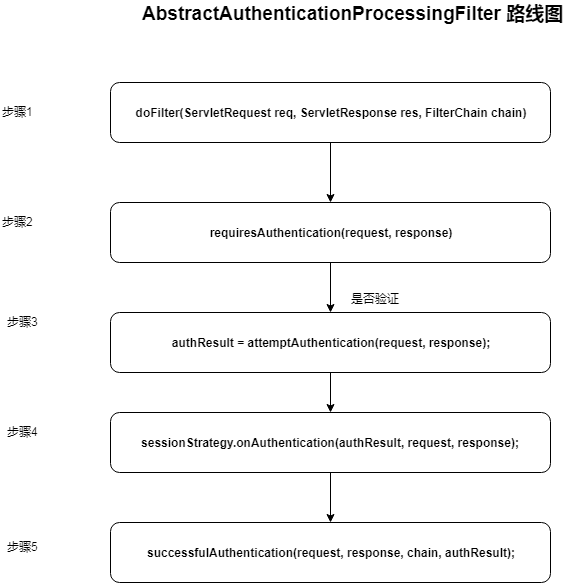
1、首先所有的请求都会走AbstractAuthenticationProcessingFilter.doFilter(req, res, chain)方法
2、判断请求是否需要验证
3、authResult = attemptAuthentication(request, response) 进行用户验证(request中会带有用户的信息),该方法也是验证过程中最重要的方法
(1)返回一个 Authentication 对象,说明验证成功
(2)验证时发生 AuthenticationException。
(3)返回Null,表示身份验证不完整。假设子类做了一些必要的工作(如重定向)来继续处理验证,方法将立即返回。假设后一个请求将被这种方法接收,其中返回的Authentication对象不为空。
接下来我们来看一下AbstractAuthenticationProcessingFilter到底是怎么搞得?
首先AbstractAuthenticationProcessingFilter抽象类,咱们看一下继承它的子类
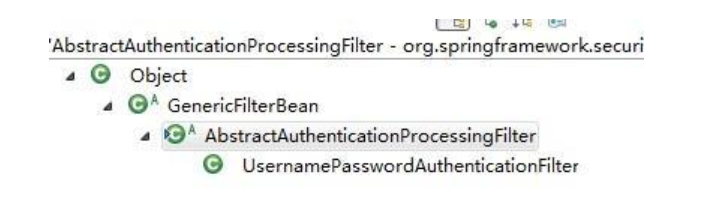
从上图我们可以看出UsernamePasswordAuthenticationFilter类是它的子类,那么我们看一下UsernamePasswordAuthenticationFilter类attemptAuthentication(request, response)方法是怎么搞得
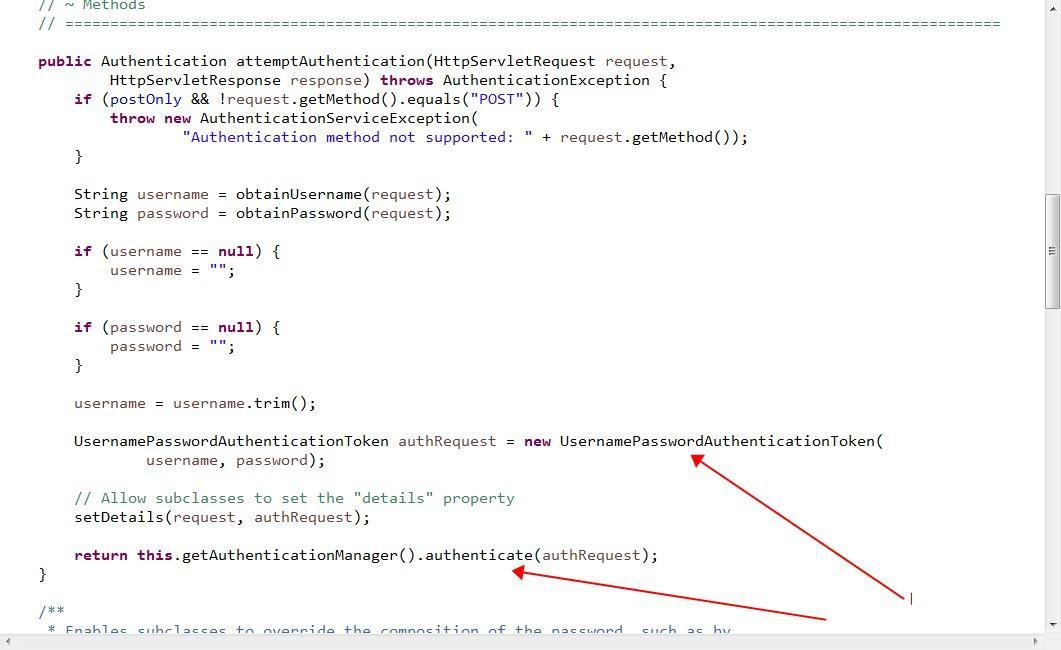
从代码可以看出:首先用用户名和密码生成个token,然后去验证token;
那么问题来了,是谁去验证的token?别急我们继续跟代码。通过跟代码我们可以得出,原来AbstractAuthenticationProcessingFilter类中有一个private AuthenticationManager authenticationManager成员变量,也就是通过它去验证token;
下面我们看一下AuthenticationManager 类:
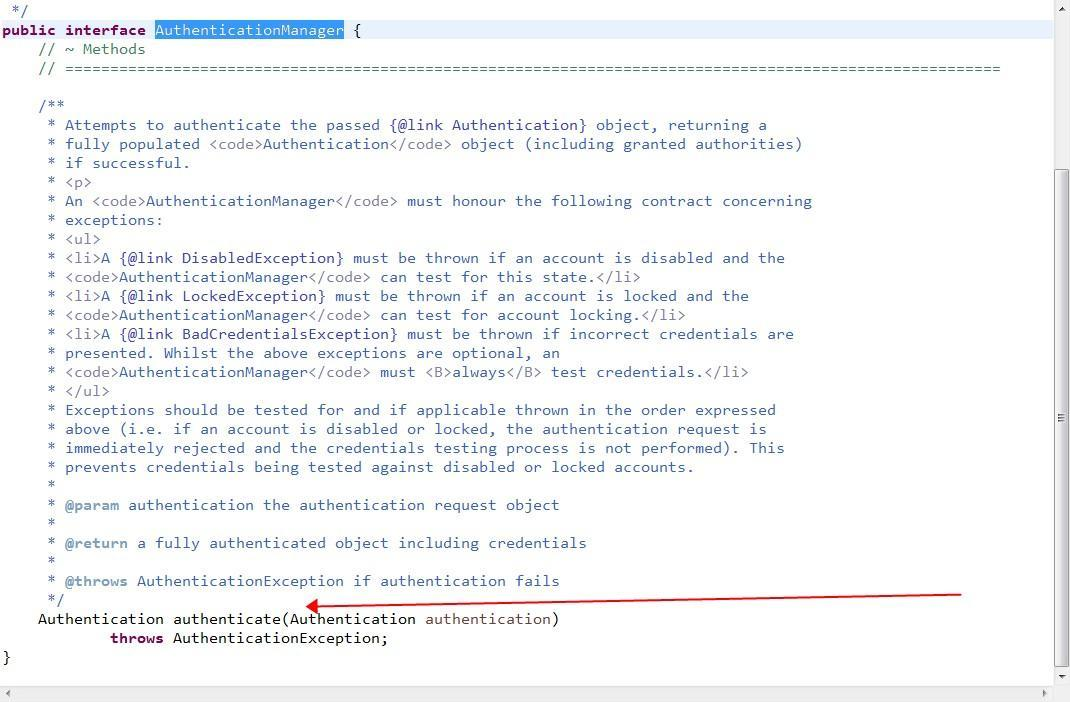
通过查看原来AuthenticationManager是一个验证管理器接口,既然是接口那一定有实现它的实现类!我们继续跟!!!
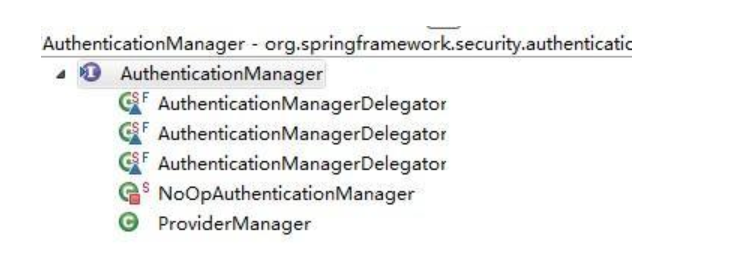
通过查看代码,就ProviderManager类像正常点的,那我们继续看看ProviderManager是到底在搞什么
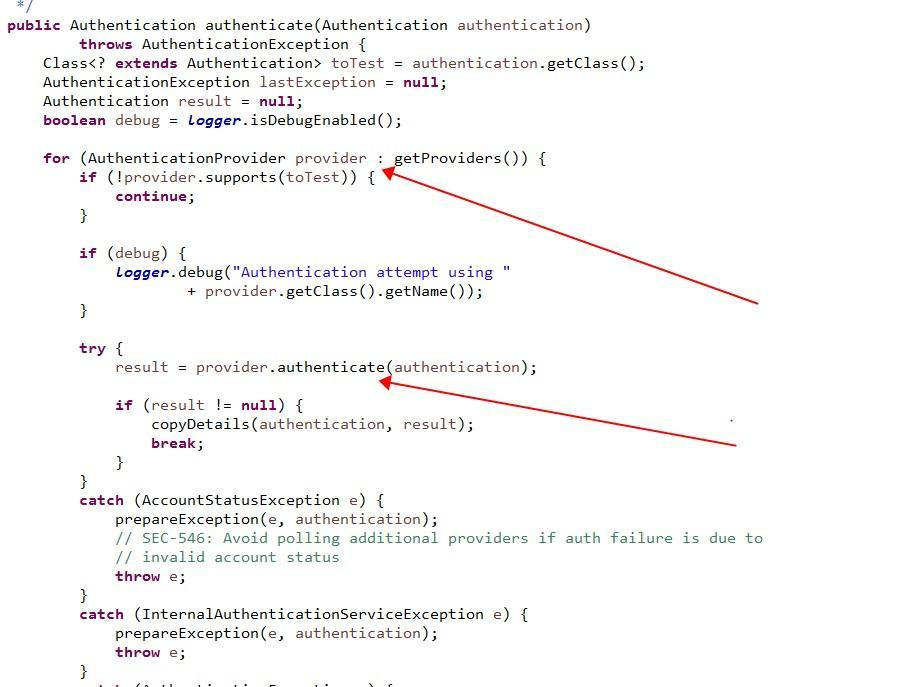
以上就是ProviderManager的authenticate(Authentication authentication),它是实现AuthenticationManager接口的,主要看一下红线指向两处:
(1)有个这个东西【getProviders()】,然后遍历它,
(2)AuthenticationProvider对象去进行验证token!!【result = provider.authenticate(authentication)】;
通过查看代码原来ProviderManager类里面有这个属性private List providers = Collections.emptyList(); 也就是getProviders();
既然干活的是AuthenticationProvider对象,那就再看看它是怎么搞得!
AuthenticationProvider接口:
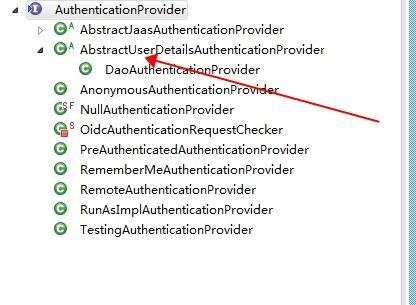
AbstractUserDetailsAuthenticationProvider通过名字,你有没有什么想法?抽象的用户详情验证提供者!!!那么我们看一下authenticate(Authentication authentication)方法!

retrieveUser方法

查看源码,他是一个抽象的方法;那接下来我们看一下它的实现类!DaoAuthenticationProvider
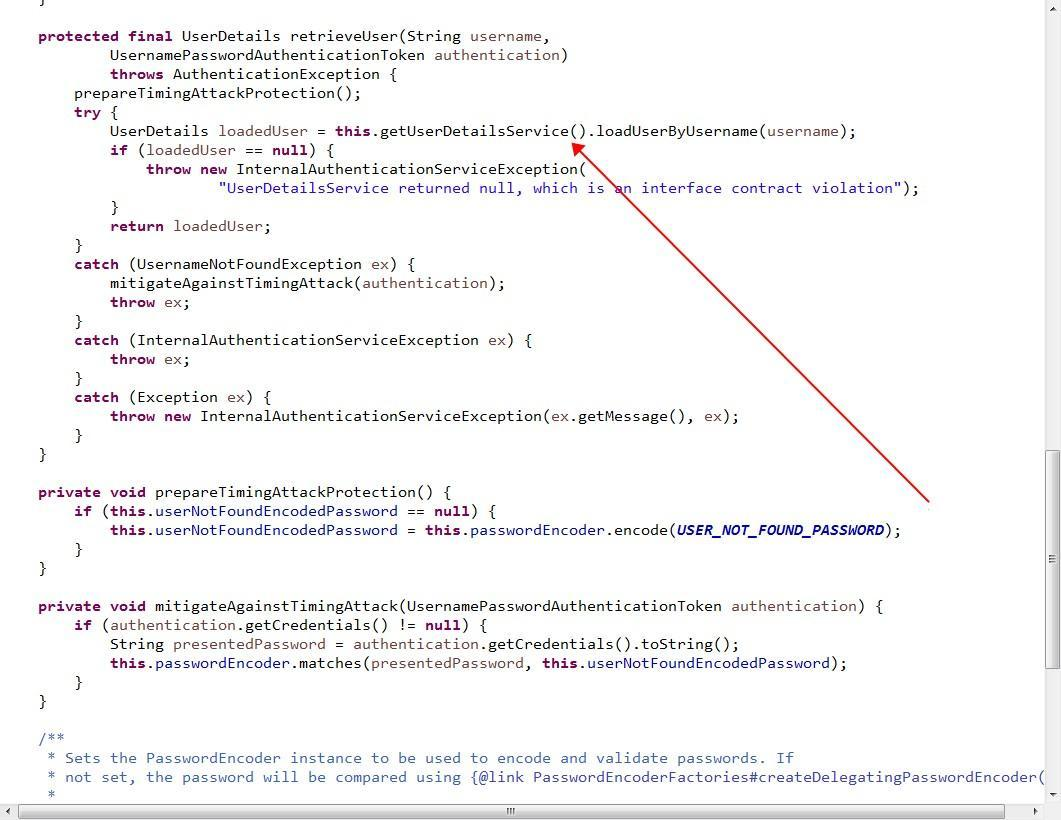
看箭头,有没有什么茅塞顿开!!!this.getUserDetailsService().loadUserByUsername(username);就是我们自己实现的UserDetailsService接口的实现类,我们通过实现loadUserByUsername(username)方法,获取userDetail对象;然后通过additionalAuthenticationChecks方法检验!!!
看到这里,如果之前没有用过spring security 的人一定会一头雾水~没事儿,多看看就好了,再结合网上的Demo自己感觉感觉!!!
总结:其实看着有点云里雾里~但是中心思想,就是把验证用户信息的一整套流程预先已经定义好了,封装在一个方法中(模板模式),然后各种暴露接口,抽象类,让子类去实现具体的业务逻辑!
源码部分文章:https://www.jianshu.com/p/dd42cb2b46dc