了解更多关于bootloader 的C语言实现,请加我QQ: 1273623966 (验证信息请填 bootloader),欢迎咨询或定制bootloader(在线升级程序)。
从15年12月份以来我的空余时间都在折腾15年底买的PIC32MZ EC Starter kit。并陆续写了十多篇随笔记录我折腾的历程。最近新完成的是用C语言实现了PIC32的UART bootloader, 采用串口通信,适用于Microchip的PIC32MZ EC,稍作对应的修改也可适用于PIC32MX, PIC32MZ EF等。Uart bootloader是用XC32编译的,电脑端的通信软件是用超级终端--HyperTerminal (也可以使用SecureCRT). 和之前我写的HyperBootloader_PIC16/PIC18/dsPIC很类似,算是一个家族系列之一。为保证家族特性,我命其名为HyperBootloader_PIC32
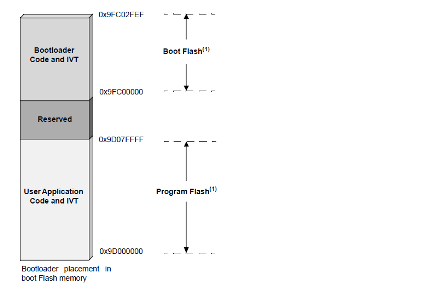
BOOTLOADER PLACEMENT
HyperBootloader_PIC32 序放在引导闪存存储器中,如下图所示。
BOOTLOADER LINKER SCRIPT
由于需要将bootloader放置在特定位置,我们不能使用默认的linker script. 我们需要修改linker script来放置bootloader, 以下是修改后的主要部分。
_RESET_ADDR                    = 0xBFC00000;
_BEV_EXCPT_ADDR                = 0xBFC00380;
_DBG_EXCPT_ADDR                = 0xBFC00480;
_SIMPLE_TLB_REFILL_EXCPT_ADDR  = _ebase_address + 0;
_CACHE_ERR_EXCPT_ADDR          = _ebase_address + 0x100;
_GEN_EXCPT_ADDR                = _ebase_address + 0x180;

/*************************************************************************
 * Memory Regions
 *
 * Memory regions without attributes cannot be used for orphaned sections.
 * Only sections specifically assigned to these regions can be allocated
 * into these regions.
 *
 * The Debug exception vector is located at 0x9FC00480.
 *
 * The config_<address> sections are used to locate the config words at
 * their absolute addresses.
 *************************************************************************/
MEMORY
{
/* Bootloader user code: Only in the Lower Boot Alias */
  kseg0_program_mem     (rx)  : ORIGIN = 0x9FC02000, LENGTH = 0xDF00
/* Lower Boot Alias last(5th) page: Not used */
  kseg0_lba_last_page   (rx)  : ORIGIN = 0x9FC10000, LENGTH = 0x4000
/* Interrupt Vector table */
  kseg0_boot_mem              : ORIGIN = 0x9FC01000, LENGTH = 0x1000
/* Reset and C Startup module */
  kseg1_boot_mem              : ORIGIN = 0xBFC00000, LENGTH = 0x480
/* Cache TLB Initialization Table */
  kseg1_boot_mem_4B0          : ORIGIN = 0xBFC004B0, LENGTH = 0xB50
BOOTLOADER MAIN CODE
修改后的linker script加到bootloader的项目中后,接着是bootloader的coding,以下是bootloader code的主要部分
        if (linereceived)
        {
            for (ix = 0; ix < incrbytes; ix++)
            {
                Uart_Putc(frameBuffer[ix]);
            }
            Uart_Putc('
');
            cksum = bcount = GetXbyte(frameBuffer[LEN_NIBBLE1_INDEX],frameBuffer[LEN_NIBBLE2_INDEX]);
            SourceAddr.v[1] = GetXbyte(frameBuffer[ADDRH_NIBBLE1_INDEX],frameBuffer[ADDRH_NIBBLE2_INDEX]);
            SourceAddr.v[0] = GetXbyte(frameBuffer[ADDRL_NIBBLE1_INDEX],frameBuffer[ADDRL_NIBBLE2_INDEX]);
            rectype = GetXbyte(frameBuffer[TYPE_NIBBLE1_INDEX],frameBuffer[TYPE_NIBBLE2_INDEX]);
            switch(rectype)
            {
            case LINEAR_ADDRESS:
                SourceAddr.v[3] = GetXbyte(frameBuffer[TYPE_NIBBLE2_INDEX+1],frameBuffer[TYPE_NIBBLE2_INDEX+2]);
                SourceAddr.v[2] = GetXbyte(frameBuffer[TYPE_NIBBLE2_INDEX+3],frameBuffer[TYPE_NIBBLE2_INDEX+4]);
                Checksum();
                break;
            case DATA:
                if ((SourceAddr.word.HW == 0x1fc0)) break;
                if (SourceAddr.Val >= (EraseAddr.Val+ PAGE_SIZE))
                {
                    EraseAddr.Val = (SourceAddr.Val/PAGE_SIZE) * PAGE_SIZE;
                    NVMErasePage(EraseAddr.Val);
                }
                linereceived = 0;
                for (ix=0; ix < 2*bcount;)
                {
                    pData.byte.LB = GetXbyte(frameBuffer[TYPE_NIBBLE2_INDEX+1+ix+0],frameBuffer[TYPE_NIBBLE2_INDEX+1+ix+1]);
                    pData.byte.HB = GetXbyte(frameBuffer[TYPE_NIBBLE2_INDEX+1+ix+2],frameBuffer[TYPE_NIBBLE2_INDEX+1+ix+3]);
                    pData.byte.UB = GetXbyte(frameBuffer[TYPE_NIBBLE2_INDEX+1+ix+4],frameBuffer[TYPE_NIBBLE2_INDEX+1+ix+5]);
                    pData.byte.MB = GetXbyte(frameBuffer[TYPE_NIBBLE2_INDEX+1+ix+6],frameBuffer[TYPE_NIBBLE2_INDEX+1+ix+7]);
                    unsigned int error = NVMWriteWord(SourceAddr.Val, pData.Val);
                    if ((error & 0x3000) > 0) Uart_Putc('N');  // for debug
                    error = 0;
                    SourceAddr.Val += 4;
                    ix += 8;
                    if (linereceived) Uart_Putc('X');        // for debug
                }
                Checksum();
                //Buf_Init();
                break;
            case END:
                Checksum();
                U1MODE = 0x0;
                U1STA = 0x0;
                TRISCSET = 0x2000; /* RC13 Input */
                LATCCLR = 0x6000;  /* Clear LATC */
                IPC28CLR = 0x1F00; /* Clear IPC28 */
                IEC3bits.U1RXIE = 0; /* Clear IEC3 */
                (*((void(*)(void))USER_APP_RESET_ADDRESS))();
                break;
            }
            linereceived = 0;
            incrbytes = 0;
        }
Bootloader编译成功后,使用programmer烧录到target, 然后拔掉programmer。并且以后再更新application再也不需要programmer了。
APPLICATION LINKER SCRIPT
Bootloader和appication同时放置在闪存存储器中,要两者都可以正常工作,就必修确保两者不能有overlap。所以application的放置需要避开bootloader,这样需要需改application 的linker script。 以下是修改后的主要部分。
_RESET_ADDR = 0x9D001000;
_SIMPLE_TLB_REFILL_EXCPT_ADDR = _ebase_address + 0;
_CACHE_ERR_EXCPT_ADDR = _ebase_address + 0x100;
_GEN_EXCPT_ADDR = _ebase_address + 0x180;

/*************************************************************************
 * Memory Regions
 *
 * Memory regions without attributes cannot be used for orphaned sections.
 * Only sections specifically assigned to these regions can be allocated
 * into these regions.
 *
 * The Debug exception vector is located at 0x9FC00480.
 * The config_<address> sections are used to locate the config words at
 * their absolute addresses.
 *************************************************************************/
MEMORY
{
    kseg1_boot_mem : ORIGIN = 0x9D001000, LENGTH = 0x480
    kseg0_program_mem (rx) : ORIGIN = 0x9D000000 + 0x1000 + 0x480, LENGTH = 0x200000 - (0x1000 + 0x480) /* All C files will be located here */

    kseg0_boot_mem : ORIGIN = 0x9D000000, LENGTH = 0x0
  kseg0_data_mem (w!x) : ORIGIN = 0x80000000, LENGTH = 0x80000
  sfrs : ORIGIN = 0xBF800000, LENGTH = 0x100000
  kseg2_ebi_data_mem : ORIGIN = 0xC0000000, LENGTH = 0x4000000
  kseg2_sqi_data_mem : ORIGIN = 0xD0000000, LENGTH = 0x4000000
  kseg3_ebi_data_mem : ORIGIN = 0xE0000000, LENGTH = 0x4000000
  kseg3_sqi_data_mem : ORIGIN = 0xF0000000, LENGTH = 0x4000000
}
HOW TO USE HYPERBOOTLOADER_PIC32
1. 使用XC32编译HyperBootloader_PIC32(编译前,需先修改linker script)。
2. 使用pickit3烧录HyperBootloader_PIC32的Hex文件到目标板中。
3. 拔除pickit3烧录器,连接目标板与PC的串口,打开超级终端,设置如下:115200-8-None-1-None, Line Delay-20ms。
4. 重启目标板,超级终端会出现Booting... 字样。
5. 6秒内,打开Send Text File对话框,选择期望烧录的application的hex文件(编译前,需先修改linker script),点击确认, HyperBootloader会将接收到的数据传回到电脑超级终端上,并将数据烧录到目标板程序存储器的正确位置。
6. 烧录完毕,自动跳转去执行application。
之后每次更新application,只需重复步骤 4 ~ 6 就可以了。
NOTE
HyperBootloader不支持configuration bits的烧写,需要application的configuration bits 和HyperBootloader_PIC32的configuration bits保持一致。