上次对EntityFramework.DynamicFilters整体的项目结构有了一个认识,这次我们就通过阅读说明文档,示例项目,和单元测试,来动手构建一个我们的体验项目,通过对动态过滤器的使用,使得我们对过滤功能,在心理上有一个感性的认识,然后再一块深入学习代码内部的机理。
首先,我们来看一下项目说明文档,项目的文档结构说明如下

这是开源项目基础内容
- CHANGELOG: 一个修改日志,为什么会有修改日志,是对历史发布版本内容的记录,也方便其他使用者,看到修改日志,知道修改了哪些功能,对自己当前的版本有什么影响,要不要升级,等问题.下面是修改日志的内容:

2.LICENSE:这个是做什么用的,打开看的时候,里面是什么法律责任,侵权等问题,去网上查了一下, 在开源项目创建时,还是得仔细考虑一下该用哪种License。要是以后你的项目火了,你就不会因为当初License没选对,而哑巴吃黄连——有苦说不出了。
特别说一下,很多新手(就像我)可能根本没有为自己的项目选择License。没有为项目选择License,意味着他人不能对你的项目进行散发、改动。但他人可以以个人的名义使或以商业用途使用你的软件。另外,如果你将没有License的项目传到了Github上,你就默认接受了Github的服务条款协议——别的用户可以查看或者fork你的项目。
这个网站介绍了各种license的区别:https://choosealicense.com/licenses/
3.Readme.md:第一次打开这个文档是下面这个样子的

去网上找了一下,那么md后缀的文件到底是个什么鬼呢,看这里:
http://www.kuqin.com/shuoit/20141125/343459.html
怎么打开呢,我在vs2015扩展里面,安装了一个插件:

再打开文档的时候,就是这个样子:
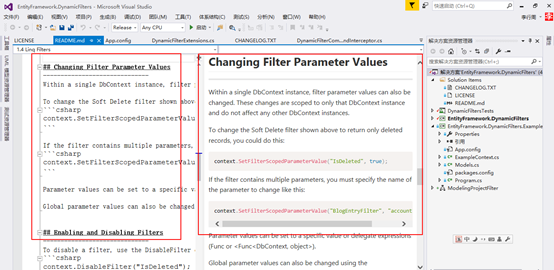
左边可以编辑,右边马上就显示了编辑的效果,确实不错
README 应该是介绍code source 的一个概览.其实这个静态文件是有约定成俗的规范.
1.项目介绍
2.代码实现了什么功能?
3.该如何使用? (系统环境参数,部署要素)
4.代码组织架构是什么样的?
5.版本更新重要摘要
如果你的README包括上面的内容,那么当使用者拿到代码,打开README后,基本就知道该如何下手了
下面是创建的体验项目:
第一步:新建控制台应用程序

第二步:通过nuget包管理器,引用:
1.EntityFramework 6.1.2
2.EntityFramework.DynamicFilters.2.6.0
第三步:添加dbContext,model
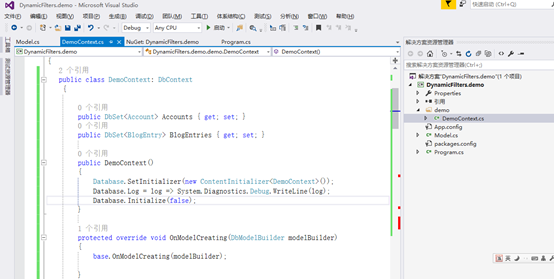
添加DemoContext:
 public class DemoContext: DbContext
    {
        public static Guid CurrentAccountID { get; set; }
        public DbSet<Account> Accounts { get; set; }
        public DbSet<BlogEntry> BlogEntries { get; set; }

        public DemoContext()
        {
            Database.SetInitializer(new ContentInitializer<DemoContext>());
            Database.Log = log => System.Diagnostics.Debug.WriteLine(log);
            Database.Initialize(false);
        }

        protected override void OnModelCreating(DbModelBuilder modelBuilder)
        {
            base.OnModelCreating(modelBuilder);
        }
    }

    public class ContentInitializer<T> : DropCreateDatabaseAlways<T>
       where T : DemoContext
    {
        protected override void Seed(T context)
        {
            System.Diagnostics.Debug.Print("Seeding db");

            //  Seeds 2 accounts with 9 blog entries, 4 of which are deleted

            var homer = new Account
            {
                UserName = "homer",
                BlogEntries = new List<BlogEntry>
                {
                    new BlogEntry { Body="Homer's first blog entry", IsDeleted=false, IsActive=true, StringValue="1"},
                    new BlogEntry { Body="Homer's second blog entry", IsDeleted=false, IsActive=true, StringValue="2"},
                    new BlogEntry { Body="Homer's third blog entry (deleted)", IsDeleted=true, IsActive=true, StringValue="3"},
                    new BlogEntry { Body="Homer's fourth blog entry (deleted)", IsDeleted=true, IsActive=true, StringValue="4"},
                    new BlogEntry { Body="Homer's 5th blog entry (inactive)", IsDeleted=false, IsActive=false, StringValue="5"},
                    new BlogEntry { Body="Homer's 6th blog entry (deleted and inactive)", IsDeleted=true, IsActive=false, StringValue="6"},
                }
            };
            context.Accounts.Add(homer);

            var bart = new Account
            {
                UserName = "bart",
                BlogEntries = new List<BlogEntry>
                {
                    new BlogEntry { Body="Bart's first blog entry", IsDeleted=false, IsActive=true, StringValue="7"},
                    new BlogEntry { Body="Bart's second blog entry", IsDeleted=false, IsActive=true, StringValue="8"},
                    new BlogEntry { Body="Bart's third blog entry", IsDeleted=false, IsActive=true, StringValue="9"},
                    new BlogEntry { Body="Bart's fourth blog entry (deleted)", IsDeleted=true, IsActive=true, StringValue="10"},
                    new BlogEntry { Body="Bart's fifth blog entry (deleted)", IsDeleted=true, IsActive=true, StringValue="11"},
                    new BlogEntry { Body="Bart's 6th blog entry (inactive)", IsDeleted=false, IsActive=false, StringValue="12"},
                    new BlogEntry { Body="Bart's 7th blog entry (deleted and inactive)", IsDeleted=true, IsActive=false, StringValue="13"},
                }
            };
            context.Accounts.Add(bart);

            context.SaveChanges();
        }
    }
添加两个实体:
 public class BlogEntry : ISoftDelete
    {
        [Key]
        [Required]
        [DatabaseGenerated(DatabaseGeneratedOption.Identity)]
        public Guid ID { get; set; }

        public Account Account { get; set; }
        public Guid AccountID { get; set; }

        public string Body { get; set; }

        public bool IsDeleted { get; set; }

        public int? IntValue { get; set; }

        public string StringValue { get; set; }
        public DateTime? DateValue { get; set; }

        public bool IsActive { get; set; }
    }

    public interface ISoftDelete
    {
        bool IsDeleted { get; set; }
    }

    public class Account
    {
        [Key]
        [Required]
        [DatabaseGenerated(DatabaseGeneratedOption.Identity)]
        public Guid ID { get; set; }

        public string UserName { get; set; }

        public ICollection<BlogEntry> BlogEntries { get; set; }

        /// <summary>
        /// Column used to verify handling of Entity properties mapped to different conceptual property names.
        /// </summary>
        [Column("RemappedDBProp")]
        public bool RemappedEntityProp { get; set; }
    }

第四步:重写dbcontext里面 protected override void OnModelCreating(DbModelBuilder modelBuilder) 构建动态过渡器
protected override void OnModelCreating(DbModelBuilder modelBuilder)
        {
            base.OnModelCreating(modelBuilder);
            modelBuilder.Filter("BlogEntryFilter", (BlogEntry b, Guid accountID, bool isDeleted) => (b.AccountID == accountID) && (b.IsDeleted == isDeleted),
                                                () => CurrentAccountID, () => false);
        }
构造了一个过滤器,自动添加条件,查询数据没有被软件删除,且只属于当前登录用户的数据。
调用
var demoContext = new demo.DemoContext();
            var allBlogEntries = demoContext.BlogEntries.ToList();
            foreach (BlogEntry blogEntry in allBlogEntries)
            {
                Console.WriteLine(blogEntry.Body);
            }
通过阅读:开源项目里面的reademe.md文档,简单的把这个动态过滤器,用到ef实体的自动查询上。
公司用的rafy,当时只是知道怎么用rafy的过滤条件,现在想想应该也跟这种方式差不多,像rafy的幽灵插件,只是rafy想根据条件,配置动态查询条件是否方便,之前都只是单独添加插件,确实没有考虑动态的问题,现在ef的这个动态过滤从全局控制确实挺方便的。