https://www.cnblogs.com/heenhui2016/p/10637746.html :jupyter notebook 与lab区别
https://www.zhihu.com/question/46309360 作用
https://jupyter.readthedocs.io/en/latest/install.html 安装参考
https://www.cnblogs.com/Neo007/p/7501625.html 安装配置
https://cloud.tencent.com/developer/article/1011087 docker︱在nvidia-docker中使用tensorflow-gpu/jupyter
如何构建包含TensorFlow/Python3/Jupyter的Docker? https://zhuanlan.zhihu.com/p/66278558
使用Docker来部署一个Tensorflow + Jupyter环境》 https://www.jianshu.com/p/fce000cf4c0f
jupyter 安装
在python安装的基础上
Jupyter lab 是Jupyter notebook 的升级版,是ipython notebook的升级版
Jupyter lab 的安装很简单,假定已经安装了anaconda了。那么已经有了Jupyter notebook了。此时执行
pip install jupyterlab
或者
conda install -c conda-forge jupyterlab
启动:
jupyter lab
jupyter lab -h 查看配置
jupyter lab --port='8080' --ip='*' --notebook-dir='d:/'
指运行在8080端口,可以从任意ip访问(可以远程机器直接连过来),工作路径为d盘根目录
设置密码:
如果没有config文件(默认在 c:/User/< your user name>/.jupyter/jupyter_notebook_config.py ),执行下面这个:
jupyter notebook --generate-config
jupyter notebook password
输入你的密码,生成对应的hash值,放到config文件的同目录下了(自动)
应该已经可以了。试试在浏览器里面输入localhost:8080 ,如果还是不行,就手动把生成的 jupyter_notebook_config.json 里面的password后面的, 复制到 jupyter_notebook_config.py 中
找到下面这行并修改:
c.NotebookApp.password = u'...刚才复制的那个密文'
配置多个kernel
多个python环境
假设之前的jupyter安装在python2.x环境中
输入 pip3 install ipykernel
然后输入 python3 -m ipykernel install --user
如果之前jupyter安装在python3.x环境中
输入 pip2 install ipykernel
然后输入 python2 -m ipykernel install --user
如果现在想将virtualenv或者conda安装的虚拟环境添加至jupyter中
使用 activate 命令激活虚拟环境
输入 pip install ipykernel
然后输入 python -m ipykernel install --name XXX
注意:如果出现 error13 permiss denied:/usr/local/share/jupyter
说明你没有权限在home以外的文件夹写东西
转而执行:python -m ipykernel install --user --name your_env_name
conda 安装jupyter
conda install jupyterlab
升级jupyter内核和客户端:conda update jupyter_core jupyter_client
启动jupyter lab:jupyter lab
启动jupyter notebook:jupyter notebook
使用
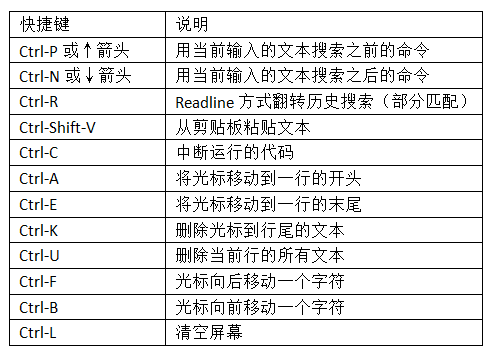
快捷方式