请求扩展
1.befor_request
请求之前
- 是在真正的相应函数之前执行
- 可以有多个,执行顺序是自上而下
- 有返回值的before_request,之后的都不会执行(包括真正的相应函数)
#基于它做用户登录认证
@app.before_request
def process_request(*args,**kwargs):
    if request.path == '/login':
        return None
    user = session.get('user_info')
    if user:
        return None
    return redirect('/login')
2.after_request
响应之后
- 在真正的响应函数之后执行的
- 必须接受一个
request参数,且return出去 - 可以有多个,执行顺序为:在后面的先执行
before_request有无返回值不会影响after_request的执行
@app.after_request
def process_response1(response):
    print('process_response1 走了')
    return response
3.app.before_first_request
项目启动第一次接受请求,就会执行,以后不会再执行
4.teardown_request
- 不管有无错误,都会执行
- 如果没错误,值为none. 有错误的话,直接传给被装饰的函数
定义一个函数
@app.teardown_request
def haserror(e):
	print(e)
5.errorhandler(错误码)
- 捕获指定的错误状态信息,
- 没有该错误码出现的错误信息,函数不会执行
- return会直接返回给浏览器界面(html页面也可以)
@app.errorhandler(404)
def error_handler(*args,**kwargs):
	print(*args,**kwargs)
	return "404错误"

@app.errorhandler(500)
def error_handler(e):
	print(e
	return "500错误"
6.template_global()
标签
@app.template_global()
def sb(a1, a2):
    return a1 + a2
#{{sb(1,2)}}

前端界面直接接收
7.template_filter()
过滤器
@app.template_filter()
def db(a1, a2, a3):
    return a1 + a2 + a3
#{{ 1|db(2,3)}}
中间件
其实就是封装旧酒,装进新瓶,自己再加点料。
Flask的请求扩展就是Django的中间件。Django的中间件不是Flask的中间件
由于知道请求之前会执行一个wsgi_app,所以这里做个请求之前的定制,先了解一下
from flask import Flask

app = Flask(__name__)

@app.route('/')
def index():
    return 'Hello World!'
# 模拟中间件
class Md(object):
    def __init__(self,old_wsgi_app):
        self.old_wsgi_app = old_wsgi_app

    def __call__(self,  environ, start_response):
        print('开始之前')
        ret = self.old_wsgi_app(environ, start_response)
        print('结束之后')
        return ret

if __name__ == '__main__':
    #1我们发现当执行app.run方法的时候,最终执行run_simple,最后执行app(),也就是在执行app.__call__方法
    #2 在__call__里面,执行的是self.wsgi_app().那我们希望在执行他本身的wsgi之前做点事情。
    #3 所以我们先用Md类中__init__,保存之前的wsgi,然后我们用将app.wsgi转化成Md的对象。
    #4 那执行新的的app.wsgi_app,就是执行Md的__call__方法。
    #把原来的wsgi_app替换为自定义的,

    app.wsgi_app = Md(app.wsgi_app)
    app.run()
请求所有的流程
ctx = self.request_context(environ)
        error = None
        try:
            try:
                ctx.push()
                #根据路径去执行视图函数,视图类
                response = self.full_dispatch_request()
            except Exception as e:
                error = e
                response = self.handle_exception(e)
            except:  # noqa: B001
                error = sys.exc_info()[1]
                raise
            return response(environ, start_response)
        finally:
            #不管出不出异常,都会走这里
            if self.should_ignore_error(error):
                error = None
            ctx.auto_pop(error)
蓝图
前置情景:一个项目一般会有多个.py文件组成,这些.py文件分别执行不同的功能,那就可以为这些不同功能的.py文件给划分到不同的目录里去。
所以蓝图用于为应用提供目录划分:
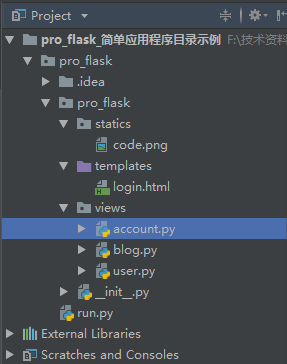
未使用蓝图的目录结构,但是没有Flask提供的蓝图好,蓝图里还提供了一些类似请求扩展的东西等等。

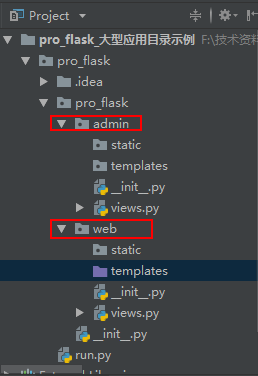
使用蓝图的目录结构
使用蓝图的目标:
1. 构造程序目录

2. 自定义程序目录

  批量处理url

  定制模板路径和静态文件路径

  请求扩展:

    - 可以针对app, 即全部程序都生效

    - 也可以针对单个的蓝图,即只有在执行该蓝图时,请求扩展才会生效

从[Flask的官方文档](http://docs.jinkan.org/docs/flask/blueprints.html)可知,蓝图需要掌握的几个方面知识点如下:

1. 注册蓝图

2. 蓝图资源

3. 静态文件

4. 模板

5. 构造URL
使用蓝图之中小型系统
目录结构
-flask_pro
    -flask_test
        -__init__.py
        -static
        -templates
        -views
            -order.py
            -user.py
     -manage.py
__init__
from flask import  Flask
app=Flask(__name__)
from flask_test.views import user
from flask_test.views import order
app.register_blueprint(user.us)
app.register_blueprint(order.ord)
manage.py
from flask_test import  app
if __name__ == '__main__':
    app.run(port=8008)
user.py
from flask import Blueprint
us=Blueprint('user',__name__)

@us.route('/login')
def login():
    return 'login'
order.py
from flask import Blueprint
ord=Blueprint('order',__name__)

@ord.route('/test')
def test():
    return 'order test'
使用蓝图之大型系统
总结:
- xx = Blueprint('account', name ,url_prefix='/xxx') :蓝图URL前缀,表示url 前缀,在该蓝图下所有url都加前缀
- xxx = Blueprint('account', name,url_prefix='/xxx',template_folder='tpls'):给当前蓝图单独使用templates,向上查找,当前找不 到,会找总templates
- 蓝图的befort_request,对当前蓝图有效
- 大型项目,可以模拟出类似于django中app的概念
偏函数
用partial可以得到一个带了参数的函数对象
定义
实际上,偏函数主要辅助原函数,作用其实和原函数差不多,不同的是,我们要多次调用原函数的时候,有些参数,我们需要多次手动的去提供值。而偏函数便可简化这些操作,减少函数调用,主要是将一个或多个参数预先赋值,以便函数能用更少的参数进行调用。
例子:
def my_sum(*args):
    result = 0
    for i in args:
    result += i
    return result

my_sum(1,2,3,4)
从上面的代码可知,此代码的功能就是实现一个求和功能,实例中是求取1,2,3,4四个数的和,但是当我们需要在这个结果上再加上7,8,9 甚至更多的数字或者求万又有更多的需求,应该怎么办呢,如下:
my_sum(1,2,3,4)+my_sum(7,8,9)
注意到,每次有新需求时,都需要再次调用my_sum函数,这样很费力,参数多了之后更麻烦,而偏函数便可解决这类问题,因此偏函数可总结为:当函数的参数个数太多,需要简化时,使用functools.partial可以创建一个新的函数,这个新函数可以固定住原函数的部分参数,从而在调用时更简单。
使用
导入: from functools import partial
第一个参数:自定义函数或者是python内置函数
第二个参数:可变参数,如果没有指定关键字,按原有函数的参数顺序进行补充,参数将作 用在原函数上,如果指定关键字就对应到所指位置
基础版
def add(a, b):
    return a + b


if __name__ == "__main__":
    # 重新生成一个偏函数对象(其中一个参数已知),并赋予mysum,然后再调用这个新函
    # 数对象,10为预先设定的参数
    mysum = partial(add, 10)
    print mysum(5)

# 结果
15
关键字参数版
def add(a, b=2):
    return a + b


def add2(a=2, b=3):
    return a + b


if __name__ == "__main__":
    mysum = partial(add, 10)
    print mysum()

    # 也可根据关键字预先设定的参数值
    mysum2 = partial(add, b=3)
    print mysum2(1)

    # 如果没有关键字,按原有参数顺序补充
    mysum3 = partial(add2, 1)
    print mysum3()

# 结果
12
4
4
升级版
class User(object):
    def __init__(self, name, age):
        self.name = name
        self.age = age


def get_user_info(user, property_name):
    value = eval('user.' + property_name)
    return value


if __name__ == "__main__":
    user = User('xiaoming', 20)
    func = partial(get_user_info, property_name='age')
    print func(user)

# 结果
20
三、面向对象补充知识
1、__call__
和__init__相对应。__call__是对象()自动运行该方法。
__init__: 类()
__call__:   对象()

class Foo:
    def __call__(self):
        print('1')

obj = Foo()
obj()
obj1 =Foo()()  # 也可以写成这种形式
2、__setattr__/__getattr__
__getattr__:拦截对象的点号运算
当对为定义的属性名称和实例进行点号运算时,就会用属性名作为字符串调用这个方法。如果
继承树可以找到该属性,则不调用此方法
class empty:
    def __getattr__(self,attrname):
        if attrname == 'age':
            return 40
        else:
            return AttributeError,attrname

# `__getattr__`只有在使用点调用属性且属性不存在的时候才会触发
x = empyte()
print(x.age) #40
print(x.name)  #报错

__setattr__:拦截所有属性的赋值语句
3、__getitem__/__setitem__
__xxxitem__:使用 [''] 的方式操作属性时被调用
__setitem__:每当属性被赋值的时候都会调用该方法,因此不能再该方法内赋值 self.name = value 会死循环
__getitem__:当访问不存在的属性时会调用该方法
__delitem__:当删除属性时调用该方法
local对象
在Flask请求上下文中,我们发现Flask中current_app, g这两个对象以及request,session这两个对象,在整个Flask生命周期中,都只是一个对象,那当请求过来的时候,是怎么区分是哪个用户的呢?
源码:
current_app = LocalProxy(_find_app)
request = LocalProxy(partial(_lookup_req_object, 'request'))
session = LocalProxy(partial(_lookup_req_object, 'session'))
g = LocalProxy(partial(_lookup_app_object, 'g'))
这里面主要用到了一个线程里面的Local对象以及偏函数partial
在使用threading.local()之前,先了解一下局部变量和全局变量。
局部变量
import threading
import time

def foo():
    x = 0
    for i in range(100):
        time.sleep(0.0001)
        x += 1

    print(threading.current_thread(), x)


for i in range(5):
    threading.Thread(target=foo).start()

"""
运行结果:
<Thread(Thread-5, started 21732)> 100
<Thread(Thread-1, started 13300)> 100
<Thread(Thread-4, started 1568)> 100
<Thread(Thread-2, started 19864)> 100
<Thread(Thread-3, started 23984)> 100
"""
上面例子使用多线程,每个子线程完成不同的计算任务,x是局部变量。
每个子线程都要压栈,每个栈是独立的空间。每次压栈,局部变量x的作用域地址是不同的(线程独享),计算结果互不干扰。
全局变量
import threading
import time

x = 0

def foo():
    global x
    x = 0
    for i in range(100):
        time.sleep(0.0001)
        x += 1

    print(threading.current_thread(), x)


for i in range(5):
    threading.Thread(target=foo).start()

"""
运行结果:
<Thread(Thread-1, started 19492)> 491
<Thread(Thread-3, started 22692)> 497
<Thread(Thread-5, started 24344)> 498
<Thread(Thread-2, started 24428)> 499
<Thread(Thread-4, started 19000)> 500
"""
上面例子中当主线程中x是全局变量时,就变成了公共资源(也就是同一个对象),每个子线程互相干扰,最终导致错误的计算结果。
Python提供了threading.local 类,将这个类实例化得到一个全局对象,但是不同的线程使用这个对象存储的数据其它线程不可见(本质上就是不同的线程使用这个对象时为其创建一个独立的字典)。
使用threading.local()
import threading
import time

loc = threading.local()

def foo():
    loc.x = 0
    for i in range(100):
        time.sleep(0.0001)
        loc.x += 1

    print(threading.current_thread(), loc.x)


for i in range(5):
    threading.Thread(target=foo).start()

"""
运行结果:
<Thread(Thread-1, started 20008)> 100
<Thread(Thread-2, started 23644)> 100
<Thread(Thread-5, started 10396)> 100
<Thread(Thread-4, started 22280)> 100
<Thread(Thread-3, started 19980)> 100
"""
每个子线程使用全局对象loc,但每个线程定义的属性loc.x是该线程独有的。
举一个错误的例子:,主线程中使用threading.local定义本地变量x,x在主线程中是独有的,子线程中就访问不到主线程的x的属性。
import threading

X='abc'
ctx=threading.local()
ctx.x=123 #主线程中定义x本地属性
print(ctx,type(ctx),ctx.x)

def work():
    print(X)
    print(ctx)
    print(ctx.x) #子线程访问不到
    print('Good job')

threading.Thread(target=work).start()

"""
运行结果:
<_thread._local object at 0x000001B22BBAB780> <class '_thread._local'> 123
abc
<_thread._local object at 0x000001B22BBAB780>
Exception in thread Thread-1:
Traceback (most recent call last):
  File "E:/Python学习笔记/flask/123.py", line 13, in work
    print(ctx.x)  # 子线程访问不到
AttributeError: '_thread._local' object has no attribute 'x'
"""
ctx全局对象对主线程和子线程都是可以使用的,主线程定义了属性x,但子线程在尝试访问属性x时,就相当于访问自己线程内的属性x,而自己线程并没有定义,就会抛出AttributeError异常:'_thread._local' object has no attribute 'x'。
自定义threading.local
函数版
from threading import get_ident, Thread
import time

# 定义一个全局字典
storage = {}

def set(k, v):
    ident = get_ident()
    # print(ident)
    if ident in storage:
        storage[ident][k] = v
    else:
        storage[ident] = {k: v}

def get(k):
    ident = get_ident()
    # print(ident)
    return storage[ident][k]

def task(arg):
    set('val', arg)
    v = get('val')
    # print(v)

for i in range(10):
    t = Thread(target=task, args=(i,))
    t.start()

print(storage)
"""
{
    20552: {'val': 0},
    18496: {'val': 1},
    24476: {'val': 2},
    18700: {'val': 3},
    23740: {'val': 4},
    22160: {'val': 5},
    23896: {'val': 6},
    19204: {'val': 7},
    19028: {'val': 8},
    17972: {'val': 9}
}
"""
面向对象版
from threading import get_ident,Thread
import time

class Local(object):
    # 定义一个类字典
    storage = {}

    def set(self, k, v):
        ident = get_ident()
        if ident in Local.storage:
            Local.storage[ident][k] = v
        else:
            Local.storage[ident] = {k: v}

    def get(self, k):
        ident = get_ident()
        return Local.storage[ident][k]

obj = Local()

def task(arg):
    obj.set('val',arg)
    v = obj.get('val')
    print(v)

for i in range(10):
    t = Thread(target=task,args=(i,))
    t.start()

print(Local.storage)
"""
{
    19296: {'val': 0},
    20436: {'val': 1},
    8240: {'val': 2},
    19668: {'val': 3},
    16932: {'val': 4}
}
"""
通过setattr和getattr实现
from threading import get_ident,Thread
import time

class Local(object):
    storage = {}

    def __setattr__(self, k, v):
        ident = get_ident()
        if ident in Local.storage:
            Local.storage[ident][k] = v
        else:
            Local.storage[ident] = {k: v}

    def __getattr__(self, k):
        ident = get_ident()
        return Local.storage[ident][k]

obj = Local()
def task(arg):
    obj.val = arg
    print(obj.val)

for i in range(10):
    t = Thread(target=task,args=(i,))
    t.start()
每个对象有自己的存储空间(字典)
from threading import get_ident, Thread
import time


class Local(object):

    def __init__(self):
        object.__setattr__(self, 'storage', {})
        # print(1, self.__dict__)
        # self.aaa = {}
        # print(self.__dict__)

    def __setattr__(self, k, v):
        # print(k, v, '>>>')
        ident = get_ident()
        # print(ident)
        if ident in self.storage:
            self.storage[ident][k] = v
        else:
            self.storage[ident] = {k: v}

    def __getattr__(self, k):
        ident = get_ident()
        return self.storage[ident][k]


obj = Local()
# print(2, obj.__dict__)


def task(arg):
    obj.val = arg
    obj.xxx = arg
    print(obj.val)
    # print(obj.__dict__)


for i in range(10):
    t = Thread(target=task, args=(i,))
    t.start()
请求上下文
简介
Flask从客户端收到请求的时候,视图函数如果要处理请求的话,可能就要访问一些对象。那么这些对象可以通过参数的形式传递进来,或者是在函数中访问外部变量。所以这个外部变量要有特定的值才会有意义,也即所谓的上下文。
譬如Flask中的request变量,这是一个请求上下文,也就是当请求被推送之后,request才会有意义,接下来才可以使用request,否则就会报错,因为缺少上下文。
引用一段《Flask Web开发》中的代码:
from flask import request

@app.route('/')
def index():
    user_agent = request.headers.get('User-Agent')
    return '<p>Your browser is %s</p>' % user_agent
就像前面说的,函数index()访问了request这个外部变量,但request必须在请求推送之后才可以使用,这就是一个请求上下文全局变量。
源码解析
首先说请求上下文管理的设计思路:
当开启多线程或者协程去执行这个程序的时候,就需要对每个访问对象包装自己的数据,这样就不会发生数据的冲突,那么要怎么才能规避这个问题呢??

    * 利用threading.local的知识,根据相似的实现原理,设计这个上下文管理机制;

    * 首先写一个Local类,这个类中封装两个属性一个的属性值是一个空的字典,这个空字典的设计是这样的:字典中的键是当先执行的线程或者协程的id值,然后值是一个空的列表;

    *另一个是get_ident方法名,这个方法是获取可以获取到线程或者协程的id;这个的内部是将协程的模块名改成:get_ident了,所以你如果开的是线程就获取线程的id,如果是协程就获取协程的id;

     * 然后就是这个类中的实现方法了,有一个__setattr__方法,这个方法的作用主要是增加给__storage__这个字典中增加值的,__getattr__这个方法时获取这当前这线程或者协程值对应的id去__storage__获取对应的id的那个列表;

    * 还有一个清空当前线程或者协程保存的数据__release_local__,
上下文(application context 和 request context)
上下文一直是计算机中难理解的概念,在知乎的一个问题下面有个很通俗易懂的回答:
每一段程序都有很多外部变量。只有像Add这种简单的函数才是没有外部变量的。一旦你的一段程序有了外部变量,这段程序就不完整,不能独立运行。你为了使他们运行,就要给所有的外部变量一个一个写一些值进去。这些值的集合就叫上下文。
– vzch
比如,在 flask 中,视图函数需要知道它执行情况的请求信息(请求的 url,参数,方法等)以及应用信息(应用中初始化的数据库等),才能够正确运行。
最直观地做法是把这些信息封装成一个对象,作为参数传递给视图函数。但是这样的话,所有的视图函数都需要添加对应的参数,即使该函数内部并没有使用到它。
flask 的做法是把这些信息作为类似全局变量的东西,视图函数需要的时候,可以使用 from flask import request 获取。但是这些对象和全局变量不同的是——它们必须是动态的,因为在多线程或者多协程的情况下,每个线程或者协程获取的都是自己独特的对象,不会互相干扰。
那么如何实现这种效果呢?如果对 python 多线程比较熟悉的话,应该知道多线程中有个非常类似的概念 threading.local,可以实现多线程访问某个变量的时候只看到自己的数据。内部的原理说起来也很简单,这个对象有一个字典,保存了线程 id 对应的数据,读取该对象的时候,它动态地查询当前线程 id 对应的数据。flaskpython 上下文的实现也类似
application context 和 request context
flask 中有两种上下文:application context 和 request context。上下文有关的内容定义在 globals.py 文件,文件的内容也非常短:
def _lookup_req_object(name):
    top = _request_ctx_stack.top
    if top is None:
        raise RuntimeError(_request_ctx_err_msg)
    return getattr(top, name)


def _lookup_app_object(name):
    top = _app_ctx_stack.top
    if top is None:
        raise RuntimeError(_app_ctx_err_msg)
    return getattr(top, name)


def _find_app():
    top = _app_ctx_stack.top
    if top is None:
        raise RuntimeError(_app_ctx_err_msg)
    return top.app


# context locals
_request_ctx_stack = LocalStack()
_app_ctx_stack = LocalStack()
current_app = LocalProxy(_find_app)
request = LocalProxy(partial(_lookup_req_object, 'request'))
session = LocalProxy(partial(_lookup_req_object, 'session'))
g = LocalProxy(partial(_lookup_app_object, 'g'))
flask 提供两种上下文:application context 和 request context 。application context 又演化出来两个变量 current_app 和 g,而 request context 则演化出来 request 和 session。
LocalStack 和 LocalProxy
这里的实现用到了两个东西:LocalStack 和 LocalProxy。它们两个的结果就是我们可以动态地获取两个上下文的内容,在并发程序中每个视图函数都会看到属于自己的上下文,而不会出现混乱。
LocalStack 和 LocalProxy 都是 werkzeug 提供的,定义在 local.py 文件中。在分析这两个类之前,我们先介绍这个文件另外一个基础的类 Local。Local 就是实现了类似 threading.local 的效果——多线程或者多协程情况下全局变量的隔离效果。下面是它的代码:
Local
# since each thread has its own greenlet we can just use those as identifiers
# for the context.  If greenlets are not available we fall back to the
# current thread ident depending on where it is.
try:
    from greenlet import getcurrent as get_ident
except ImportError:
    try:
        from thread import get_ident
    except ImportError:
        from _thread import get_ident

class Local(object):
    __slots__ = ('__storage__', '__ident_func__')

    def __init__(self):
        # 数据保存在 __storage__ 中,后续访问都是对该属性的操作
        object.__setattr__(self, '__storage__', {})
        object.__setattr__(self, '__ident_func__', get_ident)

    def __call__(self, proxy):
        """Create a proxy for a name."""
        return LocalProxy(self, proxy)

    # 清空当前线程/协程保存的所有数据
    def __release_local__(self):
        self.__storage__.pop(self.__ident_func__(), None)

    # 下面三个方法实现了属性的访问、设置和删除。
    # 注意到,内部都调用 `self.__ident_func__` 获取当前线程或者协程的 id,然后再访问对应的内部字典。
    # 如果访问或者删除的属性不存在,会抛出 AttributeError。
    # 这样,外部用户看到的就是它在访问实例的属性,完全不知道字典或者多线程/协程切换的实现
    def __getattr__(self, name):
        try:
            return self.__storage__[self.__ident_func__()][name]
        except KeyError:
            raise AttributeError(name)

    def __setattr__(self, name, value):
        ident = self.__ident_func__()
        storage = self.__storage__
        try:
            storage[ident][name] = value
        except KeyError:
            storage[ident] = {name: value}

    def __delattr__(self, name):
        try:
            del self.__storage__[self.__ident_func__()][name]
        except KeyError:
            raise AttributeError(name)
可以看到,Local 对象内部的数据都是保存在 __storage__ 属性的,这个属性变量是个嵌套的字典:map[ident]map[key]value。最外面字典 key 是线程或者协程的 identity,value 是另外一个字典,这个内部字典就是用户自定义的 key-value 键值对。用户访问实例的属性,就变成了访问内部的字典,外面字典的 key 是自动关联的。__ident_func 是 协程的 get_current 或者线程的 get_ident,从而获取当前代码所在线程或者协程的 id。
除了这些基本操作之外,Local 还实现了 __release_local__ ,用来清空(析构)当前线程或者协程的数据(状态)。__call__ 操作来创建一个 LocalProxy 对象,LocalProxy 会在下面讲到。
理解了 Local,我们继续回来看另外两个类。
LocalStack
LocalStack 是基于 Local 实现的栈结构。如果说 Local 提供了多线程或者多协程隔离的属性访问,那么 LocalStack 就提供了隔离的栈访问。下面是它的实现代码,可以看到它提供了 push、pop 和 top 方法。
__release_local__ 可以用来清空当前线程或者协程的栈数据,__call__ 方法返回当前线程或者协程栈顶元素的代理对象。
class LocalStack(object):
    """This class works similar to a :class:`Local` but keeps a stack
    of objects instead. """

    def __init__(self):
        self._local = Local()

    def __release_local__(self):
        self._local.__release_local__()

    def __call__(self):
        def _lookup():
            rv = self.top
            if rv is None:
                raise RuntimeError('object unbound')
            return rv
        return LocalProxy(_lookup)

    # push、pop 和 top 三个方法实现了栈的操作,
    # 可以看到栈的数据是保存在 self._local.stack 属性中的
    def push(self, obj):
        """Pushes a new item to the stack"""
        rv = getattr(self._local, 'stack', None)
        if rv is None:
            self._local.stack = rv = []
        rv.append(obj)
        return rv

    def pop(self):
        """Removes the topmost item from the stack, will return the
        old value or `None` if the stack was already empty.
        """
        stack = getattr(self._local, 'stack', None)
        if stack is None:
            return None
        elif len(stack) == 1:
            release_local(self._local)
            return stack[-1]
        else:
            return stack.pop()

    @property
    def top(self):
        """The topmost item on the stack.  If the stack is empty,
        `None` is returned.
        """
        try:
            return self._local.stack[-1]
        except (AttributeError, IndexError):
            return None
我们在之前看到了 request context 的定义,它就是一个 LocalStack 的实例:
_request_ctx_stack = LocalStack()
它会当前线程或者协程的请求都保存在栈里,等使用的时候再从里面读取。至于为什么要用到栈结构,而不是直接使用 Local,我们会在后面揭晓答案,你可以先思考一下。
LocalProxy
LocalProxy 是一个 Local 对象的代理,负责把所有对自己的操作转发给内部的 Local 对象。LocalProxy 的构造函数介绍一个 callable 的参数,这个 callable 调用之后需要返回一个 Local 实例,后续所有的属性操作都会转发给 callable 返回的对象。
class LocalProxy(object):
    """Acts as a proxy for a werkzeug local.
    Forwards all operations to a proxied object. """
    __slots__ = ('__local', '__dict__', '__name__')

    def __init__(self, local, name=None):
        object.__setattr__(self, '_LocalProxy__local', local)
        object.__setattr__(self, '__name__', name)

    def _get_current_object(self):
        """Return the current object."""
        if not hasattr(self.__local, '__release_local__'):
            return self.__local()
        try:
            return getattr(self.__local, self.__name__)
        except AttributeError:
            raise RuntimeError('no object bound to %s' % self.__name__)

    @property
    def __dict__(self):
        try:
            return self._get_current_object().__dict__
        except RuntimeError:
            raise AttributeError('__dict__')

    def __getattr__(self, name):
        if name == '__members__':
            return dir(self._get_current_object())
        return getattr(self._get_current_object(), name)

    def __setitem__(self, key, value):
        self._get_current_object()[key] = value
这里实现的关键是把通过参数传递进来的 Local 实例保存在 __local 属性中,并定义了 _get_current_object() 方法获取当前线程或者协程对应的对象。
NOTE:前面双下划线的属性,会保存到 _ClassName__variable 中。所以这里通过 “_LocalProxy__local” 设置的值,后面可以通过 self.__local 来获取。关于这个知识点,可以查看 stackoverflow 的这个问题。
然后 LocalProxy 重写了所有的魔术方法(名字前后有两个下划线的方法),具体操作都是转发给代理对象的。这里只给出了几个魔术方法,感兴趣的可以查看源码中所有的魔术方法。
request context
继续回到 request context 的实现:
_request_ctx_stack = LocalStack()
request = LocalProxy(partial(_lookup_req_object, 'request'))
session = LocalProxy(partial(_lookup_req_object, 'session'))
再次看这段代码希望能看明白,_request_ctx_stack 是多线程或者协程隔离的栈结构,request 每次都会调用 _lookup_req_object 栈头部的数据来获取保存在里面的 requst context。
那么请求上下文信息是什么被放在 stack 中呢?还记得之前介绍的 wsgi_app() 方法有下面两行代码吗?
ctx = self.request_context(environ)
ctx.push()
每次在调用 app.__call__ 的时候,都会把对应的请求信息压栈,最后执行完请求的处理之后把它出栈。
我们来看看request_context, 这个 方法只有一行代码:
def request_context(self, environ):
    return RequestContext(self, environ)
RequestContext
它调用了 RequestContext,并把 self 和请求信息的字典 environ 当做参数传递进去。追踪到 RequestContext 定义的地方,它出现在 ctx.py 文件中,代码如下:
class RequestContext(object):
    """The request context contains all request relevant information.  It is
    created at the beginning of the request and pushed to the
    `_request_ctx_stack` and removed at the end of it.  It will create the
    URL adapter and request object for the WSGI environment provided.
    """

    def __init__(self, app, environ, request=None):
        self.app = app
        if request is None:
            request = app.request_class(environ)
        self.request = request
        self.url_adapter = app.create_url_adapter(self.request)
        self.match_request()

    def match_request(self):
        """Can be overridden by a subclass to hook into the matching
        of the request.
        """
        try:
            url_rule, self.request.view_args =
                self.url_adapter.match(return_rule=True)
            self.request.url_rule = url_rule
        except HTTPException as e:
            self.request.routing_exception = e

    def push(self):
        """Binds the request context to the current context."""
        # Before we push the request context we have to ensure that there
        # is an application context.
        app_ctx = _app_ctx_stack.top
        if app_ctx is None or app_ctx.app != self.app:
            app_ctx = self.app.app_context()
            app_ctx.push()
            self._implicit_app_ctx_stack.append(app_ctx)
        else:
            self._implicit_app_ctx_stack.append(None)

        _request_ctx_stack.push(self)

        self.session = self.app.open_session(self.request)
        if self.session is None:
            self.session = self.app.make_null_session()

    def pop(self, exc=_sentinel):
        """Pops the request context and unbinds it by doing that.  This will
        also trigger the execution of functions registered by the
        :meth:`~flask.Flask.teardown_request` decorator.
        """
        app_ctx = self._implicit_app_ctx_stack.pop()

        try:
            clear_request = False
            if not self._implicit_app_ctx_stack:
                self.app.do_teardown_request(exc)

                request_close = getattr(self.request, 'close', None)
                if request_close is not None:
                    request_close()
                clear_request = True
        finally:
            rv = _request_ctx_stack.pop()

            # get rid of circular dependencies at the end of the request
            # so that we don't require the GC to be active.
            if clear_request:
                rv.request.environ['werkzeug.request'] = None

            # Get rid of the app as well if necessary.
            if app_ctx is not None:
                app_ctx.pop(exc)

    def auto_pop(self, exc):
        if self.request.environ.get('flask._preserve_context') or
           (exc is not None and self.app.preserve_context_on_exception):
            self.preserved = True
            self._preserved_exc = exc
        else:
            self.pop(exc)

    def __enter__(self):
        self.push()
        return self

    def __exit__(self, exc_type, exc_value, tb):
        self.auto_pop(exc_value)
每个 request context都保存了当前请求的信息,比如 request 对象和 app 对象。在初始化的最后,还调用了 match_request 实现了路由的匹配逻辑。
push 操作就是把该请求的 ApplicationContext(如果 _app_ctx_stack 栈顶不是当前请求所在 app ,需要创建新的 app context) 和 RequestContext 有关的信息保存到对应的栈上,压栈后还会保存 session 的信息; pop 则相反,把request context和 application context 出栈,做一些清理性的工作。
上下文
到这里,上下文的实现就比较清晰了:每次有请求过来的时候,flask 会先创建当前线程或者进程需要处理的两个重要上下文对象,把它们保存到隔离的栈里面,这样视图函数进行处理的时候就能直接从栈上获取这些信息。
NOTE
因为 app 实例只有一个,因此多个 request 共享了 application context。
到这里,关于 context 的实现和功能已经讲解得差不多了。还有两个疑惑没有解答。
- 为什么要把
request context和application context分开?每个请求不是都同时拥有这两个上下文信息吗? - 为什么
request context和application context都有实现成栈的结构?每个请求难道会出现多个request context或者application context吗?
第一个答案是“灵活度”,第二个答案是“多 application”。虽然在实际运行中,每个请求对应一个 request context 和一个 application context,但是在测试或者 python shell 中运行的时候,用户可以单独创建 request context 或者 application context,这种灵活度方便用户的不同的使用场景;而且栈可以让 redirect 更容易实现,一个处理函数可以从栈中获取重定向路径的多个请求信息。application 设计成栈也是类似,测试的时候可以添加多个上下文,另外一个原因是 flask 可以多个 application 同时运行:
from werkzeug.wsgi import DispatcherMiddleware
from frontend_app import application as frontend
from backend_app import application as backend

application = DispatcherMiddleware(frontend, {
    '/backend':     backend
})
这个例子就是使用 werkzeug 的 DispatcherMiddleware 实现多个 app 的分发,这种情况下 _app_ctx_stack 栈里会出现两个 application context。
Update: 为什么要用 LocalProxy
写完这篇文章之后,收到有位读者的疑问:为什么要使用 LocalProxy?不使用 LocalProxy 直接访问 LocalStack 的对象会有什么问题吗?
这是个很好的问题,上面也确实没有很明确地给出这个答案。这里解释一下!
首先明确一点,Local 和 LocalStack 实现了不同线程/协程之间的数据隔离。在为什么用 LocalStack 而不是直接使用 Local 的时候,我们说过这是因为 flask 希望在测试或者开发的时候,允许多 app 、多 request 的情况。而 LocalProxy 也是因为这个才引入进来的!
我们拿 current_app = LocalProxy(_find_app) 来举例子。每次使用 current_app 的时候,他都会调用 _find_app 函数,然后对得到的变量进行操作。
如果直接使用 current_app = _find_app() 有什么区别呢?区别就在于,我们导入进来之后,current_app 就不会再变化了。如果有多 app 的情况,就会出现错误,比如:
from flask import current_app

app = create_app()
admin_app = create_admin_app()

def do_something():
    with app.app_context():
        work_on(current_app)
        with admin_app.app_context():
            work_on(current_app)
这里我们出现了嵌套的 app,每个 with 上下文都需要操作其对应的 app,如果不适用 LocalProxy 是做不到的。
对于 request 也是类似!但是这种情况真的很少发生,有必要费这么大的功夫增加这么多复杂度吗?
其实还有一个更大的问题,这个例子也可以看出来。比如我们知道 current_app 是动态的,因为它背后对应的栈会 push 和 pop 元素进去。那刚开始的时候,栈一定是空的,只有在 with app.app_context() 这句的时候,才把栈数据 push 进去。而如果不采用 LocalProxy 进行转发,那么在最上面导入 from flask import current_app 的时候,current_app 就是空的,因为这个时候还没有把数据 push 进去,后面调用的时候根本无法使用。
所以为什么需要 LocalProxy 呢?简单总结一句话:因为上下文保存的数据是保存在栈里的,并且会动态发生变化。如果不是动态地去访问,会造成数据访问异常。
源码分析
第一阶段:将ctx(request,session)放到Local对象上

第二阶段:视图函数导入:request/session
request.method
    -LocalProxy对象.method,执行getattr方法,getattr(self._get_current_object(), name)
        -self._get_current_object()返回return self.__local(),self.__local(),在LocakProxy实例化的时候,object.__setattr__(self, '_LocalProxy__local', local),此处local就是:partial(_lookup_req_object, 'request')

    -def _lookup_req_object(name):
            top = _request_ctx_stack.top #_request_ctx_stack 就是LocalStack()对象,top方法把ctx取出来
            if top is None:
                raise RuntimeError(_request_ctx_err_msg)
            return getattr(top, name)#获取ctx中的request或session对象

第三阶段:请求处理完毕
        - 获取session并保存到cookie
        - 将ctx删除
程序运行,两个LocalStack()对象,一个里面放request和session,另一个放g和 current_app