博客转载自:http://www.cnblogs.com/21207-iHome/p/5238242.html
之前有关卡尔曼滤波的例子都比较简单,只能用于简单的理解卡尔曼滤波的基本步骤。现在让我们来看看卡尔曼滤波在实际中到底能做些什么吧。这里有一个使用卡尔曼滤波在窗口内跟踪鼠标移动的例子,原作者主页:http://home.wlu.edu/~levys/
首先,第一步是选取状态变量,这里选择系统状态变量为x=[x, y]T ,即状态变量选为鼠标在窗口内的位置。通过鼠标事件响应的回调函数可以获得鼠标当前位置,即观测值z = [x, y]T.对于这一问题外界控制量u=0. 观测噪声和系统噪声的选择需要靠实验或其它方式确定,这里先采用默认值以简化问题。则系统状态方程可以写为:
同样可以写出观测值和状态变量之间的关系,可知矩阵F和矩阵H均为2阶单位矩阵。
下面使用Python和OpenCV来解决这一问题。tinyekf.py文件中定义了EKF抽象类,使用时需要自己定义一个类(继承EKF),并实现非线性函数f(x),h(x)和雅可比矩阵JF,JH的计算。扩展卡尔曼滤波(EKF)同样能解决线性问题。
tinyekf.py:
'''
    Extended Kalman Filter in Python
'''
import numpy as np
from abc import ABCMeta, abstractmethod

class EKF(object):
    __metaclass__ = ABCMeta
    def __init__(self, n, m, pval=0.1, qval=1e-4, rval=0.1):
        '''
        Creates a KF object with n states, m observables, and specified values for
        prediction noise covariance pval, process noise covariance qval, and
        measurement noise covariance rval.
        '''
        # No previous prediction noise covariance
        self.P_pre = None

        # Current state is zero, with diagonal noise covariance matrix
        self.x = np.zeros((n,1))
        self.P_post = np.eye(n) * pval

        # Get state transition and measurement Jacobians from implementing class
        self.F = self.getF(self.x)
        self.H = self.getH(self.x)

        # Set up covariance matrices for process noise and measurement noise
        self.Q = np.eye(n) * qval
        self.R = np.eye(m) * rval

        # Identity matrix will be usefel later
        self.I = np.eye(n)

    def step(self, z):
        '''
        Runs one step of the EKF on observations z, where z is a tuple of length M.
        Returns a NumPy array representing the updated state.
        '''
        # Predict ----------------------------------------------------
        self.x = self.f(self.x)
        self.P_pre = self.F * self.P_post * self.F.T + self.Q

        # Update -----------------------------------------------------
        G = np.dot(self.P_pre * self.H.T, np.linalg.inv(self.H * self.P_pre * self.H.T + self.R))
        self.x += np.dot(G, (np.array(z) - self.h(self.x).T).T)
        self.P_post = np.dot(self.I - np.dot(G, self.H), self.P_pre)

        # return self.x.asarray()
        return self.x

    @abstractmethod
    def f(self, x):
        '''
        Your implementing class should define this method for the state transition function f(x),
        returning a NumPy array of n elements.  Typically this is just the identity function np.copy(x).
        '''
        raise NotImplementedError()

    @abstractmethod
    def getF(self, x):
        '''
        Your implementing class should define this method for returning the n x n Jacobian matrix F of the
        state transition function as a NumPy array.  Typically this is just the identity matrix np.eye(n).
        '''
        raise NotImplementedError()

    @abstractmethod
    def h(self, x):
        '''
        Your implementing class should define this method for the observation function h(x), returning
        a NumPy array of m elements. For example, your function might include a component that
        turns barometric pressure into altitude in meters.
        '''
        raise NotImplementedError()

    @abstractmethod
    def getH(self, x):
        '''
        Your implementing class should define this method for returning the m x n Jacobian matirx H of the
        observation function as a NumPy array.
        '''
        raise NotImplementedError()
kalman_mousetracker.py:
# -*- coding: utf-8 -*-
'''
kalman_mousetracker.py - OpenCV mouse-tracking demo using TinyEKF
'''

# This delay will affect the Kalman update rate
DELAY_MSEC = 20        # 卡尔曼滤波计算时间间隔,单位为ms

WINDOW_NAME = 'Kalman Mousetracker [ESC to quit]'    # 窗口名称
WINDOW_SIZE = 500                                    # 窗口大小

import cv2
import numpy as np
from sys import exit
from tinyekf import EKF

class TrackerEKF(EKF):
    '''
    An EKF for mouse tracking
    '''
    def __init__(self):
        EKF.__init__(self, 2, 2, pval=1, qval=0.001, rval=0.1)

    def f(self, x):
        # State-transition function is identity
        return np.copy(x)

    def getF(self, x):
        # So state-transition Jacobian is identity matrix
        return np.eye(2)

    def h(self, x):
        # Observation function is identity
        return x

    def getH(self, x):
        # So observation Jacobian is identity matrix
        return np.eye(2)


class MouseInfo(object):
    '''
    A class to store X,Y points
    '''
    def __init__(self):
        self.x, self.y = -1, -1

    # If you print an object then its __str__ method will get called
    # The __str__ is intended to be as human-readable as possible
    def __str__(self):
        return '%4d %4d' % (self.x, self.y)


def mouseCallback(event, x, y, flags, mouse_info):
    '''
    Callback to update a MouseInfo object with new X,Y coordinates
    '''
    mouse_info.x = x
    mouse_info.y = y


def drawCross(img, center, r, g, b):
    '''
    Draws a cross a the specified X,Y coordinates with color RGB
    '''
    d = 5               # 调整d改变X标记大小
    thickness = 2        # 线宽
    color = (r, g, b)    # 标记颜色
    ctrx = center[0]    # 标记中心点的x坐标
    ctry = center[1]    # 标记中心点的y坐标

    # Python: cv2.line(img, pt1, pt2, color[, thickness[, lineType[, shift ] ] ])--> None
    # lineType参数之一: CV_AA - antialiased line
    cv2.line(img, (ctrx - d, ctry - d), (ctrx + d, ctry + d), color, thickness, cv2.CV_AA)
    cv2.line(img, (ctrx + d, ctry - d), (ctrx - d, ctry + d), color, thickness, cv2.CV_AA)


def drawLines(img, points, r, g, b):
    '''
    Draws lines
    '''
    # Python: cv2.polylines(img, pts, isClosed, color[, thickness[, lineType[, shift ] ] ]) -->None
    # 参数pts: Array of polygonal curves
    cv2.polylines(img, [np.int32(points)], isClosed=False, color=(r, g, b))


def newImage():
    '''
    Returns a new image
    '''
    return np.zeros((500,500,3), np.uint8) # 创建矩阵,用于保存图像内容


if __name__ == '__main__':
    # Create a new image in a named window
    img = newImage()
    cv2.namedWindow(WINDOW_NAME)

    # Create an X,Y mouse info object and set the window's mouse callback to modify it
    mouse_info = MouseInfo()    # mouse_info用于存贮当前鼠标位置

    # 设置鼠标事件回调函数
    # 参数1:name – Window name
    # 参数2:onMouse – Mouse callback.
    # 参数3:param – The optional parameter passed to the callback.
    cv2.setMouseCallback(WINDOW_NAME, mouseCallback, mouse_info)

    # Loop until mouse inside window
    while True:
        if mouse_info.x > 0 and mouse_info.y > 0:    # 鼠标进入窗口内
            break
        cv2.imshow(WINDOW_NAME, img) # 鼠标没进入窗口内则一直显示黑色背景
        if cv2.waitKey(1) == 27:     # 检测是否按下ESC键
            exit(0)

    # These will get the trajectories for mouse location and Kalman estiamte
    measured_points = []    # 测量值列表
    kalman_points = []      # 估计值列表

    # Create a new Kalman filter for mouse tracking
    kalfilt = TrackerEKF()

    # Loop till user hits escape
    while True:
        # Serve up a fresh image
        img = newImage()

        # Grab current mouse position and add it to the trajectory
        measured = (mouse_info.x, mouse_info.y)
        measured_points.append(measured)    # 注意:程序运行时间越长(或者计算间隔越小)列表长度会越大

        # Update the Kalman filter with the mouse point, getting the estimate.
        estimate = kalfilt.step((mouse_info.x, mouse_info.y))

        # Add the estimate to the trajectory
        estimated = [int(c)     for c in estimate]
        kalman_points.append(estimated)        # kalman_points为2D point列表,存放每次计算出的估计值坐标

        # Display the trajectories and current points
        drawLines(img, kalman_points,   0,   255, 0)    # 绘制跟踪点移动路径
        drawCross(img, estimated,       255, 255, 255)    # X标记点,代表卡尔曼滤波估计位置
        drawLines(img, measured_points, 255, 255, 0)    # 绘制鼠标移动路径
        drawCross(img, measured, 0,   0,   255)            # X标记点,代表鼠标当前位置

        # Delay for specified interval, quitting on ESC
        cv2.imshow(WINDOW_NAME, img)    # image每隔DELAY_MSEC毫秒就刷新一次
        if cv2.waitKey(DELAY_MSEC) & 0xFF == 27:
            break

    #  close the window and de-allocate any associated memory usage.
    cv2.destroyAllWindows()
程序执行效的果如下图所示:
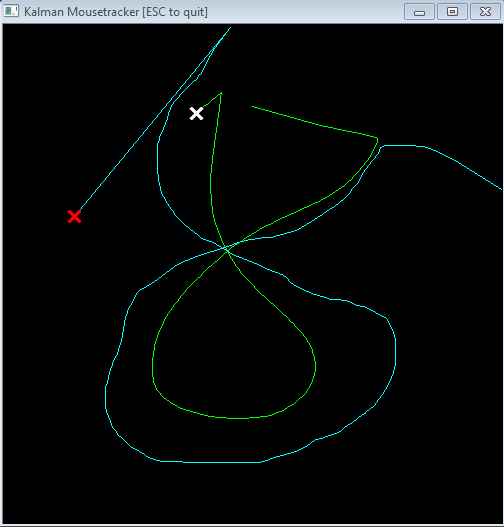
跟踪的效果与程序中的两个参数有关:qval代表了模型噪声(即模型准确度,obviously all moedls are not able to describe the motion perfectly,thus each model contains a probabilistic part),rval代表了观测噪声。使用观测值修正预测值的表达式为:

其中卡尔曼增益K的表达式为:

从上面公式可以看出当R趋于0,即测量误差非常小时,估计的结果更接近测量值。当P趋向0时,估计的结果更接近预测值。因此,当程序中rval的值相比qval小得多时跟踪进行的很流畅(卡尔曼滤波的估计值更偏向观测值)。但是当rval比qval小时(从感性上理解这个小),跟踪就出现了滞后,这说明需要更合理的鼠标运动模型,如Constant Velocity Model或Constant Acceleration Model。可以参考论文: Empirical evaluation of vehicular models for ego motion estimation.2011 IEEE Intelligent Vehicles Symposium (IV), 534–539. doi:10.1109/IVS.2011.5940526. 论文中提到不同的模型主要适用于不同的情境,例如高速公路上汽车加减速过程较少,而在闹市区汽车需要频繁加减速,此时用CA模型就比用CV模型合适。In general,more sophisticated models outperform simpler ones, especially in situations where the assumption of the simple models are no longer true. 这就是我认为卡尔曼滤波中最难的部分:根据问题建立合理的模型。
根据参考[3]中的叙述:If you have a badly defined model, you will not get a good estimate. But you can relax your model by increasing your estimated error. This will let the Kalman filter rely more on the measurement values, but still allow some noise removal.
即当你建立的模型不准确时,可以将与模型误差有关的参数Q调大,此时估计值将更加依赖观测值而不是通过模型得到的预测值。既然模型不准确,为什么还要用卡尔曼滤波,直接从传感器获取观测值不就好了吗?可是有时传感器获得的数据也不那么准确,而且传感器测量精度越高价格也越贵:Sensors are noisy. The world is full of data and events that we want to measure and track, but we cannot rely on sensors to give us perfect information. 因此,就我目前浅显的理解卡尔曼滤波是一种折衷(trade off)的方法,当模型更准时估计值更接近模型的预测,当传感器测量值更准时估计值更接近测量值。
参考:
[1] http://home.wlu.edu/~levys/kalman_tutorial/
[3] https://www.cs.cornell.edu/courses/cs4758/2012sp/materials/mi63slides.pdf