目录:
1认识电商
1.1与电商相关的技术特点
1.2电商模式------主要模式
2项目认识
2.1项目(sc)简介
2.1.1网站前台
2.1.2运营商后台
2.1.3商家管理系统
2.2系统架构
2.2.1SOA架构
2.2.2商城项目框架组合
3Dubbox框架
3.1Dubbox简介
3.2注册Zookeeper
3.3Dubbox本地 JAR包部署与安装(了解)
3.4入门小Demo
3.4.1服务提供者开发
3.4.2服务消费者开发
3.5管理中心的部署
3.5.1管理端安装
3.5.2管理端使用
1.认识电商
1.1与电商相关的技术特点
技术范围广、具有分布式、高并发、集群、高可用、负载均衡;相对来说技术新、海量数据、业务复杂、系统安全;
1.2电商模式------主要模式
- B2B--企业对企业
是指进行电子商务交易,交易的双方都是商家(或企业、公司),借助互联网的技术或各种商务网络平台,完成商务交易的过程。
- C2C--个人对个人
消费者个人间的电子商务行为。比如通过58平台用户和用户进行直接房子或者车子交易;这种交易类型就称为C2C电子商务。
- B2C--企业对个人
可以理解为商家对用户的模式;商家直接面向消费者销售产品和服务商业零售模式。一般以网络零售业为主,借助于互联网开展在线销售活动。像生活中用的比较多的网上商店,消费者通过网络在网上购物、网上支付等消费行为。
- C2B--个人对企业
用户对商家的模式,可以理解为用户的一种消费者贡献价值,C2B模式和我们熟知的供需模式是相反的,就是先有消费者需求产生而后有企业生产,即先有消费者提出需求,后有生产企业按需求组织生产。通常情况为消费者根据自身需求定制产品和价格,或主动参与产品设计、生产和定价,产品、价格等彰显消费者的个性化需求,生产企业进行定制化生产。像我们在网上器定制个人的专属物品或者购买个性化物品的交易模式;
- O2O--线上到线下
O2O:可以理解为——线上支付,线下体验;是指将线下的商务机会与互联网结合,让互联网成为线下交易的平台;生活中的例子就像我们去点外卖等;
- F2C--工厂到个人
没有中间商转差价的模式,简单理解为厂家直销;
- B2B2C -企业-企业-个人
B2B2C是一种电子商务类型的网络购物商业模式,B是BUSINESS的简称,C是CUSTOMER的简称,第一个B指的是商品或服务的供应商,第二个B指的是从事电子商务的企业,C则是表示消费者。查询相关资料会发现:第一个BUSINESS,并不仅仅局限于品牌供应商、影视制作公司和图书出版商,任何的商品供应商或服务供应商都能可以成为第一个BUSINESS;第二B是B2B2C模式的电子商务企业,通过统一的经营管理对商品和服务、消费者终端同时进行整合,是广大供应商和消费者之间的桥梁,为供应商和消费者提供优质的服务,是互联网电子商务服务供应商。C表示消费者,在第二个B构建的统一电子商务平台购物的消费者;B2B2C的来源于目前的B2B、B2C模式的演变和完善,把B2C和C2C完美地结合起来,通过B2B2C模式的电子商务企业构建自己的物流供应链系统,提供统一的服务。举个生活中的例子就是:京东商城、天猫商城、用户相互之间的关系;
2.项目认识
项目简称商城,用首写字母表示:sc
2.1 项目(sc)简介
模拟b2b2c平台,类似与京东、天猫商城。采用的是商家入驻模式,商家入驻通过后,商家有独立的管理后台录入商品信息,然后发布;
商城项目主要模拟三个板块:网站前台、运营商后台、商家管理系统(后台);
2.1.1 网站前台
一般包括首页、商品详细页、搜索页、会员中心、订单、支付、秒杀等;根据个人能力去做,其中支付和秒杀的知识点相对来说比较重要一些;参考京东页面;
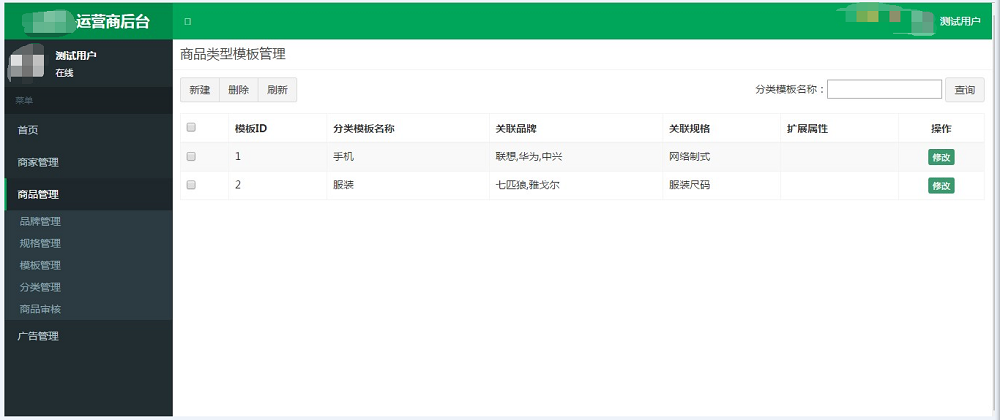
2.1.2 运营商后台
运营人员的各种管理后台,如:审核、品牌、规格、商品分类、订单查询、商品结算等等管理;如图
2.1.3 商家管理系统
入驻的商家管理后台,如:商品的管理订单查询或者统计、资金结算等相关功能;如图

2.2 系统构架
2.2.1 SOA构架
SOA是一种支持面向服务的架构服务样式;从服务、基于服务开发和服务的结果来看,面向服务是一种思维方式,更多的应用在互联网项目开发,在里面具体的功能有:页面和业务逻辑分离;
相对来说,项目采用SOA架构,个人理解,其实是看中了分布式架构,它能使项目有条不紊的进行,如上面所说,运用在页面和业务逻辑分离,这种优势在常规的垂直架构中体现的比较明显;
- sc项目模拟架构图

2.2.2商城项目框架组合
sc项目采用当前流行的前后端编程架构,相关的框架有:angularJS + Bootstrap / Spring +SpringMVC+mybatis +Dubbox;
3.Dubbox框架
3.1 Dubbox简介
Dubbox 是一个分布式服务框架,其前身是阿里巴巴开源项目Dubbo ,被国内电商及互联网项目中使用,后期阿里巴巴停止了该项目的维护,当当网便在Dubbo基础上进行优化,并继续维护,为了与原有的Dubbo区分,故将其命名为Dubbox。
Dubbox 致力于提供高性能和透明化的RPC远程服务调用方案,以及SOA服务治理方案。简单的说,dubbox就是个服务框架,如果没有分布式的需求,其实是不需要用的,只有在分布式的时候,才有dubbox这样的分布式服务框架的需求,并且本质上是服务调用,说白了就是个远程服务调用的分布式框架。如图:

其中的调用关系(个人)理解如下:
1. 服务容器负责启动,加载,运行服务提供者。
2. 服务提供者在启动时,向注册中心注册自己提供的服务。
3. 服务消费者在启动时,向注册中心订阅自己所需的服务。
4. 注册中心返回服务提供者地址列表给消费者,如果有变更,注册中心将基于长连接推送变更数据给消费者。
5. 服务消费者,从提供者地址列表中,基于软负载均衡算法,选一台提供者进行调用,如果调用失败,再选另一台调用。
6. 服务消费者和提供者,在内存中累计调用次数和调用时间,定时每分钟发送一次统计数据到监控中心。
3.2注册Zookeeper
官方推荐使用 zookeeper 注册中心。注册中心负责服务地址的注册与查找,相当于目录服务,服务提供者和消费者只在启动时与注册中心交互,注册中心不转发请求,压力较小。
安装步骤:
第一步:安装 jdk
第二步:把 zookeeper 的压缩包上传到 linux 系统。
注意:可以用:Alt+P 进入SFTP ,输入put d:xxx 命令上传;
第三步:解压缩压缩包
第四步:进入 zookeeper 目录,创建 data 文件夹。
第五步:进入conf目录 ,把 zoo_sample.cfg 改名为 zoo.cfg。
第六步:打开zoo.cfg , 修改 data 属性:dataDir=/root/zookeeper-3.4.6/data。
3.3Dubbox本地 JAR包部署与安装(了解)
Dubbox的jar包并没有部署到Maven的中央仓库中,大家在Maven的中央仓库中可以查找到Dubbo的最终版本是2.5.3 , 阿里巴巴解散了Dubbo团队后由当当网继续维护此项目,并改名为 Dubbox ,坐标不变,版本变更了,但是并没有提交到中央仓库。
我们现在需要手动将Dubbox的jar包安装到我的本地仓库中。
先将dubbo-2.8.4.jar包放到d:setup, 然后输入命令
mvn install:install-file -Dfile=d:setupdubbo-2.8.4.jar -DgroupId=com.alibaba -DartifactId=dubbo -Dversion=2.8.4 -Dpackaging=jar
3.4入门小Demo
3.4.1服务提供者开发
开发步骤:
(1)创建Maven工程dubboxdemo-service 再在pom.xml中引入依赖


 1 <project xmlns="http://maven.apache.org/POM/4.0.0" xmlns:xsi="http://www.w3.org/2001/XMLSchema-instance" xsi:schemaLocation="http://maven.apache.org/POM/4.0.0 http://maven.apache.org/xsd/maven-4.0.0.xsd">
 2   <modelVersion>4.0.0</modelVersion>
 3   <groupId>cn.itcast.dubboxdemo</groupId>
 4   <artifactId>dubboxdemo-service</artifactId>
 5   <version>0.0.1-SNAPSHOT</version>
 6   <packaging>war</packaging>
 7    <properties>
 8         <spring.version>4.2.4.RELEASE</spring.version>
 9    </properties>
10     <dependencies>
11         <!-- Spring -->
12         <dependency>
13             <groupId>org.springframework</groupId>
14             <artifactId>spring-context</artifactId>
15             <version>${spring.version}</version>
16         </dependency>
17         <dependency>
18             <groupId>org.springframework</groupId>
19             <artifactId>spring-beans</artifactId>
20             <version>${spring.version}</version>
21         </dependency>
22         <dependency>
23             <groupId>org.springframework</groupId>
24             <artifactId>spring-webmvc</artifactId>
25             <version>${spring.version}</version>
26         </dependency>
27         <dependency>
28             <groupId>org.springframework</groupId>
29             <artifactId>spring-jdbc</artifactId>
30             <version>${spring.version}</version>
31         </dependency>
32         <dependency>
33             <groupId>org.springframework</groupId>
34             <artifactId>spring-aspects</artifactId>
35             <version>${spring.version}</version>
36         </dependency>
37         <dependency>
38             <groupId>org.springframework</groupId>
39             <artifactId>spring-jms</artifactId>
40             <version>${spring.version}</version>
41         </dependency>
42         <dependency>
43             <groupId>org.springframework</groupId>
44             <artifactId>spring-context-support</artifactId>
45             <version>${spring.version}</version>
46         </dependency>
47         <!-- dubbo相关 -->
48         <dependency>
49             <groupId>com.alibaba</groupId>
50             <artifactId>dubbo</artifactId>
51             <version>2.8.4</version>
52         </dependency>
53         <dependency>
54             <groupId>org.apache.zookeeper</groupId>
55             <artifactId>zookeeper</artifactId>
56             <version>3.4.6</version>
57         </dependency>
58         <dependency>
59             <groupId>com.github.sgroschupf</groupId>
60             <artifactId>zkclient</artifactId>
61             <version>0.1</version>
62         </dependency>
63         <dependency>
64             <groupId>javassist</groupId>
65             <artifactId>javassist</artifactId>
66             <version>3.11.0.GA</version>
67         </dependency>
68     </dependencies>
69    <build>
70       <plugins>
71           <plugin>
72               <groupId>org.apache.maven.plugins</groupId>
73               <artifactId>maven-compiler-plugin</artifactId>
74               <version>2.3.2</version>
75               <configuration>
76                   <source>1.7</source>
77                   <target>1.7</target>
78               </configuration>
79           </plugin>
80           <plugin>
81                 <groupId>org.apache.tomcat.maven</groupId>
82                 <artifactId>tomcat7-maven-plugin</artifactId>
83                 <configuration>
84                     <!-- 指定端口,可以为8081 -->
85                     <port>xx</port>
86                     <!-- 请求路径 -->
87                     <path>/</path>
88                 </configuration>
89             </plugin>
90       </plugins>
91     </build>
92 </project>
(2)在电商sc项目工程的webapps下创建WEB-INF文件夹,创建web.xml
 1 <?xml version="1.0" encoding="UTF-8"?>
 2 <web-app xmlns:xsi="http://www.w3.org/2001/XMLSchema-instance"
 3     xmlns="http://java.sun.com/xml/ns/javaee"
 4     xsi:schemaLocation="http://java.sun.com/xml/ns/javaee http://java.sun.com/xml/ns/javaee/web-app_2_5.xsd"
 5     version="2.5">
 6     <!-- 加载spring容器 -->
 7     <context-param>
 8         <param-name>contextConfigLocation</param-name>
 9         <param-value>classpath:applicationContext*.xml</param-value>
10     </context-param>
11     <listener>        <listener-class>org.springframework.web.context.ContextLoaderListener</listener-class>
12     </listener>
13 </web-app>
(3)创建业务接口
1 package 包名;
2 /**
3  * 业务接口
4  * @author sc
5  *
6  */
7 public interface UserService {
8     public String getName();
9 }
(4)创建业务实现类
1 package 包名;
2 import 工具类包名;
3 import 业务层包名;
4 @Service
5 public class UserServiceImpl implements UserService {
6     public String getName() {
7         return "sc";
8     }
9 }
(5)编写配置文件
 1 <?xml version="1.0" encoding="UTF-8"?>
 2 <beans xmlns="http://www.springframework.org/schema/beans"
 3     xmlns:xsi="http://www.w3.org/2001/XMLSchema-instance" xmlns:p="http://www.springframework.org/schema/p"
 4     xmlns:context="http://www.springframework.org/schema/context"
 5     xmlns:dubbo="http://code.alibabatech.com/schema/dubbo" xmlns:mvc="http://www.springframework.org/schema/mvc"
 6     xsi:schemaLocation="http://www.springframework.org/schema/beans http://www.springframework.org/schema/beans/spring-beans.xsd
 7         http://www.springframework.org/schema/mvc http://www.springframework.org/schema/mvc/spring-mvc.xsd
 8         http://code.alibabatech.com/schema/dubbo http://code.alibabatech.com/schema/dubbo/dubbo.xsd
 9         http://www.springframework.org/schema/context http://www.springframework.org/schema/context/spring-context.xsd">
10     <dubbo:application name="dubboxdemo-service"/>
11 <dubbo:registry address="zookeeper://IP地址"/>
12 <dubbo:annotation package="包名" />
13 </beans>
(6)测试运行
tomcat7:run
3.4.2服务消费者开发
开发步骤
(1)创建Maven工程 ,在pom.xml引入依赖 ,同“dubboxdemo-service”工程。可以把tomcat插件的运行端口改为8082 。
(2)在webapps目录下创建WEB-INF 目录,并创建web.xml
 1 <?xml version="1.0" encoding="UTF-8"?>
 2 <web-app xmlns:xsi="http://www.w3.org/2001/XMLSchema-instance"
 3     xmlns="http://java.sun.com/xml/ns/javaee"
 4     xsi:schemaLocation="http://java.sun.com/xml/ns/javaee http://java.sun.com/xml/ns/javaee/web-app_2_5.xsd"
 5     version="2.5">
 6    <!-- 解决post乱码 -->
 7     <filter>
 8         <filter-name>CharacterEncodingFilter</filter-name>        <filter-class>org.springframework.web.filter.CharacterEncodingFilter</filter-class>
 9         <init-param>
10             <param-name>encoding</param-name>
11             <param-value>utf-8</param-value>
12         </init-param>
13         <init-param>
14             <param-name>forceEncoding</param-name>
15             <param-value>true</param-value>
16         </init-param>
17     </filter>
18     <filter-mapping>
19         <filter-name>CharacterEncodingFilter</filter-name>
20         <url-pattern>/*</url-pattern>
21     </filter-mapping>
22   <servlet>
23       <servlet-name>springmvc</servlet-name>      <servlet-class>org.springframework.web.servlet.DispatcherServlet</servlet-class>
24       <!-- 指定加载的配置文件 ,通过参数contextConfigLocation加载-->
25       <init-param>
26           <param-name>contextConfigLocation</param-name>
27           <param-value>classpath:applicationContext-web.xml</param-value>
28       </init-param>
29   </servlet>
30   <servlet-mapping>
31       <servlet-name>springmvc</servlet-name>
32       <url-pattern>*.*</url-pattern>
33   </servlet-mapping>
34 </web-app>
(3)拷贝业务接口:将“dubboxdemo-service”工程的(包名) 包以及下面的接口拷贝至此工程。
(4)编写Controller
 1 package 包名;
 2 import org.springframework.beans.factory.annotation.Autowired;
 3 import org.springframework.stereotype.Controller;
 4 import org.springframework.web.bind.annotation.RequestMapping;
 5 import org.springframework.web.bind.annotation.ResponseBody;
 6 import 包名.类名;
 7 @Controller
 8 @RequestMapping("/xx")
 9 public class UserController {
10     @Reference
11     private UserService userService;
12     @RequestMapping("/showName")
13     @ResponseBody
14     public String showName(){
15         return userService.getName();
16     }
17 }
(5)编写spring配置文件
 1 <?xml version="1.0" encoding="UTF-8"?>
 2 <beans xmlns="http://www.springframework.org/schema/beans"
 3     xmlns:xsi="http://www.w3.org/2001/XMLSchema-instance" xmlns:p="http://www.springframework.org/schema/p"
 4     xmlns:context="http://www.springframework.org/schema/context"
 5     xmlns:dubbo="http://code.alibabatech.com/schema/dubbo" xmlns:mvc="http://www.springframework.org/schema/mvc"
 6     xsi:schemaLocation="http://www.springframework.org/schema/beans http://www.springframework.org/schema/beans/spring-beans.xsd
 7         http://www.springframework.org/schema/mvc http://www.springframework.org/schema/mvc/spring-mvc.xsd
 8         http://code.alibabatech.com/schema/dubbo http://code.alibabatech.com/schema/dubbo/dubbo.xsd
 9         http://www.springframework.org/schema/context http://www.springframework.org/schema/context/spring-context.xsd">
10
11     <mvc:annotation-driven >
12         <mvc:message-converters register-defaults="false">
13             <bean class="org.springframework.http.converter.StringHttpMessageConverter">
14                 <constructor-arg value="UTF-8" />
15             </bean>
16         </mvc:message-converters>
17     </mvc:annotation-driven>
18     <!-- 引用dubbo 服务 -->
19     <dubbo:application name="dubboxdemo-web" />
20     <dubbo:registry address="zookeeper://ip地址"/>
21      <dubbo:annotation package="包名" />
22 </beans>
(6)测试运行
tomcat7:run;或者在游览器中输入:http://localhost:(端口号)/项目名.do
3.5管理中心的部署
我们在开发项目时,需要知道注册中心都注册了哪些服务,以便我们开发和测试。我们可以通过部署一个管理中心来实现。其实管理中心就是一个web应用,部署到tomcat即可。
3.5.1管理端安装
(1)编译源码,得到war包
下载dubbox-master.zip ,这个是dubbox的源码,我们可以使用maven命令编译源码得到“管理端”的war包。将此压缩包解压,在命令符下进入dubbo-admin目录 ,输入maven命令:mvn package -Dmaven.skip.test=true
(2)进入target文件夹,你会看到一个dubbo-admin-2.8.4.war , 在linux服务器上安装tomcat, 将此war包上传到linux服务器的tomcat的webapps下。
(3)如果你部署在zookeeper同一台主机并且端口是默认的2181,则无需修改任何配置。如果不是在一台主机上或端口被修改,需要修改WEB-INF下的dubbo.properties ,修改如下配置:
dubbo.registry.address=zookeeper://127.0.0.1:2181
修改后重新启动tomcat
3.5.2管理端使用
(1)打开浏览器,输入http://192.168.xx.xx:8080/sc ,(设置的)登录用户名和密码均为root 进入首页。
(2)启动服务提供者工程,即可在服务治理-提供者查看到该服务。点击其中一条数据后可以查看详情。
(3)启动服务消费者工程,运行页面,观察“消费者”列表