之前说的三种配置方式,都是使用XML配置,现在我们说说使用注解配置Bean。
这部分内容主要分为两个部分:使用注解配置Bean,使用注解配置Bean属性。
在classpath中扫描组件
组件扫描:Spring能够从ClassPath下自动扫描,侦测和实例化具有特定注释的组件
特定组件包括:
@Component
@Respository 持久层
@Service 业务层
@Controller 控制层
这四个标签可以混用,暂时没有什么区别,不过建议在不同层用不同的注释,方便阅读。
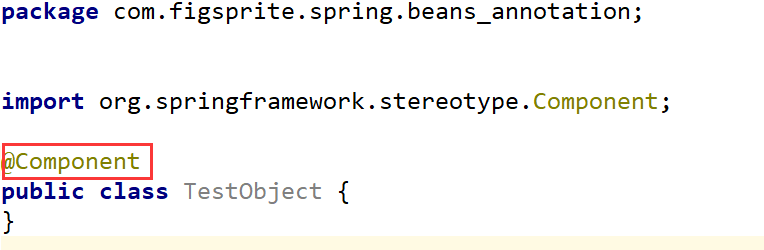
创建一个新的包com.figsprite.spring.beans_annotation,新的类com.figsprite.spring.beans_annotation.TestObject:
在TestObject.java里我们先放上注释,
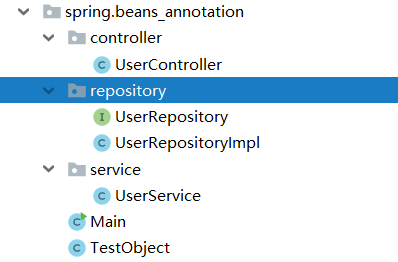
现在Bean还没有被IOC容器管理,我们再来建一个子包com.figsprite.spring.beans_annotation.repository,写一个接口com.figsprite.spring.beans_annotation.repository.UserRepository和实现类com.figsprite.spring.beans_annotation.repository.UserRepositoryImpl,接下来写业务层和控制层,分别创建一个包,然后写上相应代码,并写上注释:
UserController.java:
package com.figsprite.spring.beans_annotation.controller;

import org.springframework.stereotype.Controller;

@Controller
public class UserController {
    public void execute(){
        System.out.println("Controller execute");
    }
}
UserService.java:


package com.figsprite.spring.beans_annotation.service;

import org.springframework.stereotype.Service;

@Service
public class UserService {
    public void add(){
        System.out.println("Service Add");
    }
}
UserRepository.java
package com.figsprite.spring.beans_annotation.repository;

public interface UserRepository {

    void save();
}
UserRepositoryImpl.java
package com.figsprite.spring.beans_annotation.repository;


import org.springframework.stereotype.Repository;

@Repository("userRepository")
public class UserRepositoryImpl implements UserRepository{

    @Override
    public void save() {
        System.out.println("SAVE");
    }
}
做完这些,我们可以创建一个配置文件beans-annotation.xml,然后我们在这个配置文件里,通过<context:component-scan>标签扫描具有这些注释的类的包:
<context:component-scan base-package="com.figsprite.spring.beans_annotation"/>
接下来做一个测试,创建Main.java
在我们没有指明Bean对象的id时,在注释配置下,默认id为类名的驼峰命名。
如何命名呢?只要在我们刚刚写的标签里加个括号指定就行:
@Repository("userRepository")
Main.java:
-
package com.figsprite.spring.beans_annotation;
-
-
import com.figsprite.spring.beans_annotation.controller.UserController;
-
import com.figsprite.spring.beans_annotation.repository.UserRepositoryImpl;
-
import com.figsprite.spring.beans_annotation.service.UserService;
-
import org.springframework.context.ApplicationContext;
-
import org.springframework.context.support.ClassPathXmlApplicationContext;
-
-
public class Main {
-
public static void main(String[] args) {
-
ApplicationContext ctx = new ClassPathXmlApplicationContext("beans-annotation.xml");
-
TestObject to = (TestObject) ctx.getBean("testObject") ;
-
System.out.println(to);
-
-
UserController userController = (UserController) ctx.getBean("userController");
-
System.out.println(userController);
-
-
-
UserRepositoryImpl userRepository = (UserRepositoryImpl) ctx.getBean("userRepository");
-
System.out.println(userRepository);
-
-
UserService userService = (UserService) ctx.getBean("userService");
-
System.out.println(userService);
-
}
-
}

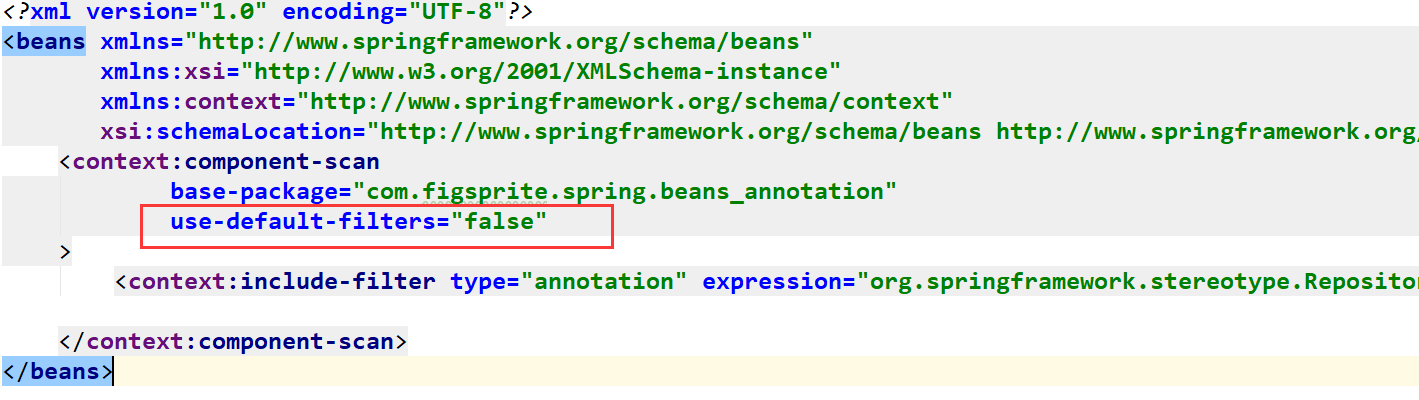
接下来回到<context:compomenr-scan>标签,再来说说里面的其他属性resource-pattern
,这个属性可以过滤特定类,比如我只想扫描repository底下的类,
<context:component-scan
base-package="com.figsprite.spring.beans_annotation"
resource-pattern="repository/*.class"/>
这样在Main里面,我们只会得到UserRepository的对象,其他的就得不到了,肯定报错,

<context:compomenr-scan>标签还有两个子标签
<context:include-filtter>包含哪些指定表达式的组件
< context:exclude-filtter >排除哪些指定表达式的组件
type属性:这里就介绍两种常用的annotation根据注解锁定目标,

比如不包含Repository注解
<context:exclude-filter type="annotation" expression="org.springframework.stereotype.Repository"/>
对于<context:include-filtter>,由于<context:compomenr-scan>默认是扫描包下的所有指定表达式组件,所有我们要加上use-default-filters="false",这样就不会自动扫描了,<context:include-filtter>与< context:exclude-filtter >使用方法一致,
另外一种是使用assignable方式,根据类名锁定目标。这里就再演示了