1.创建SpringMVC的配置文件springmvc-servlet
<?xml version="1.0" encoding="UTF-8"?>
<beans xmlns="http://www.springframework.org/schema/beans"
xmlns:xsi="http://www.w3.org/2001/XMLSchema-instance"
xmlns:mvc="http://www.springframework.org/schema/mvc"
xmlns:p="http://www.springframework.org/schema/p"
xmlns:context="http://www.springframework.org/schema/context"
xsi:schemaLocation="
http://www.springframework.org/schema/beans
http://www.springframework.org/schema/beans/spring-beans.xsd
http://www.springframework.org/schema/context
http://www.springframework.org/schema/context/spring-context.xsd
http://www.springframework.org/schema/mvc
http://www.springframework.org/schema/mvc/spring-mvc.xsd">
<context:component-scan base-package="com.wanyu.controller"></context:component-scan>
<mvc:annotation-driven/>
<!--
<mvc:annotation-driven/> 配置该标签会自动注册 DefaultAnnotationHandlerMapping(处理器映射)与
AnnotationMethodHandlerAdapter(处理器适配器)。SpringMVC需要通过这两个Bean来完成@Controller和
@RequestMapping()等注解的支持
<context:component-scan base-package=""/> 对包进行扫描,实现注解驱动Bean的定义,同时将Bean自动注入容器中使用
,即使标注了SpringMVC注解的Bean生效
-->
<bean clasas="org.springframework.web.servlet.view.InternalResourceViewResolver">
<property name="prefix" value="/WEB-INF/jsp/"></property>
<property name="suffix" value=".jsp"></property>
</bean>
</beans>
2.在web.xml中初始化springMVC的配置文件
<?xml version="1.0" encoding="UTF-8"?>
<web-app version="3.0"
xmlns="http://java.sun.com/xml/ns/javaee"
xmlns:xsi="http://www.w3.org/2001/XMLSchema-instance"
xsi:schemaLocation="http://java.sun.com/xml/ns/javaee
http://java.sun.com/xml/ns/javaee/web-app_3_0.xsd">
<display-name></display-name>
<welcome-file-list>
<welcome-file>index.jsp</welcome-file>
</welcome-file-list>
<servlet>
<servlet-name>springmvc</servlet-name>
<servlet-class>org.springframework.web.servlet.DispatcherServlet</servlet-class>
<!-- 初始化参数 -->
<init-param>
<param-name>contextConfigLocation</param-name>
<param-value>classpath:springmvc-servlet.xml</param-value>
</init-param>
</servlet>
<servlet-mapping>
<servlet-name>springmvc</servlet-name>
<url-pattern>/</url-pattern> <!-- /代表拦截所有请求 -->
</servlet-mapping>
</web-app>
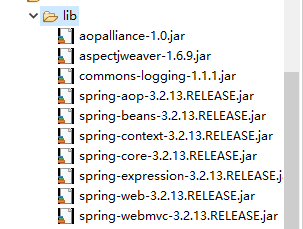
需要引入的jar包