Unlike file system and network interface discovery, the item does not necessarily have to have “snmp.discovery” key - item type of SNMP agent is sufficient.
The OIDs to discover are defined in SNMP OID field in the following format: discovery[{#MACRO1}, oid1, {#MACRO2}, oid2, …,]
where {#MACRO1}, {#MACRO2} … are valid lld macro names and oid1, oid2… are OIDs capable of generating meaningful values for these macros. A built-in macro {#SNMPINDEX} containing index of the discovered OID is applied to discovered entities. The discovered entities are grouped by {#SNMPINDEX} macro value.
To understand what we mean, let us perform few snmpwalks on our switch:
$ snmpwalk -v 2c -c public 192.168.1.1 IF-MIB::ifDescr
IF-MIB::ifDescr.1 = STRING: WAN
IF-MIB::ifDescr.2 = STRING: LAN1
IF-MIB::ifDescr.3 = STRING: LAN2

$ snmpwalk -v 2c -c public 192.168.1.1 IF-MIB::ifPhysAddress
IF-MIB::ifPhysAddress.1 = STRING: 8:0:27:90:7a:75
IF-MIB::ifPhysAddress.2 = STRING: 8:0:27:90:7a:76
IF-MIB::ifPhysAddress.3 = STRING: 8:0:27:2b:af:9e
And set SNMP OID to: discovery[{#IFDESCR}, ifDescr, {#IFPHYSADDRESS}, ifPhysAddress]
Now this rule will discover entities with {#IFDESCR} macros set to WAN, LAN1 and LAN2, {#IFPHYSADDRESS} macros set to 8:0:27:90:7a:75, 8:0:27:90:7a:76, and 8:0:27:2b:af:9e, {#SNMPINDEX} macros set to the discovered OIDs indexes 1, 2 and 3:
{
    "data": [
        {
            "{#SNMPINDEX}": "1",
            "{#IFDESCR}": "WAN",
            "{#IFPHYSADDRESS}": "8:0:27:90:7a:75"
        },
        {
            "{#SNMPINDEX}": "2",
            "{#IFDESCR}": "LAN1",
            "{#IFPHYSADDRESS}": "8:0:27:90:7a:76"
        },
        {
            "{#SNMPINDEX}": "3",
            "{#IFDESCR}": "LAN2",
            "{#IFPHYSADDRESS}": "8:0:27:2b:af:9e"
        }
    ]
}
If an entity does not have the specified OID, then the corresponding macro will be omitted for this entity. For example if we have the following data:
ifDescr.1 "Interface #1"
ifDescr.2 "Interface #2"
ifDescr.4 "Interface #4"

ifAlias.1 "eth0"
ifAlias.2 "eth1"
ifAlias.3 "eth2"
ifAlias.5 "eth4"
Then in this case SNMP discovery discovery[{#IFDESCR}, ifDescr, {#IFALIAS}, ifAlias] will return the following structure:
{
    "data": [
        {
            "{#SNMPINDEX}": 1,
            "{#IFDESCR}": "Interface #1",
            "{#IFALIAS}": "eth0"
        },
        {
            "{#SNMPINDEX}": 2,
            "{#IFDESCR}": "Interface #2",
            "{#IFALIAS}": "eth1"
        },
        {
            "{#SNMPINDEX}": 3,
            "{#IFALIAS}": "eth2"
        },
        {
            "{#SNMPINDEX}": 4,
            "{#IFDESCR}": "Interface #4"
        },
        {
            "{#SNMPINDEX}": 5,
            "{#IFALIAS}": "eth4"
        }
    ]
}
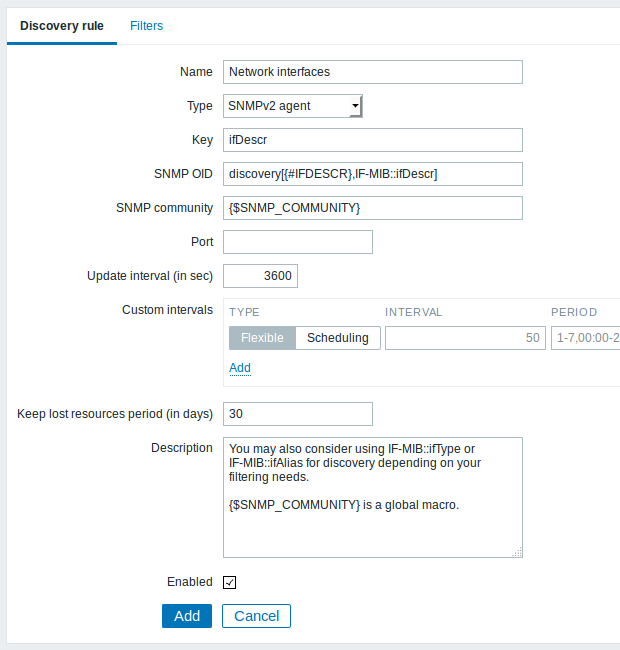
建立snmp discovery 规则,SNMP OID:discovery[{#IFDESCR},IF-MIB::ifDescr],
意思就是 snmpget 所有 IF-MIB::ifDescr 的值存放在 #IFDESCR 这个Marco(宏)里面,按照 #SNMPINDEX=1,2,3 排列存储。
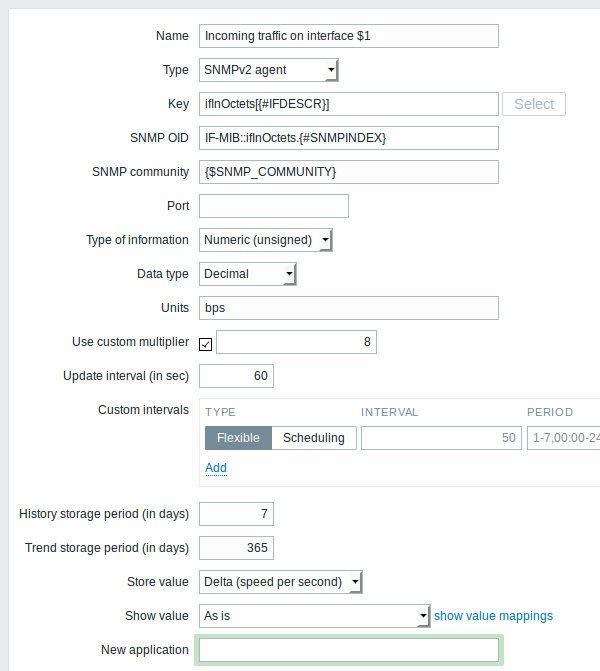
The following screenshot illustrates how we can use these macros in item prototypes:
创建 Item Prototypes规则,name里面的 $1 参数就是 key 里面传回的第一个参数,也就是 Discovery rule里面获得的 #IFDESCR 【对应#SNMPINDEX】的值。
返回的真实值就是:snmpget 的 SNMP OID 里面的IF-MIB::ifInOctets.{#SNMPINDEX}的值,SNMP community 对应的是添加主机时候设置的团体名。
当然也可以自己用snmpwalk命令一一指定要监控的某个具体的端口。