服务器中的表
select
Host
,User
,Select_priv
,Insert_priv
,Update_priv
,Delete_priv
,Create_priv
,Drop_priv
,Reload_priv
,Shutdown_priv
,Process_priv
,File_priv
,Grant_priv
,References_priv
,Index_priv
,Alter_priv
,Show_db_priv
,Super_priv
,Create_tmp_table_priv
,Lock_tables_priv
,Execute_priv
,Repl_slave_priv
,Repl_client_priv
,Create_view_priv
,Show_view_priv
,Create_routine_priv
,Alter_routine_priv
,Create_user_priv
,Event_priv
,Trigger_priv
,Create_tablespace_priv
,ssl_type
,ssl_cipher
,x509_issuer
,x509_subject
,max_questions
,max_updates
,max_connections
,max_user_connections
,plugin
,authentication_string
,password_expired
,password_last_changed
,password_lifetime
,account_locked from user;
查询 mysql 所有用户<--两种-->
SELECT DISTINCT CONCAT('User: ''',user,'''@''',host,''';') AS query FROM mysql.user;
SELECT HOST,USER FROM mysql.user;
信息:
117.136.94.236
本机ip:192.168.42.23
39.108.172.95
121.43.18.69
sudo /usr/local/mysql/bin/mysql -uroot -pBF1f8357c50e
BF1f8357c50e</div>
GRANT ALL PRIVILEGES ON *.* TO 'root'@'%' IDENTIFIED BY 'BF1f8357c50e' WITH GRANT OPTION;flush privileges;
出现:[emerg] 4613#0: bind() to 0.0.0.0:80 failed (98: Address already in use)错误!!!!!
解决方式:
-
使用命令关闭占用 80 端口的程序
sudo fuser -k 80/tcp -
进入 mysql 命令:
mysql -hlocalhost(主机地址) -uroot(用户名) -p 密码 -
关闭 mysql 命令:
mysql 退出三种方法:
mysql > exit;
mysql > quit;
mysql > \q; -
停止防火墙
sudo systemctl stop firewalld.service
并禁用防火墙服务
sudo systemctl disable firewalld.service
执行后效果:
Removed symlink /etc/systemd/system/dbus-org.fedoraproject.FirewallD1.service.
Removed symlink /etc/systemd/system/multi-user.target.wants/firewalld.service. -
安装 iptables 并启动该服务
安装
sudo yum install iptables-services
执行后效果:
complate -
开启 iptables
sudo systemctl enable iptables
sudo systemctl enable ip6tables -
执行后效果:
Created symlink from /etc/systemd/system/basic.target.wants/iptables.service to /usr/lib/systemd/system/iptables.service.
Created symlink from /etc/systemd/system/basic.target.wants/ip6tables.service to /usr/lib/systemd/system/ip6tables.service. -
启动服务
sudo systemctl start iptables
sudo systemctl start ip6tables -
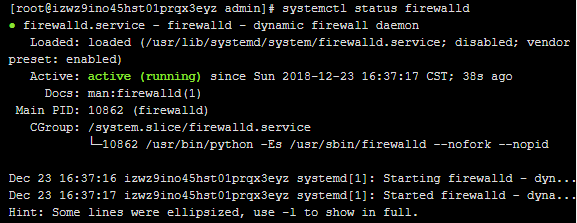
查看防火墙状态
systemctl status firewalld
(dead)未开启状态
(running)开启状态 -
开启防火墙:
systemctl start firewalld -
关闭防火墙:
systemctl stop firewalld
{开启/关闭}防火墙,命令行都没有效果可通过systemctl status firewalld查看防火墙状态
Warning: ALREADY_ENABLED: mysql
==》警告:已经启用:mysql
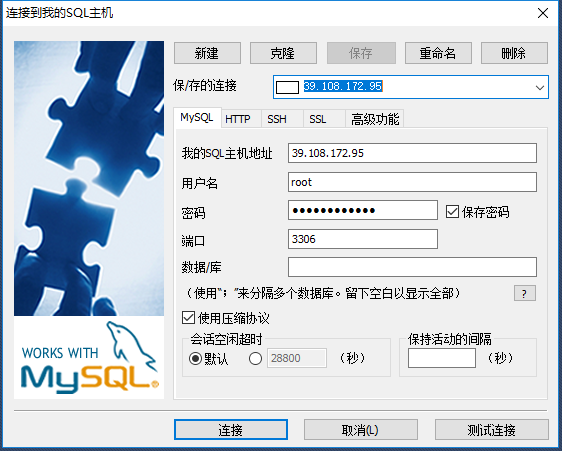
若用本地sqlyog连接服务器上的mysql数据库则修改:
+Linux centos7 将mysql加入防火墙
sudo firewall-cmd --zone=public --permanent --add-service=mysql
$\color{#3A68EE}
效果:
$
success
+重启防火墙
- 先关闭防火墙:
systemctl stop firewalld - 后开启防火墙:
systemctl start firewalld - 查看防火墙状态
systemctl status firewalld - 效果:=======》如下、、、、、
+查询数据库使用权限
- 连接数据库
mysql -uroot(用户名) -p密码 - 拼写sql语句查询
select host,user from mysql.user;
效果形似:(注意此时没有红色区域的内容)
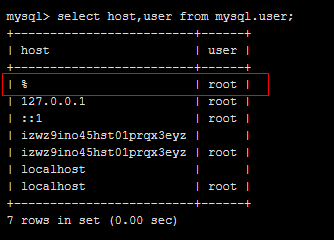
- 为该(root)用户添加权限(任何ip都能访问此数据库===》%)
GRANT ALL PRIVILEGES ON . TO 'root'@'%' IDENTIFIED BY 'BF1f8357c50e' WITH GRANT OPTION;flush privileges; - 再次查询权限
select host,user from mysql.user;
此时效果应为:

+在sqlyog中连接数据库即可