这段时间做项目,刚好碰到需要往Excel写数据,网上的资料零零散散,故自己花时间整理下。已测试过可直接运行。
1.涉及文件: NPOI.dll、NPOI.OOXML.dll、NPOI.OpenXml4Net.dll、NPOI.OpenXmlFormats.dll、NPOI.xml、ICSharpCode.SharpZipLib.dll
using System.IO;
using NPOI.HSSF.UserModel;
using NPOI.SS.UserModel;
using NPOI.XSSF.UserModel;
2.往EXCEL写数据、合并单元格、设置字体样式、插入图片
namespace Task_Test
{
    public class ExcelHelper
    {


        public static void WriteExcel()
        {
            string templateFile = @"C:	est	emple.xlsx"; // 文件必须存在
            string outFile = @"C:	est" + DateTime.Now.ToString("yyyyMMddHHmmssfff") + ".xlsx";
            string picPath = @"C:	est	est.jpg";

            IWorkbook workbook = null;
            FileStream file = new FileStream(templateFile, FileMode.Open, FileAccess.Read);

            if (Path.GetExtension(templateFile) == ".xls")
            {
                workbook = new HSSFWorkbook(file);
            }
            else if (Path.GetExtension(templateFile) == ".xlsx")
            {
                workbook = new XSSFWorkbook(file);
            }
            ISheet sheet = workbook.GetSheetAt(0);

            try
            {
                SetCellValue(sheet, 0, 0, "这里是第1行第1列内容");
                SetCellValue(sheet, 0, 1, "这里是第1行第2列内容");

                SetCellValue(sheet, 1, 0, "这里是第2行第1列内容");
                SetCellValue(sheet, 1, 1, "这里是第2行第2列内容");

                // Height:单位是1/20个点,所以要想得到一个点的话,需要乘以20。
                sheet.GetRow(1).Height = 44 * 20; // 给第2行设置行高

                // Width: 单位是1/256个字符宽度,所以要乘以256才是一整个字符宽度
                sheet.SetColumnWidth(1, 50 * 256); // 给第1列设置宽度

                SetCellValue(sheet, 2, 0, "这里是第3行第1列内容,需要设置字体样式");

                // 从第3行到第6行,第1列到第4列合并单元格
                SetCellRangeAddress(sheet, 2, 5, 0, 3);

                // 给合并之后的单元格加边框,并设置字体大小、居中、字体颜色、背景色
                AddRengionBorder(workbook, sheet, 2, 5, 0, 3);

                // 插入图片
                InsertFootSignPic(workbook, sheet, 7, 16, 0, 2, outFile, picPath);

            }
            catch (Exception ex)
            {
                throw ex;
            }
            finally
            {
                if (file != null)
                {
                    file.Close();
                }
            }
        }

        /// <summary>
        /// 单元格设置内容
        /// </summary>
        /// <param name="sheet"></param>
        /// <param name="rowIndex">第几行,从0开始</param>
        /// <param name="cellIndex">第几列,从0开始</param>
        /// <param name="value">内容(字符串)</param>
        public static void SetCellValue(ISheet sheet, int rowIndex, int cellIndex, string value)
        {
            if (sheet.GetRow(rowIndex) == null)
            {
                sheet.CreateRow(rowIndex);
            }
            if (sheet.GetRow(rowIndex).GetCell(cellIndex) == null)
            {
                sheet.GetRow(rowIndex).CreateCell(cellIndex);
            }
            sheet.GetRow(rowIndex).GetCell(cellIndex).SetCellValue(value);
        }


        /// <summary>
        /// 合并单元格
        /// </summary>
        /// <param name="sheet">要合并单元格所在的sheet</param>
        /// <param name="rowstart">开始行的索引</param>
        /// <param name="rowend">结束行的索引</param>
        /// <param name="colstart">开始列的索引</param>
        /// <param name="colend">结束列的索引</param>
        public static void SetCellRangeAddress(ISheet sheet, int rowstart, int rowend, int colstart, int colend)
        {
            for (int r = rowstart; r <= rowend; r++)
            {
                for (int c = colstart; c <= colend; c++)
                {
                    if (sheet.GetRow(r) == null)
                    {
                        sheet.CreateRow(r); // 如果行不存在,则创建行
                    }
                    if (sheet.GetRow(r).GetCell(c) == null)
                    {
                        sheet.GetRow(r).CreateCell(c); // 如果列不存在,则创建列
                    }
                }
            }
            NPOI.SS.Util.CellRangeAddress cellRangeAddress = new NPOI.SS.Util.CellRangeAddress(rowstart, rowend, colstart, colend);
            sheet.AddMergedRegion(cellRangeAddress);
        }

        /// <summary>
        /// 加范围边框和设置字体大小、颜色、背景色、居中
        /// </summary>
        /// <param name="firstRow">起始行</param>
        /// <param name="lastRow">结束行</param>
        /// <param name="firstCell">起始列</param>
        /// <param name="lastCell">结束列</param>
        /// <returns></returns>
        public static void AddRengionBorder(IWorkbook workbook, ISheet sheet, int firstRow, int lastRow, int firstCell, int lastCell)
        {
            for (int i = firstRow; i < lastRow; i++)
            {
                for (int n = firstCell; n < lastCell; n++)
                {
                    ICell cell;
                    cell = sheet.GetRow(i).GetCell(n);
                    if (cell == null)
                    {
                        cell = sheet.GetRow(i).CreateCell(n);
                    }
                    ICellStyle style = sheet.Workbook.CreateCellStyle();
                    style.BorderTop = BorderStyle.Thin;
                    style.BorderBottom = BorderStyle.Thin;
                    style.BorderLeft = BorderStyle.Thin;
                    style.BorderRight = BorderStyle.Thin;
                    style.Alignment = HorizontalAlignment.Center;   //水平对齐 :居中
                    style.VerticalAlignment = VerticalAlignment.Center; //垂直对齐  :居中

                    if (i == firstRow) //第一行
                    {
                        style.FillForegroundColor = NPOI.HSSF.Util.HSSFColor.Black.Index; // 背景色:黑色
                        style.FillPattern = FillPattern.SolidForeground;

                        IFont font = workbook.CreateFont(); //创建一个字体颜色
                        font.Color = NPOI.HSSF.Util.HSSFColor.White.Index;  //字体颜色:白色
                        font.FontHeightInPoints = 18;//字体大小

                        style.SetFont(font); //给样式设置字体
                    }

                    cell.CellStyle = style;
                }

            }
        }

        /// <summary>
        /// 往EXCEL指定单元格插入图片
        /// </summary>
        /// <param name="workbook"></param>
        /// <param name="sheet"></param>
        /// <param name="firstRow"> 起始单元格行序号,从0开始计算</param>
        /// <param name="lastRow">  终止单元格行序号,从0开始计算</param>
        /// <param name="firstCell"> 起始单元格列序号,从0开始计算</param>
        /// <param name="lastCell">  终止单元格列序号,从0开始计算</param>
        /// <param name="outFile">插入图片后,另存为路径(绝对路径)</param>
        /// <param name="picurl">图片绝对路径</param>
        public static void InsertFootSignPic(IWorkbook workbook, ISheet sheet, int firstRow, int lastRow, int firstCell, int lastCell, string outFile, string picurl)
        {
            FileStream filess = null;
            try
            {
                // 将图片转换为字节数组
                byte[] bytes = System.IO.File.ReadAllBytes("" + picurl + "");
                int pictureIdx = workbook.AddPicture(bytes, PictureType.JPEG);
                XSSFDrawing patriarch = (XSSFDrawing)sheet.CreateDrawingPatriarch();

                // dx1:起始单元格的x偏移量,如例子中的255表示直线起始位置距A1单元格左侧的距离;
                // dy1:起始单元格的y偏移量,如例子中的125表示直线起始位置距A1单元格上侧的距离;
                // dx2:终止单元格的x偏移量,如例子中的1023表示直线起始位置距C3单元格左侧的距离;
                // dy2:终止单元格的y偏移量,如例子中的150表示直线起始位置距C3单元格上侧的距离;
                // col1:起始单元格列序号,从0开始计算;
                // row1:起始单元格行序号,从0开始计算,如例子中col1 = 0,row1 = 0就表示起始单元格为A1;
                // col2:终止单元格列序号,从0开始计算;
                // row2:终止单元格行序号,从0开始计算,如例子中col2 = 2,row2 = 2就表示起始单元格为C3;

                XSSFClientAnchor anchor = new XSSFClientAnchor(10, 10, 0, 0, firstCell, firstRow, lastCell, lastRow);

                //把图片插到相应的位置
                XSSFPicture pict = (XSSFPicture)patriarch.CreatePicture(anchor, pictureIdx);

                filess = File.OpenWrite(outFile);
                workbook.Write(filess);
            }
            catch (Exception ex)
            {
                throw ex;
            }
            finally
            {
                if (filess != null)
                {
                    filess.Close();
                }
            }
        }

    }
}
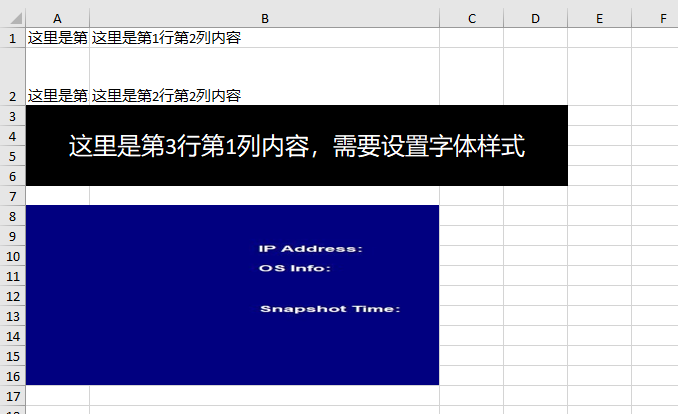
3.运行后效果图