树莓派基于tensorflow的数字识别
目前博主只试过python3.7.3+tensorflow1.13.1版本,其它tensorflow版本的还没试
一、安装tensorflow环境
-
检查python环境
1 python3 --version
2 pip3 --version
-
更新软件源
sudo apt update
sudo apt upgrade
-
执行安装相应环境
1 sudo apt-get install python3-pip python3-dev
-
若使用pip3 install tensorflow==1.13.1安装可能需要等待漫长的时间,可以先在网上下载 tensorflow-1.13.1-cp37-none-linux_armv7l.whl,然后复制到树莓派系统上,再执行以下代码可以安装成功
1 sudo pip3 install tensorflow-1.13.1-cp37-none-linux_armv7l.whl
-
运行以下程序检验环境是否安装成功
import tensorflow as tf
hello = tf.constant(“Hello, World!”)
sess = tf.Session()
print(sess.run(hello))
-
解决numpy和h5py的依赖
1 sudo apt install libatlas-base-dev
2 sudo apt install libhdf5-dev
3 sudo apt install python-h5py
-
安装numpy和h5py
1 sudo pip3 install h5py
2 sudo pip3 install numpy
-
配置opencv2环境
 1 sudo apt-get install build-essential cmake git pkg-config
 2 sudo apt install build-essential cmake git pkg-config libgtk-3-dev libcanberra-gtk*
 3 sudo apt install libavcodec-dev libavformat-dev libswscale-dev libv4l-dev libxvidcore-dev libx264-dev
 4 sudo apt install libjpeg-dev libpng-dev libtiff-dev gfortran openexr libatlas-base-dev opencl-headers
 5 sudo apt install python3-dev python3-numpy libtbb2 libtbb-dev libdc1394-22-dev
 6 sudo apt-get install libjpeg8-dev
 7 sudo apt-get install libtiff5-dev
 8 sudo apt-get install libjasper-dev
 9 sudo apt-get install libpng12-dev
10 sudo apt-get install libavcodec-dev libavformat-dev libswscale-dev libv4l-dev
11 sudo apt-get install libgtk2.0-dev
12 sudo apt-get install libatlas-base-dev gfortran
-
安装opencv2
1 // 下载OpenCV
2 sudo apt-get install libopencv-dev
3 sudo apt-get install python-opencv
二、程序分析
-
项目文件结构,生成模型放置在model文件夹,测试数据集在testimage,训练数据集在trainimage,mnist.py为训练模型程序,main.py为部署模型程序
-
mnist.py部分程序分析
-
导入库(使用tensorflow框架)
1 # -*- coding: UTF-8 -*-
2 import tensorflow as tf
3 import tensorflow.keras as keras
4 from tensorflow.keras import Sequential
5 from tensorflow.keras.layers import Flatten, Dense, Conv2D, MaxPooling2D, Dropout, MaxPool2D
6 from tensorflow.keras.datasets import mnist
7 from tensorflow.keras import backend as K
8 import json
-
设置参数(batch_size为每次训练所选取的样本数,epochs为训练次数)
1 # 设置参数
2 batch_size = 128
3 num_classes = 10
4 epochs = 10
5
6 # 输入数据维度
7 img_rows, img_cols = 28, 28
-
- 加载数据集
 1 # 加载数据集,调用库中已有mnist数据集from tensorflow.keras.datasets import mnist
 2 (x_train, y_train), (x_test, y_test) = mnist.load_data()
 3
 4 if K.image_data_format() == 'channels_first':
 5     x_train = x_train.reshape(x_train.shape[0], 1, img_rows, img_cols)
 6     x_test = x_test.reshape(x_test.shape[0], 1, img_rows, img_cols)
 7     input_shape = (1, img_rows, img_cols)
 8 else:
 9     x_train = x_train.reshape(x_train.shape[0], img_rows, img_cols, 1)
10     x_test = x_test.reshape(x_test.shape[0], img_rows, img_cols, 1)
11     input_shape = (img_rows, img_cols, 1)
12
13 x_train = x_train.astype('float32') / 255
14 x_test = x_test.astype('float32') / 255
-
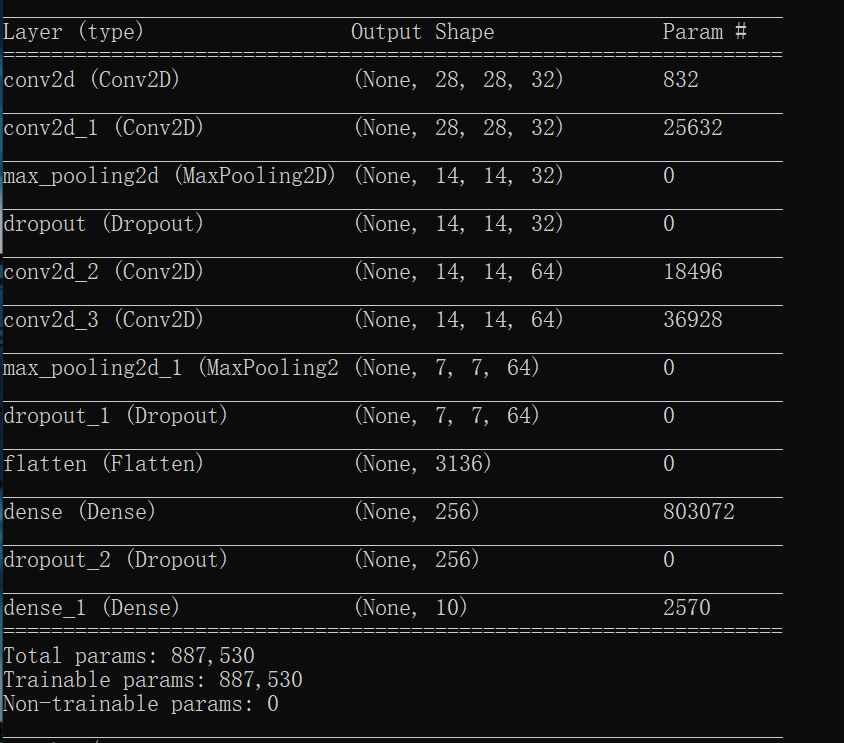
构造神经网络模型(损失函数使用交叉熵损失函数,优化器使用adam,衡量模型指标为准确率)
 1 # 构建网络
 2 model = Sequential()
 3 # 第一个卷积层,32个卷积核,大小5x5,卷积模式SAME,激活函数relu,输入张量的大小
 4 model.add(Conv2D(filters=32, kernel_size=(5, 5), padding='Same', activation='relu',
 5                  input_shape=(28, 28, 1)))
 6 model.add(Conv2D(filters=32, kernel_size=(5, 5), padding='Same', activation='relu'))
 7 # 池化层,池化核大小2x2
 8 model.add(MaxPool2D(pool_size=(2, 2)))
 9 # 随机丢弃四分之一的网络连接,防止过拟合
10 model.add(Dropout(0.25))
11 model.add(Conv2D(filters=64, kernel_size=(3, 3), padding='Same', activation='relu'))
12 model.add(Conv2D(filters=64, kernel_size=(3, 3), padding='Same', activation='relu'))
13 model.add(MaxPool2D(pool_size=(2, 2), strides=(2, 2)))
14 model.add(Dropout(0.25))
15 # 全连接层,展开操作,
16 model.add(Flatten())
17 # 添加隐藏层神经元的数量和激活函数
18 model.add(Dense(256, activation='relu'))
19 model.add(Dropout(0.25))
20 # 输出层
21 model.add(Dense(10, activation='softmax'))
22 model.summary()
23 model.compile(loss='categorical_crossentropy', optimizer='adam', metrics=['accuracy'])
-
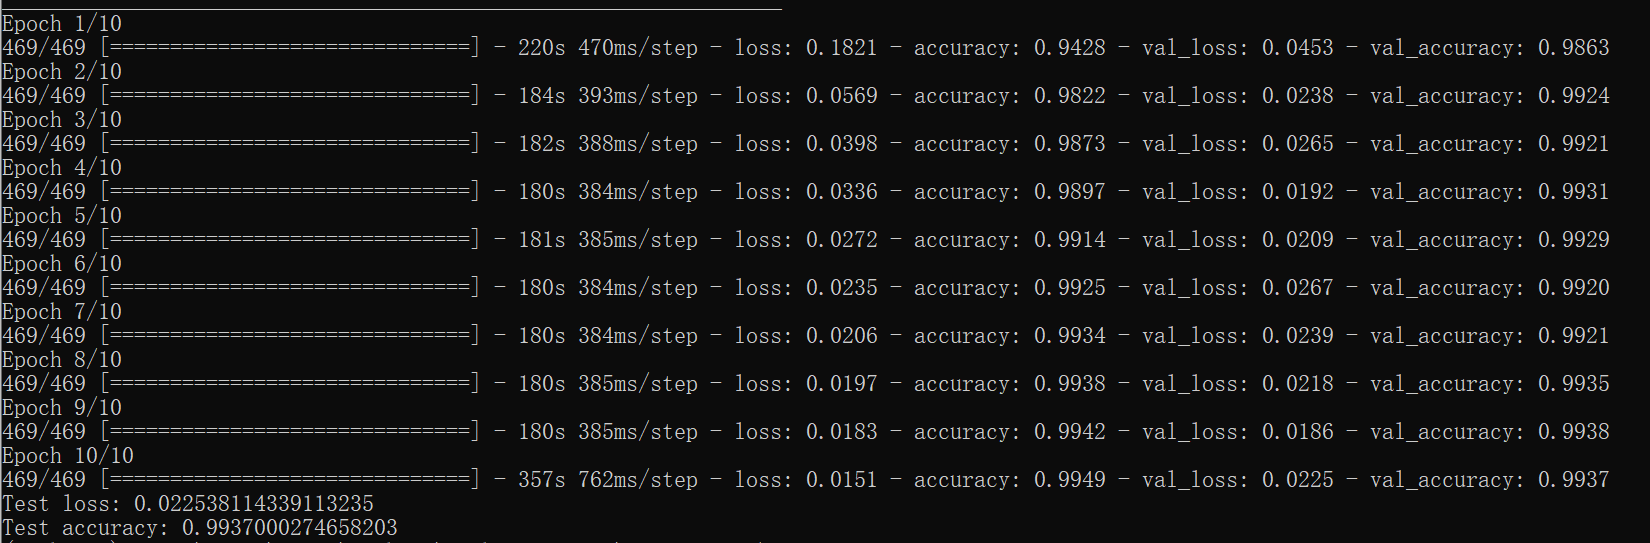
- 模型训练
1 model.fit(x_train, y_train, batch_size=batch_size,epochs=epochs,verbose=1,validation_data=(x_test, y_test))
2 score = model.evaluate(x_test, y_test, verbose=0)
3 print('Test loss:', score[0])
4 print('Test accuracy:', score[1])
-
模型及其参数保存(保存格式为h5)
1 with open('model.json', 'w') as outfile:
2     json.dump(model.to_json(), outfile)
3
4 model_file = 'model.h5'
5 model.save(model_file)
-
部署模型程序分析
-
导入库(numpy、tensorflow、matplotlib、cv2、picamera)
 1 # -*- coding: UTF-8 -*-
 2 import numpy as np
 3 import tensorflow as tf
 4 import tensorflow.keras as keras
 5 from tensorflow.keras.preprocessing.image import img_to_array, load_img
 6 import matplotlib.pyplot as plt
 7 import matplotlib.image as mpimg
 8 from PIL import Image
 9 import cv2
10 import os
11 from picamera import PiCamera
12 from time import sleep
-
加载模型model.h5
1 #load model
2 model_file = './model/model.h5'
3 model_file = model_file
4 print(type(model_file))
5 global model
6 model = keras.models.load_model(model_file)
-
调用picamera库来连接树莓派的摄像头,并通过摄像头拍摄一张分辨率为480*480的图片,将其保存至“/home/pi/Desktop/camera/tf_keras_mnist/image_28.jpg”
 1 # 调用打开摄像头库
 2 camera = PiCamera()
 3 # 设置照片分辨率为480*480
 4 camera.resolution = (480, 480)
 5 camera.start_preview()
 6 sleep(2)
 7 camera.capture('/home/pi/Desktop/camera/tf_keras_mnist/image_28.jpg')
 8 camera.stop_preview()
 9 print("Collect Image Finish!")
10 img_file = './image_28.jpg'
-
读取“./image_28.jpg”位置的图片,并将其分辨率更改为28*28,使得满足模型参数输入要求
1 img_array = cv2.imread(img_file, cv2.IMREAD_GRAYSCALE)
2 resized_image = cv2.resize(img_array, (28, 28))
3
4 img = Image.fromarray(np.uint8(resized_image))
5 img.save('output.jpg')
6 img = mpimg.imread(img_file)
-
把28*28分辨率的图片通过img_to_array把其矩阵中的参数由整数值变为浮点数的数组,再把所得数组放进已训练好的模型中,最后将会输出一个预测值
1 img = img_to_array(load_img(img_file, target_size=(28, 28), color_mode="grayscale")) / 255.
2 img = np.expand_dims(img, axis=0)
3 code = model.predict_classes(img)[0]
4 print("Predict Result: ", code)
全代码区
 1 # -*- coding: UTF-8 -*-
 2 import numpy as np
 3 import tensorflow as tf
 4 import tensorflow.keras as keras
 5 from tensorflow.keras.preprocessing.image import img_to_array, load_img
 6 import matplotlib.pyplot as plt
 7 import matplotlib.image as mpimg
 8 from PIL import Image
 9 import cv2
10 import os
11 from picamera import PiCamera
12 from time import sleep
13
14 #load model
15 model_file = './model/model.h5'
16 model_file = model_file
17 print(type(model_file))
18 global model
19 model = keras.models.load_model(model_file)
20
21
22 def preditc():
23     print("Get ready to capture images and place the camera")
24     count = 5
25     while count >= 1:
26         print("Count Down: ", count, "s")
27         count = count - 1
28         sleep(1)
29
30     # 调用打开摄像头库
31     camera = PiCamera()
32     # 设置照片分辨率为480*480
33     camera.resolution = (480, 480)
34     camera.start_preview()
35     sleep(2)
36     camera.capture('/home/pi/Desktop/camera/tf_keras_mnist/image_28.jpg')
37     camera.stop_preview()
38     print("Collect Image Finish!")
39     img_file = './image_28.jpg'
40
41     img_array = cv2.imread(img_file, cv2.IMREAD_GRAYSCALE)
42     resized_image = cv2.resize(img_array, (28, 28))
43
44     img = Image.fromarray(np.uint8(resized_image))
45     img.save('output.jpg')
46     img = mpimg.imread(img_file)
47
48     img = img_to_array(load_img(img_file, target_size=(28, 28), color_mode="grayscale")) / 255.
49     img = np.expand_dims(img, axis=0)
50     code = model.predict_classes(img)[0]
51     print("Predict Result: ", code)
52
53     plt.imshow(np.real(img).squeeze())
54     plt.show()
55
56
57 # 主函数
58 if __name__ == '__main__':
59     preditc()