1.创建Maven WEB项目
2.导入springmvc的jar包
    <dependencies>
        <dependency>
            <groupId>org.springframework</groupId>
            <artifactId>spring-webmvc</artifactId>
            <version>5.1.5.RELEASE</version>
        </dependency>
        <dependency>
            <groupId>javax.servlet</groupId>
            <artifactId>javax.servlet-api</artifactId>
            <version>4.0.1</version>
            <scope>provided</scope>
        </dependency>
        <dependency>
            <groupId>javax.servlet.jsp</groupId>
            <artifactId>javax.servlet.jsp-api</artifactId>
            <version>2.3.3</version>
            <scope>provided</scope>
        </dependency>
    </dependencies>
3.创建与配置springmvc.xml核心配置文件
<?xml version="1.0" encoding="UTF-8"?>
<beans xmlns="http://www.springframework.org/schema/beans"
    xmlns:xsi="http://www.w3.org/2001/XMLSchema-instance"
    xmlns:aop="http://www.springframework.org/schema/aop"
    xmlns:context="http://www.springframework.org/schema/context"
    xmlns:lang="http://www.springframework.org/schema/lang"
    xmlns:mvc="http://www.springframework.org/schema/mvc"
    xsi:schemaLocation="http://www.springframework.org/schema/beans
        http://www.springframework.org/schema/beans/spring-beans-4.3.xsd
        http://www.springframework.org/schema/aop
        http://www.springframework.org/schema/aop/spring-aop-4.3.xsd
        http://www.springframework.org/schema/context
        http://www.springframework.org/schema/context/spring-context-4.3.xsd
        http://www.springframework.org/schema/lang
        http://www.springframework.org/schema/lang/spring-lang-4.3.xsd
        http://www.springframework.org/schema/mvc
        http://www.springframework.org/schema/mvc/spring-mvc-4.3.xsd">

    <context:component-scan base-package="com.jiancaiyi"/>
    <mvc:annotation-driven/>
</beans>
4.在web.xml中配置前端控制器
    <!-- spring mvc 配置 -->
    <!-- 1.配置DispatcherServlet表示,该工程将采用springmvc的方式。 -->
    <servlet>
        <servlet-name>webmvc</servlet-name>
        <servlet-class>org.springframework.web.servlet.DispatcherServlet</servlet-class>
        <!-- 启动项目的时候要加载的配置文件 -->
        <init-param>
            <param-name>contextConfigLocation</param-name>
            <param-value>classpath*:spring-mvc.xml</param-value>
        </init-param>
        <load-on-startup>1</load-on-startup>
    </servlet>
    <servlet-mapping>
        <servlet-name>webmvc</servlet-name>
        <url-pattern>/</url-pattern>
    </servlet-mapping>
表 4.1. DispatcherServlet初始化参数
| 参数 | 描述 |
|---|---|
contextClass |
实现WebApplicationContext接口的类,当前的servlet用它来创建上下文。如果这个参数没有指定,默认使用XmlWebApplicationContext。 |
contextConfigLocation |
传给上下文实例(由contextClass指定)的字符串,用来指定上下文的位置。这个字符串可以被分成多个字符串(使用逗号作为分隔符)来支持多个上下文(在多上下文的情况下,如果同一个bean被定义两次,后面一个优先)。 |
| namespace | WebApplicationContext命名空间。默认值是[server-name]-servlet。 |
HandlerMapping和HandlerAdapter配置方式一
5.配置HandlerMapping处理器映射器

6.配置HandlerAdapter处理器适配器

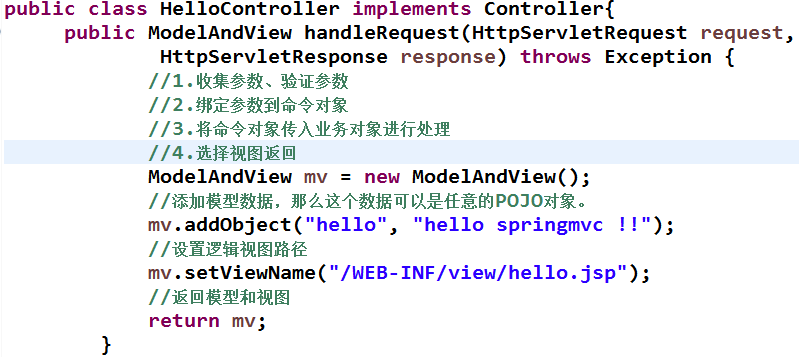
7.创建HelloController类
自定义的HelloController类需要实现
org.springframework.web.servlet.mvc.Controller接口
8.配置自定义Handler控制器

HandlerMapping和HandlerAdapter配置方式二
5.配置HandlerMapping处理器映射器

6.配置HandlerAdapter处理器适配器

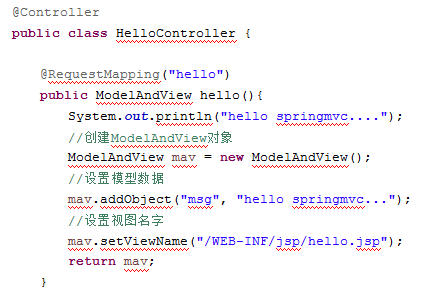
7.创建HelloController类
8.不需配置自定义Handler控制器
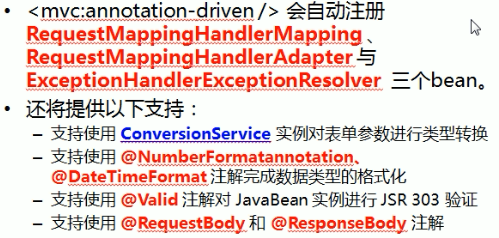
HandlerMapping和HandlerAdapter配置方式三

并且提供如下功能:
9.配置视图解析器

10.不通过Handler直接转发到视图界面必须配置注解驱动
