vhosts添加https证书两步:
1:生成证书:
sudo openssl req -x509 -nodes -days 365 -newkey rsa:2048 -keyout /etc/ssl/private/apache-selfsigned.key -out /etc/ssl/certs/apache-selfsigned.crt
关于参数:
- openssl: 基本命令行工具,用于创建并管理OpenSSL证书、密钥与其它文件。
- req: 此子命令指定我们希望使用X.509证书签名请求(简称CSR)管理。其中X.509是一项公钥基础设施标准,SSL与TLS将其指定为密钥与证书管理机制。
- -x509: 进一步修改前一条子命令,告知工具我们需要的是自签名证书,而非生成普通的证书签名请求。
- -nodes: 告知OpenSSL跳过利用密码保护证书的选项。我们的Apache需要在服务器启动时能够在不经用户许可的情况下读取该文件,而密码会影响到这一流程。
- -days 365: 此选项选定证书的有效时限。我们将其设定为一年。
- -newkey rsa:2048: 指定我们希望同时生成一份新证书与新密钥。我们在上一步设定中无需创建密钥即可签署证书,因此这里需要将密钥与证书一同创建。其中rsa:2048部分指定生成RSA密钥,长度为2048位。
- -keyout: 此行告知OpenSSL将生成的密钥文件保存在何处。
- -out: 告知OpenSSL将我们创建的证书保存在何处。
参考:https://blog.csdn.net/zstack_org/article/details/70048745
2:添加带证书的虚拟主机:
sudo lnmp ssl add
响应:
+-------------------------------------------+
|    Manager for LNMP, Written by Licess    |
+-------------------------------------------+
|              https://lnmp.org             |
+-------------------------------------------+
Please enter domain(example: www.lnmp.org): localhost
 Your domain: localhost
Enter more domain name(example: lnmp.org *.lnmp.org):
Please enter the directory for domain localhost: /home/wwwroot/www
Allow access log? (y/n) y
Enter access log filename(Default:localhost.log):
You access log filename: localhost.log
Please enter Administrator Email Address: ××××@163.com
Server Administrator Email:××××@163.com
1: Use your own SSL Certificate and Key
2: Use Let's Encrypt to create SSL Certificate and Key
Enter 1 or 2: 1
Please enter full path to SSL Certificate file: /etc/ssl/certs/apache-selfsigned.crt
Please enter full path to SSL Certificate Key file: /etc/ssl/private/apache-selfsigned.key
Please enter full path to SSL Chain file:
SSL Chain file will not set.Test Apache configure file...
访问localhost
重启电脑apache 无法访问,可通过命令进行查看错误。
httpd -k start
AH00112: Warning: DocumentRoot [/home/wwwroot/default] does not exist
AH00526: Syntax error on line 23 of /usr/local/apache/conf/vhost/localhost.conf:
SSLCertificateKeyFile: file '/etc/ssl/private/apache-selfsigned.key' does not exist or is empty
解决:
/home/wwwroot/default 目录不存在,vhost如果没有指定path,在/usr/local/apache/conf/extra/httpd-vhosts.conf 中修改。
/etc/ssl/private/apache-selfsigned.key 不存在,是因为www-data 组没有读取/etc/ssl的全选。
sudo chmod -755 /etc/ssl/*
生成被浏览器信任的证书
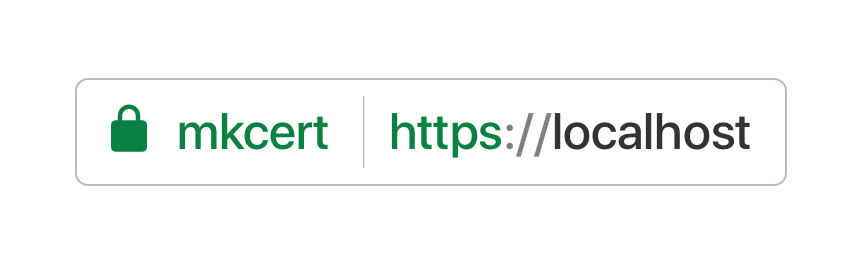
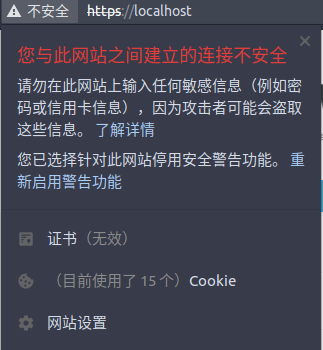
自签证书很简单,但生成的不被浏览器认可,在地址栏显示为 “不安全”。
有一个开源工具,mkcert ,由google Go 团队开发,生成可被浏览器信任的证书。原理是生成证书的同时生成自己的证书颁发机构CA, 在系统里插入一个自己的 CA root,信任这个 CA root,然后用这个根生成 SAN 证书。
github地址: https://github.com/FiloSottile/mkcert
可通过项目github的Releases打包文件直接运行生成;
./mkcert-v1.3.0-linux-amd64
是步骤帮助说明:
Using the local CA at "/home/×××/.local/share/mkcert" ✨
Usage of mkcert:

    $ mkcert -install
    Install the local CA in the system trust store.

    $ mkcert example.org
    Generate "example.org.pem" and "example.org-key.pem".

    $ mkcert example.com myapp.dev localhost 127.0.0.1 ::1
    Generate "example.com+4.pem" and "example.com+4-key.pem".

    $ mkcert "*.example.it"
    Generate "_wildcard.example.it.pem" and "_wildcard.example.it-key.pem".

    $ mkcert -uninstall
    Uninstall the local CA (but do not delete it).

For more options, run "mkcert -help".
执行 ./mkcert-v1.3.0-linux-amd64 --install 就会安装本地的私有CA,并添加系统信任此CA。
执行 ./mkcert-v1.3.0-linux-amd64 localhost 生成 The certificate is at "./localhost.pem" and the key at "./localhost-key.pem" ✅ 将证书添加nginx或apache即可。

参考: https://blog.filippo.io/mkcert-valid-https-certificates-for-localhost/