Linux Namespace
namespace是linux内核用来隔离内核资源的方案。 是对全局系统资源的一种封装隔离,使得处于不同 namespace 的进程拥有独立的全局系统资源,改变一个 namespace 中的系统资源只会影响当前 namespace 里的进程,对其他 namespace 中的进程没有影响。
隔离资源
| 名称 | 宏定义 | 隔离的资源 |
| IPC | CLONE_NEWIPC | System V IPC(信号量、消息队列、共享内存) 和POSIX MESSAGE QUEUES |
| Network | CLONE_NEWNET | Network devices、stacks、ports(网络设备、网络栈、端口等) |
| Mount | CLONE_NEWNS | Mount points(文件系统挂载点) |
| PID | CLONE_NEWPID | Process IDs(进程编号) |
| User | CLONE_NEWUSER | User and Groups IDs(用户和用户组) |
| UTS | CLONE_NEWUTS | Hostname and NIS domain name(主机名与NIS域名) |
| Cgroup | CLONE_NEWCGROUP | Cgroup root directory(cgroup的根目录) |
表现形式
- 查看进程ID的namespace
# 查看进程18863的namespace
ll /proc/18863/ns

可以看到,namespace 是链接文件,格式为[隔离类型:唯一标识],唯一标识可看成namespace的ID,同一个ID下的进程共享该namespace的全局资源。
函数
- clone():Clone()函数是在libc库中定义的一个封装函数,它负责建立新轻量级进程的堆栈并且调用对编程者隐藏了clone系统条用。实现clone()系统调用的sys_clone()服务例程并没有fn和arg参数。封装函数把fn指针存放在子进程堆栈的每个位置处,该位置就是该封装函数本身返回地址存放的位置。Arg指针正好存放在子进程堆栈中的fn的下面。当封装函数结束时,CPU从堆栈中取出返回地址,然后执行fn(arg)函数。
- setns(): 通过 setns() 函数可以将当前进程加入到已有的 namespace 中。
- unshare():通过 unshare 函数可以在原进程上进行 namespace 隔离。
容器里的进程看到的文件系统
启用隔离函数CLONE_NEWNS, 进入容器看到就是容器自己的文件系统?
- 函数验证, 在~目录下创建个ns.c文件
#define _GNU_SOURCE
#include <sys/mount.h>
#include <sys/types.h>
#include <sys/wait.h>
#include <stdio.h>
#include <sched.h>
#include <signal.h>
#include <unistd.h>
#define STACK_SIZE (1024 * 1024)
static char container_stack[STACK_SIZE];
char* const container_args[] = {
  "/bin/bash",
  NULL
};

int container_main(void* arg)
{
  printf("进入容器里面!
");

  execv(container_args[0], container_args);
  printf("错误
");
return 1;
}

int main()
{
  printf("宿主机启动一个容器!
");
int container_pid = clone(container_main, container_stack+STACK_SIZE, CLONE_NEWNS | SIGCHLD , NULL);
  waitpid(container_pid, NULL, 0);
  printf("容器停止!
");
return 0;
}
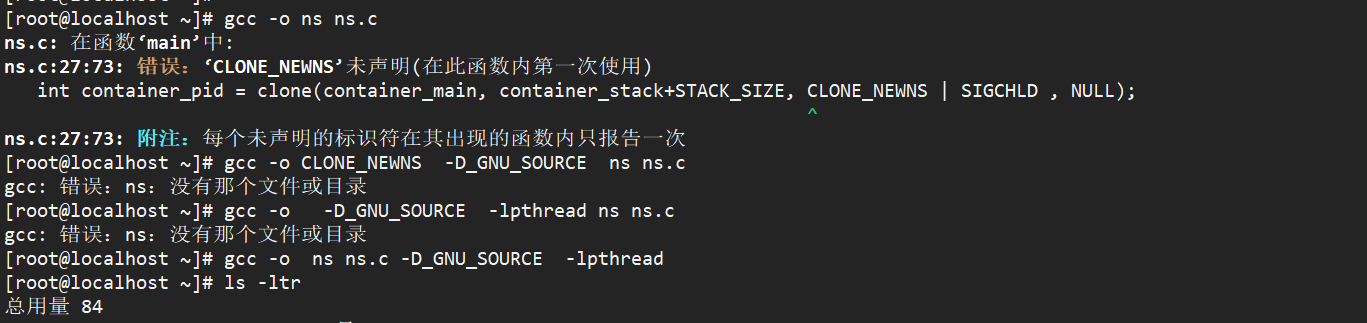
编译并执行:
# 编译
gcc -o  ns ns.c -D_GNU_SOURCE  -lpthread
# 执行
./ns
结果:

执行ns,显示我们进入到了一个容器中。假象我们容器是挂载到/tmp目录下,查看/tmp,其实这里仍然是宿主机的文件。紧接着,把容器以 tmpfs(内存盘)格式,重新挂载了 /tmp 目录。
#define SOURCE
#include <sys/mount.h>
#include <sys/types.h>
#include <sys/wait.h>
#include <stdio.h>
#include <sched.h>
#include <signal.h>
#include <unistd.h>
#define STACK_SIZE (1024 * 1024)
static char container_stack[STACK_SIZE];
char* const container_args[] = {
  "/bin/bash",
  NULL
};

int container_main(void* arg)
{
  printf("进入容器里面!
");

  mount("none", "/tmp", "tmpfs", 0, "");

  execv(container_args[0], container_args);

  printf("错误
");
  return 1;
}

int main()
{
  printf("宿主机启动一个容器!
");
  int container_pid = clone(container_main, container_stack+STACK_SIZE, CLONE_NEWNS | SIGCHLD , NULL);
  waitpid(container_pid, NULL, 0);
  printf("容器停止!
");
  return 0;
}
在容器启动前加 mount("none", "/tmp", "tmpfs", 0, "");
再编译执行ns,挂载后,就看不见任何宿主机的文件了。这就是在当前容器下的单独的文件系统了。

参考
https://time.geekbang.org/column/article/17921
本文直接拷贝了部分代码,如有侵权,请告知删除。