官方网站:https://router.vuejs.org/zh-cn/
https://segmentfault.com/a/1190000009350679
1. 安装
方式1:
一般情况下, 直接下载vue和vue-router就可以, https://unpkg.com/vue-router/dist/vue-router.js
<script src="路径/vue.js"></script>
<script src="路径/vue-router.js"></script>
方式2:
如果是模块化工程中使用vue-router,则需要先使用“npm install vue-router” 安装,然后使用
Vue.use(VueRouter)明确安装路由功能。
import Vue from 'vue'
import VueRouter from 'vue-router'
Vue.use(VueRouter)
2. 基本功能
主要是将组件(components)映射到路由(routes), 告诉vue-router什么地方渲染。
主要有两个组件需要特别注意,router-link 和router-view,前者是导航功能,使用to属性指定链接,默认<router-link>会渲染成“<a>”标签。后者是路由匹配到的页面渲染。
<router-link to="/foo">Go to Foo</router-link>
<router-view></router-view>
(1). 定义(路由)组件
const Foo = { template: '<div>foo</div>' }
const Bar = { template: '<div>bar</div>' }
(2).定义路由
const routes = [
      {
          path: '/foo',
          component: Foo
      },{
         path: '/bar',
         component: Bar
      }
]
(3). 通过 new VueRouter({routes:[]})创建router实例
const router = new VueRouter({
     routes     //(缩写)相当于 routes: routes
})
(4). 创建和挂载实例
const app = new Vue({
  router
}).$mount('#app')
或:
const app = new Vue({
    el:'#app'
    router:router //对应上面的router实例
})
this.$router指向路由器,this.$route访问当前路由,this.$router.push("路由路径")动态添加路由
当 <router-link> 对应的路由匹配成功,将自动设置 class 属性值 .router-link-active
3. 动态路由
(1). 动态传参数,使用:标记动态参数

(2). 监听路由
a. 使用watch监听'$route'
watch: {
    '$route' (to, from) {
          // 对路由变化作出响应...
     }
}
b. beforeRouteUpdate(to, from, next)守卫.【vue-router 2.2+】
beforeRouteUpdate (to, from, next) {
    // react to route changes... next必须要写
 }
(3). 高级匹配模式
vue-router 使用 path-to-regexp 作为路径匹配引擎, 高级用法文档。
优先级默认是谁先定义就先执行谁。
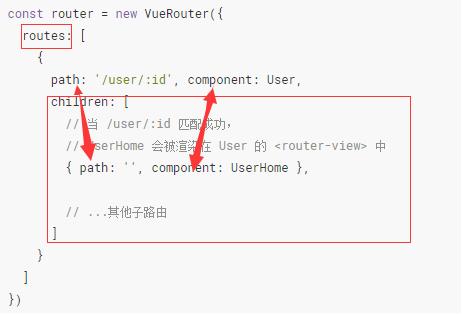
4. 嵌套路由
嵌套路由就是在router-view 中可以嵌套router(router-link和router-view), 注意配置router(路由)实例的时候, 需要在routes(数组[])的route对象中children属性(数组[])进行配置, 默认“/”会被当做根路径,所以直接就配置path属性就可以进行路由嵌套。
5. 编程式导航
我们除了使用router-link标签创建导航链接,还可以通过router提供的方法进行代码式编程。
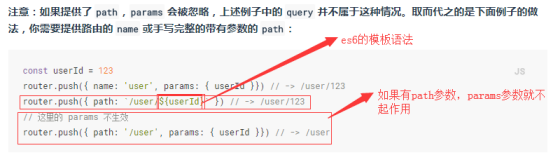
(1). router.push(location, onComplete?, onAbort?) //添加路由
(2). router.replace(location, onComplete?, onAbort?) //替换路由
(3). router.go(n) <==> window.history.go(n) //移动路由(向前或向后)

6. 命名路由和命名视图
(1). 通过名称编辑一个路由,例如上图中的router.push({"name":"user"......})
(2). 当在同级(同一个路由下),展示多个视图, 默认视图使用“default”,其他都是自定义名称
7. 重定向和别名
(1). 将当前的路径重新定向的其他,常用到的事使用routes:[{..},{path:"*", redirect:"/home"}]使用非指定路由自动跳转到/home路由.
redirect参数可以是a.路径 b.路由对象{name="home"} c. to=>{ return "路径" } 三种方式。
(2). 别名是指,url还是原本的别名url,但却渲染的取别名的路由。
{ path: '/a', component: A, alias: '/b' } 当我们访问"/b"的时候,url还是"/b" 但是实际渲染的却是路由"/a"的A组件
8. 向路由组件传递props
将原本比较固定的传参数,使用props进行传递参数。【此处待研究】
9. HTML5的history 模式
默认是hash模式,就是...#home类似这种。
可以设置 mode: 'history'
注意:需要后端支持 https://router.vuejs.org/zh-cn/essentials/history-mode.html
10. 默认滚动行为
scrollBehavior 滚动位置