学习Spring MVC的一个例子,参考书籍《Servlet、JSP、Spring MVC学习指南》,简单总结一下。
代码下载:https://github.com/PeiranZhang/springmvc-demo
本文参考链接:
https://www.cnblogs.com/yhtboke/p/5780140.html
https://blog.csdn.net/liubin5620/article/details/79922692
项目目录
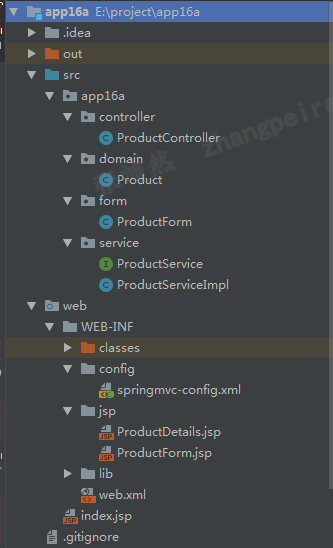
这里,没有采用maven来管理依赖,实际项目中可以使用maven方便管理项目,项目依赖的jar包如下所示

项目在IDEA中打包、部署到tomcat,可以参考博客:https://www.cnblogs.com/darange/p/10965700.html
web.xml配置
<?xml version="1.0" encoding="UTF-8"?>
<web-app xmlns="http://xmlns.jcp.org/xml/ns/javaee"
         xmlns:xsi="http://www.w3.org/2001/XMLSchema-instance"
         xsi:schemaLocation="http://xmlns.jcp.org/xml/ns/javaee http://xmlns.jcp.org/xml/ns/javaee/web-app_4_0.xsd"
         version="4.0">
    <!-- 配置前端控制器 -->
    <servlet>
        <servlet-name>springmvc</servlet-name>
        <servlet-class>org.springframework.web.servlet.DispatcherServlet</servlet-class>
        <init-param>
            <!-- contextConfigLocation配置springmvc加载的配置文件适配器、处理映射器等-->
            <param-name>contextConfigLocation</param-name>
            <param-value>/WEB-INF/config/springmvc-config.xml</param-value>
        </init-param>
        <!--值不为0表示,tomcat启动该应用时,加载servlet,而不是等到第一请求到来时再加载servlet-->
        <load-on-startup>1</load-on-startup>
    </servlet>
    <servlet-mapping>
        <servlet-name>springmvc</servlet-name>
        <!-- 所有访问都由DispatcherServlet进行解析-->
        <url-pattern>/</url-pattern>
    </servlet-mapping>
</web-app>
springmvc-config.xml
<?xml version="1.0" encoding="UTF-8"?>
<beans xmlns="http://www.springframework.org/schema/beans"
       xmlns:xsi="http://www.w3.org/2001/XMLSchema-instance"
       xmlns:mvc="http://www.springframework.org/schema/mvc"
       xmlns:context="http://www.springframework.org/schema/context"
       xmlns:aop="http://www.springframework.org/schema/aop"
       xsi:schemaLocation="http://www.springframework.org/schema/beans
       http://www.springframework.org/schema/beans/spring-beans.xsd
http://www.springframework.org/schema/mvc
http://www.springframework.org/schema/mvc/spring-mvc.xsd
http://www.springframework.org/schema/aop
http://www.springframework.org/schema/aop/spring-aop.xsd
http://www.springframework.org/schema/context
http://www.springframework.org/schema/context/spring-context.xsd">

    <!-- 与spring注解配合使用,扫描指定包及其子包下面的带有Controller、Service注解下的类,生成bean-->
    <context:component-scan base-package="app16a.controller"></context:component-scan>
    <context:component-scan base-package="app16a.service"></context:component-scan>

    <!-- 如果在配置前端控制器时拦截了所有的请求,不做特殊处理就会导致部分静态资源无法使用。如果是这种情况就可以使用下面的配置来访问静态资源文件,所以使用resource配置-->
    <!-- 没有<annotation-driven/>,<resources/>元素会阻止任意控制器被调用-->

    <!--  配置注解的处理器映射器和处理器适配器-->
    <mvc:annotation-driven/>
    <mvc:resources mapping="/*.html" location="/"/>

    <!-- 配置视图解析器,在Controller中设置视图名的时候会自动加上前缀和后缀 -->
    <bean id="viewResolver" class="org.springframework.web.servlet.view.InternalResourceViewResolver">
        <property name="prefix" value="/WEB-INF/jsp/"></property>
        <property name="suffix" value=".jsp"/>
    </bean>
</beans>
Service
@Service注解可以指定名称,当一个接口有多个实现类时,在Controller里面注入时,可以指定实现类
//service加上名称,在一个接口多个实现类时,可以这样区分
@Service("productService")
public class ProductServiceImpl implements ProductService {
    private Map<Long, Product> products =
            new HashMap<Long, Product>();
    private AtomicLong generator = new AtomicLong();
    @Override
    public Product add(Product product) {
        long newId = generator.incrementAndGet();
        product.setId(newId);
        products.put(newId, product);
        System.out.println("Add" + product);
        return product;
    }

    @Override
    public Product get(long id) {
        return products.get(id);
    }
}
Controller
Controller中使用@Qualifier指定具体的service
1.通过@RequestMapping,进行url与处理方法的映射,处理方法返回的是视图的名称,不需要写绝对路径和jsp后缀,这是因为web.xml中配置了视图解析器
2.处理方法里面参数可以自己定义,其中Model对象有spring生成,可以在model中添加对象,作为request对象,发送给jsp
3.注意转发与重定向的区别,代码编写方式可以参考代码。重定向返回的视图名字前加上"redirect:"
https://blog.csdn.net/liubin5620/article/details/79922692
1、转发使用的是getRequestDispatcher()方法;重定向使用的是sendRedirect();
2、转发:浏览器URL的地址栏不变。重定向:浏览器URL的地址栏改变;
3、转发是服务器行为,重定向是客户端行为;
4、转发是浏览器只做了一次访问请求。重定向是浏览器做了至少两次的访问请求;
5、转发2次跳转之间传输的信息不会丢失,重定向2次跳转之间传输的信息会丢失(request范围)。
转发是要比重定向快,因为重定向需要经过客户端,而转发没有。有时候,采用重定向会更好,若需要重定向到另外一个外部网站,则无法使用转发。另外,重定向还有一个应用场景:避免在用户重新加载页面时两次调用相同的动作。
例如,当提交产品表单的时候,执行保存的方法将会被调用,并执行相应的动作;这在一个真实的应用程序中,很有可能将表单中的所有产品信息加入到数据库中。但是如果在提交表单后,重新加载页面,执行保存的方法就很有可能再次被调用。同样的产品信息就将可能再次被添加,为了避免这种情况,提交表单后,你可以将用户重定向到一个不同的页面,这样的话,这个网页任意重新加载都没有副作用;
但是,使用重定向不太方便的地方是,使用它无法将值轻松地传递给目标页面。而采用转发,则可以简单地将属性添加到Model,使得目标视图可以轻松访问。由于重定向经过客户端,所以Model中的一切都会在重定向时丢失。但幸运的是,在Spring3.1版本以后,我们可以通过Flash属性,解决重定向时传值丢失的问题。
要使用Flash属性,必须在Spring MVC的配置文件中添加一个<annotation-driven/>。然后,还必须再方法上添加一个新的参数类型:org.springframework.web.servlet.mvc.support.RedirectAttributes。
4.路径变量的使用,@PathVariable
5.获取请求参数,在处理方法中增加参数,并使用注解@RequestParam
Controller代码:
@Controller
public class ProductController {
    @Autowired
    //按照名称,注入指定的接口实现类
    @Qualifier("productService")
    ProductService productService;
    private static final Log logger =
            LogFactory.getLog(ProductController.class);

    @RequestMapping(value = "/product_input")
    public String inputProduct() {
        logger.info("inputProduct called");
        return "ProductForm";
    }

    //参数productForm中的字段与提交表当中的text文本框name一一对应
    @RequestMapping(value = "/product_save")
    public String saveProduct(ProductForm productForm, Model model, RedirectAttributes redirectAttributes){
        logger.info("saveProduct called");
        Product product = new Product();
        product.setName(productForm.getName());
        product.setDescription(productForm.getDescription());
        try {
            product.setPrice(Float.parseFloat(
                    productForm.getPrice()));
        } catch (NumberFormatException e) {
        }

        productService.add(product);

        //转发
        //model里面的内容作为request属性传递给jsp_servlet
        //model.addAttribute("product", product);
        //return "ProductDetails";

        //重定向
        // 客户端重新发送请求,Model无效
        //通过addFlashAttribute,可以在jsp中引用对象
        redirectAttributes.addFlashAttribute(product);
        return "redirect:/product_details";
    }

    @RequestMapping(value = "/product_details")
    public String productDetail(){
        logger.info("productDetail called");
        return "ProductDetails";
    }

    //路径变量的使用
    //http://localhost:8080/app16a/product/1
    @RequestMapping(value = "/product/{id}")
    public String productGet(@PathVariable Long id,Model model){
        Product product = productService.get(id);
        model.addAttribute(product);
        logger.info("productGet called");
        return "ProductDetails";
    }


    //获取请求参数
    //http://localhost:8080/app16a/product?id=1
    @RequestMapping(value = "/product")
    public String productGetWithParams(@RequestParam Long id,Model model){
        Product product = productService.get(id);
        model.addAttribute(product);
        logger.info("productGetWithParams called");
        return "ProductDetails";
    }
}
视图
PoductForm.jsp:form表单中各个文本输入控件的name作为request请求参数的键,发送给action指定的url
<%@ page contentType="text/html;charset=UTF-8" language="java" %>
<html>
<head>
    <title>Add Product Form</title>
</head>
<body>
<!--product_save与product_save.action效果一样-->
<div id="global">
    <form action="product_save.action" method="post">
        <fieldset>
            <legend>Add a product</legend>
            <p>
                <label for="name">Product Name: </label>
                <input type="text" id="name" name="name"
                       tabindex="1">
            </p>
            <p>
                <label for="description1">Description: </label>
                <input type="text" id="description1"
                       name="description" tabindex="2">
            </p>
            <p>
                <label for="price">Price: </label>
                <input type="text" id="price" name="price"
                       tabindex="3">
            </p>
            <p id="buttons">
                <input id="reset" type="reset" tabindex="4">
                <input id="submit" type="submit" tabindex="5"
                       value="Add Product">
            </p>
        </fieldset>
    </form>
</div>
</body>
</html>
ProductDetails.jsp
<%@ page contentType="text/html;charset=UTF-8" language="java" %>
<html>
<head>
    <title>Save Product</title>
</head>
<body>
<div id="global">
    <h4>The product has been saved.</h4>
    <p>
    <h5>Details:</h5>
    <%--
    Controller里面的Model中的product对象其实是作为request属性传递给jsp的,所以这里用requestScope来引用--%>
    Product Name: ${requestScope.product.name}<br/>
    Description: ${requestScope.product.description}<br/>
    Price: $${requestScope.product.price}
    </p>
</div>
</body>
</html>
以上只是对Spring MVC的简单使用