一.nginx实现负载均衡或者代理
1. 在前面我们已经说过,安装nginx许多核心模块已经安装,nginx的配置文件是以模块的形式组织的,不同的模块实现不同的功能,其中代理或者说负载是upstream_module模块实现的,所以我们首先要安装nginx,通过./configure文件时,我们可以看到在生成makefile的时候,默认是安装了upstream_modul。
[root@proxy nginx-1.6.2]# ./configure --help |grep upstream
--without-http_upstream_ip_hash_module
disable ngx_http_upstream_ip_hash_module
--without-http_upstream_least_conn_module
disable ngx_http_upstream_least_conn_module
--without-http_upstream_keepalive_module
disable ngx_http_upstream_keepalive_module
2.在nginx配置文件中进行配置:/application/nginx/conf的nginx.conf文件
events {
worker_connections 1024;
}
http {
include mime.types;
default_type application/octet-stream;
sendfile on;
keepalive_timeout 65;
upstream backend {
server 192.168.0.103:80 max_fails=3 fail_timeout=30s;
server 192.168.0.104:80 max_fails=3 fail_timeout=30s;
server {
listen 80;
server_name www.etiantian.org;
index index.html index.htm;
location / {
proxy_pass http://backend;
error_page 500 502 503 504 /50x.html;
location = /50x.html {
root html;
}
}
}
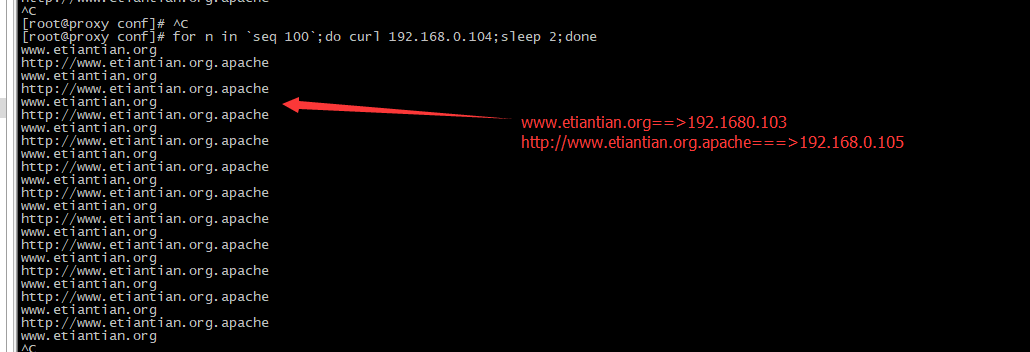
二.在这里想要说明的是,从192.168.0.104进行访问,无论负载均衡转发到103或者105,所用的转发都是rr算法,这种算法有一个问题,就是在登陆一台机器的时候,存在会话失败的情况,提示重新登陆的,因为这种算法机制导致,随机的情况下决定会产生的。登陆信息都存放在/tmp/下面,里面有此时登陆的session。其实在现有技术中有好多方法去避免这种会话失败的情况,比如改变算法为ip_hash等,这里不做说明,等后面在说明,这里知道一下就可以了。
三、ngnix节点多虚拟主机的代理问题
在配置文件nginx.conf中添加如下两行:
1)proxy_set_header Host $host 当后端web服务器上也配置有多个虚拟主机时,需用该Header来区分反向代理哪个主机名
2)proxy_set_headerX-Forwarded-For $remote_addr; 如果后端web服务器上的程序需要获取用户IP,从该Header头获取
四、扫尾任务
1.chkconfig 是开机启动命令,如:chkconfig --list |grep nfs
2.远程查看端口的命令至少有三个: 1)telnet ip 端口 2)nmap ip -p 端口 3)nc ip 端口
3.写一个批量修改文件名的脚本,比如将oldboy换成djw。
1)写出需要创建的文件名,如下:
[root@djw3 test]# cat name.txt
ceshi_filename_oldboy1_a.txt
ceshi_filename_oldboy2_a.txt
ceshi_filename_oldboy3_a.txt
ceshi_filename_oldboy4_a.txt
ceshi_filename_oldboy5_a.txt
ceshi_filename_oldboy6_a.txt
ceshi_filename_oldboy7_a.txt
ceshi_filename_oldboy8_a.txt
2)进行文件名创建
[root@djw3 test1]# touch `cat name.txt | tr "
" " "`
[root@djw3 test1]# ll
total 4
-rw-r--r-- 1 root root 0 Nov 8 07:05 ceshi_filename_oldboy1_a.txt
-rw-r--r-- 1 root root 0 Nov 8 07:05 ceshi_filename_oldboy2_a.txt
-rw-r--r-- 1 root root 0 Nov 8 07:05 ceshi_filename_oldboy3_a.txt
-rw-r--r-- 1 root root 0 Nov 8 07:05 ceshi_filename_oldboy4_a.txt
-rw-r--r-- 1 root root 0 Nov 8 07:05 ceshi_filename_oldboy5_a.txt
-rw-r--r-- 1 root root 0 Nov 8 07:05 ceshi_filename_oldboy6_a.txt
-rw-r--r-- 1 root root 0 Nov 8 07:05 ceshi_filename_oldboy7_a.txt
-rw-r--r-- 1 root root 0 Nov 8 07:05 ceshi_filename_oldboy8_a.txt
-rw-r--r-- 1 root root 232 Nov 8 07:01 name.txt
替换脚本
第一种方法:for n in `ls ceshi_*`; do mv $n `echo $n | sed 's#oldboy#djw#g'`;done
第二种方法:ls |awk -F"oldboy" '{print "mv " $0" "$1"djw"$2}'|bash
第三种方法: rename "oldboy" "djw" ceshi*
4.线程模式的统计方法:pstree -a|grep httpd |wc -l
进程模式的统计方法:ps -ef|grep http |wc -l