接着系列四,继续开始我们face_recognition项目的其他一些功能。
案例一:从摄像头获取视频进行人脸识别-较慢版(要使用openCV)
这是一个超级简单(但缓慢)的例子运行人脸识别的实时视频从你的网络摄像头。第二个例子有点复杂,但运行起来更快。
请注意:本例要求安装OpenCV (' cv2 '库),仅用于从摄像头读取。使用face_recognition库不需要OpenCV。只有当您想要运行这个时才需要它
在knowe_people文件夹中创建facerec_from_webcam.py文件并写入以下代码:

import face_recognition
import cv2
import numpy as np

# This is a super simple (but slow) example of running face recognition on live video from your webcam.
# There's a second example that's a little more complicated but runs faster.

# PLEASE NOTE: This example requires OpenCV (the `cv2` library) to be installed only to read from your webcam.
# OpenCV is *not* required to use the face_recognition library. It's only required if you want to run this
# specific demo. If you have trouble installing it, try any of the other demos that don't require it instead.

# Get a reference to webcam #0 (the default one)
video_capture = cv2.VideoCapture(0)

# Load a sample picture and learn how to recognize it.
obama_image = face_recognition.load_image_file("obama.jpg")
obama_face_encoding = face_recognition.face_encodings(obama_image)[0]

# Load a second sample picture and learn how to recognize it.
biden_image = face_recognition.load_image_file("biden.jpg")
biden_face_encoding = face_recognition.face_encodings(biden_image)[0]

# Create arrays of known face encodings and their names
known_face_encodings = [
    obama_face_encoding,
    biden_face_encoding
]
known_face_names = [
    "Barack Obama",
    "Joe Biden"
]

while True:
    # Grab a single frame of video
    ret, frame = video_capture.read()

    # Convert the image from BGR color (which OpenCV uses) to RGB color (which face_recognition uses)
    rgb_frame = frame[:, :, ::-1]

    # Find all the faces and face enqcodings in the frame of video
    face_locations = face_recognition.face_locations(rgb_frame)
    face_encodings = face_recognition.face_encodings(rgb_frame, face_locations)

    # Loop through each face in this frame of video
    for (top, right, bottom, left), face_encoding in zip(face_locations, face_encodings):
        # See if the face is a match for the known face(s)
        matches = face_recognition.compare_faces(known_face_encodings, face_encoding)

        name = "Unknown"

        # If a match was found in known_face_encodings, just use the first one.
        # if True in matches:
        #     first_match_index = matches.index(True)
        #     name = known_face_names[first_match_index]

        # Or instead, use the known face with the smallest distance to the new face
        face_distances = face_recognition.face_distance(known_face_encodings, face_encoding)
        best_match_index = np.argmin(face_distances)
        if matches[best_match_index]:
            name = known_face_names[best_match_index]

        # Draw a box around the face
        cv2.rectangle(frame, (left, top), (right, bottom), (0, 0, 255), 2)

        # Draw a label with a name below the face
        cv2.rectangle(frame, (left, bottom - 35), (right, bottom), (0, 0, 255), cv2.FILLED)
        font = cv2.FONT_HERSHEY_DUPLEX
        cv2.putText(frame, name, (left + 6, bottom - 6), font, 1.0, (255, 255, 255), 1)

    # Display the resulting image
    cv2.imshow('Video', frame)

    # Hit 'q' on the keyboard to quit!
    if cv2.waitKey(1) & 0xFF == ord('q'):
        break

# Release handle to the webcam
video_capture.release()
cv2.destroyAllWindows()

代码中有obama和biden图片,然后终端切换到knowe_people目录下,输入以下命令,弹出窗口如下:

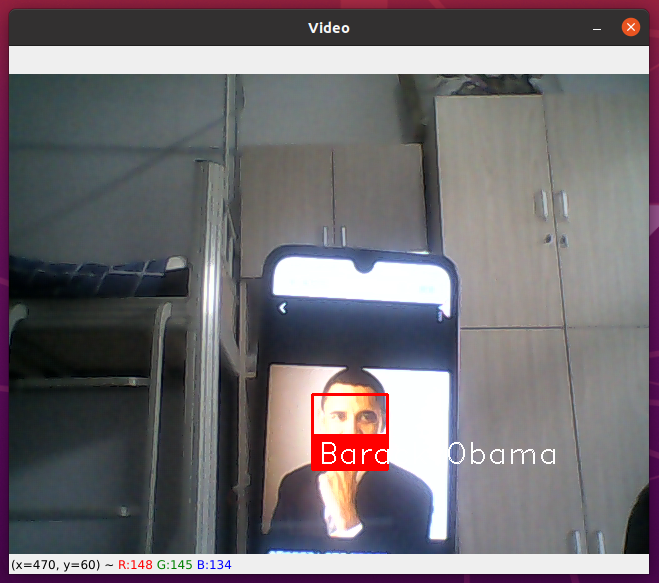
首先会打开自带的摄像头,进行人脸识别。我们选取网上obama照片进行测试如下:第一次不成功,第二次成功,可能是因为电脑像素太低,未能识别
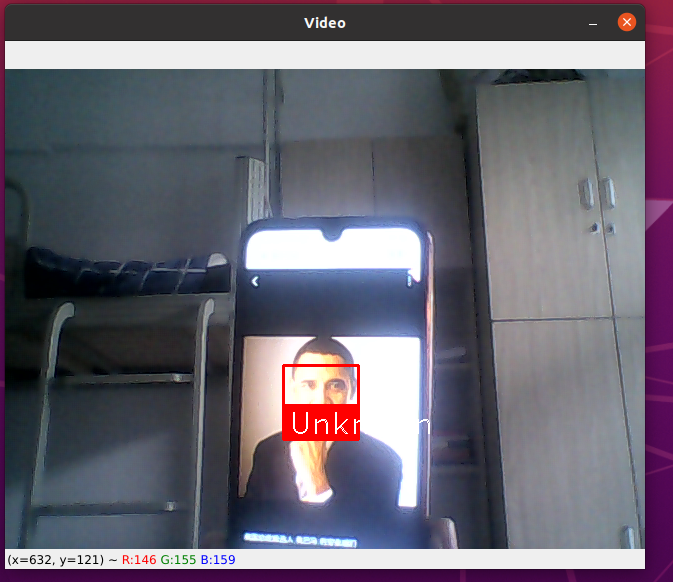
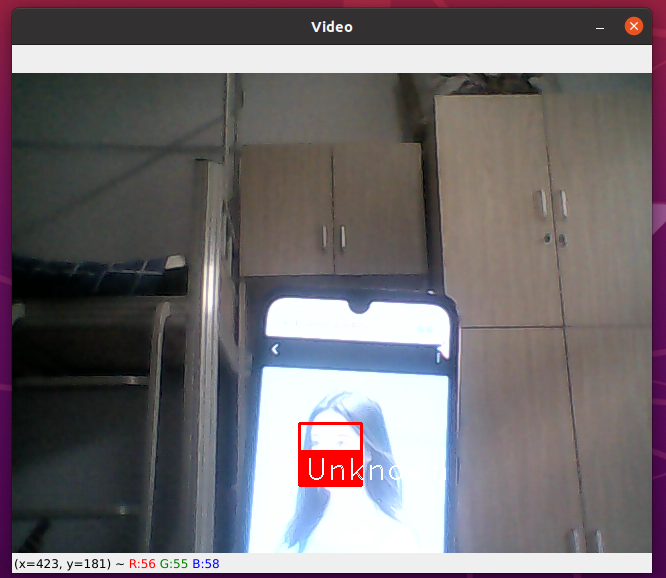
接着我们放入数据集中没有的照片,如下图鞠婧祎的照片,首先检测人脸,识别效果是unknowe,这个是正常的,因为数据集没有待匹配的人脸信息。
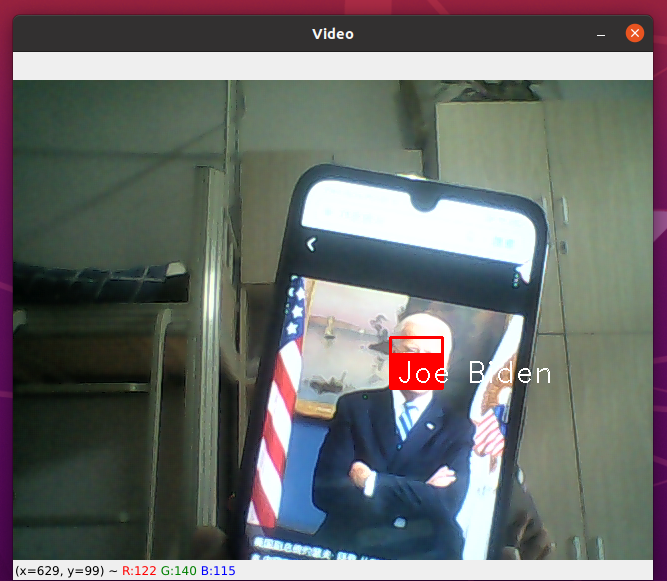
接着又测试数据集中biden人脸,输出如下:
案例二:从摄像头获取视频进行人脸识别-较快版(要使用openCV)
这是一个在你的网络摄像头上运行的实时视频人脸识别的演示。它比另一个例子稍微复杂一些,但它包括一些基本的性能调整,以使事情运行得更快:
1. 以1/4分辨率处理每个视频帧(但仍以全分辨率显示)
2. 只在每一帧视频中检测人脸。
具体操作:在knowe_people文件夹中创建facerec_from_webcam_faster.py文件并写入以下代码:

import face_recognition
import cv2
import numpy as np

# This is a demo of running face recognition on live video from your webcam. It's a little more complicated than the
# other example, but it includes some basic performance tweaks to make things run a lot faster:
#   1. Process each video frame at 1/4 resolution (though still display it at full resolution)
#   2. Only detect faces in every other frame of video.

# PLEASE NOTE: This example requires OpenCV (the `cv2` library) to be installed only to read from your webcam.
# OpenCV is *not* required to use the face_recognition library. It's only required if you want to run this
# specific demo. If you have trouble installing it, try any of the other demos that don't require it instead.

# Get a reference to webcam #0 (the default one)
video_capture = cv2.VideoCapture(0)

# Load a sample picture and learn how to recognize it.
obama_image = face_recognition.load_image_file("obama.jpg")
obama_face_encoding = face_recognition.face_encodings(obama_image)[0]

# Load a second sample picture and learn how to recognize it.
biden_image = face_recognition.load_image_file("biden.jpg")
biden_face_encoding = face_recognition.face_encodings(biden_image)[0]

# Create arrays of known face encodings and their names
known_face_encodings = [
    obama_face_encoding,
    biden_face_encoding
]
known_face_names = [
    "Barack Obama",
    "Joe Biden"
]

# Initialize some variables
face_locations = []
face_encodings = []
face_names = []
process_this_frame = True

while True:
    # Grab a single frame of video
    ret, frame = video_capture.read()

    # Resize frame of video to 1/4 size for faster face recognition processing
    small_frame = cv2.resize(frame, (0, 0), fx=0.25, fy=0.25)

    # Convert the image from BGR color (which OpenCV uses) to RGB color (which face_recognition uses)
    rgb_small_frame = small_frame[:, :, ::-1]

    # Only process every other frame of video to save time
    if process_this_frame:
        # Find all the faces and face encodings in the current frame of video
        face_locations = face_recognition.face_locations(rgb_small_frame)
        face_encodings = face_recognition.face_encodings(rgb_small_frame, face_locations)

        face_names = []
        for face_encoding in face_encodings:
            # See if the face is a match for the known face(s)
            matches = face_recognition.compare_faces(known_face_encodings, face_encoding)
            name = "Unknown"

            # # If a match was found in known_face_encodings, just use the first one.
            # if True in matches:
            #     first_match_index = matches.index(True)
            #     name = known_face_names[first_match_index]

            # Or instead, use the known face with the smallest distance to the new face
            face_distances = face_recognition.face_distance(known_face_encodings, face_encoding)
            best_match_index = np.argmin(face_distances)
            if matches[best_match_index]:
                name = known_face_names[best_match_index]

            face_names.append(name)

    process_this_frame = not process_this_frame


    # Display the results
    for (top, right, bottom, left), name in zip(face_locations, face_names):
        # Scale back up face locations since the frame we detected in was scaled to 1/4 size
        top *= 4
        right *= 4
        bottom *= 4
        left *= 4

        # Draw a box around the face
        cv2.rectangle(frame, (left, top), (right, bottom), (0, 0, 255), 2)

        # Draw a label with a name below the face
        cv2.rectangle(frame, (left, bottom - 35), (right, bottom), (0, 0, 255), cv2.FILLED)
        font = cv2.FONT_HERSHEY_DUPLEX
        cv2.putText(frame, name, (left + 6, bottom - 6), font, 1.0, (255, 255, 255), 1)

    # Display the resulting image
    cv2.imshow('Video', frame)

    # Hit 'q' on the keyboard to quit!
    if cv2.waitKey(1) & 0xFF == ord('q'):
        break

# Release handle to the webcam
video_capture.release()
cv2.destroyAllWindows()

然后终端切换到knowe_people目录下,输入以下命令python3 facerec_from_webcam_faster.py,弹出窗口跟上面是一样的,但是性能更加优越。

案例三:从视频文件中识别人脸并把识别结果输出为新的视频文件
这是一个在视频文件上运行人脸识别并将结果保存到一个新的视频文件的演示。请注意:这个例子只需要安装OpenCV (' cv2 '库)来从你的摄像头读取。
使用face_recognition库不需要OpenCV。
具体操作:先准备所需要的视频文件如,并且需要知道视频中人脸姓名的图片。

在knowe_people文件夹中创建facerec_from_video_file.py文件并写入以下代码:
import face_recognition
import cv2
# This is a demo of running face recognition on a video file and saving the results to a new video file.
#
# PLEASE NOTE: This example requires OpenCV (the `cv2` library) to be installed only to read from your webcam.
# OpenCV is *not* required to use the face_recognition library. It's only required if you want to run this
# specific demo. If you have trouble installing it, try any of the other demos that don't require it instead.
# Open the input movie file
input_movie = cv2.VideoCapture("hamilton_clip.mp4")
length = int(input_movie.get(cv2.CAP_PROP_FRAME_COUNT))
# Create an output movie file (make sure resolution/frame rate matches input video!)
fourcc = cv2.VideoWriter_fourcc(*'XVID')
output_movie = cv2.VideoWriter('output.avi', fourcc, 29.97, (640, 360))
# Load some sample pictures and learn how to recognize them.
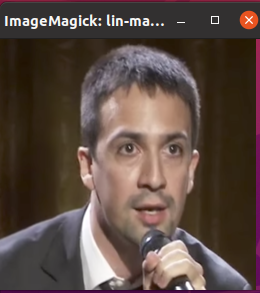
lmm_image = face_recognition.load_image_file("lin-manuel-miranda.png")
lmm_face_encoding = face_recognition.face_encodings(lmm_image)[0]
al_image = face_recognition.load_image_file("alex-lacamoire.png")
al_face_encoding = face_recognition.face_encodings(al_image)[0]
known_faces = [
lmm_face_encoding,
al_face_encoding
]
# Initialize some variables
face_locations = []
face_encodings = []
face_names = []
frame_number = 0
while True:
# Grab a single frame of video
ret, frame = input_movie.read()
frame_number += 1
# Quit when the input video file ends
if not ret:
break
# Convert the image from BGR color (which OpenCV uses) to RGB color (which face_recognition uses)
rgb_frame = frame[:, :, ::-1]
# Find all the faces and face encodings in the current frame of video
face_locations = face_recognition.face_locations(rgb_frame)
face_encodings = face_recognition.face_encodings(rgb_frame, face_locations)
face_names = []
for face_encoding in face_encodings:
# See if the face is a match for the known face(s)
match = face_recognition.compare_faces(known_faces, face_encoding, tolerance=0.50)
# If you had more than 2 faces, you could make this logic a lot prettier
# but I kept it simple for the demo
name = None
if match[0]:
name = "Lin-Manuel Miranda"
elif match[1]:
name = "Alex Lacamoire"
face_names.append(name)
# Label the results
for (top, right, bottom, left), name in zip(face_locations, face_names):
if not name:
continue
# Draw a box around the face
cv2.rectangle(frame, (left, top), (right, bottom), (0, 0, 255), 2)
# Draw a label with a name below the face
cv2.rectangle(frame, (left, bottom - 25), (right, bottom), (0, 0, 255), cv2.FILLED)
font = cv2.FONT_HERSHEY_DUPLEX
cv2.putText(frame, name, (left + 6, bottom - 6), font, 0.5, (255, 255, 255), 1)
# Write the resulting image to the output video file
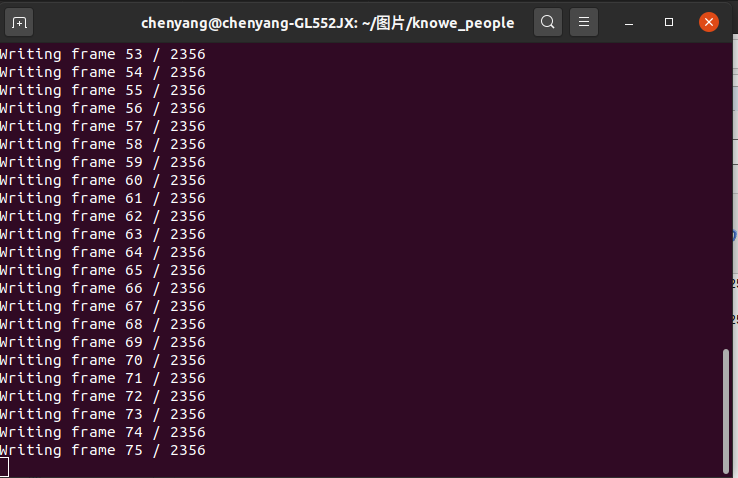
print("Writing frame {} / {}".format(frame_number, length))
output_movie.write(frame)
# All done!
input_movie.release()
cv2.destroyAllWindows()
然后终端切换到knowe_people目录下,输入以下命令python3 facerec_from_video_file.py,可见输出如下:
接着在knowe_people文件夹出现一个output.avi文件,打开如下:
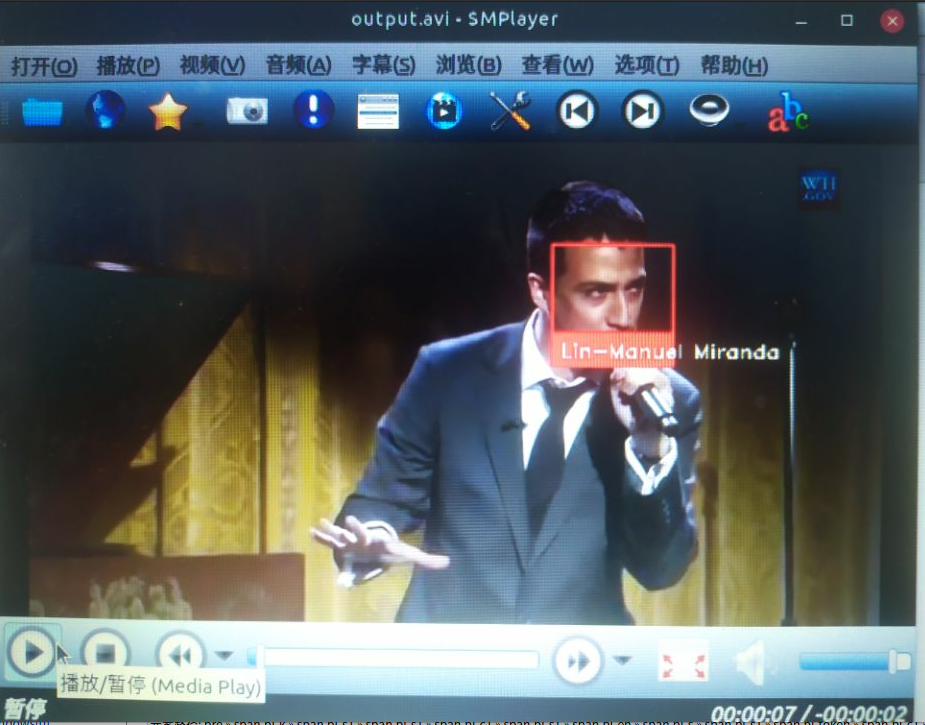
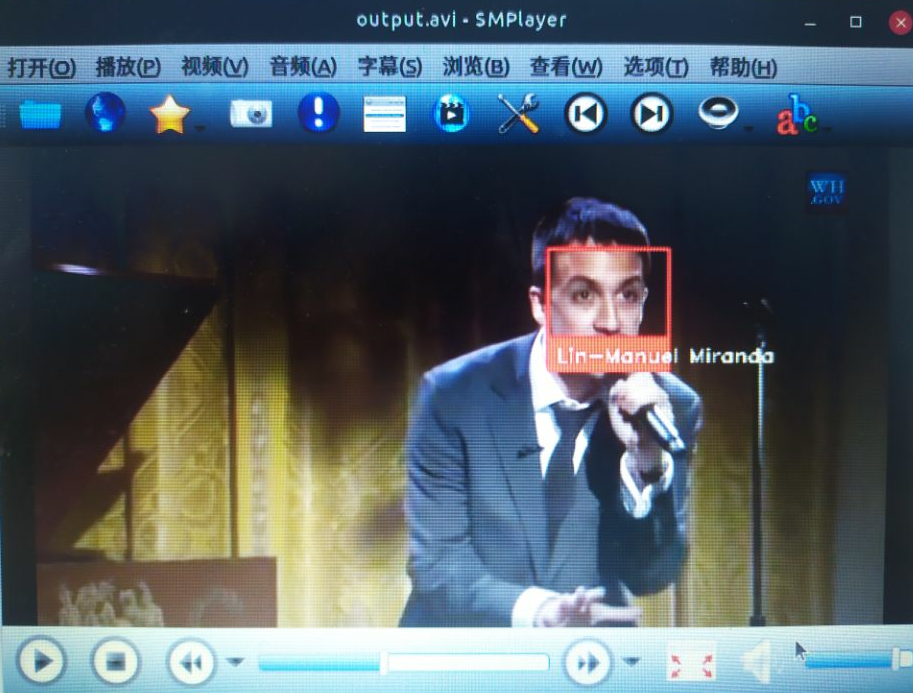
已经识别出来视频中的人脸了,大功告成。
今天主要是实现了项目3个功能,先就这样,以后有时间再优化,更多内容见其他系列:
案例一:从摄像头获取视频进行人脸识别-较慢版(要使用openCV)
案例二:从摄像头获取视频进行人脸识别-较快版(要使用openCV)
案例三:从视频文件中识别人脸并把识别结果输出为新的视频文件