本文博客链接:http://blog.csdn.net/qq1084283172/article/details/54426189
吐槽:ubuntu系统真是让人又爱又恨,也有可能是VMware Workstation Pro虚拟机的原因;同一个版本的ubuntu系统在Oracle VM VirtualBox上安装很顺利没有多大的问题,但是在VMware Workstation Pro虚拟机上安装,就会出现各种奇葩的问题,为了配置一个自己用的顺手的ubuntu环境真是折腾死人,来来回回不下10次,而且还发现一个问题,按照别人的博客教程,同一个步骤,自己就是不能操作成功,总会出现这样那样的问题,有些作者的博客吧,自己也不实践一下网上照抄过来的,后来实践发现很多教程都是错的甚至是误导人的,只有极少数人是经过实践并分析出原因给出的解决方法。下面就记录一下,基于ubuntu 14.04.5(x64bit) 编译Android 4.4.4 r1源码遇到的坑以及解决的办法。
一、JDK安装
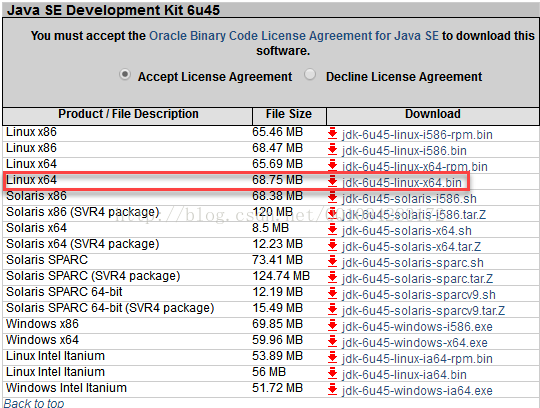
编译Android4.x的源码是不能用OpenJDK,需要用Oracle JDK 1.6,Oracle
JDK 1.7目前是不支持的;编译Android 5.x版本以后的源码不再能使用Oracle JDK,需要使用OpenJDK
7版本。从下载页http://www.oracle.com/technetwork/java/javasebusiness/downloads/java-archive-downloads-javase6-419409.html#jdk-6u45-oth-JPR,下载Linux
x64bit版本Oracle JDK 1.60_45.
将从官网下载的 jdk-6u45-linux-x64.bin 拷贝ubuntu 14.04.5系统的 /home/androidcode/AndroidDevlop 路径下,执行解压:
cd /home/androidcode/AndroidDevlop
sudo chmod u+x jdk-6u45-linux-x64.bin
sudo ./jdk-6u45-linux-x64.bin
sudo gedit /etc/profile
# 添加java环境变量
export JAVA_HOME=/home/androidcode/AndroidDevlop/jdk1.6.0_45
export JRE_HOME=${JAVA_HOME}/jre
export PATH=$PATH:${JAVA_HOME}/bin
export CLASSPATH=.:${JAVA_HOME}/lib:${JRE_HOME}/lib
source /etc/profile
java -version
// 为Oracle jdk创建/usr/bin的符号链接(数字300 表示优先级)
sudo update-alternatives --install /usr/bin/java java /home/androidcode/AndroidDevlop/jdk1.6.0_45/bin/java 300
sudo update-alternatives --install /usr/bin/javac javac /home/androidcode/AndroidDevlop/jdk1.6.0_45/bin/javac 300
// 后面两项可以不配置
sudo update-alternatives --install /usr/bin/javah javah /home/androidcode/AndroidDevlop/jdk1.6.0_45/bin/javah 300
sudo update-alternatives --install /usr/bin/jar jar /home/androidcode/AndroidDevlop/jdk1.6.0_45/bin/jar 300

// jdk默认版本切换命令
sudo update-alternatives --config java
sudo update-alternatives --config javac

// 设置系统默认的JDK/JRE
sudo update-alternatives --set java /usr/bin/java java /home/androidcode/AndroidDevlop/jdk1.6.0_45/bin/java
sudo update-alternatives --set javac /usr/bin/javac javac /home/androidcode/AndroidDevlop/jdk1.6.0_45/bin/javac
1.功能作用
update-alternatives是dpkg的实用工具,用来维护系统命令的符号链接,以决定系统默认使用什么命令。
在Debian系统中,我们可能会同时安装有很多功能类似的程序和可选配置,如Web浏览器程序(firefox,konqueror)、窗口管理器(wmaker、metacity)和鼠标的不同主题等。这样,用户在使用系统时就可进行选择,以满足自已的需求。
但对于普通用户来说,在这些程序间进行选择配置会较困难。update-alternatives工具就是为了解决这个问题,帮助用户能方便地选择自已喜欢程序和配置系统功能

2.位置
/usr/bin/update-alternatives

3.格式用法
update-alternatives [<选项> ...] <命令>

4.主要参数
Commands:
  --install <link> <name> <path> <priority>
    [--slave <link> <name> <path>] ...
                           在系统中加入一组替换项.
  --remove <name> <path>   从 <名称> 替换组中去除 <路径> 项.
  --remove-all <name>      从替换系统中删除 <名称> 替换组.
  --auto <name>            将 <名称> 的主链接切换到自动模式.
  --display <name>         显示关于 <名称> 替换组的信息.
  --query <name>           machine parseable version of --display <name>.
  --list <name>            列出 <名称> 替换组中所有的可用替换项.
  --get-selections         list master alternative names and their status.
  --set-selections         read alternative status from standard input.
  --config <name>          列出 <名称> 替换组中的可选项,并就使用其中哪一个,征询用户的意见.
  --set <name> <path>      将 <路径> 设置为 <名称> 的替换项.
  --all                    对所有可选项一一调用 --config 命令.

<link> 是指向 /etc/alternatives/<名称> 的符号链接>.(e.g. /usr/bin/pager)
<name> 是该链接替换组的主控名.(e.g. pager)
<path> 是替换项目标文件的位置.(e.g. /usr/bin/less)
<priority> 是一个整数,在自动模式下,这个数字越高的选项,其优先级也就越高.

Options:
  --altdir <directory>     指定不同的可选项目录.
  --admindir <directory>   指定不同的管理目录.
  --log <file>             设置log文件.
  --force                  allow replacing files with alternative links.
  --skip-auto              skip prompt for alternatives correctly configured in automatic mode (relevant for --config only)
  --verbose                详尽的操作进行信息,更多的输出.
  --quiet                  安静模式,输出尽可能少的信息.
  --help                   显示本帮助信息.
  --version                显示版本信息.

5.应用实例
1、列出可用的候选命令
update-alternatives --list java

2、显示和修改实际指向的候选命令,
sudo update-alternatives --config java

3、配置系统上所有的候选命令
sudo update-alternatives --all

4、显示一个命令链接的所有可选命令
update-alternatives --display editor

5、将 <名称> 的主链接切换到自动模式
sudo update-alternatives --auto editor

6、在系统中加入一组替换项
sudo update-alternatives --install x-cursor-theme x-cursor-theme /etc/X11/cursors/Gold.theme 70
感谢链接:
https://my.oschina.net/stevenleesmart/blog/159356
http://www.lampblog.net/ubuntu/update-alternatives%E5%91%BD%E4%BB%A4/
http://www.tuicool.com/articles/NBBbmia
关于编译Android源码需要的依赖库文件和需要的环境条件具体的可以参考google官网的文档https://source.android.com/source/requirements.html。下面的命令是google官网给出的,编译Android 4.4.4 r1源码需要安装的依赖库文件:
sudo apt-get install git gnupg flex bison gperf build-essential zip curl libc6-dev libncurses5-dev:i386 x11proto-core-dev libx11-dev:i386 libreadline6-dev:i386 libgl1-mesa-dri:i386 libgl1-mesa-dev g++-multilib mingw32 tofrodos python-markdown libxml2-utils xsltproc zlib1g-dev:i386 dpkg-dev
sudo ln -s /usr/lib/i386-linux-gnu/mesa/libGL.so.1 /usr/lib/i386-linux-gnu/libGL.so
The following packages have unmet dependencies:
 unity-control-center : Depends: libcheese-gtk23 (>= 3.4.0) but it is not going to be installed
                        Depends: libcheese7 (>= 3.0.1) but it is not going to be installed
E: Error, pkgProblemResolver::Resolve generated breaks, this may be caused by held packages.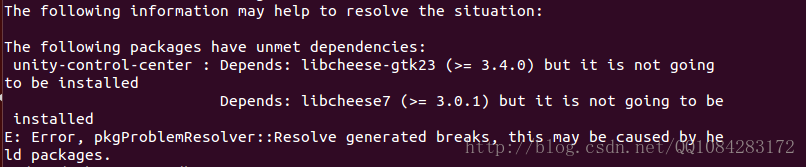
博文http://blog.csdn.net/dev_linux/article/details/45276403的作者给出的解决方法给了我启发,后来我发现在命令行终端执行 sudo apt-get install libcheese-gtk23 libcheese7 命令,提示 libcheese-gtk23 libcheese7已经存在了,只是版本和这里安装需要的版本不符,执行下面的命令就可以解决。但是也有风险,很可能导致ubuntu系统不能进入图形界面因为一些系统的程序文件也被卸载移除了,需要在命令行进行ubuntu图形界面的修复,具体的参考:http://blog.csdn.net/qq1084283172/article/details/54421090。
sudo apt-get remove   libcheese-gtk23 libcheese7
sudo apt-get install  libcheese-gtk23 libcheese7
++++++++++++++++++++++++++++++++++++++++++++++其他的解决办法参考+++++++++++++++++++++++++++++
1)出现类似的问题讨论
 Steam needs to install these additional packages:
    libgl1-mesa-dri:i386, libgl1-mesa-glx:i386, libc6:i386
[sudo] password for polochamps:
....................................................................................................................
Reading package lists... Done
Building dependency tree
Reading state information... Done
Some packages could not be installed. This may mean that you have
requested an impossible situation or if you are using the unstable
distribution that some required packages have not yet been created
or been moved out of Incoming.
The following information may help to resolve the situation:

The following packages have unmet dependencies:
 libgl1-mesa-glx:i386 : Depends: libglapi-mesa:i386 (= 10.1.3-0ubuntu0.3)
 unity-control-center : Depends: libcheese-gtk23 (>= 3.4.0) but it is not going to be installed
                        Depends: libcheese7 (>= 3.0.1) but it is not going to be installed
E: Error, pkgProblemResolver::Resolve generated breaks, this may be caused by held packages.
Press return to continue:# I'm just being cautious because the last time I run "sudo apt-get autoremove" it screwed me up.
sudo apt-get update
sudo apt-get upgrade
sudo apt-get dist-upgrade
# without autoremove command, then, if you get no errors, to install 32bit libraries (as it appears not to drag them in):
sudo apt-get install lib32z1 lib32ncurses5 lib32bz2-1.0 lib32stdc++6
# then:
sudo apt-get install steam -y参考链接:https://ubuntuforums.org/showthread.php?t=2268104&page=2
解决办法1
sudo apt-get install libglew-dev libcheese7 libcheese-gtk23 libclutter-gst-2.0-0 libcogl15 libclutter-gtk-1.0-0 libclutter-1.0-0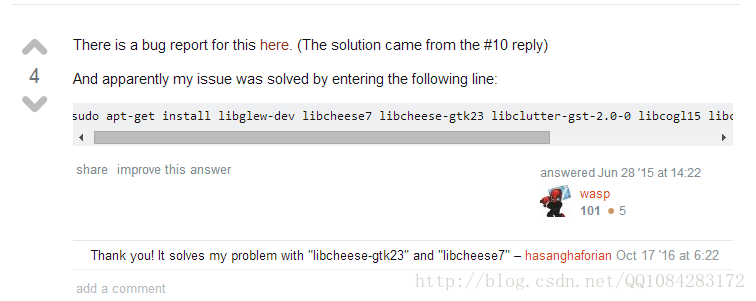
也有网友提到是ubuntu的源的问题,采用下面的方法解决的问题:
# So the problem has been with the dependencies, namely
# libegl1-mesa-drivers depending on libglapi-mesa ( = 10.1.3-0ubuntu0.3 ) (maybe should be >=)
# I have added the xorg-edgers PPA again and then properly downgraded with ppa-purge as so:

sudo add-apt-repository ppa:xorg-edgers/ppa && sudo apt-get update
sudo ppa-purge  ppa:xorg-edgers/ppa && sudo apt-get update

# and now I have all packages from xorg-edgers removed and system settings dialog opens up :)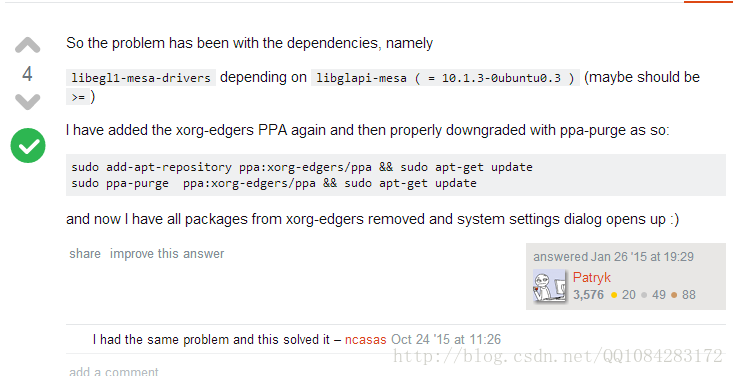
参考链接:http://askubuntu.com/questions/575548/system-settings-stopped-showing-up
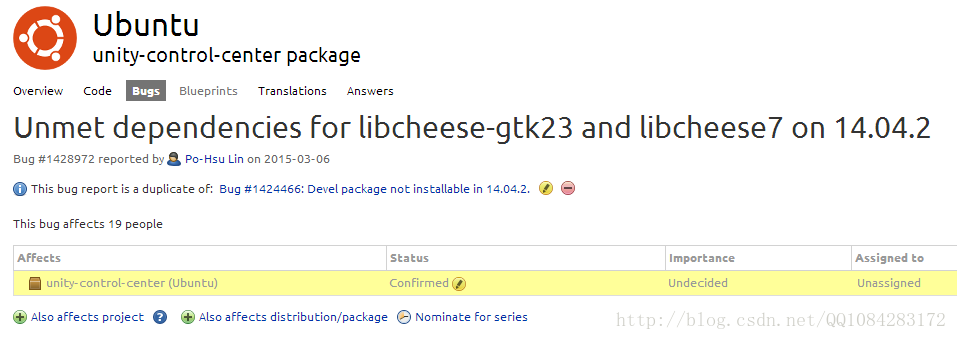
Note that:上面提供的解决方法,虽然有些能够解决 "libcheese-gtk23" 和 "libcheese7" 不能能安装成功的问题,但是即使解决了这个问题,接下来又会产生新的问题也就是 Unmet dependencies for libcheese-gtk23 and libcheese7 会影响到ubuntu 14.04系统的 unity-control-center 也就是上文提到的使用 sudo apt-get remove libcheese-gtk23 libcheese7和sudo apt-get install libcheese-gtk23 libcheese7解决问题,重启系统会出现不能进入ubuntu系统图形登陆界面,只出现命令行的登陆界面,需要修复ubuntu系统的图形登陆界面,纵然ubuntu系统图形登陆界面修复成功,打开ubuntu系统的 system settings 会出现图标变少的情况,原来很多常用的图标都没有了,需要修复,其实这是ubuntu 14.04系统的bug,具体的讨论参考地址:https://bugs.launchpad.net/ubuntu/+source/unity-control-center/+bug/1428972。
解决方法:
For Comment #9, I had the same issue when trying to install cuda 7, and doing
sudo apt-get install libglew-dev libcheese7 libcheese-gtk23 libclutter-gst-2.0-0 libcogl15 libclutter-gtk-1.0-0 libclutter-1.0-0
fixed it for me.再次执行前面安装编译依赖库命令,再次出现下面的错误:
The following packages have unmet dependencies:
 build-essential : Depends: g++ (>= 4:4.4.3) but it is not going to be installed
 g++-multilib : Depends: gcc-multilib (>= 4:4.8.2-1ubuntu6) but it is not going to be installed
                Depends: g++ (>= 4:4.8.2-1ubuntu6) but it is not going to be installed
                Depends: g++-4.8-multilib (>= 4.8.2-5~) but it is not going to be installed
E: Unable to correct problems, you have held broken packages.

经过网络查询发现是依赖库安装源地址旧了的缘故,需要添加下载源地址然后更新安装源地址,具体的可以参考网址:http://askubuntu.com/questions/685669/install-g-ubuntu-14-04-depends-g-4-8-4-8-2-5-but-it-is-not-going-to-b给出的解决方法:
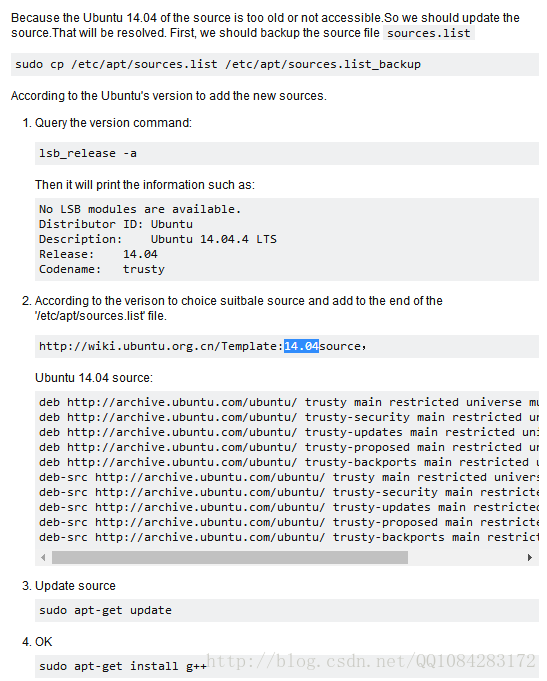
1.执行下面的命令备份原来的安装源sources.list
sudo cp /etc/apt/sources.list /etc/apt/sources.list_backup
lsb_release -a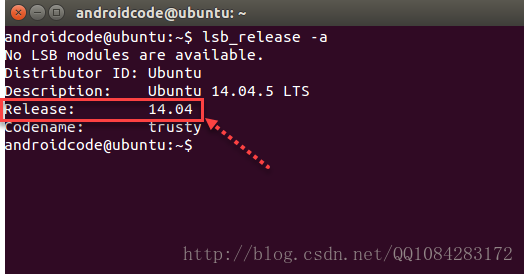
3.通过上面获取到的ubuntu系统的发布号 14.04 拼接成下面的url地址,登陆下面这个url地址,查看该版本的ubuntu有效的安装源地址:
http://wiki.ubuntu.org.cn/Template:14.04source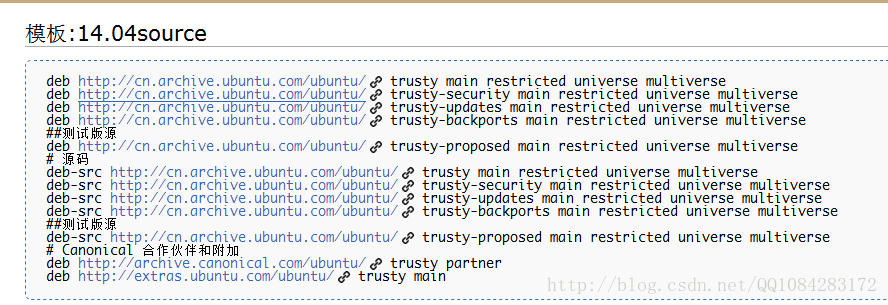
4.执行 sudo gedit /etc/apt/sources.list 命令,打开 /etc/apt/sources.list文件,将下面的安装源地址添加到/etc/apt/sources.list文件的末尾,然后保存文件,关闭gedit:
sudo gedit  /etc/apt/sources.list

deb http://cn.archive.ubuntu.com/ubuntu/ trusty main restricted universe multiverse
deb http://cn.archive.ubuntu.com/ubuntu/ trusty-security main restricted universe multiverse
deb http://cn.archive.ubuntu.com/ubuntu/ trusty-updates main restricted universe multiverse
deb http://cn.archive.ubuntu.com/ubuntu/ trusty-backports main restricted universe multiverse
##测试版源
deb http://cn.archive.ubuntu.com/ubuntu/ trusty-proposed main restricted universe multiverse
# 源码
deb-src http://cn.archive.ubuntu.com/ubuntu/ trusty main restricted universe multiverse
deb-src http://cn.archive.ubuntu.com/ubuntu/ trusty-security main restricted universe multiverse
deb-src http://cn.archive.ubuntu.com/ubuntu/ trusty-updates main restricted universe multiverse
deb-src http://cn.archive.ubuntu.com/ubuntu/ trusty-backports main restricted universe multiverse
##测试版源
deb-src http://cn.archive.ubuntu.com/ubuntu/ trusty-proposed main restricted universe multiverse
# Canonical 合作伙伴和附加
deb http://archive.canonical.com/ubuntu/ trusty partner
deb http://extras.ubuntu.com/ubuntu/ trusty main
sudo apt-get update
sudo apt-get install g++
sudo apt-get install g++-multilib
再次执行安装依赖库文件的命令,就能执行成功了:
sudo apt-get install git gnupg flex bison gperf build-essential zip curl libc6-dev libncurses5-dev:i386 x11proto-core-dev libx11-dev:i386 libreadline6-dev:i386 libgl1-mesa-dri:i386 libgl1-mesa-dev g++-multilib mingw32 tofrodos python-markdown libxml2-utils xsltproc zlib1g-dev:i386 dpkg-dev
sudo ln -s /usr/lib/i386-linux-gnu/mesa/libGL.so.1 /usr/lib/i386-linux-gnu/libGL.so
三、编译Android 4.4.4 r1的源码
1)初始化编译环境
. build/envsetup.sh 或 source build/envsetup.sh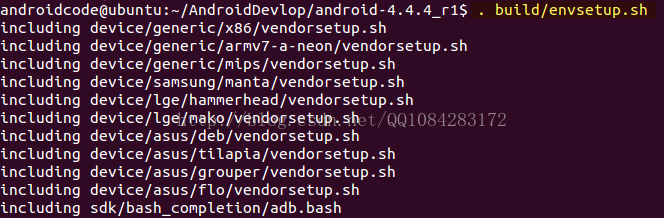
2)选择编译目标版本
lunch的方式有很多中,可以使用lunch命令查看,我使用最常用的
lunch 9 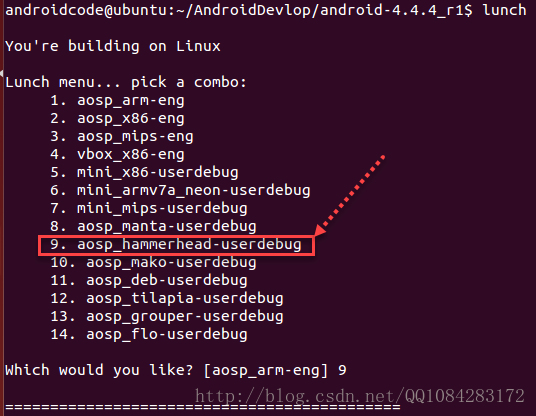
3)编译
1.make后面可以更参数:如你的机器时双核,每核双线程的话,使用make -j4,这样速度更快,但编译时使用的内存也更多2.make失败或停止后,可以使用make -k 继续编译
make -j16 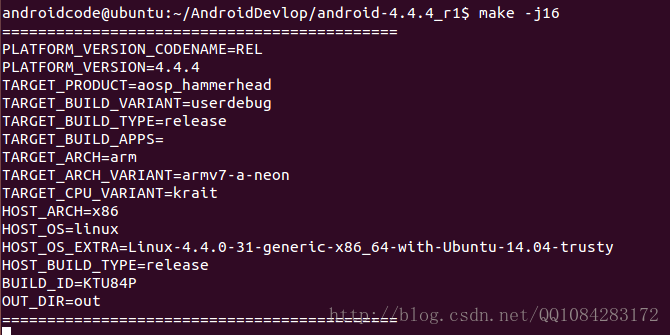
四、后记
前面由于执行sudo apt-get remove libcheese-gtk23 libcheese7可能导致重启ubuntu系统不能进入图形界面的情况,因此需要执行下面的操作进行修复:
1、进入了命令行界面,输完用户名和密码
2、重装gdm,sudo apt-get install gdm
3、设置启动界面的风格:dpkg -reconfigure gdm
4、重启reboot可登录。
sudo apt-get install  lightdm
dpkg -reconfigure lightdm
sudo apt-get install unity-control-centerhttp://blog.csdn.net/qq1084283172/article/details/54421090
http://www.linuxidc.com/Linux/2016-04/130698.htm
http://www.cnblogs.com/bozhicheng/p/5769221.html
http://blog.csdn.net/chouretang/article/details/43769839
http://wenda.so.com/q/1455520897722099?src=110
五、谷歌官方给出的编译Android源码的说明
怪不得自己编译Android源码各种出错呢,原来是根本就不看谷歌官方网站给出的各种说明,到头来各种出错找不到原因。
Hardware requirements
Your development workstation should meet or exceed these hardware requirements:
- A 64-bit environment is required for Gingerbread (2.3.x) and newer versions, including the master branch. You can compile older versions on 32-bit systems.
- At least 100GB of free disk space for a checkout, 150GB for a single build, and 200GB or more for multiple builds. If you employ ccache, you will need even more space.
- If you are running Linux in a virtual machine, you need at least 16GB of RAM/swap
Software requirements
The Android Open Source Project (AOSP) master branch
is traditionally developed and tested on Ubuntu Long Term Support (LTS) releases, but other distributions may be used. See the list below for recommended versions.
You workstation must have the software listed below. See Establishing a Build Environment for additional required packages and the commands to install them.
Operating system
Android is typically built with a GNU/Linux or Mac OS operating system. It is also possible to build Android in a virtual machine on unsupported systems such as Windows.
GNU/Linux
- Android 6.0 (Marshmallow) - AOSP master: Ubuntu 14.04 (Trusty)
- Android 2.3.x (Gingerbread) - Android 5.x (Lollipop): Ubuntu 12.04 (Precise)
- Android 1.5 (Cupcake) - Android 2.2.x (Froyo): Ubuntu 10.04 (Lucid)
Mac OS (Intel/x86)
- Android 6.0 (Marshmallow) - AOSP master: Mac OS v10.10 (Yosemite) or later with Xcode 4.5.2 and Command Line Tools
- Android 5.x (Lollipop): Mac OS v10.8 (Mountain Lion) with Xcode 4.5.2 and Command Line Tools
- Android 4.1.x-4.3.x (Jelly Bean) - Android 4.4.x (KitKat): Mac OS v10.6 (Snow Leopard) or Mac OS X v10.7 (Lion) and Xcode 4.2 (Apple's Developer Tools)
- Android 1.5 (Cupcake) - Android 4.0.x (Ice Cream Sandwich): Mac OS v10.5 (Leopard) or Mac OS X v10.6 (Snow Leopard) and the Mac OS X v10.5 SDK
Java Development Kit (JDK)
Please note, since there are no available supported OpenJDK 8 packages for Ubuntu 14.04, the Ubuntu 15.04 packages must be installed manually. See JDK for Ubuntu LTS 14.04 for precise instructions.
- The master branch of Android in AOSP: Ubuntu - OpenJDK 8, Mac OS - jdk 8u45 or newer
- Android 5.x (Lollipop) - Android 6.0 (Marshmallow): Ubuntu - OpenJDK 7, Mac OS - jdk-7u71-macosx-x64.dmg
- Android 2.3.x (Gingerbread) - Android 4.4.x (KitKat): Ubuntu - Java JDK 6, Mac OS - Java JDK 6
- Android 1.5 (Cupcake) - Android 2.2.x (Froyo): Ubuntu - Java JDK 5
Key packages
- Python 2.6 -- 2.7 from python.org
- GNU Make 3.81 -- 3.82 from gnu.org; Android 3.2.x (Honeycomb) and earlier will need to revert from make 3.82 to avoid build errors
- Git 1.7 or newer from git-scm.com
Installing required packages (Ubuntu 14.04)
You will need a 64-bit version of Ubuntu. Ubuntu 14.04 is recommended.
$ sudo apt-get install git-core gnupg flex bison gperf build-essential
  zip curl zlib1g-dev gcc-multilib g++-multilib libc6-dev-i386
  lib32ncurses5-dev x11proto-core-dev libx11-dev lib32z-dev ccache
  libgl1-mesa-dev libxml2-utils xsltproc unzip
Note: To use SELinux tools for policy analysis, also install the python-networkx package.
Note: If you are using LDAP and want to run ART host tests, also install the libnss-sss:i386 package.
Installing required packages (Ubuntu 12.04)
You may use Ubuntu 12.04 to build older versions of Android. Version 12.04 is not supported on master or recent releases.
$ sudo apt-get install git gnupg flex bison gperf build-essential zip curl libc6-dev libncurses5-dev:i386 x11proto-core-dev libx11-dev:i386 libreadline6-dev:i386 libgl1-mesa-glx:i386 libgl1-mesa-dev g++-multilib mingw32 tofrodos python-markdown libxml2-utils xsltproc zlib1g-dev:i386 $ sudo ln -s /usr/lib/i386-linux-gnu/mesa/libGL.so.1 /usr/lib/i386-linux-gnu/libGL.so谷歌参考网址:https://source.android.com/source/initializing.html
The following instructions to build the Android source tree apply to all branches, including master. The basic sequence of build commands is as follows:
Note: If you're building Android 6.0 or later, please see Compiling with Jack for information on this new default toolchain.
Obtain proprietary binaries
AOSP cannot be used from pure source code only and requires additional hardware-related proprietary libraries to run, such as for hardware graphics acceleration. See the sections below for download links and Device binaries requirements for additional resources.
Download proprietary binaries
You can download official binaries for the supported devices running tagged AOSP release branches from Google's Nexus driver page. These binaries add access to additional hardware capabilities with non-open source code. To instead build the AOSP master branch, use the Binaries Preview for Nexus Devices. When building the master branch for a device, use the binaries for the most recent numbered release or with the most recent date.
Extract proprietary binaries(如何将google提供的设备驱动相关的文件添加到Android源码中参与编译)
Each set of binaries comes as a self-extracting script in a compressed archive. Uncompress each archive,
run the included self-extracting script from the root of the source tree,then confirm that you agree to the terms of the enclosed license agreement.The
binaries and their matching makefiles will be installed in the vendor/hierarchy of the source tree.
Clean up
To ensure the newly installed binaries are properly taken into account after being extracted, delete the existing output of any previous build using:
$ make clobber
Set up environment
Initialize the environment with the envsetup.sh script. Note that replacing source with . (a
single dot) saves a few characters, and the short form is more commonly used in documentation.
$ source build/envsetup.sh
or
$ . build/envsetup.sh
Choose a target
Choose which target to build with lunch. The exact configuration can be passed as an argument. For example, the following command:
$ lunch aosp_arm-eng
refers to a complete build for the emulator, with all debugging enabled.
If run with no arguments lunch will prompt you to choose a target from the menu.
All build targets take the form BUILD-BUILDTYPE, where the BUILD is
a codename referring to the particular feature combination.
The BUILDTYPE is one of the following:
| Buildtype | Use |
|---|---|
| user | limited access; suited for production |
| userdebug | like "user" but with root access and debuggability; preferred for debugging |
| eng | development configuration with additional debugging tools |
For more information about building for and running on actual hardware, see Running Builds.
Build the code
Please note, this section is merely a summary to ensure setup is complete. See Running Builds for detailed instructions on building Android.
Build everything with make. GNU make can handle parallel tasks with a -jN argument,
and it's common to use a number of tasks N that's between 1 and 2 times the number of hardware threads on the computer being used for the build. For example, on a dual-E5520 machine (2 CPUs, 4 cores per CPU, 2 threads per core), the fastest builds are made
with commands between make -j16 and make -j32.
$ make -j4
Run it!
You can either run your build on an emulator or flash it on a device. Please note that you have already selected your build target with lunch, and it
is unlikely at best to run on a different target than it was built for.
Note: Remember to obtain proprietary
binaries or your build will not boot successfully on your target hardware. If you obtain binary blobs at this point you will need to unpack them, make clobber and rebuild.
Flash with fastboot
To flash a device, you will need to use fastboot, which should be included in your path after a successful build. See Flashing
a device for instructions.
Emulate an Android Device
The emulator is added to your path automatically by the build process. To run the emulator, type:
$ emulator
谷歌官方参考链接:https://source.android.com/source/building.html
六、Ubuntu虚拟机系统VMware Tools的安装(顺便记录一下)
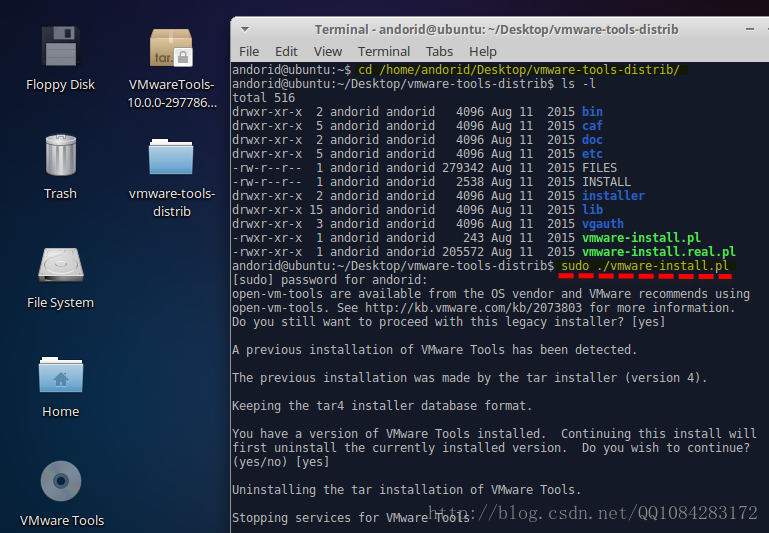
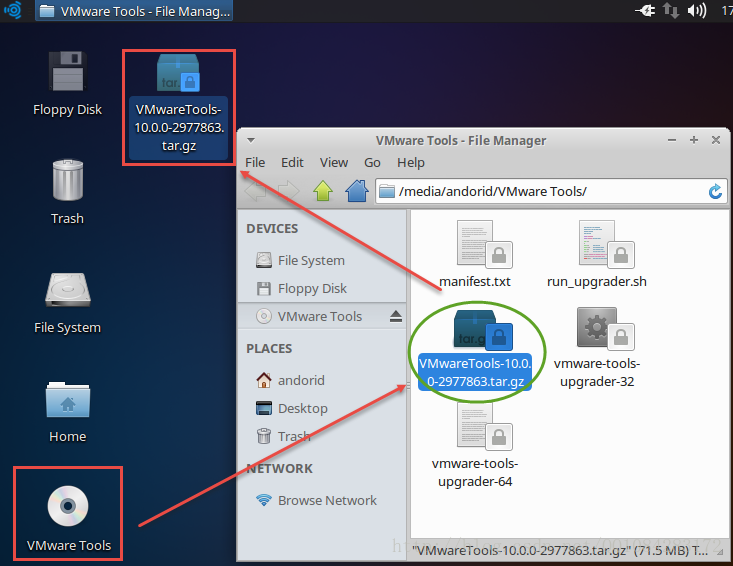
1.通过VMware Workstation Pro虚拟机的菜单栏虚拟机(M)---> 安装VMware Tools(T) ,点击安装VMware Tools虚拟机增强工具,此时在ubuntu studio 16.04.1 64bit系统的桌面,会生成一个 VMware Tools的图标,点击进去会发现VMware Tools的安装包 VMwareTools-10.0.0-2977863.tar.gz 如下图,将其拷贝一份到ubuntu studio 16.04.1 64bit系统的桌面上。
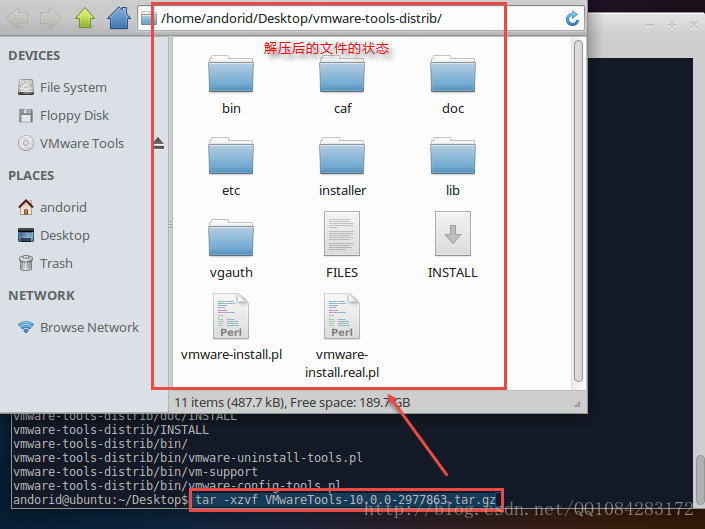
2.打开终端对 VMwareTools-10.0.0-2977863.tar.gz 进行解压
命令:
tar -xzvf VMwareTools-10.0.0-2977863.tar.gz
3.进入 VMwareTools-10.0.0-2977863.tar.gz解压后的文件目录vmware-tools-distrib,su权限执行./vmware-install.pl ,按照 VMwareTools的安装提示一路回车直到 VMwareTools安装完成,然后reboot重启系统。
命令:
cd vmware-tools-distrib
sudo ./vmware-install.pl
reboot