前面的话
对PHP来说,有很多模板引擎可供选择,但Smarty是一个使用PHP编写出来的,是业界最著名、功能最强大的一种PHP模板引擎。Smarty像PHP一样拥有丰富的函数库,从统计字数到自动缩进、文字环绕以及正则表达式都可以直接使用,如果觉得不够,SMARTY还有很强的扩展能力,可以通过插件的形式进行扩充。另外,Smarty也是一种自由软件,用户可以自由使用、修改,以及重新分发该软件。本文将详细介绍Smarty模板引擎
Smarty是一个php模板引擎。更准确的说,它分离了逻辑程序和外在的内容,提供了一种易于管理的方法。Smarty总的设计理念就是分离业务逻辑和表现逻辑,优点概括如下:
速度——相对于其他的模板引擎技术而言,采用Smarty编写的程序可以获得最大速度的提高
编译型——采用Smarty编写的程序在运行时要编译成一个非模板技术的PHP文件,这个文件采用了PHP与HTML混合的方式,在下一次访问模板时将Web请求直接转换到这个文件中,而不再进行模板重新编译(在源程序没有改动的情况下),使用后续的调用速度更快
缓存技术——Smarty提供了一种可选择使用的缓存技术,它可以将用户最终看到的HTML文件缓存成一个静态的HTML页面。当用户开启Smarty缓存时,并在设定的时间内,将用户的Web请求直接转换到这个静态的HTML文件中来,这相当于调用一个静态的HTML文件
插件技术——Smarty模板引擎是采用PHP的面向对象技术实现,不仅可以在原代码中修改,还可以自定义一些功能插件(按规则自定义的函数)
强大的表现逻辑——在Smarty模板中能够通过条件判断以及迭代地处理数据,它实际上就是种程序设计语言,但语法简单,设计人员在不需要预备的编程知识前提下就可以很快学会
模板继承——模板的继承是Smarty3的新事物。在模板继承里,将保持模板作为独立页面而不用加载其他页面,可以操纵内容块继承它们。这使得模板更直观、更有效和易管理
当然,也有不适合使用Smarty的地方。例如,需要实时更新的内容,需要经常重新编译模板,所以这类型的程序使用Smarty会使模板处理速度变慢。另外,在小项目中也不适合使用Smarty模板,小项目因为项目简单而前端与后端兼于一人的项目,使用Smarty会在一定程度上丧失PHP开发迅速的优点
配置
【安装】
安装Smarty很简单,到Smarty官方网站下载最新的稳定版本,然后解压压缩包,在解压后的目录可以看到一个名叫libs的Smarty类库目录,直接将libs文件夹复制到程序主文件夹下即可
[注意]Smarty要求web服务器运行php4.0以上版本
libs文件夹下共包含以下6个文件
1 Smarty.class.php(主文件)
2 SmartyBC.class.php(兼容其他版本Smarty)
3 sysplugins/* (系统函数插件)
4 plugins/* (自定义函数插件)
5 Autoloader.php
6 debug.tpl
【实例化】
/* 并指定了Smarty.class.php所在位置,注意'S'是大写的*/ require './libs/Smarty.class.php';
/* 实例化Smarty类的对象$smarty */ $smarty = new Smarty();
【init】
Smarty要求4个目录,默认下命名为:tempalates、templates_c、configs和cache。每个都是可以自定义的,可以分别修改Smarty类属性或相关方法:$template_dir、$compile_dir、$config_dir和$cache_dir
 1 /** file: init.inc.php Smarty对象的实例化及初使化文件 */
 2 define("ROOT", str_replace("\", "/",dirname(__FILE__)).'/');
 3  //指定项目的根路径 require ROOT.'libs/Smarty.class.php';
 4  //加载Smarty类文件         $smarty = new Smarty();
 5  //实例化Smarty类的对象$smarty
 6  /* 推荐用Smarty3以上版本方式设置默认路径,成功后返回$smarty对象本身,可连贯操作 */
 7 $smarty ->setTemplateDir(ROOT.'templates/')
 8 //设置所有模板文件存放的目录
 9   // ->addTemplateDir(ROOT.'templates2/')
10   //可以添加多个模板目录 ->setCompileDir(ROOT.'templates_c/')
11 //设置所有编译过的模板文件存放的目录 ->addPluginsDir(ROOT.'plugins/')
12 //添加模板扩充插件存放的目录 ->setCacheDir(ROOT.'cache/')
13 //设置缓存文件存放的目录 ->setConfigDir(ROOT.'configs');
14 //设置模板配置文件存放的目录 $smarty->caching = false;
15 //设置Smarty缓存开关功能 $smarty->cache_lifetime = 60*60*24;
16 //设置模板缓存有效时间段的长度为1天 $smarty->left_delimiter = '<{';
17 //设置模板语言中的左结束符 $smarty->right_delimiter = '}>'; //设置模板语言中的右结束符
【demo】
 1 <!-- main.tpl -->
 2 <!DOCTYPE html>
 3 <html lang="en">
 4  <head>
 5 <meta charset="UTF-8">
 6  <title>Document</title>
 7 </head>
 8  <body>
 9 <{$content}>
10 </body>
11 </html>
1 <?php
2 require './init.inc.php';
3 $smarty -> assign('content','this is content.....');
4 $smarty -> display('main.tpl');
5 ?>
【注释】
模板注释被*星号包围,而两边的星号又被定界符包围。注释只存在于模板里面,而在输出的页面中不可见
【变量】
模板变量用美元符号$开始,可以包含数字、字母和下划线,这与php变量很像。可以引用数组的数字或非数字索引,当然也可以引用对象属性和方法
配置文件变量是一个不用美元符号$,而是用#号包围着变量(#hashmarks#),或者是一个$smarty.config形式的变量
[注意]Smarty可以识别嵌入在双引号中的变量
 1 数学和嵌入标签
 2 {$x+$y} // 输出x+y的和 {assign var=foo value=$x+$y}
 3 // 属性中的变量 {$foo[$x+3]}
 4 // 变量作为数组索引 {$foo={counter}+3}
 5 // 标签里面嵌套标签 {$foo="this is message {counter}"}
 6 // 引号里面使用标签
 7 定义数组
 8 {assign var=foo value=[1,2,3]}
 9 {assign var=foo value=['y'=>'yellow','b'=>'blue']}
10 {assign var=foo value=[1,[9,8],3]} // 可以嵌套
11 短变量分配
12 {$foo=$bar+2}
13 {$foo = strlen($bar)}
14 {$foo = myfunct( ($x+$y)*3 )} // 作为函数参数 {$foo.bar=1} // 赋值给指定的数组索引 {$foo.bar.baz=1}
15 {$foo[]=1}
16
17 点语法
18 {$foo.a.b.c} => $foo['a']['b']['c']
19 {$foo.a.$b.c} => $foo['a'][$b]['c']
20 {$foo.a.{$b+4}.c} => $foo['a'][$b+4]['c']
21 {$foo.a.{$b.c}} => $foo['a'][$b['c']]
22
23 PHP语法
24 {$foo[1]}
25 {$foo['bar']}
26 {$foo['bar'][1]}
27 {$foo[$x+$x]}
28 {$foo[$bar[1]]}
29 {$foo[section_name]}
 1 <!-- main.tpl -->
 2 <!DOCTYPE html>
 3 <html lang="en">
 4 <head>
 5 <meta charset="UTF-8">
 6 <title>Document</title>
 7 </head>
 8 <body>
 9 <{***定义数组:10***}>
10 <{assign var=foo value=[10,20,30]}>
11 <{$foo[0]}><br>
12 <{***短变量分配:0***}>
13 <{$foo=0}> <{$foo}><br>
14 <{***点语法:1***}>
15 <{$test.a}><br>
16 <{***PHP语法:1***}>
17 <{$test['a']}><br>
18 <{***数学运算:3***}>
19 <{$test.a+$test.b}><br>
20 </body>
21 </html>
1 <?php
2 require './init.inc.php';
3 $smarty -> assign('test',['a'=>1,'b'=>2]);
4 $smarty -> display('main.tpl');
5 ?>
【函数】
每一个smarty标签输出一个变量或者调用某种函数。在定界符内函数和其属性将被处理和输出
1 <{funcname attr1="val" attr2="val"}>
 1 {config_load file="colors.conf"}
 2
 3 {include file="header.tpl"}
 4
 5 {if $highlight_name}
 6     Welcome, <div style="color:{#fontColor#}">{$name}!</div>
 7 {else}
 8     Welcome, {$name}!
 9 {/if}
10
11 {include file="footer.tpl"}
【属性】
大多数函数都带有自己的属性以便于明确说明或者修改他们的行为,smarty函数的属性很像HTML中的属性。静态数值不需要加引号,但是字符串建议使用引号。可以使用普通smarty变量,也可以使用带调节器的变量作为属性值,它们也不用加引号。甚至可以使用php函数返回值和复杂表达式作为属性值
一些属性用到了布尔值(true或false),它们表明为真或为假。如果没有为这些属性赋布尔值,那么默认使用true为其值
 1 {include file="header.tpl"}
 2 {include file="header.tpl" nocache} // 等于nocache=true {include file="header.tpl" attrib_name="attrib value"}
 3
 4 {include file=$includeFile}
 5 {include file=#includeFile# title="My Title"} {assign var=foo value={counter}}
 6 {assign var=foo value=substr($bar,2,5)}
 7 {assign var=foo value=$bar|strlen}
 8 {assign var=foo value=$buh+$bar|strlen}
 9
10 {html_select_date display_days=true}
11
12 {mailto address="smarty@example.com"}
13
14 <select name="company_id">
15 {html_options options=$companies selected=$company_id}
16 </select>
变量
Smarty有几种不同类型的变量,变量的类型取决于它的前缀符号是什么(或者被什么符号包围)。Smarty的变量可以直接被输出或者作为函数属性和调节器(modifiers)的参数,或者用于内部的条件表达式等等。如果要输出一个变量,只要用定界符将它括起来就可以
1、从PHP分配的变量
1 index.php: $smarty = new Smarty;
2 $smarty->assign('Contacts',array('fax' => '555-222-9876','email' => 'zaphod@slartibartfast.com'));
3 $smarty->display('index.tpl');
4
5 index.tpl: <{$Contacts.fax}><br> <{$Contacts.email}><br>
6
7 OUTPUT: 555-222-9876<br>
8 zaphod@slartibartfast.com<br>
2、从配置文件读取的变量
加载配置文件后,配置文件中的变量需要用两个井号"#"包围或者是smarty的保留变量$smarty.config.来调用
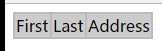
 1 foo.conf:
 2 pageTitle = "This is mine"
 3 tableBgColor = "#bbbbbb"
 4 rowBgColor = "#cccccc"
 5
 6 <!-- main.tpl -->
 7 <{config_load file='foo.conf'}>
 8 <!DOCTYPE>
 9 <html>
10 <title><{#pageTitle#}></title>
11 <body>
12 <table style="background:<{#tableBgColor#}>">
13     <tr style="background:<{#rowBgColor#}>">
14         <td>First</td>
15         <td>Last</td>
16         <td>Address</td>
17     </tr>
18 </table>
19 </body>
20 </html>
21
22
23 <?php
24 require './init.inc.php';
25 $smarty -> display('main.tpl');
26 ?>
 1 foo.conf:
 2
 3 [a]
 4 x=1
 5
 6 [b]
 7 x=2
 8
 9 [c]
10 x=3
11
12 <!-- main.tpl -->
13 <{config_load file='foo.conf' section="a"}>
14 <{#x#}>
15
16 output:1
4、模板里定义的变量
|
1
2
3
4
5
|
<{$name='Bob'}>The value of $name is <{$name}>. output:The value of $name is Bob. |
5、保留变量
|
1
2
3
4
5
6
7
8
9
10
11
12
13
14
15
|
$smarty.get$smarty.post$smarty.cookies$smarty.server$smarty.env$smarty.session$smarty.request$smarty.now //当前时间戳$smarty.const //访问php常量$smarty.capture //捕获内置的{capture}...{/capture}模版输出$smarty.config //取得配置变量。{$smarty.config.foo}是{#foo#}的同义词$smarty.section //指向{section}循环的属性$smarty.template //返回经过处理的当前模板名$smarty.current_dir //返回经过处理的当前模板目录名$smarty.version //返回经过编译的Smarty模板版本号 |
|
1
2
3
4
5
6
|
<!-- main.tpl --><{$smarty.now}><br><{date('Y-m-d',$smarty.now)}><br><{$smarty.template }><br> <{$smarty.current_dir }><br> <{$smarty.version }><br> |

变量调节器
变量调节器作用于变量、自定义函数或字符串。变量调节器的用法是:‘|’符号右接调节器名称。变量调节器可接收附加参数影响其行为。参数位于调节器右边,并用‘:’符号分开
[注意]对于同一个变量,可以使用多个修改器。它们将从左到右按照设定好的顺序被依次组合使用。使用时必须要用"|"字符作为它们之间的分隔符
capitalize[首字符大写]
将变量里的所有单词首字大写,与php的ucwords()函数类似。默认参数为false用于确定带数字的单词是否需要大写
|
1
2
3
4
5
6
7
8
9
10
|
<{$articleTitle="next x-men film, x3, delayed."}><{$articleTitle}><br><{$articleTitle|capitalize}><br><{$articleTitle|capitalize:true}> <br>output:next x-men film, x3, delayed.Next X-Men Film, x3, Delayed.Next X-Men Film, X3, Delayed. |
lower[小写]
将变量字符串小写,作用等同于php的strtolower()函数
|
1
2
3
4
5
6
7
8
|
<{$articleTitle="Next x-men film, x3, delayed."}><{$articleTitle}><br><{$articleTitle|lower}><br>output:Next x-men film, x3, delayed.next x-men film, x3, delayed. |
upper[大写]
将变量改为大写,等同于php的strtoupper()函数
|
1
2
3
4
5
6
7
8
|
<{$articleTitle="Next x-men film, x3, delayed."}><{$articleTitle}><br><{$articleTitle|upper}><br>output:Next x-men film, x3, delayed.NEXT X-MEN FILM, X3, DELAYED. |
cat[连接字符串]
将cat里的值后接到给定的变量后面
|
1
2
3
|
<{$articleTitle="next x-men film, x3, delayed."}> <{$articleTitle|cat:" yesterday."}>OUTPUT: next x-men film, x3, delayed. yesterday. |
count_characters[字符计数]
计算变量里的字符数。默认参数为false,用于确定是否计算空格字符
|
1
2
3
4
5
6
7
8
9
|
<{$articleTitle="next x-men film, x3, delayed."}><{$articleTitle}><br><{$articleTitle|count_characters}><br><{$articleTitle|count_characters:true}><br>OUTPUT:next x-men film, x3, delayed.2529 |
count_paragraphs[计算段数]
计算变量里的段落数量
|
1
2
3
4
5
6
7
|
<{$articleTitle="next x-men
film, x3, delayed."}><{$articleTitle}><br><{$articleTitle|count_paragraphs}><br>OUTPUT:next x-men film, x3, delayed.2 |
count_sentences[计算句数]
计算变量里句子的数量
|
1
2
3
4
5
6
7
|
<{$articleTitle="next x-men. film, x3, delayed."}><{$articleTitle}><br><{$articleTitle|count_sentences}><br>OUTPUT:next x-men. film, x3, delayed.2 |
count_words[计算词数]
计算变量里的词数
|
1
2
3
4
5
6
7
|
<{$articleTitle="next x-men film, x3, delayed."}><{$articleTitle}><br><{$articleTitle|count_words}><br>OUTPUT:next x-men film, x3, delayed.5 |
date_format[格式化日期]
|
1
2
3
4
5
6
7
8
9
10
11
12
13
14
15
16
17
18
19
20
21
22
23
24
25
26
27
28
29
30
31
32
33
34
35
|
%a - 当前区域星期几的简写%A - 当前区域星期几的全称%b - 当前区域月份的简写%B - 当前区域月份的全称%c - 当前区域首选的日期时间表达%C - 世纪值(年份除以 100 后取整,范围从 00 到 99)%d - 月份中的第几天,十进制数字(范围从 01 到 31)%D - 和 %m/%d/%y 一样%e - 月份中的第几天,十进制数字,一位的数字前会加上一个空格(范围从 ' 1' 到 '31')%g - 和 %G 一样,但是没有世纪%G - 4 位数的年份,符合 ISO 星期数(参见 %V)。和 %V 的格式和值一样,只除了如果 ISO 星期数属于前一年或者后一年,则使用那一年。%h - 和 %b 一样%H - 24 小时制的十进制小时数(范围从 00 到 23)%I - 12 小时制的十进制小时数(范围从 00 到 12)%j - 年份中的第几天,十进制数(范围从 001 到 366)%m - 十进制月份(范围从 01 到 12)%M - 十进制分钟数%n - 换行符%p - 根据给定的时间值为 `am' 或 `pm',或者当前区域设置中的相应字符串%r - 用 a.m. 和 p.m. 符号的时间%R - 24 小时符号的时间%S - 十进制秒数%t - 制表符%T - 当前时间,和 %H:%M:%S 一样%u - 星期几的十进制数表达 [1,7],1 表示星期一%U - 本年的第几周,从第一周的第一个星期天作为第一天开始%V - 本年第几周的 ISO 8601:1988 格式,范围从 01 到 53,第 1 周是本年第一个至少还有 4 天的星期,星期一作为每周的第一天。(用 %G 或者 %g 作为指定时间戳相应周数的年份组成。)%W - 本年的第几周数,从第一周的第一个星期一作为第一天开始%w - 星期中的第几天,星期天为 0%x - 当前区域首选的时间表示法,不包括时间%X - 当前区域首选的时间表示法,不包括日期%y - 没有世纪数的十进制年份(范围从 00 到 99)%Y - 包括世纪数的十进制年份%Z 或 %z - 时区名或缩写%% - 文字上的 `%' 字符 |
|
1
2
3
4
5
6
|
<{$smarty.now|date_format}><br><{$smarty.now|date_format:"%D"}><br>output:Mar 25, 201703/25/17 |
default[默认值]
为变量设置一个默认值。当变量未设置或为空字符串时,将由给定的默认值替代其输出
|
1
2
3
4
5
6
7
|
<{$articleTitle|default:'a'}><br><{$articleTitle="next x-men film, x3, delayed."}><{$articleTitle|default:'a'}><br>output:anext x-men film, x3, delayed. |
escape[转义]
escape作用于变量,用以html、url、单引号、十六进制、十六进制实体、javascript、邮件的转码或转义。第一个参数默认为'html',可选参数有'html,htmlall,url,quotes,hex,hexentity,javascript';第二个参数默认为'utf-8',可选参数有'ISO-8859-1,UTF-8'...
|
1
2
3
4
5
6
7
|
<{$articleTitle="'Stiff Opposition Expected to Casketless Funeral Plan'"}><{$articleTitle|escape}><br><{$articleTitle|escape:'url'}>output:'Stiff Opposition Expected to Casketless Funeral Plan'%27Stiff%20Opposition%20Expected%20to%20Casketless%20Funeral%20Plan%27 |
indent[缩进]
在每行缩进字符串,默认是4个字符。对于第一个可选参数,可以指定缩进字符数,对于第二个可选参数,可以指定使用什么字符缩进,例如' '作为tab
|
1
2
3
4
5
6
7
|
<{$articleTitle="'Stiff Opposition Expected to Casketless Funeral Plan'"}><{$articleTitle}><br><{$articleTitle|indent}>output:'Stiff Opposition Expected to Casketless Funeral Plan' 'Stiff Opposition Expected to Casketless Funeral Plan' |
nl2br[换行符替换成<br />]
所有的换行符将被替换成 <br />,功能同PHP中的nl2br()函数一样
|
1
2
3
4
5
6
7
8
|
<{$articleTitle="Next x-men
film, x3, delayed."}><{$articleTitle}><br><{$articleTitle|nl2br}><br>output:Next x-men film, x3, delayed.Next x-menfilm, x3, delayed. |
regex_replace[正则替换]
使用正则表达式在变量中搜索和替换,语法来自php的preg_replace()函数
|
1
2
3
4
5
6
7
8
|
<{$articleTitle="Next x-men
film, x3, delayed."}><{$articleTitle}><br><{$articleTitle|regex_replace:"/[
]/":" "}><br>output:Next x-menfilm, x3, delayed.Next x-men film, x3, delayed. |
replace[替换]
一种在变量中进行简单的搜索和替换字符串的处理。等同于php的str_replace()函数
|
1
2
3
4
5
6
7
|
<{$articleTitle="Next x-men film, x3, delayed."}><{$articleTitle}><br><{$articleTitle|replace:"x":"y"}><br>output:Next x-men film, x3, delayed.Neyt y-men film, y3, delayed. |
spacify[插空]
插空是一种在变量的字符串的每个字符之间插入空格或者其他的字符(串)的方法
|
1
2
3
4
5
6
7
8
9
|
<{$articleTitle="Next x-men film, x3, delayed."}><{$articleTitle}><br><{$articleTitle|spacify}><br><{$articleTitle|spacify:"^"}><br>output:Next x-men film, x3, delayed.N e x t x - m e n f i l m , x 3 , d e l a y e d .N^e^x^t^ ^x^-^m^e^n^ ^f^i^l^m^,^ ^x^3^,^ ^d^e^l^a^y^e^d^. |
string_format[字符串格式化]
一种格式化字符串的方法,例如格式化为十进制数等等。实际运用的是php的sprintf()函数
|
1
2
3
4
5
6
7
8
9
|
<{$number=23.5678}><{$number}><br><{$number|string_format:"%.2f"}><br><{$number|string_format:"%d"}>output:23.567823.5723 |
strip[去除(多余空格)]
用一个空格或一个给定字符替换所有重复空格、换行和制表符
1 <{$articleTitle="Grandmother of eight makes hole in one."}> 2 <{$articleTitle}><br> 3 <{$articleTitle|strip}><br> 4 <{$articleTitle|strip:' '}><br> 5 6 output: 7 Grandmother of 8 eight makes hole in one. 9 Grandmother of eight makes hole in one. 10 Grandmother of eight makes hole in one.
strip_tags[去除html标签]
去除<和>标签,包括在<和>之间的全部内容
|
1
2
3
4
5
6
7
|
<{$articleTitle="Blind Woman Gets New Kidney from Dad she Hasn't Seen in <b>years</b>."}><{$articleTitle}><br><{$articleTitle|strip_tags}><br>output:Blind Woman Gets New Kidney from Dad she Hasn't Seen in <b>years</b>.<br>Blind Woman Gets New Kidney from Dad she Hasn't Seen in years .<br> |
truncate[截取]
从字符串开始处截取某长度的字符,默认是80个,也可以指定第二个参数作为追加在截取字符串后面的文本串。该追加字串被计算在截取长度中。默认情况下,smarty会截取到一个词的末尾。如果想要精确的截取多少个字符,把第三个参数改为"true";第四个参数默认设置为FALSE,表示将截取至字符串末尾,设置为TRUE则截取到中间。注意如果设了TRUE,则忽略字符边界
|
1
2
3
4
5
6
7
8
9
10
11
12
13
14
15
16
17
18
19
|
<{$articleTitle='Two Sisters Reunite after Eighteen Years at Checkout Counter.'}><{$articleTitle}><br><{$articleTitle|truncate}><br><{$articleTitle|truncate:30}><br><{$articleTitle|truncate:30:""}><br><{$articleTitle|truncate:30:"---"}><br><{$articleTitle|truncate:30:"":true}><br><{$articleTitle|truncate:30:"...":true}><br><{$articleTitle|truncate:30:'..':true:true}><br>output:Two Sisters Reunite after Eighteen Years at Checkout Counter.Two Sisters Reunite after Eighteen Years at Checkout Counter.Two Sisters Reunite after...Two Sisters Reunite afterTwo Sisters Reunite after---Two Sisters Reunite after EighTwo Sisters Reunite after E...Two Sisters Re..ckout Counter. |
wordwrap[行宽约束]
可以指定段落的列宽(也就是一行多少个字符,超过这个字符数换行),默认80。第二个参数可选,指定在约束点使用什么换行符,默认为"
"。默认情况下smarty将截取到词尾,如果想精确到设定长度的字符,请将第三个参数设为ture。本调节器等同于php的wordwrap()函数
|
1
2
3
4
5
6
7
8
9
10
11
12
13
14
15
16
17
18
19
20
21
22
|
<{$articleTitle="Blind woman gets new kidney from dad she hasn't seen in years."}><{$articleTitle}><br><{$articleTitle|wordwrap:30}><br><{$articleTitle|wordwrap:20}><br><{$articleTitle|wordwrap:30:"<br />
"}><br><{$articleTitle|wordwrap:26:"
":true}><br>output:Blind woman gets new kidney from dad she hasn't seen in years.<br>Blind woman gets new kidneyfrom dad she hasn't seen inyears.<br>Blind woman gets newkidney from dad shehasn't seen inyears.<br>Blind woman gets new kidney<br />from dad she hasn't seen in<br />years.<br>Blind woman gets newkidney from dad she hasn'tseen in years.<br> |
内置函数
{$var=...} 变量赋值
这是{assign}函数的简写版,可以直接赋值给模版,也可以为数组元素赋值
|
1
2
3
4
|
<{$name='Bob'}>The value of $name is <{$name}>.output:The value of $name is Bob. |
{append} 追加
{append}用于在模板执行期间建立或追加模板变量数组
|
1
2
3
4
5
6
7
8
9
10
11
|
<{append var='name' value='Bob' index='first'}><{append var='name' value='Meyer' index='last'}><{* 或者 *}><{append 'name' 'Bob' index='first'}> <{* 简写 *}><{append 'name' 'Meyer' index='last'}> <{* 简写 *}>The first name is <{$name.first}>.<br>The last name is <{$name.last}>.output:The first name is Bob.The last name is Meyer. |
{assign} 赋值
{assign}用来在模板运行时为模板变量赋值
<{assign var="name" value="Bob"}>
<{assign "name" "Bob"}>
<{* 简写 *}>
The value of $name is <{$name}>.

output:
The value of $name is Bob.
{config_load}
{config_load}用来从配置文件中加载config变量(#variables#)到模版
foo.conf:

[a]
x=1

[b]
x=2

[c]
x=3

<!-- main.tpl -->
<{config_load file='foo.conf' section="a"}>
<{#x#}>

output:1
{for} 循环
{for}、{forelse}标签用来创建一个简单循环,支持以下不同的格式:
{for $var=$start to $end}步长为1的简单循环;
{for $var=$start to $end step $step}其它步长循环
当循环无迭代时执行{forelse}
 1 <ul>
 2 <{for $foo=1 to 3}>
 3 <li><{$foo}></li><{/for}>
 4 </ul>
 5
 6 output:
 7 <ul>
 8     <li>1</li>
 9     <li>2</li>
10     <li>3</li>
11 </ul>
 1 <ul>
 2 <{for $foo=2 to 10 max=3}>
 3 <li><{$foo}></li><{/for}>
 4 </ul>
 5
 6 output:
 7 <ul>
 8     <li>2</li>
 9     <li>3</li>
10     <li>4</li>
11 </ul>
{while}循环
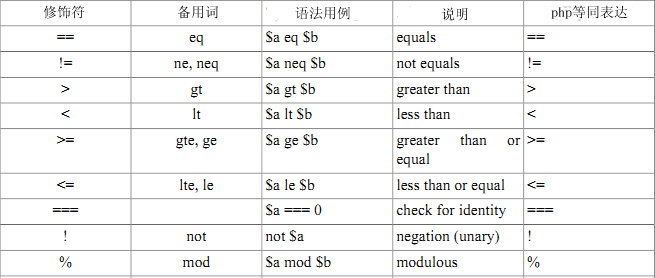
随着一些特性加入到模版引擎,Smarty的{while}循环与php的while语句一样富有弹性。每一个{while}必须与一个{/while}成对出现,所有php条件和函数在它身上同样适用,诸如||、or、&&、and、is_array()等等
下面是一串有效的限定符,它们的左右必须用空格分隔开,注意列出的清单中方括号是可选的,在适用情况下使用相应的等号(全等或不全等)
{foreach},{foreachelse}遍历
{foreach}用来遍历数据数组,{foreach}与{section}循环相比更简单、语法更干净,也可以用来遍历关联数组
1 {foreach $arrayvar as $itemvar}
2 {foreach $arrayvar as $keyvar=>$itemvar}
{foreach}循环可以嵌套;数组变量通常是(另)一个数组的值,用来指导循环的次数,可以为专有循环传递一个整数;当数组变量无值时执行{foreachelse};
{foreach}的属性是@index、@iteration、@first、@last、@show、@total;
可以用循环项目中的当前键({$item@key})代替键值变量
 1 <{$myColors['a'] = 'red'}>
 2 <{$myColors['b'] = 'green'}>
 3 <{$myColors['c'] = 'blue'}>
 4 <ul>
 5     <{foreach $myColors as $color}>
 6         <li><{$color@key}>:<{$color}></li>
 7     <{/foreach}>
 8 </ul>
 9
10 output:
11 <ul>
12         <li>a:red</li>
13         <li>b:green</li>
14         <li>c:blue</li>
15 </ul>
@index:包含当前数组的下标,开始时为0
@iteration:包含当前循环的迭代,总是以1开始,这点与index不同。每迭代一次值自动加1
@first:当{foreach}循环第一个时first为真
@last:当{foreach}迭代到最后时last为真
@show:检测{foreach}循环是否无数据显示,show是个布尔值(true or false)
@total:包含{foreach}循环的总数(整数),可以用在{forach}里面或后面
{break}:停止/终止数组迭代
{continue}:中止当前迭代而开始下一个迭代/循环
 1 <{$myColors['a'] = 'red'}>
 2 <{$myColors['b'] = 'green'}>
 3 <{$myColors['c'] = 'blue'}>
 4 <{$myColors['d'] = 'pink'}>
 5 <{$myColors['e'] = 'yellow'}>
 6 <ul>
 7     <{foreach $myColors as $color}>
 8         <{if $color@first}>
 9             <li><b><{$color@iteration}>:<{$color@index}>:<{$color@key}>:<{$color}></b></li>
10         <{elseif $color@last}>
11             <li><b><{$color@iteration}>:<{$color@index}>:<{$color@key}>:<{$color}></b></li>
12         <{else}>
13             <li><{$color@iteration}>:<{$color@index}>:<{$color@key}>:<{$color}></li>
14         <{/if}>
15     <{foreachelse}>
16         no result...
17     <{/foreach}>
18 </ul>
19
20 output:
21 <ul>
22     <li><b>1:0:a:red</b></li>
23     <li>2:1:b:green</li>
24     <li>3:2:c:blue</li>
25     <li>4:3:d:pink</li>
26     <li><b>5:4:e:yellow</b></li>
27 </ul>
{if}{elseif}{else} 条件
随着一些特性加入到模版引擎,Smarty的{if}语句与php的if语句一样富有弹性。每一个{if}必须与一个{/if}成对出现,允许使用{else}和{elseif},所有php条件和函数在这里同样适用,诸如||、or、&&、and、is_array()等等
<{if $name == 'Fred' || $name == 'Wilma'}><br> ... <br><{/if}> <br><{* 允许使用圆括号 *}> <br><{if ( $amount < 0 or $amount > 1000 ) and $volume >= #minVolAmt#}> <br>... <br><{/if}> <br><{* 可以嵌入函数 *}><br> <{if count($var) gt 0}> <br>... <br><{/if}> <br><{* 数组检查 *}> <br><{if is_array($foo) }> <br>..... <br><{/if}> <br><{* 是否空值检查 *}> <br><{if isset($foo) }> <br>..... <br><{/if}> <br><{* 测试值为偶数还是奇数 *}> <br><{if $var is even}> <br>... <br><{/if}> <br><{if $var is odd}> <br>... <br><{/if}> <br><{if $var is not odd}> <br>... <br><{/if}> <br><{* 测试var能否被4整除 *}> <br><{if $var is div by 4}> <br>... <br><{/if}> <br><{* 测试发现var是偶数,2个为一组,也就是0=even, 1=even, 2=odd, 3=odd, 4=even, 5=even, 等等 *}> <br><{if $var is even by 2}> <br>... <br><{/if}> <br><{* 0=even, 1=even, 2=even, 3=odd, 4=odd, 5=odd, etc. *}> <br><{if $var is even by 3}> <br>... <br><{/if}>
{include}
{include}标签用于在当前模板中包含其它模板。当前模板中的任何有效变量在被包含模板中同样可用
必须指定file属性,该属性指明模板资源的位置
变量可以作为属性参数传递给被包含模板,任何明确传递给被包含模板的变量只在被包含文件的作用域中有效。如果传递的属性变量在当前模板中有同名变量,那么传递的属性变量将覆盖当前模板变量
|
1
2
3
4
5
6
7
8
9
10
11
|
<!-- main.tpl --><{include file="header.tpl" test="小火柴"}><!-- header.tpl --><{$test}><{$test="aaa"}><br><{$test}>output:小火柴aaa |
{function}
{function}用来在模板中创建函数,可以像调用插件函数一样调用它们
我们不写一个表达内容的插件,而是让它保留在模板中,通常这是个更易于管理的选择。同时,它也简化了对数据的遍历,例如深度嵌套菜单。另外可以在模板中直接使用{funcname...}函数。
{function}标签必须包含模板函数名的name属性,该name标签名必须能够调用模板函数
默认变量值应能作为属性传递到模板函数,当模板函数被调用的时候,默认值应能被复写
在模板函数内部应能使用被调用模板的所有变量值,在模板函数中更改或新建变量的值必须具局部作用域,而且在执行模板函数后这些变量值在被调用模板内部应不可见
调用函数时,可以直接使用函数名,或者使用{call}
|
1
2
3
4
5
6
7
8
9
10
11
12
13
|
<!-- main.tpl --><{function name=test a=0 b=0}> <{$a}>+<{$b}>=<{$a+$b}><{/function}><{test}><br><{test a=1 b=2}><br><{call test a=3 b=3}><br>output:0+0=01+2=33+3=6 |
插件
Smarty中的插件总是按需加载。只有在模板脚本中调用特定的调节器、函数、资源插件等时才会自动加载。此外,每个插件只加载一次,即便在同一个请求中存在几个不同的Smarty实例同时运行
插件目录可以是一个包含路径的字符串或包含多个路径的数组。安装插件的时候,将插件简单地置于其中一个目录下,Smarty会自动识别使用
插件文件和函数必须遵循特定的命名约定以便Smarty识别
插件文件必须命名如下:
type.name.php
其中type为下面这些插件类型中的一种:
name为合法标识符,仅包含字母、数字和下划线
function.html_select_date.php, resource.db.php, modifier.spacify.php
插件内的函数应遵循如下命名约定
smarty_type_name ()
如果调节器(modifier)命名为foo,那么按规则函数为smarty_modifier_foo()。如果指定的插件文件不存在或文件、函数命名不合规范,Smarty会输出对应的错误信息
Smarty既可自动从文件系统加载插件,也可在运行时通过register_* API函数注册插件。当然,也可以通过unregister_* API函数卸载已经载入的插件
对于只在运行时注册的插件函数不必遵守命名约定
如果某个插件依赖其它插件的某些功能(事实上,一些插件被绑定在Smarty中),那么可以通过如下方法加载需要的插件:
|
1
2
3
|
<?php require_once $smarty->_get_plugin_filepath('function', 'html_options');?> |
按照惯例,Smarty对象通常作为最后一个参数传递给插件,但有两个例外:1、调节器不须接受Smarty对象的传递;2、为了向前兼容旧版Smarty,块插件将$repeat排在Smarty对象后面作为最后一个参数($smarty作为倒数第二个参数)
【模板函数】
|
1
2
3
|
void smarty_function_name($params, $smarty);array $params;object $smarty; |
模板传递给模板函数的所有属性都包含在关联数组$params中
在模板中,函数的输出内容(返回值)在原位置用函数标签代替,例如{fetch}函数。作为另一种选择,函数也可以单纯地用来做些非输出内容的任务,如{assign}函数
如果函数需要分配(俗话说的赋值)一些变量给模板或者使用Smarty提供的一些函数,可以通过$smarty对象实现,如$smarty->foo()
|
1
2
3
4
5
6
7
8
9
10
11
12
|
//function.eightball.php<?phpfunction smarty_function_eightball($params, $smarty){ $answers = array('Yes', 'No','No way','Outlook not so good','Ask again soon','Maybe in your reality'); $result = array_rand($answers); return $answers[$result];}?><!-- main.tpl -->Question: Will we ever have time travel?<br>Answer: <{eightball}>. |
除了使用以上方式,还可以使用registerPlugin()方式来进行插件注册,但是由于与PHP代码混合在一起,不建议使用
registerPlugin()
void registerPlugin(string type, string name, mixed callback, bool cacheable, mixed cache_attrs);
registerPlugin()方法在脚本中注册函数或方法作为插件。其参数如下:
“type”定义插件的类型,其值为下列之一:“function”、“block”、“compiler”和“modifier”
“name”定义插件的函数名
“callback”为定义的php回调函数,其类型为下列之一:
1、包含函数名的字符串;
2、格式为(&$object, $method)的数组,其中,&$object为引用对象,$method为包含方法名的字符串;
3、格式为($class, $method)的数组,其中,$class为类名,$method为类中的方法。
“cacheable”和“cache_attrs”参数大多情况下可以省略
 1 <?php
 2 header("content-type:text/html;charset=utf-8");
 3 require './init.inc.php';
 4 function eightball($params, $smarty){
 5     $answers = array('Yes', 'No','No way','Outlook not so good','Ask again soon','Maybe in your reality');
 6     $result = array_rand($answers);
 7     return $answers[$result];
 8 }
 9 $smarty -> registerPlugin('function', 'test', 'eightball');
10 $smarty -> display('main.tpl');
11 ?>
12 <!-- main.tpl -->
13 Question: Will we ever have time travel?<br>
14 Answer: <{test}>. <br>

【调节器】
调节器是一些简短的函数,这些函数被应用于显示模板前作用于一个变量,或者其它情形中。调节器可以连接起来(执行)
mixed smarty_modifier_name($value, $param1);
mixed $value;
[mixed $param1, ...];
调节器插件的第一个参数应该直接了当地声明处理什么类型(可以是字符串、数组、对象等等这些类型)。其它的参数是可选的,取决于执行的操作类型。调节器必须返回处理结果
|
1
2
3
4
5
6
7
8
9
10
11
12
13
14
15
|
//modifier.u.php<?phpfunction smarty_modifier_u($str){ return ucwords($str);}?><!-- main.tpl --><{$testValue = 'Question: Will we ever have time travel?' }><br><{$testValue}><br><{$testValue|u}><br>output:Question: Will we ever have time travel?Question: Will We Ever Have Time Travel? |
【块函数】
|
1
2
3
4
5
|
void smarty_block_name($params, $content, $smarty, &$repeat);array $params;mixed $content;object $smarty;boolean &$repeat; |
块函数的形式是这样的:{func} .. {/func}。换句话说,他们被封闭在一个模板区域内,然后对该区域的内容进行操作。块函数优先于同名的自定义函数,换句话说,不能同时使用自定义函数{func}和块函数{func} .. {/func}。
默认地,函数实现会被Smarty调用两次:一次是在开始标签,另一次是在闭合标签
从Smarty3.1开始打开标签回调(函数)的返回值同样会被显示
只有块函数的开始标签具有属性。所有属性包含在作为关联数组的$params变量中,经由模板传递给模板函数。当处理闭合标签时,函数同样可访问开始标签的属性
$content变量值取决于函数是被开始标签调用还是被闭合标签调用。假如是开始标签,变量值将为NULL,如果是闭合标签,$content变量值为模板块的内容。请注意这时模板块已经被Smarty处理过,因此所接收到的是模板的输出而不是模板资源
&$repeat参数通过引用传递给函数执行,并为其提供控制块显示多少次的可能性。默认情况下,在首次调用块函数(块开始标签)时,&$repeat变量为true,在随后的所有块函数(闭合标签)调用中其值始终为false。函数每次执行返回的&$repeat值为true时,{func} .. {/func}之间的内容会被求值,同时参数$content里的新块内容会再次调用执行函数
如果嵌套了块函数,可以通过$smarty->_tag_stack变量访问找出父块函数。只须对块函数运行一下var_dump(),函数结构就可以一目了然了
|
1
2
3
4
5
6
7
8
9
10
11
12
13
14
15
16
17
|
//block.s.php<?phpfunction smarty_block_s($params, $content, $smarty, &$repeat){ return substr($content,0,$params['num']+1);}?><!-- main.tpl --><{$testValue = 'Question: Will we ever have time travel?' }><br><{$testValue}><br><{s num="5"}><{$testValue}><{/s}>output:Question: Will we ever have time travel?Quest |
模板继承
继承带来了模板面向对象概念(oop),它允许定义一个或多个基模板供子模板继承。继承意味着子模板可覆盖所有或部份父模板中命名相同的块区域
模板继承是一种编译时进程,其将建立一个独立的编译模板文件。与对应的基于载入{include}子模板解决方案相比,当解释模板时,前者有更好的性能
{extends} 继承
{extends}标签用在模板继承中子模版对父模板的继承
{extends}标签用在模版中的第一行
如果子模板用{extends}标签继承父模板,那么它只能包含{block}标签(内容),其它任何模板内容都将忽略
使用此语法为模板资源继承$template_dir目录外的文件
{extends file='parent.tpl'}
{extends 'parent.tpl'}  {* short-hand *}
{block} 块
{block}用来给模板继承定义一个模板资源的命名区域。子模板的{block}资源区域将会取代父模板中的相应区域。{block}可以嵌套
任意的子、父模板{block}区域可以彼此结合。可以通过子{block}定义使用append、prepend选项标记追加或预置父{block}内容。使用{$smarty.block.parent}可将父模板的{block}内容插入至子{block}内容中的任何位置。使用{$smarty.block.child}可将子模板{block}内容插入至父{block}内容中的任何位置
[注意]子模板不能定义任何内容,除了需要覆盖父模板的{block}标签块,所有在{block}标签外的内容将被自动移除
|
1
2
3
4
5
6
7
8
9
10
11
12
13
14
15
16
17
18
19
20
21
22
23
24
25
|
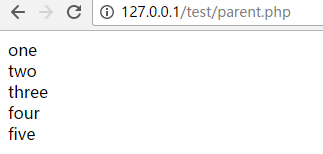
<!-- parent.tpl--><!DOCTYPE html><html lang="en"><head> <meta charset="UTF-8"> <title>Document</title></head><body><{block name="one"}> one<{/block}><br><{block name="two"}> two<{/block}><br><{block name="three"}> three<{/block}><br><{block name="four"}> four <{$smarty.block.child}><{/block}><br><{block name="five"}> five<{/block}><br></body></html> |
|
1
2
3
4
5
6
7
8
9
10
11
12
13
14
15
16
17
18
|
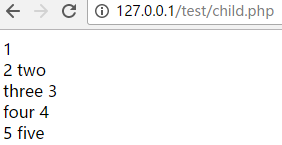
<!-- child.tpl--><{extends 'parent.tpl'}><{block name="one"}> 1<{/block}><br><{block name="two" prepend}> 2<{/block}><br><{block name="three" append}> 3<{/block}><br><{block name="four"}> 4<{/block}><br><{block name="five"}> 5 <{$smarty.block.parent}><{/block}><br>block区域之外的内容不会显示 |
|
1
2
3
4
5
6
7
8
9
10
11
12
|
<!-- parent.php--><?phpheader("content-type:text/html;charset=utf-8");require './init.inc.php';$smarty -> display('parent.tpl');?><!-- child.php--><?phpheader("content-type:text/html;charset=utf-8");require './init.inc.php';$smarty -> display("child.tpl");?> |