说明:
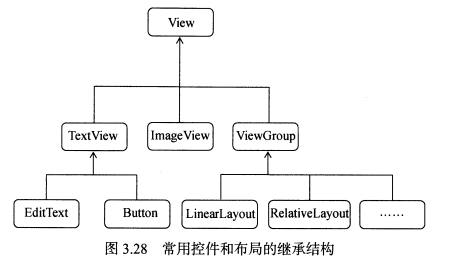
- 我们所用的所有控件都是直接或间接继承自View的
- 所用的所有布局都是直接或间接继承自ViewGroup的
- View是Android中最基本的一种UI组件,它可以在屏幕上绘制一块矩形区域,并能响应这块区域的各种事件,因此,我们使用的各种控件其实就是在View的基础上又添加了各自特有的功能。
- 而ViewGroup则是一种特殊的View,它可以包含很多子View和子ViewGroup,是一个用于防止控件和布局的容器
1.引入布局
- 如果你用过iPhone应该会知道,几乎每一个iPhone应用的界面顶部都会有一个标题栏,标题栏上会有一到两个按钮可用于返回或其他操作(iPhone 没有实体返回键)。
- 现在很多Android 程序也都喜欢模仿iPhone的风格,在界面的顶部放置一个标题栏。虽然Android系统已经给每个活动提供了标题栏功能,但这里我们决定先不使用它,而是创建一个自定义的标题栏。
示例:写一个自己的标题栏
(1)新建一个布局文件title.xml
<?xml version="1.0" encoding="utf-8"?>
<LinearLayout xmlns:android="http://schemas.android.com/apk/res/android"
    android:layout_width="match_parent"
    android:layout_height="wrap_content"
    android:background="@drawable/ic_launcher_background">

    <Button
        android:id="@+id/title_back"
        android:layout_width="wrap_content"
        android:layout_height="wrap_content"
        android:layout_gravity="center"
        android:layout_margin="5dp"
        android:background="#ff0000"
        android:text="返回"
        android:textColor="#ffffff"></Button>

    <TextView
        android:id="@+id/title_text"
        android:layout_width="wrap_content"
        android:layout_height="wrap_content"
        android:layout_gravity="center"
        android:layout_margin="5dp"
        android:layout_weight="1"
        android:background="#ff0000"
        android:text="新闻页"
        android:textColor="#fff"
        android:textSize="24sp"></TextView>

    <Button
        android:id="@+id/title_edit"
        android:layout_width="wrap_content"
        android:layout_height="wrap_content"
        android:layout_gravity="center"
        android:layout_margin="5dp"
        android:background="#f00"
        android:textColor="#fff"
        android:text="编辑"
        ></Button>

</LinearLayout>
(2)在页面中使用:
<?xml version="1.0" encoding="utf-8"?>
<FrameLayout xmlns:android="http://schemas.android.com/apk/res/android"
    xmlns:app="http://schemas.android.com/apk/res-auto"
    xmlns:tools="http://schemas.android.com/tools"
    android:layout_width="match_parent"
    android:layout_height="match_parent"
    android:orientation="horizontal"
    tools:context=".MainActivity">

    <include layout="@layout/title"></include>

</FrameLayout>
我们只需要通过一行include 语句将标题栏布局引入进来就可以了。
(3)把系统自带的标题栏隐藏掉()
public class MainActivity extends AppCompatActivity {

    @Override
    protected void onCreate(Bundle savedInstanceState) {
        super.onCreate(savedInstanceState);
        setContentView(R.layout.activity_main);

//        隐藏系统自带的标题栏
        ActionBar actionBar=getSupportActionBar();
        if(actionBar!=null){
            actionBar.hide();
        }
    }
}
说明:
- 这里调用了getSupportActionBar()方法来获取ActionBar的实例
- 然后调用ActionBar的hide()方法将标题栏隐藏起来
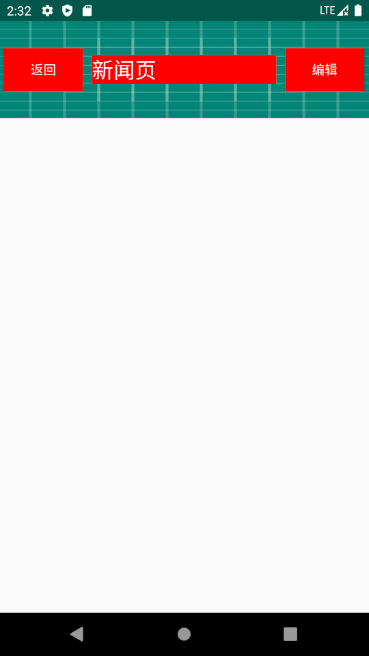
效果:
2.创建自定义控件
- 引入布局的技巧确实解决了重复编写布局代码的问题,但是如果布局中有一些控件要求能够响应事件,我们还是需要在每个活动中为这些控件单独编写一次事件注册的代码
- 比如标题栏中的返回按钮,其实不管在哪一个活动中,这个按钮的功能都是相同的,即销毁当前活动,而如果在每一个活动中都需要重新注册一遍返回按钮的点击事件,无疑会增加很多重复代码,这种情况最好是使用自定义控件的方式来解决。
- 新建TitleLayout继承自LinearLayout,让它成为我们自定义的标题栏控件,代码如下所示:
public class TitleLayout extends LinearLayout {
    public TitleLayout(Context context, AttributeSet attrs){
        super(context,attrs);
        LayoutInflater.from(context).inflate(R.layout.title,this);
    }
}
说明:
- 首先我们重写了LinearLayout中带有两个参数的构造函数,在布局中引入TitleLayout控件就会调用这个函数
- 然后在构造函数中需要对标题栏布局进行动态加载,这需要借助LayoutInflater来实现。
- 通过LayoutInflater的from()方法可以构建出一个LayoutInflater对象
- 然后调用inflate()方法就可以动态加载一个布局文件,inflate()方法接收讲个参数:
- 第一个参数是要加载的布局文件的id(这里是R.layout.title)
- 第二个参数是给加载好的布局再添加一个父布局,这里我们想要指定为TiltleLayout,于是直接传入this
使用自定义控件:
    <com.example.layout.TitleLayout
        android:layout_width="match_parent"
        android:layout_height="wrap_content"></com.example.layout.TitleLayout>
说明:
- 添加自定义控件和添加普通控件的方式基本是一样的,只不过在添加自定义控件的时候,我们需要指明控件的完整类名,包名在这里是不可以省略的。
为标题栏中的按钮添加点击事件:
修改TitleLayout中的代码:
public class TitleLayout extends LinearLayout {
    public TitleLayout(Context context, AttributeSet attrs){
        super(context,attrs);
        LayoutInflater.from(context).inflate(R.layout.title,this);

        Button titBack=(Button) findViewById(R.id.title_back);
        Button titEdit=(Button) findViewById(R.id.title_edit);
        titBack.setOnClickListener(new OnClickListener() {
            @Override
            public void onClick(View view) {
                ((Activity) getContext()).finish();
            }
        });
        titEdit.setOnClickListener(new OnClickListener() {
            @Override
            public void onClick(View view) {
                Toast.makeText(getContext(),"你点击了编辑按钮",Toast.LENGTH_SHORT).show();
            }
        });
    }
}
说明:
- 首先还是通过findViewById()方法得到按钮的实例
- 然后分别调用setOnClickListener()方法给两个按钮注册了点击事件,分别执行了销毁当前活动和弹出Toast提示框的功能
3.最常用和最难用的控件——ListView
- ListView几乎是Android中最常见的控件之一,几乎所有的应用程序都会用到它。
- 由于手机屏幕控件都比较有限,能够一次性在屏幕上显示的内容并不多,当我们的程序中有大量的数据需要展示的时候,就可以借助ListView实现。
- ListView允许用户通过手指上下滑动的方式将屏幕外的数据滚动到屏幕内,同时屏幕上原有的数据则会滚动出屏幕。相信你其实每天都在使用这个控件,比如查看QQ聊天记录,翻阅微博最新消息,等等。
(1)简单用法
    <ListView
        android:id="@+id/list_view"
        android:layout_height="match_parent"
        android:layout_width="match_parent"></ListView>
public class MainActivity extends AppCompatActivity {

    private String[] data={
            "AAAAA","BBBBB","CCCCC","DDDDD","EEEEE","FFFFF","GGGGG",
            "HHHHH","IIIII","JJJJJ","KKKKK","IIIII","JJJJJ","KKKKK","IIIII","JJJJJ","KKKKK"
    };

    @Override
    protected void onCreate(Bundle savedInstanceState) {
        super.onCreate(savedInstanceState);
        setContentView(R.layout.activity_main);

        ArrayAdapter<String> adapter=new ArrayAdapter<String>(
                MainActivity.this,android.R.layout.simple_list_item_1,data);
        ListView listView=(ListView) findViewById(R.id.list_view);
        listView.setAdapter(adapter);
    }
}
说明:
- 数组中的数据是无法直接传递给ListView的,我们还需要借助适配器来完成。
- Android 中提供了很多适配器的实现类,其中我认为最好用的就是ArrayAdapter。它可以通过泛型来指定要适配的数据类型,然后在构造函数中把要适配的数据传入。ArayAdapter有多个构造函数的重载,你应该根据实际情况选择最合适的一种。这里由于我们提供的数据都是字符串,因此将ArrayAdapter的泛型指定为String,然后在 ArayAdapter的构造函数中依次传入当前上下文、ListView子项布局的id,以及要适配的数据。
- 注意,我们使用了android.R.layout.simple_list_item 1作为ListView子项布局的id,这是一个Android内置的布局文件,里面只有一个TextView,可用于简单地显示一段文本。这样适配器对象就构建好了。
- 最后,还需要调用ListView的setAdapter()方法,将构建好的适配器对象传递进去,这样ListView和数据之间的关联就建立完成了。
效果:

(2)定制ListView的界面
- 只能显示一段文本的ListView实在是太单调了,我们现在就来对ListView的界面进行定制,让它可以显示更加丰富的内容。
- 首先需要准备好一组图片,分别对应上面提供的每一种水果,待会我们要让这些水果名称的旁边都有一个图样。
- 接着定义一个实体类,作为ListView适配器的适配类型。新建Fruit,代码如下所示