参考转自:https://www.cnblogs.com/TankXiao/p/3888070.html
testNG生成报告共3种方式:
第一种:生成原始报告:
这里使用的是xml最简单的版本:,如下图所示
<?xml version="1.0" encoding="UTF-8"?><!DOCTYPE suite SYSTEM "http://testng.org/testng-1.0.dtd" >
<suite name="Suite1">
<test name="test12">
<classes>
<class name="TankLearn2.Learn.TestNGLearn1" />
</classes>
</test>
</suite>
使用的时候只要修改对应的class name就可以。
第二种:
使用testNG-xslt美化测试报告
可以参考:https://www.tuicool.com/articles/FJzYBr
----------------------------------------------------------------------------------------------
<?xml version="1.0" encoding="UTF-8"?>
<project name="testTng" basedir="." default="transform">
<property name="lib.dir" value="lib" />
<path id=".classpath">
<!-- adding the saxon jar to your classpath -->
<fileset dir="${lib.dir}" includes="*.jar" />
</path>
<target name="transform">
<xslt
in="E:UsersAdministratorworkspace estNG_test est-output estng-results.xml"
style="E:UsersAdministratorworkspace estNG_test est-output estng-results.xsl"
out="E:/Users/Administrator/workspace/testNG_test/test-output/index1.html">
<!-- you need to specify the directory here again -->
<param name="testNgXslt.outputDir"
expression="E:/Users/Administrator/workspace/testNG_test/test-output" />
<classpath refid=".classpath" />
</xslt>
</target>
</project>
--------------------------------------------------------
只要替换对应的路径就可以了。生成的报告比较美观。
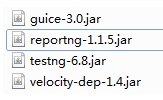
第三种:reportNG 生成测试报告
需要导入的 jar包
使用的xml如下所示:
----------------------------------------------------------------------------------------
<?xml version="1.0" encoding="UTF-8"?>
<suite name="test" parallel="true">

    <test name="test" preserver-order="true">
        <classes>
            <class name="testNG_test.test_testNG" />
        </classes>

        <listeners>
            <listener class-name="org.uncommons.reportng.HTMLReporter" />
            <listener class-name="org.uncommons.reportng.JUnitXMLReporter" />
        </listeners>
    </test> <!-- Test -->
</suite> <!-- Suite -->
-----------------------------------------------------------------------------
使用的时候只要修改对应的class name就可以了。