非对称加密简介:
对称加密算法在加密和解密时使用的是同一个秘钥;
而非对称加密算法需要两个密钥来进行加密和解密,这两个秘钥是
公开密钥(public key,简称公钥)
私有密钥(private key,简称私钥)
而非对称加密算法需要两个密钥来进行加密和解密,这两个秘钥是
公开密钥(public key,简称公钥)
私有密钥(private key,简称私钥)
常用的DES、三 重DES、AES等都属于对称加密;
RSA, EI Gamal, ECC, Knapsack, etc都属于非对称加密;
与对称加密算法不同,非对称加密算法需要两个密钥:公开密钥(publickey)和私有密钥(privatekey)。
公开密钥与私有密钥是一对。
如果用公开密钥对数据进行加密,只有用对应的私有密钥才能解密;
如果用私有密钥对数据进行加密,那么只有用对应的公开密钥才能解密。
因为加密和解密使用的是两个不同的密钥,所以这种算法叫作非对称加密算法。
公开密钥与私有密钥是一对。
如果用公开密钥对数据进行加密,只有用对应的私有密钥才能解密;
如果用私有密钥对数据进行加密,那么只有用对应的公开密钥才能解密。
因为加密和解密使用的是两个不同的密钥,所以这种算法叫作非对称加密算法。
简单理解:
加密 公钥加密——私钥解密
数字证书 私钥签名——公钥验证
加密 公钥加密——私钥解密
数字证书 私钥签名——公钥验证

使用秘钥登录linux:
1.在SSH Secure Shell Client 上选择 Edit->settings->Keys
2. 点击“Generate New” 可选择 rsa dsa两种加密方式
3. 输入生成Key的文件名和注释,打算使用空密码登录则Passphrase中不输入密码
4. 完成
3. 输入生成Key的文件名和注释,打算使用空密码登录则Passphrase中不输入密码
4. 完成
5. 登录SSH Server,进入/root目录
再到Edit->Settings->key下,选择”upload”刚才的秘钥
这样就把公钥上传到服务器了 z
6. 因为SSH Server是Linux,而SSH Secure Shell Client客户端上Windows,所以密钥需要进行格式转换
并把公钥追加到authorized_keys中
cd $HOME/.ssh/
ssh-keygen -i -f xxx.pub >> authorized_keys
并把公钥追加到authorized_keys中
cd $HOME/.ssh/
ssh-keygen -i -f xxx.pub >> authorized_keys
7. 修改sshd_config
sudo vi /etc/ssh/sshd_config
让这几项生效:
RSAAuthentication yes 设置是否使用RSA算法进行安全验证
PubkeyAuthentication yes 设置是否使用公钥进行安全验证
AuthorizedKeysFile %h/.ssh/authorized_keys 这里确定公钥的位置
可选择关闭输入pasword认证:
PasswordAuthentication no
8. 重启sshd服务 sudo service sshd restart
9. 连接即可,自己生成的keys在c:Users<username>AppDataRoamingSSHUserKeys中
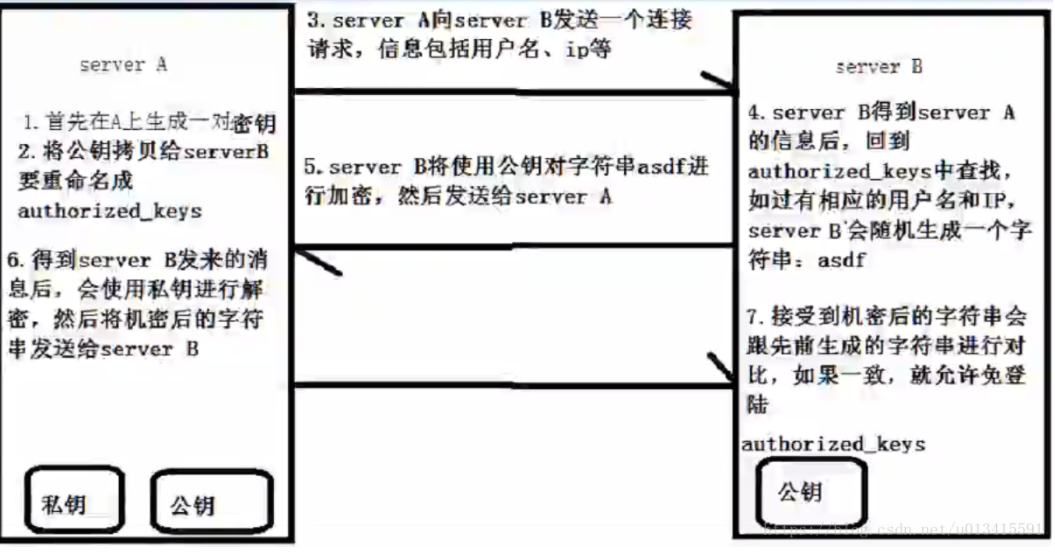
二、服务器之间配置免密 秘钥登陆
三台Linux 服务器

 IP            Hostname

192.168.0.1    node1

192.168.0.2    node2

192.168.0.3    node3


配置node1无密码连接node2和node3:

[root@node1 ~]# ssh-keygen -t rsa
Generating public/private rsa key pair.
Enter file in which to save the key (/root/.ssh/id_rsa): #密钥存放位置
Created directory '/root/.ssh'.
Enter passphrase (empty for no passphrase): #输入密码(空密码 则直接回车)
Enter same passphrase again:  #再次输入密码
Your identification has been saved in /root/.ssh/id_rsa.    #生成的私钥
Your public key has been saved in /root/.ssh/id_rsa.pub. #生成的公钥
The key fingerprint is:
SHA256:FGrYUe6qiaKaRXz4sp/HLWJJvDeUsGaV+++EKe9fKwc root@ceph-node1

关于 ssh-keygen的参数解释:http://www.cnblogs.com/wangkongming/p/6362397.html

将公钥传输至node2
 [root@ceph-node1 ~]# ssh-copy-id -i /root/.ssh/id_rsa.pub root@192.168.0.2
/usr/bin/ssh-copy-id: INFO: Source of key(s) to be installed: "/root/.ssh/id_rsa.pub"
/usr/bin/ssh-copy-id: INFO: attempting to log in with the new key(s), to filter out any that are already installed
/usr/bin/ssh-copy-id: INFO: 1 key(s) remain to be installed -- if you are prompted now it is to install the new keys
root@192.168.0.2's password:

输入node2的密码

Number of key(s) added: 1

Now try logging into the machine, with:   "ssh 'root@192.168.200.130'"
and check to make sure that only the key(s) you wanted were added.

公钥添加成功


在node2 的/root目录下就是出现 .ssh文件夹,下面是对应的公钥文件。
在node1上ssh到node2,这样就能实现无密码访问了。

接着配置node1 对 node3的免密访问
 [root@ceph-node1 ~]# ssh-copy-id -i /root/.ssh/id_rsa.pub root@192.168.0.3


这只是在node1上配置了对于node2和node3的无密码访问,
接下来配置node2对node3对于其他服务器的无密码访问,只需要在对应的节点上做以上相同的操作即可。
————————————————
1.生成公钥私钥
$ ssh-keygen -t rsa -f ~/.ssh/id_rsa 指定秘钥类型 目录 名字
2.将公钥拷贝到/home/hadoop/.ssh/authorized_key 中
3.修改stricthostkeychecking 参数
$ ssh-keygen -t rsa -f ~/.ssh/id_rsa 指定秘钥类型 目录 名字
Generating public/private rsa key pair.
Created directory '/home/hadoop/.ssh'.
Enter passphrase (empty for no passphrase):
Enter same passphrase again:
Your identification has been saved in /home/hadoop/.ssh/id_rsa. 私钥
Your public key has been saved in /home/hadoop/.ssh/id_rsa.pub. 公钥
The key fingerprint is:
38:95:cf:a6:78:37:ea:77:3a:20:a1:13:db:3f:2a:72 hadoop@master.hadoop
The key's randomart image is:
+--[ RSA 2048]----+
| |
| . |
| o |
| . .o o |
| =o.S + |
| + oo.o |
| ..oo.o |
| . E .ooo.. |
| o ..ooo.+ |
+-----------------+
2.将公钥拷贝到/home/hadoop/.ssh/authorized_key 中
#cat /home/hadoop/.ssh/id_rsa.pub>>/home/hadoop/.ssh/authorized_key
设定权限
设定权限
#chmod 600 ~/.ssh/authorized_key
3.修改stricthostkeychecking 参数
StrictHostKeyChecking"如果设为"yes",ssh将不会自动把计算机的密匙加入"$HOME/.ssh/known_hosts"文件,且一旦计算机的密匙发生了变化,就拒绝连接。
可以修改全局变量 vi /etc/ssh/ssh_config
在这里设置 StrictHostKeyChecking no
在这里设置 StrictHostKeyChecking no
也可以只修改用户的ssh环境
新建 ~/.ssh/config
Host 0.0.0.0
StrictHostKeyChecking no
新建 ~/.ssh/config
Host 0.0.0.0
StrictHostKeyChecking no
最后改下权限
chmod 600 ~/.ssh/config
总结注意事项
1、文件和目录的权限千万别设置成chmod 777.这个权限太大了,不安全,数字签名也不支持。我开始图省事就这么干了
2、生成的rsa/dsa签名的公钥是给对方机器使用的。这个公钥内容还要拷贝到authorized_keys
3、linux之间的访问直接 ssh 机器ip
4、某个机器A生成自己的RSA或者DSA的数字签名,将公钥给目标机器B,然后B接收后设定相关权限(公钥和authorized_keys权限),这个B就能 被生成数字签名的机器A无密码访问了
https:
先说一下什么是http
http超文本传输协议,是一个基于请求与响应,无状态的,应用层的协议,常基于TCP/IP协议传输数据,
互联网上应用最为广泛的一种网络协议,所有的WWW文件都必须遵守这个标准。
设计HTTP的初衷是为了提供一种发布和接收HTML页面的方法。
那什么是https
HTTPS是身披SSL外壳的HTTP。HTTPS是一种通过计算机网络进行安全通信的传输协议。
经由HTTP进行通信,利用SSL/TLS建立全信道,加密数据包。
HTTPS使用的主要目的是提供对网站服务器的身份认证,同时保护交换数据的隐私与完整性。
PS:TLS是传输层加密协议,前身是SSL协议,由网景公司1995年发布,有时候两者不区分。