搭建环境
Red Hat Enterprise Linux Server release 7.3 (Maipo)
zookeeper-3.4.11
jdk1.7.0_80
Python 2.7.5 (https://www.cnblogs.com/kimyeee/p/7250560.html)
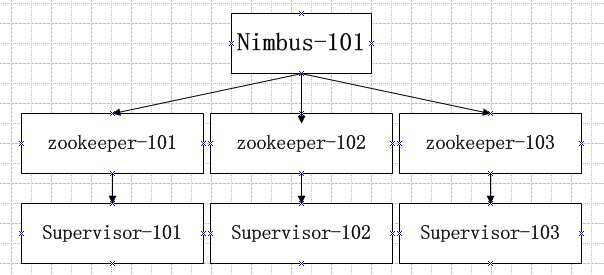
集群方案
机器:101 102 103
安装步骤
安装依赖jdk和python
[cluster@PCS101 ~]$ java -version
java version "1.7.0_80"
Java(TM) SE Runtime Environment (build 1.7.0_80-b15)
Java HotSpot(TM) 64-Bit Server VM (build 24.80-b11, mixed mode)
[cluster@PCS101 ~]$ python -V
Python 2.7.5
1.解压storm
[cluster@PCS101 tars]$ tar -zxvf apache-storm-0.9.2-incubating.tar.gz -C /home/cluster
#改名
[cluster@PCS101 ~]$ mv /home/cluster/apache-storm-0.9.2-incubating apache-storm-0.9.2
#创建任务目录
[cluster@PCS101 ~]$ mkdir /home/cluster/apache-storm-0.9.2/task
2.修改配置
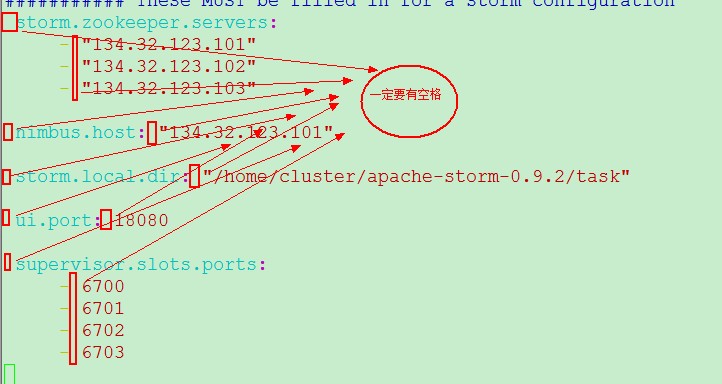
[cluster@PCS101 conf]$ vim /home/cluster/apache-storm-0.9.2/conf/storm.yaml
(1)zookeeper集群地址
storm.zookeeper.servers:
   - "134.32.123.101"
   - "134.32.123.102"
   - "134.32.123.103"

(2)主节点Nimbus配置
nimbus.host: "134.32.123.101"

(3)设置storm运行任务执行的jar存放的目录
storm.local.dir: "/home/cluster/apache-storm-0.9.2/task"

(4)配置UI端口:ui.port
ui.port: 18080

(5)配置worker而进程默认端口号,如果worker进程超过设置数量,则多出来的worker会随机分配端口
supervisor.slots.ports:
  - 6700
  - 6701
  - 6702
  - 6703
配置注意留有空格:
3.将101上的storm拷贝到102、103上
[cluster@PCS101 ~]$ scp -r /home/cluster/apache-storm-0.9.2/ cluster@134.32.123.102:/home/cluster/
[cluster@PCS101 ~]$ scp -r /home/cluster/apache-storm-0.9.2/ cluster@134.32.123.103:/home/cluster/
4.root用户修改系统环境变量
[root@PCS101 ~]# vim /etc/profile
export STORM_HOME=/home/cluster/apache-storm-0.9.2
export PATH=$JAVA_HOME/bin:$MYSQL_BIN:$STORM_HOME/bin:$PATH
[root@PCS101 ~]# source /etc/profile
5.启动(保证zookeeper集群已启动)
按顺序启动:
启动Nimbus
134.32.123.101: 主机器(nimbus运行)    : nohup storm nimbus > /dev/null 2>&1 &
[cluster@PCS101 ~]$ jps
14213 QuorumPeerMain
5986 Jps
5063 nimbus
启动supervisor
134.32.123.101: 从机器(supervisor运行): nohup storm supervisor > /dev/null 2>&1 &
134.32.123.102: 从机器(supervisor运行): nohup storm supervisor > /dev/null 2>&1 &
134.32.123.103: 从机器(supervisor运行): nohup storm supervisor > /dev/null 2>&1 &
[cluster@PCS102 conf]$ jps
4198 supervisor
4572 Jps
6120 QuorumPeerMain
启动UI (默认jetty做容器)
134.32.123.101: 主机器(ui运行)        : nohup storm ui > /dev/null 2>&1 & (查看ui)
[cluster@PCS101 conf]$ jps
28890 supervisor
14213 QuorumPeerMain
22594 nimbus
30680 Jps
30307 core
启动logviewer
134.32.123.101: 主机器(logviewer运行) : nohup storm logviewer > /dev/null 2>&1 &(查看工作日志)
[cluster@PCS101 conf]$ jps
28890 supervisor
14213 QuorumPeerMain
594 Jps
22594 nimbus
32692 logviewer
30307 core
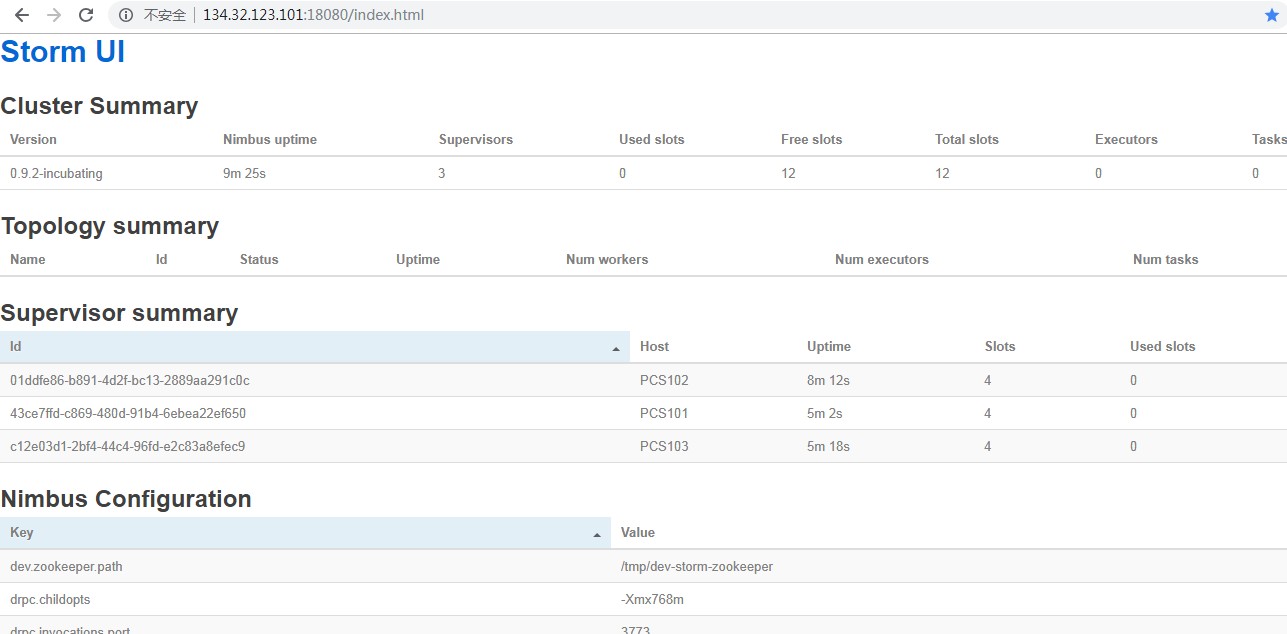
访问 StormUI
http://134.32.123.101:18080/
附一:伪分布式搭建
#storm帮助命令
[cluster@PCS101 ~]$ ./bin/storm --help

#下面分别按照顺序启动ZooKeeper、Nimbus、UI、supervisor、logviewer
[cluster@PCS101 ~]$ ./bin/storm dev-zookeeper >> ./logs/zk.out 2>&1 &
[cluster@PCS101 ~]$ ./bin/storm nimbus >> ./logs/nimbus.out 2>&1 &
[cluster@PCS101 ~]$ ./bin/storm ui >> ./logs/ui.out 2>&1 &
[cluster@PCS101 ~]$ ./bin/storm supervisor >> ./logs/supervisor.out 2>&1 &
[cluster@PCS101 ~]$ ./bin/storm logviewer >> ./logs/logviewer.out 2>&1 &
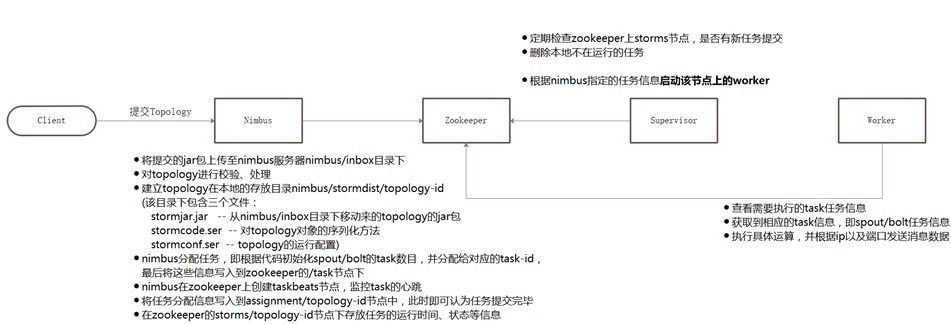
附二:storm提交任务流程
附三:storm本地目录树

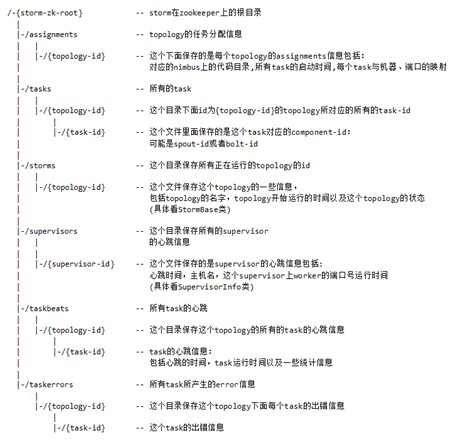
附四:ZK目录树
参考: