前言:阅读好的代码如同观赏美景一样的美妙
OkHttp是一个Square公司在github开源的Java网络请求框架,非常流行。OkHttp 的代码并不是特别庞大,代码很多巧妙的实现,非常值得学习。
建议下载一个OkHttp的源码,使用 Idea 或者 Source Insight 阅读 ,跟随本文一起阅读。
OKHttp的全局概览:
分析一个复杂的框架,可以先
分析简单的调用流程
然后分析全局的类之间的关系
OkHttp 的类图
来自:http://frodoking.github.io/2015/03/12/android-okhttp/
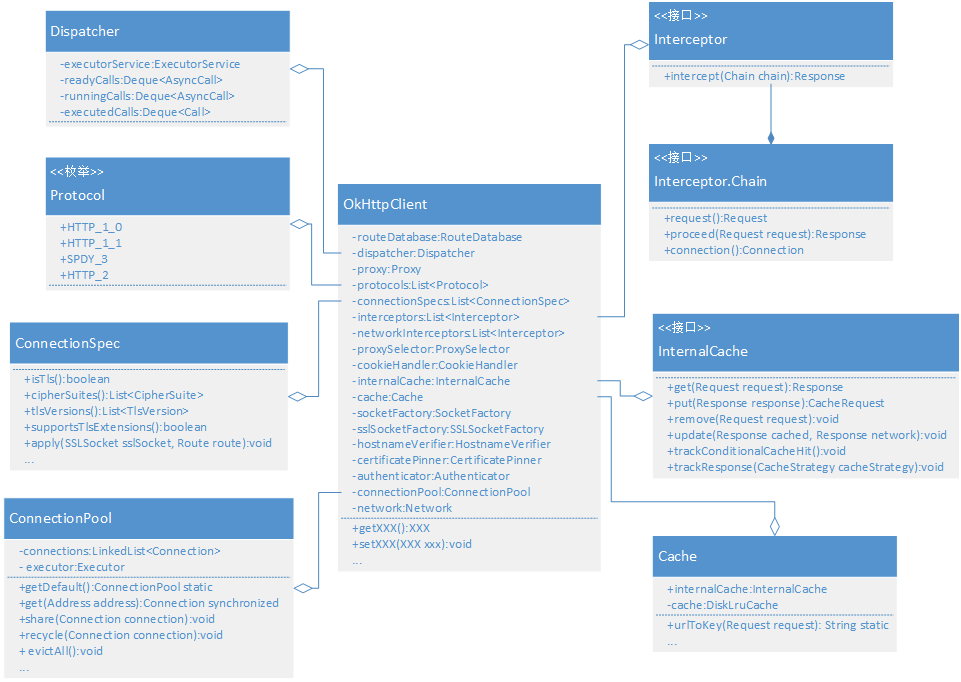
如何编写一个复杂的框架,OkHttp给我们一个好的示范,这符合设计模式中的门面模式,框架的核心是 OkHttpClient 。
使用者的所有操作都是通过操作OkHttpClient 实现,OkHttpClient 下面有很多子模块,OKHttpClient 知道所有子模块的实现,OKHttpClient调用各个子模块完成功能,各个子模块是独立的,
它们不知道OKHttpClient的存在。
OkHttp流程图
(from piasy 大神)
<img src="bc55d9e1-5392-4f7f-8aab-78f0b1ffda5f_files/6869cc51-abb8-4c46-9784-a10ea0239d07.png" border="0" alt="" name="" width="548" height="876" class="">
: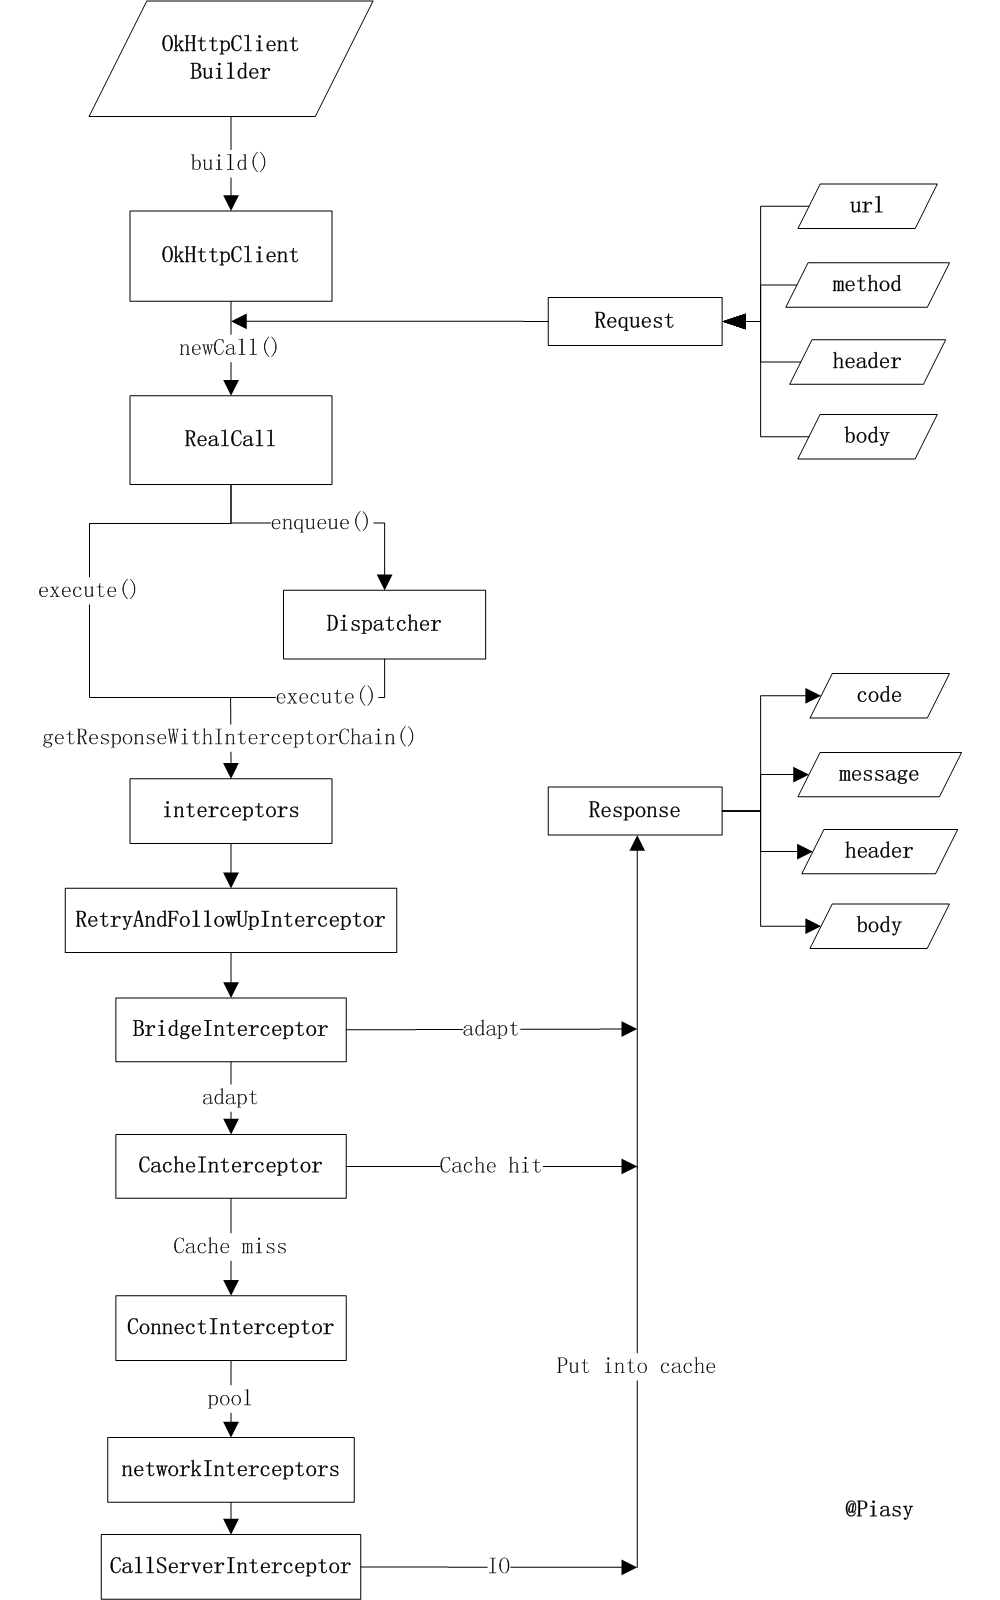
虽然 OKHttpClient 很复杂,但是逻辑还是很简洁的。
可以划分了三个阶段
- 1.OKHttpClient +Request 构造 RealCall
- 2.RealCall 直接同步执行或者进入 异步队列,统一由Dispatcher分发
- 3.通过Interceptor的责任链,层层调用,最后获取 Response
OKHttp最简单的用法是:
OkHttpClient client = new OkHttpClient();

String run(String url) throws IOException {
  Request request = new Request.Builder()
      .url(url)
      .build();

  Response response = client.newCall(request).execute();
  return response.body().string();
}
这里,我们所使用的是最简单的功能,使用的类只有三个OKHttpClient,Request ,Response。
可以说,OKHttp从设计的时候就考虑了易用性
一个网络请求框架,最简单的只需要
有OkHttpClient,Request,Response就能发起一次请求和响应了
下面我们就整个发起请求,接收Response的过程进行分析:
1.0 创建 OkHttpClient
这是发起所有调用Call的工厂,包括发送HTTP Request ,和接收 Response
由于OkHttpClient 内部实现的连接池,线程池,等,所以
每个应用一般只需要一个Single 单例的OKHttpClient即可,复用这个单例进行Http请求,不需要担心单例的扩展性问题,非常的简单易用并且扩展性良好(因为OKHttp 灵活使用的建造器模式 :OkHttpClent.Builder):
例如:
如果你只需要默认配置的OKHttpClient:
那么,
你只需要:
OkHttpClient client=new OkHttpClient();
为啥会没有Builder呢?因为构造函数OkHttpClient() 已经默认使用默认的new Buidler();
其实
public OkHttpClient() {
    this(new Builder());
  }

  private OkHttpClient(Builder builder) {
   this.dispatcher = builder.dispatcher;
  //省略代码
  }
如果不使用默认配置,那么我们无法使用 OkHttpClient(Builder builder)
这个私有的方法new 一个OKHttpClient实例的
可以这样:
OkHttpClient.Builder bulider=new OKHttpClient.Builder();
OkHttpClient client=buider.xxx().xxx().build();
那么单例的OKHttpClient会不会影响OkHttpClient的扩展性呢?
不会,我们之所以要单例一个OKHttpClient,是应该不重复创建连接池和线程池
也就是说,可以全局定义一个OkHttpClient ,在需要特殊配置一个OKHttpClient的时候,这个局部的OKHttpClient
引用的连接池和线程池是复用自全局单例的就行;
如:
  OkHttpClient eagerClient = client.newBuilder()
        .readTimeout(500, TimeUnit.MILLISECONDS)
        .build();
    Response response = eagerClient.newCall(request).execute();
具体实现是:通过全局的OkHttpClient 单例new属性一样的的Builder,然后给这个Builder单独配置局部的属性
后,再通过这个Builder创建一个局部的OKHttpClient即可
 public Builder newBuilder() {
    return new Builder(this);
  }

Builder(OkHttpClient okHttpClient) {
      this.dispatcher = okHttpClient.dispatcher;
      this.proxy = okHttpClient.proxy;
       //省略代码

  }
1.1 创建Request
Request request = new Request.Builder()
      .url(url)
      .build();
同样使用了Builder模式
注意:Request包含的信息只有 url ,body ,header,tag,method等基础的信息
1.2通过OKHttpClient通过new Call(Request request)创建一个RealCall
OkHttpClient:

 @Override public Call newCall(Request request) {
    return new RealCall(this, request, false /* for web socket */);
  }
1.3创建 RealCall
OkHttp的网络请求分为同步和异步两种情况:
*同步:
直接调用
RealCall 的 execute的方法,经历一系列的拦截器 Intercepter,返回Response
*异步:
通过RealCall的enqueue方法,创建一个AsyncCall,把这个AsyncCall,通过Client的Dispatcher
分发下去
1.4 同步执行请求和异步执行在Dispatcher的分发过程:
1 同步请求
- RealCall.java
@Override public Response execute() throws IOException {
    synchronized (this) {
      if (executed) throw new IllegalStateException("Already Executed");
      executed = true;
    }
    captureCallStackTrace();
    eventListener.callStart(this);
    try {
      client.dispatcher().executed(this);//通过Dispatcher记录这个在
       //最重要是这一句,通过拦截器的调用链获取Response,同步执行
      Response result = getResponseWithInterceptorChain();
      if (result == null) throw new IOException("Canceled");
      return result;
    } catch (IOException e) {
      eventListener.callFailed(this, e);
      throw e;
    } finally {
      client.dispatcher().finished(this);//结束后,Dispatcher负责清理这个记录
    }
  }
2 异步请求:
利用构造 responseCallback 构造一个RealCall的内部类 AsyncCall的对象,
然后把它插入 Dispatcher的队列中
- RealCall.java
@Override public void enqueue(Callback responseCallback) {
    synchronized (this) {
      if (executed) throw new IllegalStateException("Already Executed");
      executed = true;
    }
    captureCallStackTrace();
    eventListener.callStart(this);
    client.dispatcher().enqueue(new AsyncCall(responseCallback));
}- AsyncCall.java
因为AsyncCall是RealCall的内部类 ,所以它的对象,对应的外部类RealCall的实例,并且它实现了Runnable接口,所以可以在线程池执行
  final class AsyncCall extends NamedRunnable {
    private final Callback responseCallback;

    AsyncCall(Callback responseCallback) {
      super("OkHttp %s", redactedUrl());
      this.responseCallback = responseCallback;
    }

    String host() {
      return originalRequest.url().host();
    }

    Request request() {
      return originalRequest;
    }

    RealCall get() {
      return RealCall.this;
    }

    @Override protected void execute() {
      boolean signalledCallback = false;
      try {
        Response response = getResponseWithInterceptorChain();
        if (retryAndFollowUpInterceptor.isCanceled()) {
          signalledCallback = true;
          responseCallback.onFailure(RealCall.this, new IOException("Canceled"));
        } else {
          signalledCallback = true;
          responseCallback.onResponse(RealCall.this, response);
        }
      } catch (IOException e) {
        if (signalledCallback) {
          // Do not signal the callback twice!
          Platform.get().log(INFO, "Callback failure for " + toLoggableString(), e);
        } else {
          eventListener.callFailed(RealCall.this, e);
          responseCallback.onFailure(RealCall.this, e);
        }
      } finally {
        client.dispatcher().finished(this);
      }
    }
  }
- Dispatcher.java
  //注意这是一个同步方法
  synchronized void enqueue(AsyncCall call) {
    if (runningAsyncCalls.size() < maxRequests && runningCallsForHost(call) < maxRequestsPerHost) {
       //为了避免太多请求同时执行,这里有两个限制,
      //同时请求的最大数目不能超过 maxRequests ,同时对于每一个主机host(服务器),同时请求数目不能超过maxRequestsPerHost
      runningAsyncCalls.add(call);
      executorService().execute(call);
    } else {
       //否则就加入一个准备
      readyAsyncCalls.add(call);
    }
  }

//同步方法 获取一个单实例的 线程池
public synchronized ExecutorService executorService() {
    if (executorService == null) {
     //这个线程池参数设置也有很多学问啊,
      executorService = new ThreadPoolExecutor(0, Integer.MAX_VALUE, 60, TimeUnit.SECONDS,
          new SynchronousQueue<Runnable>(), Util.threadFactory("OkHttp Dispatcher", false));
    }
    return executorService;
  }

//在一个Call执行结束后
  private <T> void finished(Deque<T> calls, T call, boolean promoteCalls) {
    int runningCallsCount;
    Runnable idleCallback;
    synchronized (this) {
      if (!calls.remove(call)) throw new AssertionError("Call wasn't in-flight!");
       //需要取出新的Call执行,调用 promoteCalls() 自动执行 N个Call直到达到数目限制
      if (promoteCalls) promoteCalls();
      runningCallsCount = runningCallsCount();
      idleCallback = this.idleCallback;
    }

    if (runningCallsCount == 0 && idleCallback != null) {
      idleCallback.run();
    }
  }

   //主动取出就绪的Call 执行
  private void promoteCalls() {
    if (runningAsyncCalls.size() >= maxRequests) return; // Already running max capacity.
    if (readyAsyncCalls.isEmpty()) return; // No ready calls to promote.

    for (Iterator<AsyncCall> i = readyAsyncCalls.iterator(); i.hasNext(); ) {
      AsyncCall call = i.next();

      if (runningCallsForHost(call) < maxRequestsPerHost) {
        i.remove();
        runningAsyncCalls.add(call);
        executorService().execute(call);
      }

      if (runningAsyncCalls.size() >= maxRequests) return; // Reached max capacity.
    }
  }
1.5 Interceptor链式调用拦截的原理和流程
在OkHttp中,比如我们有各种需求,需要透明压缩Gzip,我们的请求的Request只有我们的设定的内容,需要添加
Http协议的的Header的固定的头信息,还要允许用户可以编写自己的逻辑插入调用的过程中,这里就需要了解OkHttp的链式调用拦截的逻辑
首先,假设整个请求响应是一个黑盒子
我们
输入的是 application request
输出 application 的 response
中间经历了一些了的Interceptors,有OkHttp自己的定义的,也可以有自定义的:
如:
Response getResponseWithInterceptorChain() throws IOException {
    // Build a full stack of interceptors.
    List<Interceptor> interceptors = new ArrayList<>();
    interceptors.addAll(client.interceptors());
    interceptors.add(retryAndFollowUpInterceptor);
    interceptors.add(new BridgeInterceptor(client.cookieJar()));
    interceptors.add(new CacheInterceptor(client.internalCache()));
    interceptors.add(new ConnectInterceptor(client));
    if (!forWebSocket) {
      interceptors.addAll(client.networkInterceptors());
    }
    interceptors.add(new CallServerInterceptor(forWebSocket));

    Interceptor.Chain chain = new RealInterceptorChain(
        interceptors, null, null, null, 0, originalRequest);
    return chain.proceed(originalRequest);
  }
由源代码可以看到,创建了一个 List
保存所有的拦截器
然后利用这个拦截器列表构建了一个 index=0(标识当前的Interceptor) 调用链 Interceptor.Chain chain = new RealInterceptorChain(...,0,...),
调用chain.proceed(originalRequest),传入最原始的的request ,返回对应的response
下面是chain.proceed的源码:
public Response proceed(Request request, StreamAllocation streamAllocation, HttpCodec httpCodec,
      Connection connection) throws IOException {
    if (index >= interceptors.size()) throw new AssertionError();

    calls++;

    // If we already have a stream, confirm that the incoming request will use it.
    if (this.httpCodec != null && !sameConnection(request.url())) {
      throw new IllegalStateException("network interceptor " + interceptors.get(index - 1)
          + " must retain the same host and port");
    }

    // If we already have a stream, confirm that this is the only call to chain.proceed().
    if (this.httpCodec != null && calls > 1) {
      throw new IllegalStateException("network interceptor " + interceptors.get(index - 1)
          + " must call proceed() exactly once");
    }

    // Call the next interceptor in the chain.
    RealInterceptorChain next = new RealInterceptorChain(
        interceptors, streamAllocation, httpCodec, connection, index + 1, request);
    Interceptor interceptor = interceptors.get(index);
    Response response = interceptor.intercept(next);

    // Confirm that the next interceptor made its required call to chain.proceed().
    if (httpCodec != null && index + 1 < interceptors.size() && next.calls != 1) {
      throw new IllegalStateException("network interceptor " + interceptor
          + " must call proceed() exactly once");
    }

    // Confirm that the intercepted response isn't null.
    if (response == null) {
      throw new NullPointerException("interceptor " + interceptor + " returned null");
    }

    return response;
其中:最重要的代码如下:
RealInterceptorChain next = new RealInterceptorChain(
interceptors, streamAllocation, httpCodec, connection, index + 1, request);
Interceptor interceptor = interceptors.get(index);
Response response = interceptor.intercept(next);
首先创建一个next的Chain
然后根据 index获取当前的拦截器
调用Interceptor.intercept(next),传入下一个 nextChain,并且执行这个拦截逻辑
注意有两种情况,intercept
拦截器可以决定直接返回reponse结束所有的链式调用过程,还是继续调用nextChain.proceed执行下一个拦截调用的过程,返回response
最重要的Interceptor :CallServerInterceptor
这个拦截器是最后一个拦截器,它负责发送请求到服务器
/** This is the last interceptor in the chain. It makes a network call to the server. */
public final class CallServerInterceptor implements Interceptor {
  private final boolean forWebSocket;

  public CallServerInterceptor(boolean forWebSocket) {
    this.forWebSocket = forWebSocket;
  }

  @Override public Response intercept(Chain chain) throws IOException {
    RealInterceptorChain realChain = (RealInterceptorChain) chain;
    HttpCodec httpCodec = realChain.httpStream();
    StreamAllocation streamAllocation = realChain.streamAllocation();
    RealConnection connection = (RealConnection) realChain.connection();
    Request request = realChain.request();

    long sentRequestMillis = System.currentTimeMillis();

    realChain.eventListener().requestHeadersStart(realChain.call());
    httpCodec.writeRequestHeaders(request);
    realChain.eventListener().requestHeadersEnd(realChain.call(), request);

    Response.Builder responseBuilder = null;
    if (HttpMethod.permitsRequestBody(request.method()) && request.body() != null) {
      // If there's a "Expect: 100-continue" header on the request, wait for a "HTTP/1.1 100
      // Continue" response before transmitting the request body. If we don't get that, return
      // what we did get (such as a 4xx response) without ever transmitting the request body.
      if ("100-continue".equalsIgnoreCase(request.header("Expect"))) {
        httpCodec.flushRequest();
        realChain.eventListener().responseHeadersStart(realChain.call());
        responseBuilder = httpCodec.readResponseHeaders(true);
      }

      if (responseBuilder == null) {
        // Write the request body if the "Expect: 100-continue" expectation was met.
        realChain.eventListener().requestBodyStart(realChain.call());
        long contentLength = request.body().contentLength();
        CountingSink requestBodyOut =
            new CountingSink(httpCodec.createRequestBody(request, contentLength));
        BufferedSink bufferedRequestBody = Okio.buffer(requestBodyOut);

        request.body().writeTo(bufferedRequestBody);
        bufferedRequestBody.close();
        realChain.eventListener()
            .requestBodyEnd(realChain.call(), requestBodyOut.successfulCount);
      } else if (!connection.isMultiplexed()) {
        // If the "Expect: 100-continue" expectation wasn't met, prevent the HTTP/1 connection
        // from being reused. Otherwise we're still obligated to transmit the request body to
        // leave the connection in a consistent state.
        streamAllocation.noNewStreams();
      }
    }

    httpCodec.finishRequest();

    if (responseBuilder == null) {
      realChain.eventListener().responseHeadersStart(realChain.call());
      responseBuilder = httpCodec.readResponseHeaders(false);
    }

    Response response = responseBuilder
        .request(request)
        .handshake(streamAllocation.connection().handshake())
        .sentRequestAtMillis(sentRequestMillis)
        .receivedResponseAtMillis(System.currentTimeMillis())
        .build();

    realChain.eventListener()
        .responseHeadersEnd(realChain.call(), response);

    int code = response.code();
    if (forWebSocket && code == 101) {
      // Connection is upgrading, but we need to ensure interceptors see a non-null response body.
      response = response.newBuilder()
          .body(Util.EMPTY_RESPONSE)
          .build();
    } else {
      response = response.newBuilder()
          .body(httpCodec.openResponseBody(response))
          .build();
    }

    if ("close".equalsIgnoreCase(response.request().header("Connection"))
        || "close".equalsIgnoreCase(response.header("Connection"))) {
      streamAllocation.noNewStreams();
    }

    if ((code == 204 || code == 205) && response.body().contentLength() > 0) {
      throw new ProtocolException(
          "HTTP " + code + " had non-zero Content-Length: " + response.body().contentLength());
    }

    return response;
  }

  static final class CountingSink extends ForwardingSink {
    long successfulCount;

    CountingSink(Sink delegate) {
      super(delegate);
    }

    @Override public void write(Buffer source, long byteCount) throws IOException {
      super.write(source, byteCount);
      successfulCount += byteCount;
    }
  }
}
总结
OKHttp整体的调用流程还是很清晰的,可以看到作者的功力。我们在分析的时候重点关注一个请求从发起到响应结束的过程就能更容易理解。