官网
vue-quill-editor
Toolbar Module - Quill
vue-quill-image-upload
图片支持上传服务器并调整大小
1.在 package.json 中加入 "quill-image-extend-module": "^1.1.2" 依赖
2.在编辑器组件中引入以下代码
<template>
  <div class="in-editor-panel">
    <quill-editor ref="quillEditor" v-model="content" :options="editorOption" @change="onChange">
    </quill-editor>
  </div>
</template>

<script type="text/ecmascript-6">
  import 'quill/dist/quill.core.css'
  import 'quill/dist/quill.snow.css'
  import { quillEditor, Quill } from 'vue-quill-editor'
  import { ImageExtend, QuillWatch } from 'quill-image-extend-module'
  import { hasClass } from 'assets/scripts/dom/dom'

  Quill.register('modules/ImageExtend', ImageExtend)

  export default {
    props: {
      value: {
        type: String,
        default: ''
      },
      toolbarMode: {
        type: Number,
        default: 0
      },
      placeholder: {
        type: String,
        default: '请输入内容'
      },
      height: {
        type: Number,
        default: 170
      },
      imagePath: {
        type: String,
        default: ''
      }
    },
    data () {
      return {
        content: '',
        toolbars: [
          [
            ['bold', 'italic', 'underline', 'strike'],
            ['blockquote', 'code-block'],
            [{'header': 1}, {'header': 2}],
            [{'list': 'ordered'}, {'list': 'bullet'}],
            [{'script': 'sub'}, {'script': 'super'}],
            [{'indent': '-1'}, {'indent': '+1'}],
            [{'direction': 'rtl'}],
            [{'size': ['small', false, 'large', 'huge']}],
            [{'header': [1, 2, 3, 4, 5, 6, false]}],
            [{'font': []}],
            [{'color': []}, {'background': []}],
            [{'align': []}],
            ['clean'],
            ['link', 'image', 'video']
          ],
          [
            ['bold', 'italic', 'underline'],
            ['blockquote', 'code-block'],
            [{'list': 'ordered'}, {'list': 'bullet'}],
            [{'header': [1, 2, 3, 4, 5, 6, false]}],
            [{'color': []}, {'background': []}],
            [{'align': []}],
            ['link', 'image', 'video']
          ],
          [
            ['bold', 'italic', 'underline'],
            ['blockquote', 'code-block'],
            [{'list': 'ordered'}, {'list': 'bullet'}],
            [{'color': []}, {'background': []}],
            ['insert']
          ]
        ],
        editorOption: {
          modules: {
            ImageExtend: {
              loading: true,
              name: 'image',
              size: 2,
              action: `/api/file/upload/image?filePath=${JSON.stringify(this.imagePath)}`,
              response: (res) => {
                return res.data
              }
            },
            toolbar: {
              container: [],
              handlers: {
                'image': function () {
                  QuillWatch.emit(this.quill.id)
                }
              }
            }
          },
          placeholder: this.placeholder
        }
      }
    },
    computed: {
      editor () {
        return this.$refs.quillEditor.quill
      }
    },
    watch: {
      // 监听父组件传入的内容
      value (newVal) {
        this.$nextTick(() => {
          this._listenerImage()
        })

        if (newVal === this.content) {
          return false
        }

        // 传入的内容不等于编辑器自身内容,则更新
        this.content = newVal
      },
      'content' () {
        this._listenerImage()
      }
    },
    created () {
      // 指定工具栏
      this.editorOption.modules.toolbar.container = this.toolbars[this.toolbarMode]
    },
    mounted () {
      // 设置编辑器高度
      this.editor.container.style.height = `${this.height}px`
    },
    methods: {
      // 显示宽度修改框
      _showWidthBox (event) {
        // 获取当前图片对象
        let currentImg = event.target

        // 弹出宽度输入框
        this.$prompt('请输入宽度', '提示', {
          inputValue: currentImg.width,
          confirmButtonText: '确定',
          cancelButtonText: '取消'
        }).then(({value}) => {
          // 赋值新宽度
          currentImg.width = value
        }).catch(() => {})
      },
      // 监听图片点击
      _listenerImage () {
        // 获取DOM对象
        let editor = document.getElementsByClassName('ql-editor')[0]
        let img = editor.getElementsByTagName('img')

        // 非空验证
        if (img.length === 0) {
          return
        }

        for (let i = 0; i < img.length; i++) {
          let currentImg = img[i]

          // 绑定且防止重复绑定
          currentImg.removeEventListener('dblclick', this._showWidthBox, false)
          currentImg.addEventListener('dblclick', this._showWidthBox, false)
        }
      },
      onChange () {
        // 告知父组件内容发生变化
        this.$emit('input', this.content)
      }
    },
    components: {
      quillEditor
    }
  }
</script>
集成quill-image-extend-module后打包抱错:

原因是因为 uglifyjs 不支持ES6 (ES2015), 所以你需要在webpack uglify 之前, 把报错的文件(或文件夹)用babel-loader 处理
vue webpack template 有个 build/webpack.base.conf.js 文件

这文件的有这一段
var path = require('path')
var utils = require('./utils')
...
module.exports = {
...
module: {
...
{
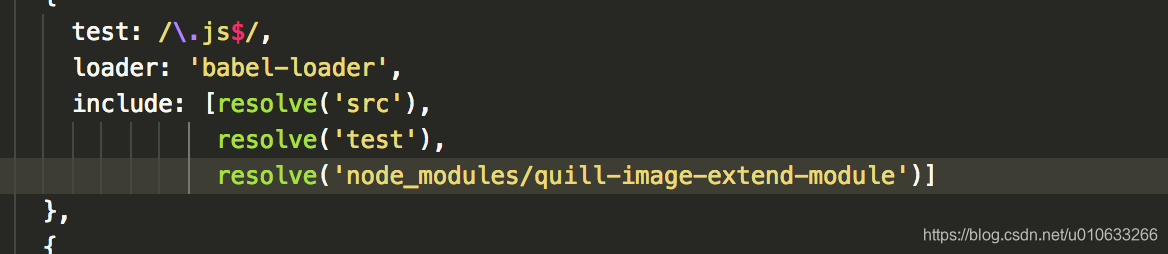
test: /.js$/,
loader: 'babel-loader',
include: [
resolve('src'),
resolve('test')
]
},
这段代表的就是用 babel-loader 把 这些 include 的所有文件(和文件夹里任何文件), 用babel-loader 处理, 你会发现你的src 也在这个 include 列组里 (很容易理解,因为写Vue, 就基本会用到 ES6 syntax)
只需要吧这个插件的路径加到下面就行(如下):
主要记住一个原理就是
基本上任何与javascript syntax 有关的问题 (build 会报错是哪个文件, 而且一般都是在uglify 环节), 都可以放到这里。指定先用babel-loader 转换成最基础的javascript 格式, 这样一般后续环节都不会有javascript syntax 问题 (因为最基础的javascript 格式总该都要支持吧)。