欢迎访问我的GitHub
https://github.com/zq2599/blog_demos
内容:所有原创文章分类汇总及配套源码,涉及Java、Docker、Kubernetes、DevOPS等;
《disruptor笔记》系列链接
本篇概览
- 本文是《disruptor笔记》系列的第六篇,主要内容是将一些常用的消费模式做汇总,后续日常开发中如果有需要就能拿来即用;
- 以下是常用的模式:
- C1、C2独立消费,C3依赖C1和C2

- C1独立消费,C2和C3也独立消费,但依赖C1,C4依赖C2和C3:
- C1和C2独立消费,C3和C4也是独立消费,但C3和C4都依赖C1和C2,然后C5依赖C3和C4:

- C1和C2共同消费,C3和C4也是共同消费,但C3和C4都依赖C1和C2,然后C5依赖C3和C4:
- C1和C2共同消费,C3和C4独立消费,但C3和C4都依赖C1和C2,然后C5依赖C3和C4:
- C1和C2独立消费,C3和C4是共同消费,但C3和C4都依赖C1和C2,然后C5依赖C3和C4:
关于本篇代码
- 为了省事儿,本次不会新建工程,而是直接使用前文的consume-mode模块,因此,下面这些类直接就直接使用了,无需重写代码:
- 事件定义:OrderEvent
- 事件工厂:OrderEventFactory
- 事件生产者:OrderEventProducer
- 用在独立消费场景的事件消费者:MailEventHandler
- 用在共同消费场景的事件消费者:MailWorkHandler
源码下载
- 本篇实战中的完整源码可在GitHub下载到,地址和链接信息如下表所示(https://github.com/zq2599/blog_demos):
| 名称 | 链接 | 备注 |
|---|---|---|
| 项目主页 | https://github.com/zq2599/blog_demos | 该项目在GitHub上的主页 |
| git仓库地址(https) | https://github.com/zq2599/blog_demos.git | 该项目源码的仓库地址,https协议 |
| git仓库地址(ssh) | git@github.com:zq2599/blog_demos.git | 该项目源码的仓库地址,ssh协议 |
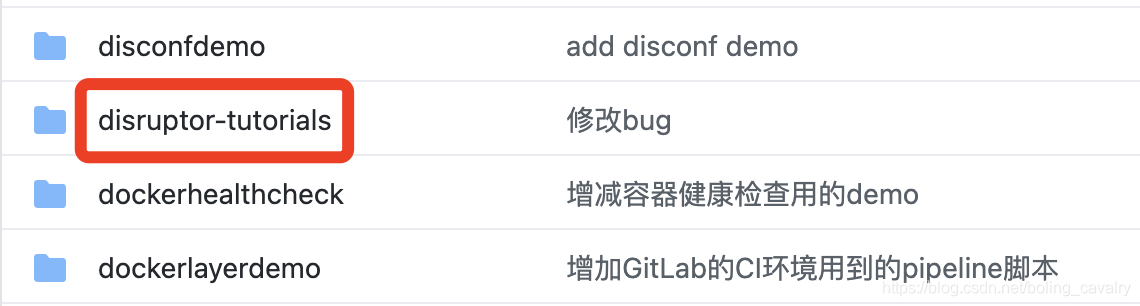
- 这个git项目中有多个文件夹,本次实战的源码在disruptor-tutorials文件夹下,如下图红框所示:
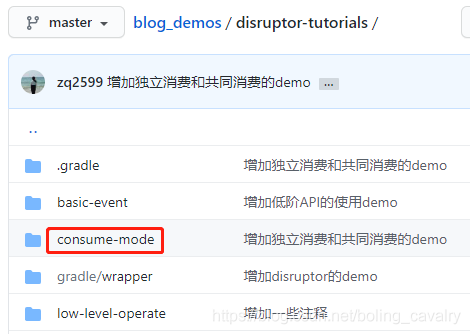
- disruptor-tutorials是个父工程,里面有多个module,本篇实战的module是consume-mode,如下图红框所示:
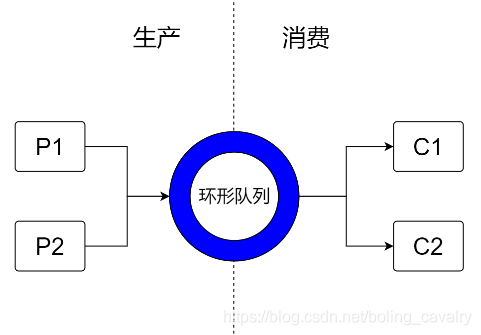
多个生产者和多个独立消费者
咱们即将实现下图的逻辑:
- 前面几篇文章所有实战的生产者都只有一个,到了本篇,为了让consume-mode模块的代码能够支持多生产者,咱们要对功能业务的抽象父类做以下两处改动:
-
init方法原本为private型,现在为了能让子类重此方法,将其改为protected类型;
-
增加名为publishWithProducer2的方法,可见内部只有抛出异常,要想其正常工作,需要子类自己来实现:
public void publishWithProducer2(String value) throws Exception {
	throw new Exception("父类未实现此方法,请在子类中重写此方法后再调用");
}
- 为了实现多生产者功能,新增MultiProducerServiceImpl.java,有几处要注意的地方稍后会提到:
package com.bolingcavalry.service.impl;

import com.bolingcavalry.service.*;
import com.lmax.disruptor.BlockingWaitStrategy;
import com.lmax.disruptor.dsl.Disruptor;
import com.lmax.disruptor.dsl.ProducerType;
import lombok.Setter;
import org.springframework.scheduling.concurrent.CustomizableThreadFactory;
import org.springframework.stereotype.Service;
import javax.annotation.PostConstruct;

@Service("multiProducerService")
public class MultiProducerServiceImpl extends ConsumeModeService {

    /**
     * 第二个生产者
     */
    @Setter
    protected OrderEventProducer producer2;

    @PostConstruct
    @Override
    protected void init() {
        // 实例化
        disruptor = new Disruptor<>(new OrderEventFactory(),
                BUFFER_SIZE,
                new CustomizableThreadFactory("event-handler-"),
                // 生产类型是多生产者
                ProducerType.MULTI,
                // BlockingWaitStrategy是默认的等待策略
                new BlockingWaitStrategy());

        // 留给子类实现具体的事件消费逻辑
        disruptorOperate();

        // 启动
        disruptor.start();

        // 第一个生产者
        setProducer(new OrderEventProducer(disruptor.getRingBuffer()));

        // 第二个生产者
        setProducer2(new OrderEventProducer(disruptor.getRingBuffer()));
    }

    @Override
    protected void disruptorOperate() {
        // 一号消费者
        MailEventHandler c1 = new MailEventHandler(eventCountPrinter);

        // 二号消费者
        MailEventHandler c2 = new MailEventHandler(eventCountPrinter);

        // 调用handleEventsWithWorkerPool,表示创建的多个消费者以共同消费的模式消费
        disruptor.handleEventsWith(c1, c2);
    }

    @Override
    public void publishWithProducer2(String value) throws Exception {
        producer2.onData(value);
    }
}
- 上述代码有以下几处要注意:
- 重写父类的init方法,主要是实例化Disruptor的时候,多传入两个参数:ProducerType.MULTI表示生产类型是多生产者,BlockingWaitStrategy是等待策略,之前的代码中咱们没有传此参数时,默认的就是BlockingWaitStrategy
- init方法中还执行了setProducer2方法,设置成员变量producer2
- 重写publishWithProducer2方法,调用成员变量producer2发表事件
- 重写disruptorOperate方法,里面设置了两个独立消费者
- 验证上述代码的方式依旧是单元测试,打开ConsumeModeServiceTest.java,新增以下代码,可见新增了两个线程同时执行发布事件的操作:
    @Autowired
    @Qualifier("multiProducerService")
    ConsumeModeService multiProducerService;

	@Test
    public void testMultiProducerService() throws InterruptedException {
        log.info("start testMultiProducerService");
        CountDownLatch countDownLatch = new CountDownLatch(1);

        // 两个生产者,每个生产100个事件,一共生产两百个事件
        // 两个独立消费者,每人消费200个事件,因此一共消费400个事件
        int expectEventCount = EVENT_COUNT*4;

        // 告诉service,等消费到400个消息时,就执行countDownLatch.countDown方法
        multiProducerService.setCountDown(countDownLatch, expectEventCount);

        // 启动一个线程,用第一个生产者生产事件
        new Thread(() -> {
            for(int i=0;i<EVENT_COUNT;i++) {
                log.info("publich {}", i);
                multiProducerService.publish(String.valueOf(i));
            }
        }).start();

        // 再启动一个线程,用第二个生产者生产事件
        new Thread(() -> {
            for(int i=0;i<EVENT_COUNT;i++) {
                log.info("publishWithProducer2 {}", i);
                try {
                    multiProducerService.publishWithProducer2(String.valueOf(i));
                } catch (Exception e) {
                    e.printStackTrace();
                }
            }
        }).start();

        // 当前线程开始等待,前面的service.setCountDown方法已经告诉过service,
        // 等消费到expectEventCount个消息时,就执行countDownLatch.countDown方法
        // 千万注意,要调用await方法,而不是wait方法!
        countDownLatch.await();

        // 消费的事件总数应该等于发布的事件数
        assertEquals(expectEventCount, multiProducerService.eventCount());
    }
- 测试结果如下,测试通过,符合预期:

C1、C2独立消费,C3依赖C1和C2
- 逻辑图如下:
- 实现代码如下,非常简单,依赖关系用then即可实现:
package com.bolingcavalry.service.impl;

import com.bolingcavalry.service.ConsumeModeService;
import com.bolingcavalry.service.MailEventHandler;
import com.bolingcavalry.service.MailWorkHandler;
import com.bolingcavalry.service.SmsEventHandler;
import org.springframework.stereotype.Service;

@Service("scene5")
public class Scene5 extends ConsumeModeService {

    @Override
    protected void disruptorOperate() {
        MailEventHandler c1 = new MailEventHandler(eventCountPrinter);
        MailEventHandler c2 = new MailEventHandler(eventCountPrinter);
        MailEventHandler c3 = new MailEventHandler(eventCountPrinter);

        disruptor
                // C1、C2独立消费
                .handleEventsWith(c1, c2)
                // C3依赖C1和C2
                .then(c3);
    }
}
- 单元测试代码:
    @Autowired
    @Qualifier("scene5")
    Scene5 scene5;

    @Test
    public void testScene5 () throws InterruptedException {
        log.info("start testScene5");
        testConsumeModeService(scene5,
                EVENT_COUNT,
                // 三个独立消费者,一共消费300个事件
                EVENT_COUNT * 3);
    }
- 为了节省篇幅,测试结果就不贴了,要注意的是,每个事件都一定是C1和C2先消费过,才会被C3消费到;
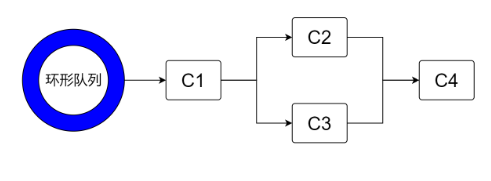
C1独立消费,C2和C3也独立消费,但依赖C1,C4依赖C2和C3
- 逻辑图如下:
- 实现代码如下:
package com.bolingcavalry.service.impl;

import com.bolingcavalry.service.ConsumeModeService;
import com.bolingcavalry.service.MailEventHandler;
import org.springframework.stereotype.Service;

@Service("scene6")
public class Scene6 extends ConsumeModeService {

    @Override
    protected void disruptorOperate() {
        MailEventHandler c1 = new MailEventHandler(eventCountPrinter);
        MailEventHandler c2 = new MailEventHandler(eventCountPrinter);
        MailEventHandler c3 = new MailEventHandler(eventCountPrinter);
        MailEventHandler c4 = new MailEventHandler(eventCountPrinter);

        disruptor
                // C1
                .handleEventsWith(c1)
                // C2和C3也独立消费
                .then(c2, c3)
                // C4依赖C2和C3
                .then(c4);
    }
}
- 单元测试代码:
    @Autowired
    @Qualifier("scene6")
    Scene6 scene6;

    @Test
    public void testScene6 () throws InterruptedException {
        log.info("start testScene6");
        testConsumeModeService(scene6,
                EVENT_COUNT,
                // 四个独立消费者,一共消费400个事件
                EVENT_COUNT * 4);
    }
C1和C2独立消费,C3和C4也是独立消费,但C3和C4都依赖C1和C2,然后C5依赖C3和C4
- 逻辑图如下:
- 实现代码如下:
package com.bolingcavalry.service.impl;

import com.bolingcavalry.service.ConsumeModeService;
import com.bolingcavalry.service.MailEventHandler;
import org.springframework.stereotype.Service;

@Service("scene7")
public class Scene7 extends ConsumeModeService {

    @Override
    protected void disruptorOperate() {
        MailEventHandler c1 = new MailEventHandler(eventCountPrinter);
        MailEventHandler c2 = new MailEventHandler(eventCountPrinter);
        MailEventHandler c3 = new MailEventHandler(eventCountPrinter);
        MailEventHandler c4 = new MailEventHandler(eventCountPrinter);
        MailEventHandler c5 = new MailEventHandler(eventCountPrinter);

        disruptor
                // C1和C2独立消费
                .handleEventsWith(c1, c2)
                // C3和C4也是独立消费,但C3和C4都依赖C1和C2
                .then(c3, c4)
                // 然后C5依赖C3和C4
                .then(c5);
    }
}
- 单元测试代码:
    @Autowired
    @Qualifier("scene7")
    Scene7 scene7;

    @Test
    public void testScene7 () throws InterruptedException {
        log.info("start testScene7");
        testConsumeModeService(scene7,
                EVENT_COUNT,
                // 五个独立消费者,一共消费500个事件
                EVENT_COUNT * 5);
    }
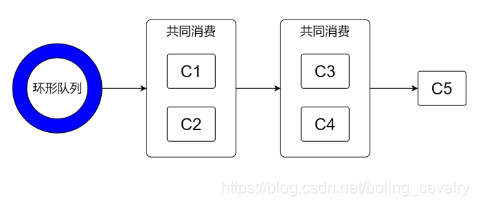
C1和C2共同消费,C3和C4也是共同消费,但C3和C4都依赖C1和C2,然后C5依赖C3和C4
- 逻辑图如下:
- 实现代码如下:
package com.bolingcavalry.service.impl;

import com.bolingcavalry.service.ConsumeModeService;
import com.bolingcavalry.service.MailEventHandler;
import com.bolingcavalry.service.MailWorkHandler;
import org.springframework.stereotype.Service;

/**
 * @author will (zq2599@gmail.com)
 * @version 1.0
 * @description: C1和C2共同消费,C3和C4也是共同消费,但C3和C4都依赖C1和C2,然后C5依赖C3和C4
 * @date 2021/5/23 11:05
 */
@Service("scene8")
public class Scene8 extends ConsumeModeService {

    @Override
    protected void disruptorOperate() {
        MailWorkHandler c1 = new MailWorkHandler(eventCountPrinter);
        MailWorkHandler c2 = new MailWorkHandler(eventCountPrinter);
        MailWorkHandler c3 = new MailWorkHandler(eventCountPrinter);
        MailWorkHandler c4 = new MailWorkHandler(eventCountPrinter);
        MailWorkHandler c5 = new MailWorkHandler(eventCountPrinter);

        disruptor
                // C1和C2共同消费
                .handleEventsWithWorkerPool(c1, c2)
                // C3和C4也是独立消费,但C3和C4都依赖C1和C2
                .thenHandleEventsWithWorkerPool(c3, c4)
                // 然后C5依赖C3和C4
                .thenHandleEventsWithWorkerPool(c5);
    }
}
- 单元测试代码:
    @Autowired
    @Qualifier("scene8")
    Scene8 scene8;

    @Test
    public void testScene8 () throws InterruptedException {
        log.info("start testScene8");
        testConsumeModeService(scene8,
                EVENT_COUNT,
                // C1和C2共同消费,C3和C4共同消费,C5虽然只是一个,但也是共同消费模式,
                // 也就是一共有三组消费者,所以一共消费300个事件
                EVENT_COUNT * 3);
    }
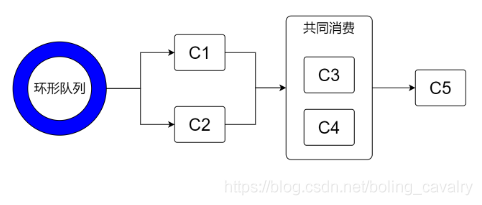
C1和C2共同消费,C3和C4独立消费,但C3和C4都依赖C1和C2,然后C5依赖C3和C4
- 逻辑图如下:
- 实现代码如下:
package com.bolingcavalry.service.impl;

import com.bolingcavalry.service.ConsumeModeService;
import com.bolingcavalry.service.MailEventHandler;
import com.bolingcavalry.service.MailWorkHandler;
import org.springframework.stereotype.Service;

@Service("scene9")
public class Scene9 extends ConsumeModeService {

    @Override
    protected void disruptorOperate() {
        MailWorkHandler c1 = new MailWorkHandler(eventCountPrinter);
        MailWorkHandler c2 = new MailWorkHandler(eventCountPrinter);
        MailEventHandler c3 = new MailEventHandler(eventCountPrinter);
        MailEventHandler c4 = new MailEventHandler(eventCountPrinter);
        MailEventHandler c5 = new MailEventHandler(eventCountPrinter);

        disruptor
                // C1和C2共同消费
                .handleEventsWithWorkerPool(c1, c2)
                // C3和C4独立消费,但C3和C4都依赖C1和C2
                .then(c3, c4)
                // 然后C5依赖C3和C4
                .then(c5);
    }
}
- 单元测试代码:
    @Autowired
    @Qualifier("scene9")
    Scene9 scene9;

    @Test
    public void testScene9 () throws InterruptedException {
        log.info("start testScene9");
        testConsumeModeService(scene9,
                EVENT_COUNT,
                // C1和C2共同消费(100个事件),
                // C3和C4独立消费(200个事件),
                // C5独立消费(100个事件),
                // 所以一共消费400个事件
                EVENT_COUNT * 4);
    }
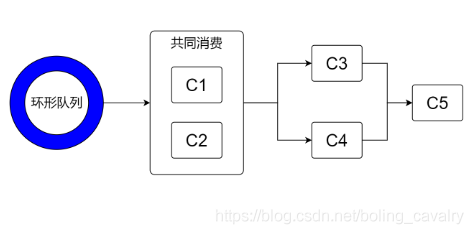
C1和C2独立消费,C3和C4是共同消费,但C3和C4都依赖C1和C2,然后C5依赖C3和C4
- 逻辑图如下:
- 实现代码如下:
package com.bolingcavalry.service.impl;

import com.bolingcavalry.service.ConsumeModeService;
import com.bolingcavalry.service.MailEventHandler;
import com.bolingcavalry.service.MailWorkHandler;
import org.springframework.stereotype.Service;

@Service("scene10")
public class Scene10 extends ConsumeModeService {

    @Override
    protected void disruptorOperate() {
        MailEventHandler c1 = new MailEventHandler(eventCountPrinter);
        MailEventHandler c2 = new MailEventHandler(eventCountPrinter);
        MailWorkHandler c3 = new MailWorkHandler(eventCountPrinter);
        MailWorkHandler c4 = new MailWorkHandler(eventCountPrinter);
        MailEventHandler c5 = new MailEventHandler(eventCountPrinter);

        disruptor
                // C1和C2共同消费
                .handleEventsWith(c1, c2)
                // C3和C4是共同消费,但C3和C4都依赖C1和C2
                .thenHandleEventsWithWorkerPool(c3, c4)
                // 然后C5依赖C3和C4
                .then(c5);
    }
}
- 单元测试代码:
    @Test
    public void testScene10 () throws InterruptedException {
        log.info("start testScene10");
        testConsumeModeService(scene10,
                EVENT_COUNT,
                // C1和C2独立消费(200个事件),
                // C3和C4共同消费(100个事件),
                // C5独立消费(100个事件),
                // 所以一共消费400个事件
                EVENT_COUNT * 4);
    }
- 至此,一些常见场景的代码已完成,希望本文能给您一些参考,帮您更得心应手的用好这个优秀的工具;
你不孤单,欣宸原创一路相伴
欢迎关注公众号:程序员欣宸
微信搜索「程序员欣宸」,我是欣宸,期待与您一同畅游Java世界...
https://github.com/zq2599/blog_demos