Feign 系列(03)Feign 工作原理
Spring Cloud 系列目录(https://www.cnblogs.com/binarylei/p/11563952.html#feign)
1. Feign 是如何设计的
首先回顾一下 Feign 的基本用法:
// 1. Feign 动态代理
GitHub github = Feign.builder()
    .decoder(new GsonDecoder())
    .target(GitHub.class, "https://api.github.com");
// 2. Feign 执行
List<Contributor> contributors = github.contributors("OpenFeign", "feign");
总结: Feign 使用时分成两步:一是生成 Feign 的动态代理;二是 Feign 执行。

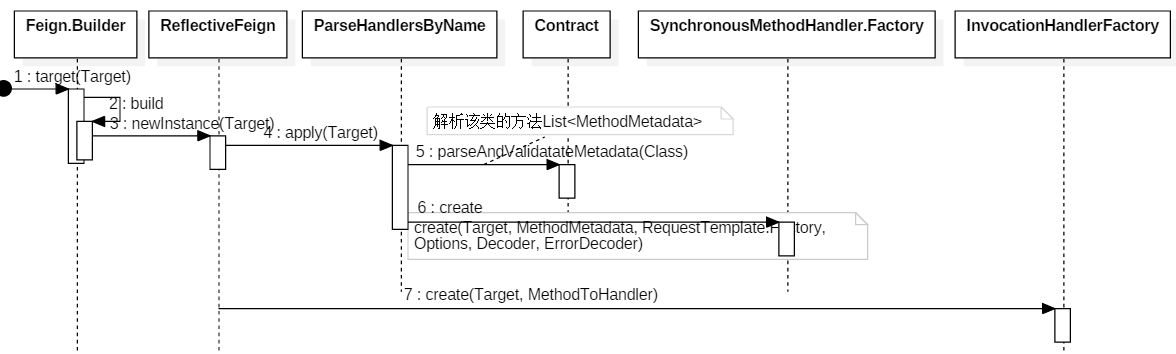
总结:
- 前两步是生成动态对象:将 Method 方法的注解解析成 MethodMetadata,并最终生成 Feign 动态代理对象。
- 后几步是调用过程:根据解析的 MethodMetadata 对象,将 Method 方法的参数转换成 Request,最后调用 Client 发送请求。
2. Feign 动态代理
Feign 的默认实现是 ReflectiveFeign,通过 Feign.Builder 构建。再看代码前,先了解一下 Target 这个对象。
public interface Target<T> {
  // 接口的类型
  Class<T> type();

  // 代理对象的名称,默认为url,负载均衡时有用
  String name();
  // 请求的url地址,eg: https://api/v2
  String url();
}
其中 Target.type 是用来生成代理对象的,url 是 Client 对象发送请求的地址。
2.1 ReflectiveFeign 构建
public Feign build() {
    // client 有三种实现 JdkHttp/ApacheHttp/okHttp,默认是 jdk 的实现
    SynchronousMethodHandler.Factory synchronousMethodHandlerFactory =
        new SynchronousMethodHandler.Factory(client, retryer, requestInterceptors, logger,
                                             logLevel, decode404, closeAfterDecode, propagationPolicy);
    ParseHandlersByName handlersByName =
        new ParseHandlersByName(contract, options, encoder, decoder, queryMapEncoder,
                                errorDecoder, synchronousMethodHandlerFactory);
    return new ReflectiveFeign(handlersByName, invocationHandlerFactory, queryMapEncoder);
}
总结: 介绍一下几个主要的参数:
Client这个没什么可说的,有三种实现 JdkHttp/ApacheHttp/okHttpRequestInterceptor请求拦截器ContractREST 注解解析器,默认为 Contract.Default(),即支持 Feign 的原生注解。InvocationHandlerFactory生成 JDK 动态代理,实际执行是委托给了 MethodHandler。
2.2 生成代理对象
public <T> T newInstance(Target<T> target) {
    // 1. Contract 将 target.type 接口类上的方法和注解解析成 MethodMetadata,
    //    并转换成内部的MethodHandler处理方式
    Map<String, MethodHandler> nameToHandler = targetToHandlersByName.apply(target);
    Map<Method, MethodHandler> methodToHandler = new LinkedHashMap<Method, MethodHandler>();
    List<DefaultMethodHandler> defaultMethodHandlers = new LinkedList<DefaultMethodHandler>();

    for (Method method : target.type().getMethods()) {
        if (method.getDeclaringClass() == Object.class) {
            continue;
        } else if (Util.isDefault(method)) {
            DefaultMethodHandler handler = new DefaultMethodHandler(method);
            defaultMethodHandlers.add(handler);
            methodToHandler.put(method, handler);
        } else {
            methodToHandler.put(method, nameToHandler.get(Feign.configKey(target.type(), method)));
        }
    }

    // 2. 生成 target.type 的 jdk 动态代理对象
    InvocationHandler handler = factory.create(target, methodToHandler);
    T proxy = (T) Proxy.newProxyInstance(target.type().getClassLoader(),
                                         new Class<?>[]{target.type()}, handler);

    for (DefaultMethodHandler defaultMethodHandler : defaultMethodHandlers) {
        defaultMethodHandler.bindTo(proxy);
    }
    return proxy;
}
总结: newInstance 生成了 JDK 的动态代理,从 factory.create(target, methodToHandler) 也可以看出 InvocationHandler 实际委托给了 methodToHandler。methodToHandler 默认是 SynchronousMethodHandler.Factory 工厂类创建的。
2.3 MethodHandler 方法执行器
ParseHandlersByName.apply 生成了每个方法的执行器 MethodHandler,其中最重要的一步就是通过 Contract 解析 MethodMetadata。
public Map<String, MethodHandler> apply(Target key) {
    // 1. contract 将接口类中的方法和注解解析 MethodMetadata
    List<MethodMetadata> metadata = contract.parseAndValidatateMetadata(key.type());
    Map<String, MethodHandler> result = new LinkedHashMap<String, MethodHandler>();
    for (MethodMetadata md : metadata) {
        // 2. buildTemplate 实际上将 Method 方法的参数转换成 Request
        BuildTemplateByResolvingArgs buildTemplate;
        if (!md.formParams().isEmpty() && md.template().bodyTemplate() == null) {
            // 2.1 表单
            buildTemplate = new BuildFormEncodedTemplateFromArgs(md, encoder, queryMapEncoder);
        } else if (md.bodyIndex() != null) {
            // 2.2 @Body 注解
            buildTemplate = new BuildEncodedTemplateFromArgs(md, encoder, queryMapEncoder);
        } else {
            // 2.3 其余
            buildTemplate = new BuildTemplateByResolvingArgs(md, queryMapEncoder);
        }
        // 3. 将 metadata 和 buildTemplate 封装成 MethodHandler
        result.put(md.configKey(),
                   factory.create(key, md, buildTemplate, options, decoder, errorDecoder));
    }
    return result;
}
总结: 这个方法由以下几步:
- Contract 统一将方法解析 MethodMetadata(*),这样就可以通过实现不同的 Contract 适配各种 REST 声明式规范。
- buildTemplate 实际上将 Method 方法的参数转换成 Request。
- 将 metadata 和 buildTemplate 封装成 MethodHandler。
这样通过以上三步就创建了一个 Target.type 的代理对象 proxy,这个代理对象就可以像访问普通方法一样发送 Http 请求,其实和 RPC 的 Stub 模型是一样的。了解 proxy 后,其执行过程其实也就一模了然。
3. Feign 调用过程
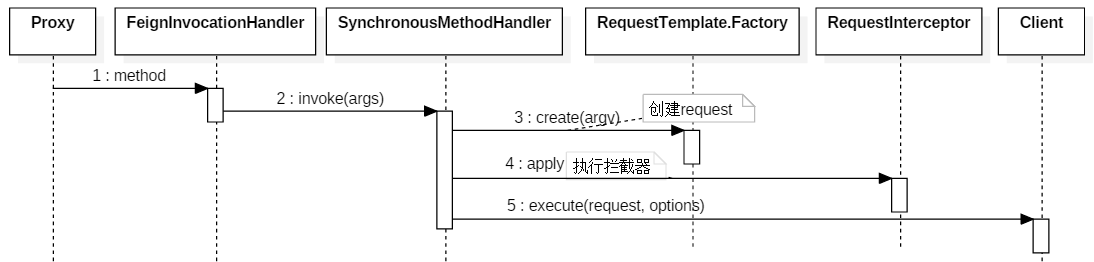
3.1 FeignInvocationHandler#invoke
private final Map<Method, MethodHandler> dispatch;
public Object invoke(Object proxy, Method method, Object[] args) throws Throwable {
    ...
    // 每个Method方法对应一个MethodHandler
    return dispatch.get(method).invoke(args);
}
总结: 和上面的结论一样,实际的执行逻辑实际上是委托给了 MethodHandler。
3.2 SynchronousMethodHandler#invoke
// 发起 http 请求,并根据 retryer 进行重试
public Object invoke(Object[] argv) throws Throwable {
    // template 将 argv 参数构建成 Request
    RequestTemplate template = buildTemplateFromArgs.create(argv);
    Options options = findOptions(argv);
    Retryer retryer = this.retryer.clone();

    // 调用client.execute(request, options)
    while (true) {
        try {
            return executeAndDecode(template, options);
        } catch (RetryableException e) {
            try {
                // 重试机制
                retryer.continueOrPropagate(e);
            } catch (RetryableException th) {
                ...
            }
            continue;
        }
    }
}
总结: invoke 主要进行请求失败的重试机制,至于具体执行过程委托给了 executeAndDecode 方法。
// 一是编码生成Request;二是http请求;三是解码生成Response
Object executeAndDecode(RequestTemplate template, Options options) throws Throwable {
    // 1. 调用拦截器 RequestInterceptor,并根据 template 生成 Request
    Request request = targetRequest(template);
    // 2. http 请求
    Response response = client.execute(request, options);
	// 3. response 解码
    if (Response.class == metadata.returnType()) {
        byte[] bodyData = Util.toByteArray(response.body().asInputStream());
        return response.toBuilder().body(bodyData).build();
    }
    ...
}

Request targetRequest(RequestTemplate template) {
    // 执行拦截器
    for (RequestInterceptor interceptor : requestInterceptors) {
        interceptor.apply(template);
    }
    // 生成 Request
    return target.apply(template);
}
总结: executeAndDecode 最终调用 client.execute(request, options) 进行 http 请求。
4. 思考:如何基于 Feign 实现负载均衡与熔断
4.1 基于 Feign 的负载均衡 - 整合 Ribbon
想要进行负载均衡,那就要对 Client 进行包装,实现负载均衡。 相关代码见RibbonClient和LBClient。
// RibbonClient 主要逻辑
private final Client delegate;
private final LBClientFactory lbClientFactory;
public Response execute(Request request, Request.Options options) throws IOException {
    try {
        URI asUri = URI.create(request.url());
        String clientName = asUri.getHost();
        URI uriWithoutHost = cleanUrl(request.url(), clientName);
        // 封装 RibbonRequest,包含 Client、Request、uri
        LBClient.RibbonRequest ribbonRequest =
            new LBClient.RibbonRequest(delegate, request, uriWithoutHost);
        // executeWithLoadBalancer 实现负载均衡
        return lbClient(clientName).executeWithLoadBalancer(
            ribbonRequest,
            new FeignOptionsClientConfig(options)).toResponse();
    } catch (ClientException e) {
        propagateFirstIOException(e);
        throw new RuntimeException(e);
    }
}
总结: 实际上是把 Client 对象包装了一下,通过 executeWithLoadBalancer 进行负载均衡,这是 Ribbon 提供了 API。更多关于 Ribbon 的负载均衡就不在这进一步说明了。
public final class LBClient extends AbstractLoadBalancerAwareClient
	<LBClient.RibbonRequest, LBClient.RibbonResponse> {

	// executeWithLoadBalancer 方法通过负载均衡算法后,最终调用 execute
	@Override
    public RibbonResponse execute(RibbonRequest request, IClientConfig configOverride)
            throws IOException, ClientException {
        Request.Options options;
        if (configOverride != null) {
            options = new Request.Options(
                    configOverride.get(CommonClientConfigKey.ConnectTimeout, connectTimeout),
                    configOverride.get(CommonClientConfigKey.ReadTimeout, readTimeout),
                    configOverride.get(CommonClientConfigKey.FollowRedirects, followRedirects));
        } else {
            options = new Request.Options(connectTimeout, readTimeout);
        }
        // http 请求
        Response response = request.client().execute(request.toRequest(), options);
        if (retryableStatusCodes.contains(response.status())) {
            response.close();
            throw new ClientException(ClientException.ErrorType.SERVER_THROTTLED);
        }
        return new RibbonResponse(request.getUri(), response);
    }
}
4.2 基于 Feign 的熔断与限流 - 整合 Hystrix
想要进行限流,那就要在方法执行前进行拦截,也就是重写 InvocationHandlerFactory,在方法执行前进行熔断与限流。相关代码见 HystrixFeign,其实也就是实现了 HystrixInvocationHandler。
// HystrixInvocationHandler 主要逻辑
public Object invoke(final Object proxy, final Method method, final Object[] args)
      throws Throwable {
    HystrixCommand<Object> hystrixCommand =
        new HystrixCommand<Object>(setterMethodMap.get(method)) {
            @Override
            protected Object run() throws Exception {
                return HystrixInvocationHandler.this.dispatch.get(method).invoke(args);
            }
            @Override
            protected Object getFallback() {
            };
        }
    ...
	return hystrixCommand.execute();
}
参考:
-
Spring Cloud Feign设计原理:https://www.jianshu.com/p/8c7b92b4396c
每天用心记录一点点。内容也许不重要,但习惯很重要!