在开始学Directx10,11时,有几个常见的概念,或变量如SwapChain,RenderTarget,Depth Buffer都有点似懂非懂,很多时候都是依样画葫芦。写的多了,加上看了SDK和《Intro to d3d10》后,最近突然焕然大悟。记录分享下。
1:SwapChain。
SwapChain这个概念还是比较容易懂的,主要负责维护几个表面(图像)的集合,当显示器在展示当前帧时,Directx在后台绘制下一帧。
怕讲的不够准确清晰,附《Intro to d3d10》的详细解释如下:
To avoid flickering in animation, it is best to draw a frame of animation into an off-screen texture called the back buffer. Once the entire scene has been drawn to the back buffer for the given frame of animation, it is presented to the screen as one complete frame; in this way, the viewer does not watch as the frame gets drawn — the viewer only sees complete frames. The ideal time to present the frame to the screen is during the vertical blanking interval. To implement this, two texture buffers are maintained by the hardware, one called the front buffer and a second called the back buffer. The front buffer stores the image data currently being displayed on the monitor, while the next frame of animation is being drawn to the back buffer. After the frame has been drawn to the back buffer, the roles of the back buffer and front buffer are reversed: The back buffer becomes the front buffer and the front buffer becomes the back buffer for the next frame of animation. Swapping the roles of the back and front buffers is called presenting. Presenting is an efficient operation, as the pointer to the current front buffer and the pointer to the current back buffer just need to be swapped. Figure 4.1 illustrates the process. 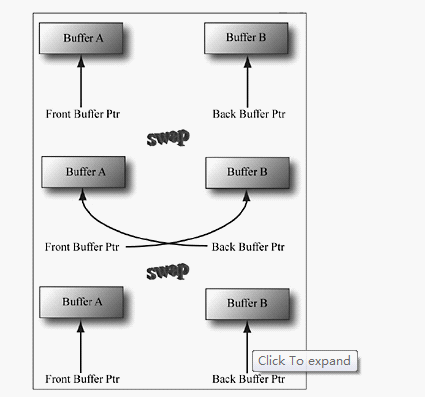
Fiture4.1
Front buffer和back buffer合称SwapChain,在Directx11中它接口是IDXGISwapChain。最常用的函数是IDXGISwapChain::Present(),其将后台绘制的back buffer与前台显示的front buffer调换。
2:Depth Buffer。
这个也比较容易懂,就是记录当前所绘制的每个pixel的深度信息,其数据结构是一个texture。
附录《Intro to d3d10》的详细解释:
The depth buffer is an example of a texture that does not contain image data, but rather depth information about a particular pixel. The possible depth values range from 0.0 to 1.0, where 0.0 denotes the closest an object can be to the viewer and 1.0 denotes the farthest an object can be from the viewer. There is a one-to-one correspondence between each element in the depth buffer and each pixel in the back buffer (i.e., the ijth element in the back buffer corresponds to the ijth element in the depth buffer). So if the back buffer had a resolution of 1280×1024, there would be 1280×1024 depth entries.
还有个和DepthBuffer对应的Stencil buffer。暂时还没用过它,只好跳过先。下面可能有时说DepthBuffer,有时说Depth/Stencil Buffer。不过主要指的都是Depth Buffer。
明白了SwapChain和DepthBuffer的概念后,下面分别说下在程序中具体如何使用SwapChain和DepthBuffer。
对于SwapChain,一般来说主要在三个地方用到。
第一:初始化并创建IDXGISwapChain接口。我们一般在一开始声明一个全局的IDXGISwapChain *pSwapChain。然后创建个DXGI_SWAP_CHAIN_DESC结构来描述我们自己的SwapChain的一些细节。最后再调用函数D3D11CreateDeviceAndSwapChain()来创建IDXGISwapChain。
程序的具体实现如下:
DXGI_SWAP_CHAIN_DESC scDesc;
ZeroMemory(&scDesc,sizeof(DXGI_SWAP_CHAIN_DESC));
scDesc.BufferCount=1;
scDesc.BufferDesc.Height=height;
scDesc.BufferDesc.Width=width;
scDesc.BufferDesc.Format=DXGI_FORMAT_R8G8B8A8_UNORM;
scDesc.BufferDesc.RefreshRate.Numerator=60;
scDesc.BufferDesc.RefreshRate.Denominator=1;
scDesc.BufferUsage=DXGI_USAGE_RENDER_TARGET_OUTPUT;
scDesc.OutputWindow=m_hWnd;
scDesc.SampleDesc.Count=1;
scDesc.SampleDesc.Quality=0;
scDesc.Windowed=TRUE;
hr=D3D11CreateDeviceAndSwapChain(NULL,driverTypes,NULL,createDeviceFlags,featureLevels,numFeatureLevels,D3D11_SDK_VERSION,&scDesc,&m_pSwapChain,&m_pDevice,&featureLevelOut,&m_pContext);
第二:创建Render Target View。这个让我有点迷糊了一段时间。写了段时间d3d11程序,加上看sdk和《intro to d3d10》后清晰了不少。
首先为什么要创建这么一个render target view呢?首先从render target说起,什么是render target呢?前面我们说了,在显示front buffer的时候,Directx在后台渲染back buffer,这就是render target。
为了让Directx能够渲染这个render target,必须将这个buffer绑定到Directx的绘制管道(pipeline)。但是在Directx11中我们不能直接将resource绑定到绘制管道(pipeline),作为更好的方法,我们创建该resource view,然后将它绑定到渲染管道,这样我们就能绘制这个resource了。所以这就是RenderTargetView的由来,以及为什么我们要创建它。
具体创建方法如下:
ID3D11RenderTargetView *pRTV;
ID3D11Texture2D *pBackBuffer;
pSwapChain->GetBuffer(0,__uuidof(ID3D11Texture2D),(void**)(&backBuffer));
pDevice->CreateRenderTargetView(backBuffer,0,&pRTV);
ReleaseCOM(backBuffer);
第三:使用swapChain。1:清空RenderTarget,主要是清空上一帧在render target中绘制的东西,以开始重新绘制新的一帧内容。
在程序中具体使用方法,在每帧调用的绘制函数DrawFunction()的开始加上一句pSwapChain->CleaerRendrTargetView()就可以了。如下
void DrawFunction(……)
{
float clearColor[4]={0.5f,0.5f,0.5f,0.0f};
m_pContext->ClearRenderTargetView(m_pRTV,clearColor);
/////////
……
/////////
}
2:把后台绘制好的back buffer与前台的front buffer调换。这个通过IDXGISwapChain::Present()来完成。这个就解释了我曾经的疑惑,因为我觉得把一开始的back buffer设置为render target,但是back buffer和front buffer是在不断交换的啊,也就是render target是不断地变换的啊。这就要通过函数Present()来协调了。每绘制好back buffer,并把它与前台的front buffer调换的时候,render target也就自动指向了调回来的front buffer(已经是back buffer了)。
在程序中具体使用方法,在每帧调用的绘制函数DrawFunction()的最后加上一句pSwapChain->Present(0,0)就可以了。如下
void DrawFunction(……)
{
float clearColor[4]={0.5f,0.5f,0.5f,0.0f};
m_pContext->ClearRenderTargetView(m_pRTV,clearColor);
/////////
……
/////////
pSwapChain->Present(0,0);
}
在明白了SwapChain和RenderTarget and view用法后,我们再来看看如何在程序中如何创建和使用Depth/Stencil buffer and view。
第一:创建Depth/Stencil buffer and view。因为前面说了,Depth/Stencil buffer其实就是一个texture。一开始为空,后面根据场景,全部由GPU帮我们自动计算读写。所以创建Depth/Stencil buffer and view就和创建一个texture resource和相应resource view一样。先声明一个接口ID3D11Texture2D* m_pBackBuffer;然后创建一个描述该texture的结构D3D11_TEXTURE2D_DESC;最后通过ID3D11Device::CreateTexture2D()来创建这个DepthBuffer。对于DepthBuffer view,我们只需再调用ID3D11Device::CreateDepthStencilView()来创建该DepthBuffer的view。
程序的具体实现如下:
//create depth stencil buffer.
D3D11_TEXTURE2D_DESC depthDesc;
ZeroMemory(&depthDesc,sizeof(D3D11_TEXTURE2D_DESC));
depthDesc.ArraySize=1;
depthDesc.BindFlags=D3D11_BIND_DEPTH_STENCIL;
depthDesc.CPUAccessFlags=0;
depthDesc.Format=DXGI_FORMAT_D24_UNORM_S8_UINT;
depthDesc.Height=height;
depthDesc.Width=width;
depthDesc.MipLevels=1;
depthDesc.MiscFlags=0;
depthDesc.SampleDesc.Count=1;
depthDesc.SampleDesc.Quality=0;
depthDesc.Usage=D3D11_USAGE_DEFAULT;
hr=m_pDevice->CreateTexture2D(&depthDesc,NULL,&m_pDepthStencil);
//create the depth stencil buffer view.
D3D11_DEPTH_STENCIL_VIEW_DESC dsViewDesc;
ZeroMemory(&dsViewDesc,sizeof(D3D11_DEPTH_STENCIL_VIEW_DESC));
dsViewDesc.Format=depthDesc.Format;
dsViewDesc.ViewDimension=D3D11_DSV_DIMENSION_TEXTURE2D;
dsViewDesc.Texture2D.MipSlice=0;
hr=m_pDevice->CreateDepthStencilView(m_pDepthStencil,&dsViewDesc,&m_pDepthStencilView);
第二:使用Detph/Stencil buffer。主要在每帧的绘制函数DrawFunction()开始调用ID3D11DeviceContext::ClearDepthStencilView()来清空Depth/Stencil Buffer,后面的计算GPU会自动替我们做。
void DrawFunction(……)
{
float clearColor[4]={0.5f,0.5f,0.5f,0.0f};
m_pContext->ClearRenderTargetView(m_pRTV,clearColor);
m_pContext->ClearDepthStencilView(m_pDepthStencilView,D3D11_CLEAR_DEPTH,1.0f,0.0f);
/////////
……
/////////
pSwapChain->Present(0,0);
}
最后当我们创建好了render taget view和depth buffer view,我们就将其绑定到pipeline的output merget stage,使相应的resource正式成为pipeline的render target和depth buffer。
m_pDevice->OMSetRenderTarget(1,&m_pRTV,m_pDepthStencilView);