1.hive简介
logo 是一个身体像蜜蜂,头是大象的家伙,相当可爱。

Hive是一个数据仓库基础工具在Hadoop中用来处理结构化数据。它架构在Hadoop之上,总归为大数据,并使得查询和分析方便。并提供简单的sql查询功能,可以将sql语句转换为MapReduce任务进行运行。
术语“大数据”是大型数据集,其中包括体积庞大,高速,以及各种由与日俱增的数据的集合。使用传统的数据管理系统,它是难以加工大型数据。因此,Apache软件基金会推出了一款名为Hadoop的解决大数据管理和处理难题的框架。
Hive起源于Facebook(一个美国的社交服务网络)。Facebook有着大量的数据,而Hadoop是一个开源的MapReduce实现,可以轻松处理大量的数据。但是MapReduce程序对于Java程序员来说比较容易写,但是对于其他语言使用者来说不太方便。此时Facebook最早地开始研发Hive,它让对Hadoop使用SQL查询(实际上SQL后台转化为了MapReduce)成为可能,那些非Java程序员也可以更方便地使用。hive最早的目的也就是为了分析处理海量的日志。
官网:http://hive.apache.org/
2.hive架构
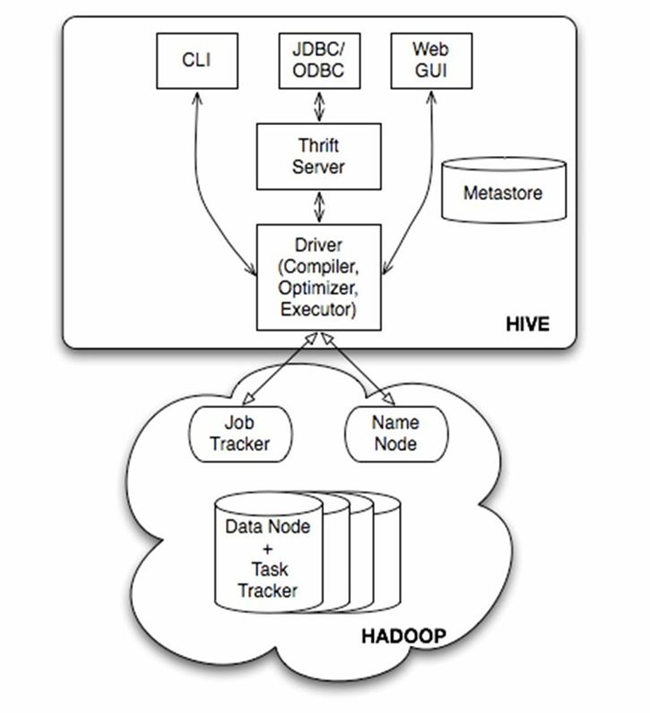
由上图可知,hadoop和mapreduce是hive架构的根基。Hive架构包括如下组件:CLI(command line interface)、JDBC/ODBC、Thrift Server、WEB GUI、metastore和Driver(Complier、Optimizer和Executor),这些组件我可以分为两大类:服务端组件和客户端组件。
2.1服务端组件:
Driver组件:该组件包括Complier、Optimizer和Executor,它的作用是将我们写的HiveQL(类SQL)语句进行解析、编译优化,生成执行计划,然后调用底层的mapreduce计算框架。
Metastore组件:元数据服务组件,这个组件存储hive的元数据,hive的元数据存储在关系数据库里,hive支持的关系数据库有derby、mysql。元数据对于hive十分重要,因此hive支持把metastore服务独立出来,安装到远程的服务器集群里,从而解耦hive服务和metastore服务,保证hive运行的健壮性.
Thrift服务:thrift是facebook开发的一个软件框架,它用来进行可扩展且跨语言的服务的开发,hive集成了该服务,能让不同的编程语言调用hive的接口。
2.2客户端组件:
CLI:command line interface,命令行接口。
Thrift客户端:上面的架构图里没有写上Thrift客户端,但是hive架构的许多客户端接口是建立在thrift客户端之上,包括JDBC和ODBC接口。
WEBGUI:hive客户端提供了一种通过网页的方式访问hive所提供的服务。这个接口对应hive的hwi组件(hive web interface),使用前要启动hwi服务。
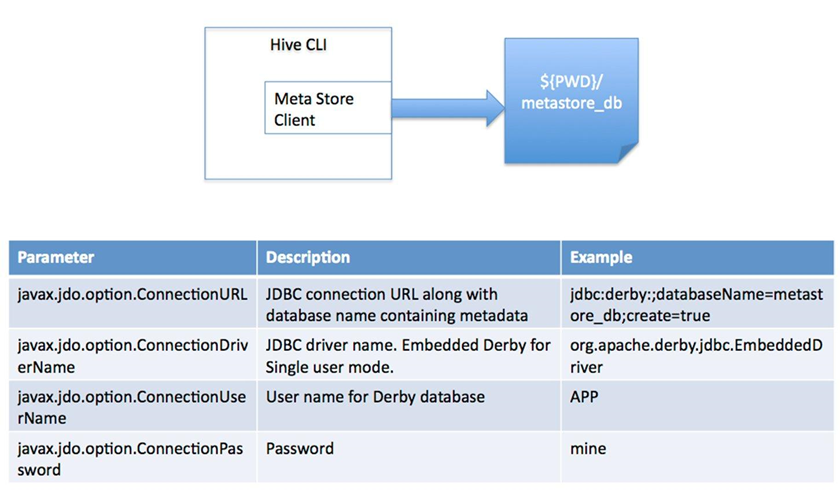
详解metastore:
Hive的metastore组件是hive元数据集中存放地。Metastore组件包括两个部分:metastore服务和后台数据的存储。后台数据存储的介质就是关系数据库,例如hive默认的嵌入式磁盘数据库derby,还有mysql数据库。Metastore服务是建立在后台数据存储介质之上,并且可以和hive服务进行交互的服务组件,默认情况下,metastore服务和hive服务是安装在一起的,运行在同一个进程当中。我也可以把metastore服务从hive服务里剥离出来,metastore独立安装在一个集群里,hive远程调用metastore服务,这样我们可以把元数据这一层放到防火墙之后,客户端访问hive服务,就可以连接到元数据这一层,从而提供了更好的管理性和安全保障。使用远程的metastore服务,可以让metastore服务和hive服务运行在不同的进程里,这样也保证了hive的稳定性,提升了hive服务的效率。
2.3hive的详细执行过程:
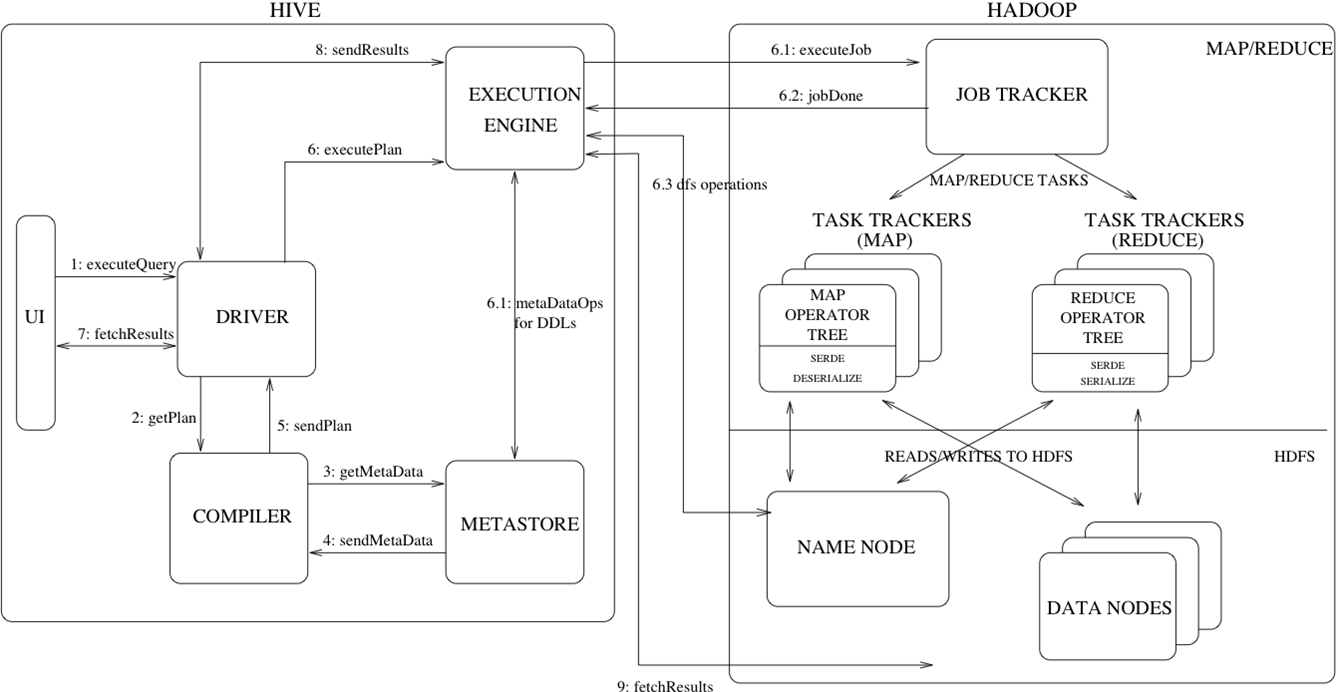
简单的将就是说sql或者HQL会被Hive解释,编译,优化并生成查询计划,一般情况而言查询计划会被转化为MapReduce任务进而执行。
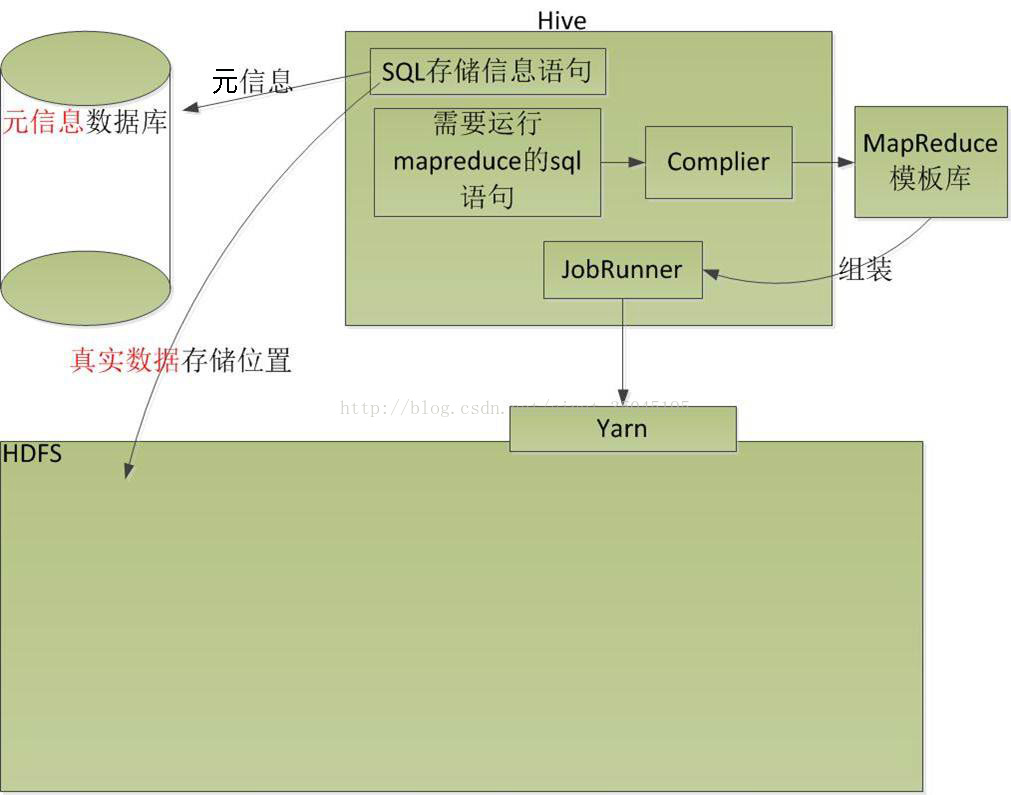
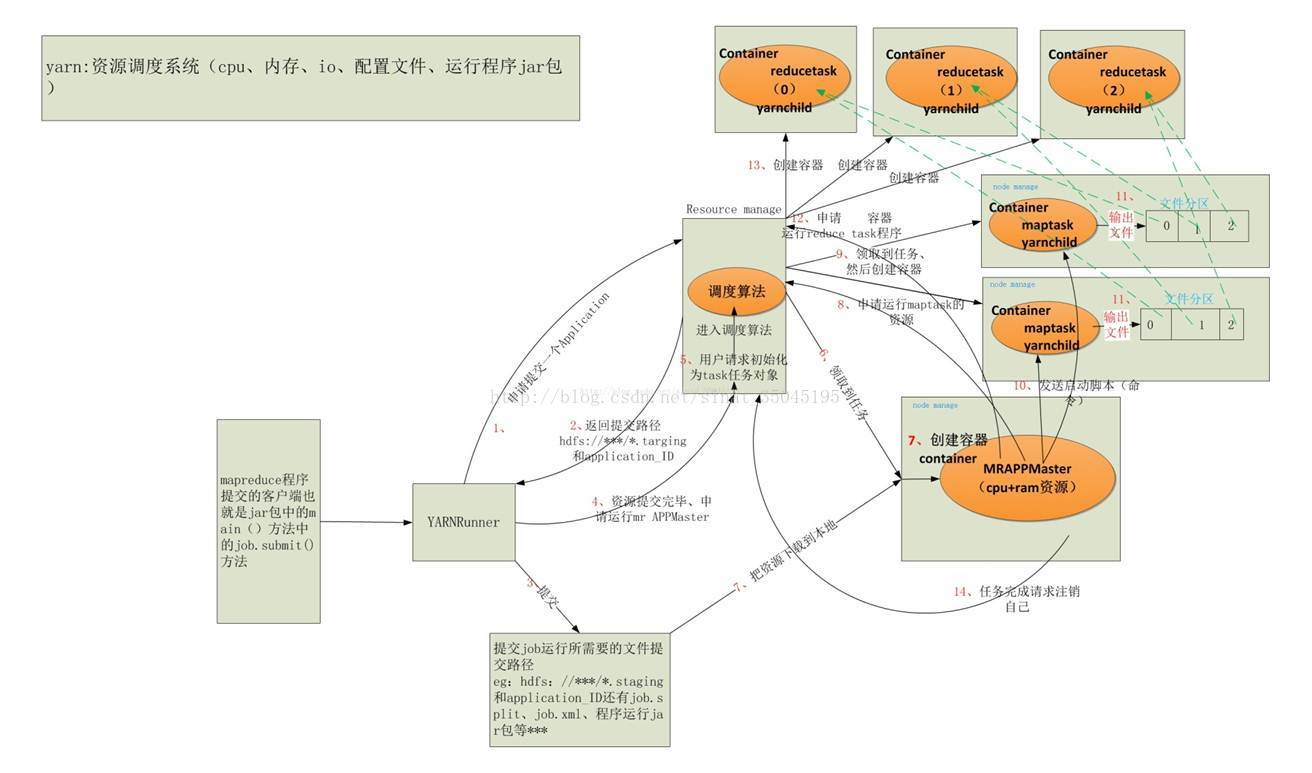
Hive创建的表的元信息存在于结构型数据库之内(这个数据库可以是自带的Derby数据库也可以是用户自己安装的数据库),而表中的内容存在于HDFS之中,用户输入SQL语句之后进行编译,然后在模板库找到对应的模板组装,最后交给Yarn运行,最后附带一张Yarn执行mapreduce任务的解释图
3.hive安装
Hive有三种模式(内嵌模式、本地模式、远程模式)
3.1内嵌模式
内嵌模式:内嵌derby数据库(一个会话连接,常用于简单测试)derby是个in-memory的数据库。
它的安装方法如下:
1、下载hive
(下载之前一定要去官网http://hive.apache.org/downloads.html看看安装的hadoop版本和hive版本兼容表,找到适合自己的那一款)下载地址:http://mirror.bit.edu.cn/apache/hive/
我的hadoop版本是3.1.1 所以我选择的hive也是3.1.1
2.配置
解压安装包
[root@node01 software]# tar xf apache-hive-3.1.1-bin.tar.gz -C /opt/
/etc/profile
export HIVE_HOME=/opt/apache-hive-3.1.1-bin
PATH=$PATH:$JAVA_HOME/bin:$HADOOP_HOME/bin:$HADOOP_HOME/sbin:$ZOOKEEPER_HOME/bin:$HIVE_HOME/bin
hive-site.xml
<?xml version="1.0" encoding="UTF-8" standalone="no"?>
<?xml-stylesheet type="text/xsl" href="configuration.xsl"?>
<configuration>
<property>
  <name>javax.jdo.option.ConnectionURL</name>
  <value>jdbc:derby:;databaseName=metastore_db;create=true</value>
</property>

<property>
  <name>javax.jdo.option.ConnectionDriverName</name>
  <value>org.apache.derby.jdbc.EmbeddedDriver</value>
</property>

<property>
  <name>hive.metastore.local</name>
  <value>true</value>
</property>

<property>
  <name>hive.metastore.schema.verification</name>
  <value>false</value>
</property>

<property>
  <name>hive.metastore.warehouse.dir</name>
  <value>/user/hive/warehouse</value>
</property>
<property>
    <name>datanucleus.schema.autoCreateAll</name>
    <value>true</value>
</property>
</configuration>
hive-env.sh 底部追加两行
HADOOP_HOME=/opt/hadoop-3.1.1
HIVE_CONF_DIR=/opt/apache-hive-3.1.1/conf
启动验证
4.注意
注:使用derby存储方式时,运行hive会在当前目录生成一个derby文件和一个metastore_db目录。这种存储方式的弊端是在同一个目录下同时只能有一个hive客户端能使用数据库,否则会提示如下错误
hive> show tables;

FAILED: Error in metadata: javax.jdo.JDOFatalDataStoreException: Failed to start database 'metastore_db', see the next exception for details.

NestedThrowables:

java.sql.SQLException: Failed to start database 'metastore_db', see the next exception for details.

FAILED: Execution Error, return code 1 from org.apache.hadoop.hive.ql.exec.DDLTask
3.2.单用户模式(mysql)
单用户模式
就是客户端和服务端在一个节点上
通过网络连接到一个数据库,是最经常使用的一种模式

1.安装mysql
直接使用yum 安装,步骤省略。
安装完成,启动服务,进入mysql后需要对用户授权。

刚刚本地的内嵌模式我们是安装在node1上,现在我们单用户模式的单用户客户端在node02上安装。
1.在node02 上传 hive安装包和 mysql连接驱动包

[root@node02 software]# tar xf apache-hive-3.1.1-bin.tar.gz -C /opt/
2.强连接驱动包拷贝到hive的lib目录下
[root@node02 ~]# cp /software/mysql-connector-java-5.1.47-bin.jar /opt/apache-hive-3.1.1-bin/lib/
3.配置
mv hive-default.xml.template hive-site.xml
编辑
4.初始化元数据
[root@node02 ~]# schematool -dbType mysql -initSchema
Initialization script completed。。。 表示初始化成功
5.进入hive

6.一些问题整理
出现如下频繁警告。
Tue Jan 08 01:58:53 CST 2019 WARN: Establishing SSL connection without server's identity verification is not recommended. According to MySQL 5.5.45+, 5.6.26+ and 5.7.6+ requirements SSL connection must be established by default if explicit option isn't set. For compliance with existing applications not using SSL the verifyServerCertificate property is set to 'false'. You need either to explicitly disable SSL by setting useSSL=false, or set useSSL=true and provide truststore for server certificate verification.
修改前属性配置:
<property>
  <name>javax.jdo.option.ConnectionURL</name>
  <value>jdbc:mysql://node02/hive_remote?createDatabaseIfNotExist=true</value>
</property>
修改后属性配置
<property> <name>javax.jdo.option.ConnectionURL</name> <value>jdbc:mysql://node02/hive_remote?createDatabaseIfNotExist=true&useUnicode=true&characterEncoding=UTF-8&useSSL=false</value> </property>
Caused by: org.apache.hadoop.hdfs.server.namenode.SafeModeException: Cannot create directory /tmp/hive/root/df1ae4e0-6cdc-4100-aec7-3cce1e75efa7. Name node is in safe mode.
在node01上关闭安全模式
hdfs dfsadmin -safemode leave
3.3多用户模式
客户端node04和服务端node02分布在不同的节点上,客户端通过远程的方式连接。
客户端node04节点操作,基本和服务端差不多操作,区别是他不需要初始化。
1.配置环境变量(同单用户一样省略)
2.拷贝mysql的连接驱动包到hive的lib目录下
3.安装mysql
4.修改配置
客户端node04的配置如下
<?xml version="1.0" encoding="UTF-8" standalone="no"?>
<?xml-stylesheet type="text/xsl" href="configuration.xsl"?>
<configuration>

<property>
  <name>hive.metastore.warehouse.dir</name>
  <value>/user/hive/warehouse</value>
</property>

<property>
  <name>hive.metastore.local</name>
  <value>false</value>
</property>
<property>
  <name>hive.metastore.schema.verification</name>
   <value>false</value>
</property>

<property>
  <name>hive.metastore.uris</name>
  <value>thrift://node02:9083</value>
</property>

</configuration>
5.服务端后台开启metastore
nohup hive --service metastore &
6.在客户端执行hive操作
[root@node04 conf]# hive
which: no hbase in (/usr/local/sbin:/usr/local/bin:/usr/sbin:/usr/bin:/usr/java/jdk1.8.0_191-amd64/bin:/opt/hadoop-3.1.1/bin:/opt/hadoop-3.1.1/sbin:/opt/zookeeper-3.4.10/bin:/opt/apache-hive-3.1.1-bin//bin:/root/bin)
SLF4J: Class path contains multiple SLF4J bindings.
SLF4J: Found binding in [jar:file:/opt/apache-hive-3.1.1-bin/lib/log4j-slf4j-impl-2.10.0.jar!/org/slf4j/impl/StaticLoggerBinder.class]
SLF4J: Found binding in [jar:file:/opt/hadoop-3.1.1/share/hadoop/common/lib/slf4j-log4j12-1.7.25.jar!/org/slf4j/impl/StaticLoggerBinder.class]
SLF4J: See http://www.slf4j.org/codes.html#multiple_bindings for an explanation.
SLF4J: Actual binding is of type [org.apache.logging.slf4j.Log4jLoggerFactory]
Hive Session ID = 6f032213-071d-4b09-81d1-8e6020efd285

Logging initialized using configuration in jar:file:/opt/apache-hive-3.1.1-bin/lib/hive-common-3.1.1.jar!/hive-log4j2.properties Async: true
Hive-on-MR is deprecated in Hive 2 and may not be available in the future versions. Consider using a different execution engine (i.e. spark, tez) or using Hive 1.X releases.
Hive Session ID = 6c91ed66-2839-4d1e-b5a5-4c7cc33c20b1
hive> show tables;
OK
test02
Time taken: 4.764 seconds, Fetched: 1 row(s)

hive>  create table users(id int,name string);
OK
Time taken: 5.851 seconds
hive> insert into users values(1,'benjamin');
Query ID = root_20190108055650_32bc4f70-0564-4378-b459-15d13f2e7625
Total jobs = 3
Launching Job 1 out of 3
Number of reduce tasks determined at compile time: 1
In order to change the average load for a reducer (in bytes):
  set hive.exec.reducers.bytes.per.reducer=<number>
In order to limit the maximum number of reducers:
  set hive.exec.reducers.max=<number>
In order to set a constant number of reducers:
  set mapreduce.job.reduces=<number>
Starting Job = job_1546878395750_0002, Tracking URL = http://node03:8088/proxy/application_1546878395750_0002/
Kill Command = /opt/hadoop-3.1.1/bin/mapred job  -kill job_1546878395750_0002
Hadoop job information for Stage-1: number of mappers: 1; number of reducers: 1
2019-01-08 05:59:01,834 Stage-1 map = 0%,  reduce = 0%
2019-01-08 05:59:22,068 Stage-1 map = 100%,  reduce = 0%, Cumulative CPU 1.99 sec
2019-01-08 06:00:38,929 Stage-1 map = 100%,  reduce = 0%, Cumulative CPU 1.99 sec
2019-01-08 06:01:48,323 Stage-1 map = 100%,  reduce = 0%, Cumulative CPU 1.99 sec
2019-01-08 06:02:51,343 Stage-1 map = 100%,  reduce = 0%, Cumulative CPU 1.99 sec
2019-01-08 06:03:52,405 Stage-1 map = 100%,  reduce = 0%, Cumulative CPU 1.99 sec
2019-01-08 06:04:10,893 Stage-1 map = 100%,  reduce = 67%, Cumulative CPU 4.04 sec
2019-01-08 06:04:14,173 Stage-1 map = 100%,  reduce = 100%, Cumulative CPU 4.63 sec
MapReduce Total cumulative CPU time: 4 seconds 630 msec
Ended Job = job_1546878395750_0002
Stage-4 is selected by condition resolver.
Stage-3 is filtered out by condition resolver.
Stage-5 is filtered out by condition resolver.
Moving data to directory hdfs://mycluster/user/hive_remote/warehouse/users/.hive-staging_hive_2019-01-08_05-56-50_443_4859297556177527153-1/-ext-10000
Loading data to table default.users
MapReduce Jobs Launched:
Stage-Stage-1: Map: 1  Reduce: 1   Cumulative CPU: 4.63 sec   HDFS Read: 15225 HDFS Write: 243 SUCCESS
Total MapReduce CPU Time Spent: 4 seconds 630 msec
OK
Time taken: 450.721 seconds
hive>
通过上面数据的插入操作,发现hive的操作最终会变成一个mapreduce任务在运行,也正验证了之前所述。
6.在服务端查看数据库
[root@node02 ~]# mysql -uroot -phive
mysql: [Warning] Using a password on the command line interface can be insecure.
Welcome to the MySQL monitor.  Commands end with ; or g.
Your MySQL connection id is 221
Server version: 5.7.24 MySQL Community Server (GPL)

Copyright (c) 2000, 2018, Oracle and/or its affiliates. All rights reserved.

Oracle is a registered trademark of Oracle Corporation and/or its
affiliates. Other names may be trademarks of their respective
owners.

Type 'help;' or 'h' for help. Type 'c' to clear the current input statement.

mysql> use hive_remote;
Reading table information for completion of table and column names
You can turn off this feature to get a quicker startup with -A

Database changed
mysql> select * from TBLS;
+--------+-------------+-------+------------------+-------+------------+-----------+-------+----------+---------------+--------------------+--------------------+--------------------+
| TBL_ID | CREATE_TIME | DB_ID | LAST_ACCESS_TIME | OWNER | OWNER_TYPE | RETENTION | SD_ID | TBL_NAME | TBL_TYPE      | VIEW_EXPANDED_TEXT | VIEW_ORIGINAL_TEXT | IS_REWRITE_ENABLED |
+--------+-------------+-------+------------------+-------+------------+-----------+-------+----------+---------------+--------------------+--------------------+--------------------+
|      2 |  1546898176 |     1 |                0 | root  | USER       |         0 |     2 | users    | MANAGED_TABLE | NULL               | NULL               |                    |
+--------+-------------+-------+------------------+-------+------------+-----------+-------+----------+---------------+--------------------+--------------------+--------------------+
1 row in set (0.00 sec)

mysql>
服务端存储的是hdfs中的元数据信息。