最近买了本书《Android第一行代码》,通篇看了下感觉不错,书本最后有个实战项目酷欧天气,闲来无事就照着敲了一遍代码,主要在请求天气接口和背景优化做了些小改动,现在来记录下。
(1) android studio完成代码目录结构
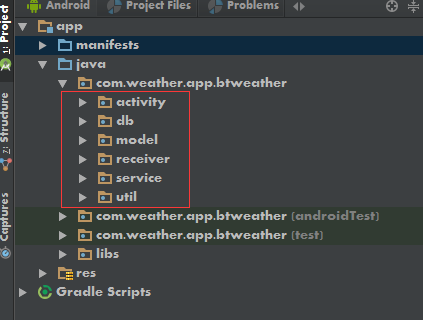

其中activity包存放天气所有活动有关的代码,db包用于存放所有数据库相关的代码,model包存放所有模型相关的代码,receiver包用于存放所有广播接收器相关的代码,service包用于存放所有服务相关的代码,util包用于存放所有工具相关的代码。
(2) 创建好数据库和表
在db包下新建一个BtWeatherOpenHelper类,这里我准备建立三张表,Provice、City、County,分别用于存放省、市、县,代码如下:
 1 public class BtWeatherOpenHelper extends SQLiteOpenHelper {
 2
 3     /**
 4      *  Province表建表语句
 5      */
 6     public static final String CREATE_PROVINCE = "create table Province ("
 7             + "id integer primary key autoincrement,"
 8             + "province_name text,"
 9             + "province_code text)";
10
11     /**
12      * City表建表语句
13      */
14     public static final String CREATE_CITY = "create table City ("
15             + "id integer primary key autoincrement,"
16             + "city_name text, "
17             + "city_code text, "
18             + "province_id integer)";
19
20     /**
21      * County表建表语句
22      */
23     public static final String CREATE_COUNTY = "create table County ("
24             + "id integer primary key autoincrement, "
25             + "county_name text, "
26             + "county_code text, "
27             + "city_id integer)";
28
29
30     public BtWeatherOpenHelper(Context context, String name, SQLiteDatabase.CursorFactory factory, int version) {
31         super(context, name, factory, version);
32     }
33
34     @Override
35     public void onCreate(SQLiteDatabase db) {
36         db.execSQL(CREATE_PROVINCE);    // 创建Province表
37         db.execSQL(CREATE_CITY);    // 创建City表
38         db.execSQL(CREATE_COUNTY); // 创建County表
39     }
40
41     @Override
42     public void onUpgrade(SQLiteDatabase db, int oldVersion, int newVersion) {
43
44     }
45 }
对于Province建表语句里,其中id是自增长主键,province_name表示省名,province_code表示省级代号;
对于City建表语句里,其中id是自增长主键,city_name表示城市名,city_code表示市级代号,province_id是City表关联Province表的外键;
对于County建表语句里,其中id是自增长主键,county_name表示县名,county_code表示县级代号,city_id是County表关联City表的外键。
接下来我们要在每张表写一个对应的实体类,这样方便我们后续的开发工作。因此,在model包下新建一个Province类,如下:
 1 public class Province {
 2     private int id;
 3     private String provinceName;
 4     private String provinceCode;
 5
 6
 7     public int getId() {
 8         return id;
 9     }
10
11     public void setId(int id) {
12         this.id = id;
13     }
14
15     public String getProvinceName() {
16         return provinceName;
17     }
18
19     public void setProvinceName(String provinceName) {
20         this.provinceName = provinceName;
21     }
22
23     public String getProvinceCode() {
24         return provinceCode;
25     }
26
27     public void setProvinceCode(String provinceCode) {
28         this.provinceCode = provinceCode;
29     }
30 }
同理也在model包下新建一个City和County类,可以看到实体类的内容非常简单,基本就是生成数据库表对应字段的get和set方法就可以了。接着我们还需要创建一个BtWeatherDB类,这个类会把一些常用的数据库操作封装起来,以方便我们后面实用,代码如下:
  1 public class BtWeatherDB {
  2     /**
  3      * 数据库名
  4      */
  5     public static final String DB_NAME = "Bt_weather";
  6
  7     /**
  8      * 数据库版本
  9      */
 10     public static final int VERSION = 1;
 11     private static BtWeatherDB btWeatherDB;
 12     private SQLiteDatabase db;
 13
 14     /**
 15      * 将构造方法私有化
 16      */
 17     private BtWeatherDB(Context context){
 18         BtWeatherOpenHelper dbHelper = new BtWeatherOpenHelper(context,DB_NAME,null,VERSION);
 19         db = dbHelper.getWritableDatabase();
 20     }
 21
 22     /**
 23      * 获取BtWeatherDB的实例
 24      */
 25     public synchronized static BtWeatherDB getInstance(Context context){
 26         if (btWeatherDB == null){
 27             btWeatherDB = new BtWeatherDB(context);
 28         }
 29         return btWeatherDB;
 30     }
 31
 32     /**
 33      * 将Province实例存储到数据库
 34      */
 35     public void saveProvince(Province province){
 36         if (province != null){
 37             ContentValues values = new ContentValues();
 38             values.put("province_name",province.getProvinceName());
 39             values.put("province_code",province.getProvinceCode());
 40             db.insert("Province",null,values);
 41         }
 42     }
 43
 44     /**
 45      * 从数据库获取全国所有省份信息
 46      */
 47     public List<Province> loadProvince(){
 48         List<Province> list = new ArrayList<Province>();
 49         Cursor cursor = db.query("Province",null,null,null,null,null,null);
 50         if (cursor.moveToFirst()){
 51             do{
 52                 Province province = new Province();
 53                 province.setId(cursor.getInt(cursor.getColumnIndex("id")));
 54                 province.setProvinceName(cursor.getString(cursor.getColumnIndex("province_name")));
 55                 province.setProvinceCode(cursor.getString(cursor.getColumnIndex("province_code")));
 56                 list.add(province);
 57             } while(cursor.moveToNext());
 58         }
 59         if (cursor != null){
 60             cursor.close();
 61         }
 62         return list;
 63     }
 64
 65     /**
 66      * 将City实例存储到数据库
 67      */
 68     public void saveCity(City city){
 69         if (city != null){
 70             ContentValues values = new ContentValues();
 71             values.put("city_name",city.getCityName());
 72             values.put("city_code",city.getCityCode());
 73             values.put("province_id",city.getProvinceId());
 74             db.insert("City",null,values);
 75         }
 76     }
 77
 78     /**
 79      * 将数据库读取某省下所有的城市信息
 80      */
 81     public List<City> loadCities(int provinceId){
 82         List<City> list = new ArrayList<City>();
 83         Cursor cursor = db.query("City",null,"province_id = ?",
 84                 new String[]{String.valueOf(provinceId)},null,null,null);
 85
 86         if (cursor.moveToFirst()){
 87             do{
 88                 City city = new City();
 89                 city.setId(cursor.getInt(cursor.getColumnIndex("id")));
 90                 city.setCityName(cursor.getString(cursor.getColumnIndex("city_name")));
 91                 city.setCityCode(cursor.getString(cursor.getColumnIndex("city_code")));
 92                 city.setProvinceId(provinceId);
 93                 list.add(city);
 94             }while (cursor.moveToNext());
 95         }
 96         if (cursor != null){
 97             cursor.close();
 98         }
 99         return list;
100     }
101
102     /**
103      * 将County实例存储到数据库
104      */
105     public void saveCounty(County county){
106         if (county != null){
107             ContentValues values = new ContentValues();
108             values.put("county_name",county.getCountyName());
109             values.put("county_code",county.getCountyCode());
110             values.put("city_id",county.getCityId());
111             db.insert("County",null,values);
112         }
113     }
114
115     /**
116      * 从数据库读取某城市下所有的县信息
117      */
118     public List<County> loadCounties(int cityId){
119         List<County> list = new ArrayList<County>();
120         Cursor cursor = db.query("County",null,"City_id = ?",
121                 new String[] {String.valueOf(cityId)},null,null,null);
122         if (cursor.moveToFirst()){
123             do{
124                 County county = new County();
125                 county.setId(cursor.getInt(cursor.getColumnIndex("id")));
126                 county.setCountyName(cursor.getString(cursor.getColumnIndex("county_name")));
127                 county.setCountyCode(cursor.getString(cursor.getColumnIndex("county_code")));
128                 county.setCityId(cityId);
129                 list.add(county);
130             } while(cursor.moveToNext());
131         }
132         if (cursor != null){
133             cursor.close();
134         }
135         return list;
136     }
137 }
从上面可以看到,BtWeatherDB是一个单例类,我们将它的构造方法私有化,并提供一个getInstance()方法来获取BtWeatherDB的实例,这样就可以保证全局范围内只有一个BtWeathereDB的实例。接下来我们在BtWeatherDB中提供了六组方法,saveProvince()、loadProvince()、saveCity()、loadCities()、saveCounty()、loadCounties(),分别用于存储省份数据、读取所有省份数据、存储城市数据、读取某省内所有城市数据、存储县数据、读取某市内所有县的数据。
(3) 遍历全国省市县数据
我们知道,全国省市县的数据都是通过网络请求服务器端获得的,因此这里和服务器的交互必不可少,所以我们在util包下先增加一个HttpUtil类,代码如下:
 1 public class HttpUtil {
 2     public static void sendHttpRequest(final String address, final HttpCallbackListener listener){
 3         new Thread( new Runnable() {
 4             @Override
 5             public void run() {
 6                 HttpURLConnection connection = null;
 7                 try{
 8                     URL url = new URL(address);
 9                     connection = (HttpURLConnection)url.openConnection();
10                     connection.setRequestMethod("GET");
11                     connection.setConnectTimeout(8000);
12                     connection.setReadTimeout(8000);
13                     InputStream in = connection.getInputStream();
14                     BufferedReader reader = new BufferedReader(new InputStreamReader(in));
15                     StringBuilder response = new StringBuilder();
16                     String line;
17                     while ((line = reader.readLine()) != null){
18                         response.append(line);
19                     }
20                     if (listener != null){
21                         // 回调onFinish()方法
22                         listener.onFinish(response.toString());
23                     }
24                 }catch (Exception e){
25                     if (listener != null){
26                         // 回调onError()方法
27                         listener.onError(e);
28                     }
29                 }finally {
30                     if (connection != null){
31                         connection.disconnect();
32                     }
33                 }
34             }
35         }).start();
36     }
37 }
HttpUtil类中使用到了HttpCallbackListener接口来回调服务返回的结果,因此我们需要在util包下添加这个接口,如下:
1 public interface HttpCallbackListener {
2     void onFinish(String response);
3
4     void onError(Exception e);
5 }
另外,由于服务器返回的省市县数据都是“代号|城市,代号|城市”这种格式的,所以我们最好在提供一个工具类来解析和处理这种数据,故在util包下新建一个Utility类,代码如下:
  1 public class Utility {
  2
  3     /**
  4      * 解析和处理服务器返回的省级数据
  5      */
  6     public synchronized static boolean handleProvinceResponse(BtWeatherDB btWeatherDB,String response){
  7         if (!(TextUtils.isEmpty(response))){
  8             String[] allProvince = response.split(",");
  9             if (allProvince != null && allProvince.length > 0){
 10                 for (String p : allProvince){
 11                     String[] array = p.split("\|");
 12                     Province province = new Province();
 13                     province.setProvinceCode(array[0]);
 14                     province.setProvinceName(array[1]);
 15                     // 将解析出来的数据存储到Province类
 16                     btWeatherDB.saveProvince(province);
 17                 }
 18                 return true;
 19             }
 20         }
 21         return false;
 22     }
 23
 24     /**
 25      * 解析和处理服务器返回的市级数据
 26      */
 27     public static boolean handleCitiesResponse(BtWeatherDB btWeatherDB,String response,int provinceId){
 28         if (!TextUtils.isEmpty(response)){
 29             String[] allCities = response.split(",");
 30             if (allCities != null && allCities.length > 0){
 31                 for (String c: allCities){
 32                     String[] array = c.split("\|");
 33                     City city = new City();
 34                     city.setCityCode(array[0]);
 35                     city.setCityName(array[1]);
 36                     city.setProvinceId(provinceId);
 37                     // 将解析出来的数据存储到City类
 38                     btWeatherDB.saveCity(city);
 39                 }
 40                 return true;
 41             }
 42         }
 43         return false;
 44     }
 45
 46     /**
 47      * 解析和处理服务器返回的县级数据
 48      */
 49     public static boolean handleCountiesResponse(BtWeatherDB btWeatherDB,String response,int CityId){
 50         if (!TextUtils.isEmpty(response)){
 51             String[] allCounties = response.split(",");
 52             if (allCounties != null && allCounties.length > 0){
 53                 for (String c: allCounties){
 54                     String[] array = c.split("\|");
 55                     County county = new County();
 56                     county.setCountyCode(array[0]);
 57                     county.setCountyName(array[1]);
 58                     county.setCityId(CityId);
 59                     btWeatherDB.saveCounty(county);
 60                 }
 61                 return true;
 62             }
 63         }
 64         return false;
 65     }
 66
 67     /**
 68      * 解析服务器返回的JSON数据,并将解析出的数据存储到本地
 69      */
 70     public static void handleWeatherResponse(Context context,String response){
 71         try{
 72             JSONObject jsonObject = new JSONObject(response);
 73             JSONObject weatherInfo = jsonObject.getJSONObject("weatherinfo");
 74             String cityName = weatherInfo.getString("city");
 75             String weatherCode = weatherInfo.getString("cityid");
 76             String temp1 = weatherInfo.getString("temp1");
 77             String temp2 = weatherInfo.getString("temp2");
 78             String weatherDesp = weatherInfo.getString("weather");
 79             String publishTime = weatherInfo.getString("ptime");
 80             saveWeatherInfo(context, cityName, weatherCode, temp1, temp2, weatherDesp, publishTime);
 81         } catch (JSONException e){
 82             e.printStackTrace();
 83         }
 84     }
 85
 86     /**
 87      * 将服务器返回的所有的天气信息存储到SharePreferences文件中
 88      */
 89     public static void saveWeatherInfo(Context context, String cityName, String weatherCode, String temp1, String temp2,
 90             String weatherDesp, String publishTime){
 91         SimpleDateFormat sdf = new SimpleDateFormat("yyyy年M月d日", Locale.CANADA);
 92         SharedPreferences.Editor editor = PreferenceManager.getDefaultSharedPreferences(context).edit();
 93         editor.putBoolean("city_selected",true);
 94         editor.putString("city_name",cityName);
 95         editor.putString("weather_code",weatherCode);
 96         editor.putString("temp1",temp1);
 97         editor.putString("temp2",temp2);
 98         editor.putString("weather_desp",weatherDesp);
 99         editor.putString("publish_time",publishTime);
100         editor.putString("current_date",sdf.format(new Date()));
101         editor.commit();
102     }
103 }
可以看到,我们提供了 handleProvinceResponse()、handleCitiesResponse()、handleCountiesResponse()、handleWeatherResponse()、saveWeatherInfo()这五个方法,分别用于解析和处理服务器返回的省级、市级、县级数据,用于JSON格式的天气信息解析出来和保存天气信息到文件里。
然后我们写下界面,在res/layout目录中新建choose_area.xml布局,代码如下:
 1 <?xml version="1.0" encoding="utf-8"?>
 2 <LinearLayout xmlns:android="http://schemas.android.com/apk/res/android"
 3               android:layout_width="match_parent"
 4               android:layout_height="match_parent"
 5               android:orientation="vertical">
 6
 7     <RelativeLayout
 8         android:layout_width="match_parent"
 9         android:layout_height="50dp"
10         android:background="#484E61">
11
12         <TextView
13             android:layout_width="wrap_content"
14             android:layout_height="wrap_content"
15             android:layout_centerInParent="true"
16             android:textColor="#fff"
17             android:textSize="24sp"
18             android:id="@+id/title_text"/>
19     </RelativeLayout>
20
21     <ListView
22         android:layout_width="match_parent"
23         android:layout_height="match_parent"
24         android:id="@+id/list_view">
25     </ListView>
26
27 </LinearLayout>
接下来最关键一步,就是要编写用于遍历省市县数据的活动了,在activity包下新建ChooseAreaActivity继承于Activity,代码如下:
  1 public class ChooseAreaActivity extends Activity {
  2
  3     public static final String TAG = ChooseAreaActivity.class.getSimpleName();
  4     public static final int LEVEL_PROVINCE = 0;
  5     public static final int LEVEL_CITY = 1;
  6     public static final int LEVEL_COUNTY = 2;
  7
  8     private ProgressDialog progressDialog;
  9     private TextView titleText;
 10     private ListView listView;
 11     private ArrayAdapter<String> adapter;
 12     private BtWeatherDB btWeatherDB;
 13     private List<String> dataList = new ArrayList<String>();
 14
 15     // 省列表
 16     private List<Province> provinceList;
 17
 18     // 市列表
 19     private List<City> cityList;
 20
 21     // 县列表
 22     private List<County> countyList;
 23
 24     // 选中的省份
 25     private Province selectedProvince;
 26
 27     // 选中的城市
 28     private City selectedCity;
 29
 30     // 当前选中的级别
 31     private int currentLevel;
 32
 33     /**
 34      * 是否从WeatherActivity中跳转过来
 35      */
 36     private boolean isFromWeatherActivity;
 37
 38     protected void onCreate(Bundle savedInstanceState){
 39         super.onCreate(savedInstanceState);
 40         requestWindowFeature(Window.FEATURE_NO_TITLE);
 41         isFromWeatherActivity = getIntent().getBooleanExtra("from_weather_activity",false);
 42         SharedPreferences prefs = PreferenceManager.getDefaultSharedPreferences(this);
 43         // 已经选择了城市且不是从WeatherActivity跳转过来,才会直接跳转到WeatherActivity
 44         if (prefs.getBoolean("city_selected",false) && !isFromWeatherActivity){
 45             Intent intent = new Intent(this,WeatherActivity.class);
 46             startActivity(intent);
 47             finish();
 48             return;
 49         }
 50         requestWindowFeature(Window.FEATURE_NO_TITLE);
 51         setContentView(R.layout.choose_area);
 52         listView = (ListView)findViewById(R.id.list_view);
 53         titleText = (TextView)findViewById(R.id.title_text);
 54         adapter = new ArrayAdapter<String>(this,android.R.layout.simple_list_item_1,dataList);
 55         listView.setAdapter(adapter);
 56         btWeatherDB = BtWeatherDB.getInstance(this);
 57         listView.setOnItemClickListener(new AdapterView.OnItemClickListener() {
 58             @Override
 59             public void onItemClick(AdapterView<?> parent, View view, int position, long id) {
 60                     if (currentLevel == LEVEL_PROVINCE){
 61                         selectedProvince = provinceList.get(position);
 62                         queryCities();
 63                     } else if (currentLevel == LEVEL_CITY){
 64                         selectedCity = cityList.get(position);
 65                         queryCounties();
 66                     } else if (currentLevel == LEVEL_COUNTY){
 67                         String countyCode = countyList.get(position).getCountyCode();
 68                         Intent intent = new Intent(ChooseAreaActivity.this,WeatherActivity.class);
 69                         intent.putExtra("county_code",countyCode);
 70                         startActivityForResult(intent,1);
 71                     }
 72                 }
 73         });
 74         queryProvinces();   // 加载省级数据
 75     }
 76
 77     @Override
 78     protected void onActivityResult(int requestCode, int resultCode, Intent data) {
 79         switch (resultCode){
 80             case RESULT_OK:
 81                 break;
 82             default:
 83                 break;
 84         }
 85     }
 86
 87     /**
 88      * 查询全国所有的省,优先从数据库查询,如果没有查询到再去服务器上查询
 89      */
 90     private void queryProvinces(){
 91         provinceList = btWeatherDB.loadProvince();
 92         if (provinceList.size() > 0){
 93             dataList.clear();
 94             for (Province province : provinceList){
 95                 dataList.add(province.getProvinceName());
 96             }
 97             adapter.notifyDataSetChanged();
 98             listView.setSelection(0);
 99             titleText.setText("中国");
100             currentLevel = LEVEL_PROVINCE;
101         } else {
102             queryFromServer(null,"province");
103         }
104     }
105
106     /**
107      * 查询选中省内所有的市,优先从数据库查询,如果没有查询到再去服务器查询
108      */
109     private void queryCities(){
110         cityList = btWeatherDB.loadCities(selectedProvince.getId());
111         if (cityList.size() > 0){
112             dataList.clear();
113             for (City city : cityList){
114                 dataList.add(city.getCityName());
115             }
116             adapter.notifyDataSetChanged();
117             listView.setSelection(0);
118             titleText.setText(selectedProvince.getProvinceName());
119             currentLevel = LEVEL_CITY;
120         } else {
121             queryFromServer(selectedProvince.getProvinceCode(),"city");
122         }
123     }
124
125     /**
126      * 查询选中市内所有的县,优先从数据库查询,如果没有查询到再去服务器查询
127      */
128     private void queryCounties(){
129         countyList = btWeatherDB.loadCounties(selectedCity.getId());
130         if (countyList.size() > 0){
131             dataList.clear();
132             for (County county : countyList){
133                 dataList.add(county.getCountyName());
134             }
135             adapter.notifyDataSetChanged();
136             listView.setSelection(0);
137             titleText.setText(selectedCity.getCityName());
138             currentLevel = LEVEL_COUNTY;
139         } else {
140             queryFromServer(selectedCity.getCityCode(),"county");
141         }
142     }
143
144     /**
145      * 根据传入的代号和类型从服务器上查询省市县数据
146      */
147     private void queryFromServer(final String code ,final String type){
148         String address;
149         if (!TextUtils.isEmpty(code)){
150             address = "http://www.weather.com.cn/data/list3/city" + code + ".xml";
151         } else {
152             address = "http://www.weather.com.cn/data/list3/city.xml";
153         }
154         showProgressDialog();
155         HttpUtil.sendHttpRequest(address, new HttpCallbackListener() {
156             @Override
157             public void onFinish(String response) {
158                 boolean result = false;
159                 if ("province".equals(type)){
160                     result = Utility.handleProvinceResponse(btWeatherDB,response);
161                 } else if ("city".equals(type)){
162                     result = Utility.handleCitiesResponse(btWeatherDB,response,selectedProvince.getId());
163                 } else if ("county".equals(type)){
164                     result = Utility.handleCountiesResponse(btWeatherDB,response,selectedCity.getId());
165                 }
166                 if (result){
167                     // 通过runOnUiThread()方法回到主线程处理逻辑
168                     runOnUiThread(new Runnable() {
169                         @Override
170                         public void run() {
171                             closeProgressDialog();
172                             if ("province".equals(type)){
173                                 queryProvinces();
174                             } else if ("city".equals(type)){
175                                 queryCities();
176                             } else if ("county".equals(type)){
177                                 queryCounties();
178                             }
179                         }
180                     });
181                 }
182             }
183
184             @Override
185             public void onError(Exception e) {
186                 // 通过runOnUiThread()方法回到主线程处理逻辑
187                 runOnUiThread(new Runnable() {
188                     @Override
189                     public void run() {
190                         closeProgressDialog();
191                         Toast.makeText(ChooseAreaActivity.this,"加载失败",Toast.LENGTH_SHORT).show();
192                     }
193                 });
194             }
195         });
196     }
197
198     /**
199      * 显示进度对话框
200      */
201     private void showProgressDialog(){
202         if (progressDialog == null){
203             progressDialog = new ProgressDialog(this);
204             progressDialog.setMessage("正在加载...");
205             progressDialog.setCanceledOnTouchOutside(false);
206         }
207         progressDialog.show();
208     }
209
210     /**
211      * 关闭进度对话框
212      */
213     private void closeProgressDialog(){
214         if (progressDialog != null){
215             progressDialog.dismiss();
216         }
217     }
218
219     /**
220      * 捕获Back键,根据当前的级别来判断,此时应该返回市列表、省列表、还是直接退出
221      */
222     public void onBackPressed(){
223         if (currentLevel == LEVEL_COUNTY){
224             queryCities();
225         } else if (currentLevel == LEVEL_CITY){
226             queryProvinces();
227         } else {
228             finish();
229         }
230     }
231
232 }
这个类里面代码比较多,可以逻辑并不复杂,首先onCreate()方法中先是获取一些控件的实例,然后去初始化ArrayAdapter,将它设置为ListView的适配器。之后又去获取到了BtWeatherDB的实例,并给ListView设置了点击事件,到这里我们的初始化工作就算是完成了。在onCreate()方法的最后,调用了queryProvince()方法,也就是从这里开始加载省级数据。queryProvince()方法的内部会首先调用BtWeatherDB的loadProvince()方法来从数据库中读取省级数据,如果读取到了就直接将数据显示到桌面上,如果没有读取到就调用queryFromServer()方法来从服务器上查询数据。
queryFromServer()方法会先根据传入的参数来拼装查询地址,确定了查询地址之后,接下来就调用HttpUtil的sendHttpRequest()方法来向服务器发送请求,响应的数据会回调到onFinish()方法中,然后我们在这里去调用Utility的handleProvinceResponse()方法来解析和处理服务器返回的数据,并存储到数据库中。接下来在解析和处理完数据之后,我们再次调用了queryProvince()方法来重新加载省级数据,由于queryProvince()方法牵扯到了UI操作,因此必须要在主线程中调用,这里借助了runOnUiThread()方法来实现从子线程切换到主线程,它的实现原理其实也是基于异步消息处理机制的。现在数据库中已经存在了数据,因此调用queryProvince()就会直接将数据显示到界面上。当你点击某个省的时候会进入到ListView的onItemClick()方法中,这个时候会根据当前的级别来判断去调用queryCities()方法还是queryCounties()方法,queryCities方法查询市级数据,而queryCounties()方法是查询县级数据。至于onBackPressed()方法来覆盖默认Back键的行为,这里会根据当前的级别来判断返回市级列表、省级列表,还是直接退出。
(4) 显示天气信息
在res/layout目录中新建weather_layout.xml,代码如下:
  1 <?xml version="1.0" encoding="utf-8"?>
  2 <LinearLayout xmlns:android="http://schemas.android.com/apk/res/android"
  3               android:layout_width="match_parent"
  4               android:layout_height="match_parent"
  5               android:orientation="vertical">
  6
  7     <RelativeLayout
  8         android:layout_width="match_parent"
  9         android:layout_height="50dp"
 10         android:background="#484E61">
 11
 12         <Button
 13             android:layout_width="30dp"
 14             android:layout_height="30dp"
 15             android:layout_centerVertical="true"
 16             android:layout_marginLeft="12dp"
 17             android:background="@drawable/home"
 18             android:id="@+id/switch_city"/>
 19
 20         <TextView
 21             android:layout_width="wrap_content"
 22             android:layout_height="wrap_content"
 23             android:layout_centerInParent="true"
 24             android:textColor="#fff"
 25             android:textSize="24sp"
 26             android:id="@+id/city_name"/>
 27
 28         <Button
 29             android:layout_width="30dp"
 30             android:layout_height="30dp"
 31             android:layout_alignParentRight="true"
 32             android:layout_centerHorizontal="true"
 33             android:layout_marginRight="16dp"
 34             android:layout_marginTop="10dp"
 35             android:background="@drawable/refresh"
 36             android:id="@+id/refresh_weather"/>
 37     </RelativeLayout>
 38
 39     <RelativeLayout
 40         android:id="@+id/weather_background"
 41         android:layout_width="match_parent"
 42         android:layout_height="0dp"
 43         android:layout_weight="1"
 44         android:background="#27A5F9">
 45
 46         <TextView
 47             android:layout_width="wrap_content"
 48             android:layout_height="wrap_content"
 49             android:layout_alignParentRight="true"
 50             android:layout_marginRight="10dp"
 51             android:layout_marginTop="10dp"
 52             android:textColor="#FFF"
 53             android:textSize="18sp"
 54             android:id="@+id/publish_text"/>
 55
 56         <LinearLayout
 57             android:layout_width="wrap_content"
 58             android:layout_height="wrap_content"
 59             android:layout_centerInParent="true"
 60             android:orientation="vertical"
 61             android:id="@+id/weather_info_layout">
 62
 63             <TextView
 64                 android:layout_width="wrap_content"
 65                 android:layout_height="40dp"
 66                 android:gravity="center"
 67                 android:textColor="#FFF"
 68                 android:textSize="18sp"
 69                 android:id="@+id/current_date"/>
 70
 71             <TextView
 72                 android:layout_width="wrap_content"
 73                 android:layout_height="60dp"
 74                 android:layout_gravity="center_horizontal"
 75                 android:gravity="center"
 76                 android:textColor="#FFF"
 77                 android:textSize="40sp"
 78                 android:id="@+id/weather_desp"/>
 79
 80             <LinearLayout
 81                 android:layout_width="wrap_content"
 82                 android:layout_height="60dp"
 83                 android:layout_gravity="center_horizontal"
 84                 android:orientation="horizontal">
 85
 86                 <TextView
 87                     android:layout_width="wrap_content"
 88                     android:layout_height="wrap_content"
 89                     android:layout_gravity="center_vertical"
 90                     android:textColor="#FFF"
 91                     android:textSize="40sp"
 92                     android:id="@+id/temp1"/>
 93
 94                 <TextView
 95                     android:layout_width="wrap_content"
 96                     android:layout_height="wrap_content"
 97                     android:layout_gravity="center_vertical"
 98                     android:layout_marginLeft="10dp"
 99                     android:layout_marginRight="10dp"
100                     android:text="~"
101                     android:textColor="#FFF"
102                     android:textSize="40sp"/>
103
104                 <TextView
105                     android:layout_width="wrap_content"
106                     android:layout_height="wrap_content"
107                     android:layout_gravity="center_vertical"
108                     android:textColor="#FFF"
109                     android:textSize="40sp"
110                     android:id="@+id/temp2"/>
111             </LinearLayout>
112         </LinearLayout>
113     </RelativeLayout>
114
115 </LinearLayout>
接下来在activity包下新建WeatherActivity继承自Activity,这里要注意一点书中提供访问天气代号接口已经失效了, 就是这个地址"http://www.weather.com.cn/data/list3/city" + countyCode + ".xml"已经不能访问了,另外通过天气代号查询天气信息地址也要改为"http://www.weather.com.cn/adat/cityinfo/*/.html",不过我想到另外方法那就是下载个本地数据库有县级所对应的天气代号就可以获得天气信息,在网上找了很久,终于找到比较全的有城市对应天气代号数据库文件,(数据库文件我放在res自己创建raw目录下),如下图:


我们可以查询城市CITY_ID找到对应的WEATHER_ID得到天气代号,代码如下:
 1  /**
 2      * 从数据库读取县对应的天气代号
 3      */
 4     private String initWeatherData(final String wt_id) {
 5         String weatherdata = null;
 6         String result_str = null;
 7         String selection = "CITY_ID=?" ;
 8         String[] selectionArgs = new  String[]{ wt_id };
 9         // 导入外部数据库复制到手机内存
10         copyDataBase();
11
12         Cursor cursor = db.query("city_table",new String[]{"WEATHER_ID"},selection, selectionArgs, null, null, null);
13         while (cursor.moveToNext()){
14             weatherdata = cursor.getString(0);
15             if (wt_id == weatherdata){
16                 break;
17             }
18         }
19         result_str = weatherdata;
20         return result_str;
21     }
22
23     /**
24      * 复制工程raw目录下数据库文件到手机内存里
25      */
26     private void copyDataBase() {
27         try {
28             String weatherfileName = getCacheDir() + "/" + DATABASE_FILENAME;
29             File dir = new File(DATABASE_PATH);
30             if (!dir.exists()) {
31                 dir.mkdir();
32             }
33             try {
34                 InputStream is = this.getResources().openRawResource(R.raw.citychina);
35                 FileOutputStream fos = new FileOutputStream(weatherfileName);
36                 byte[] buffer = new byte[8192];
37                 int count = 0;
38                 while ((count = is.read(buffer)) > 0) {
39                     fos.write(buffer, 0, count);
40                 }
41                 fos.close();
42                 is.close();
43             } catch (Exception e) {
44                 e.printStackTrace();
45             }
46             // 根据数据库文件路径打开数据库
47             db = SQLiteDatabase.openOrCreateDatabase(
48                     weatherfileName, null);
49             if (db != null) {
50                 KLog.v(TAG,"db build success!");
51             } else {
52                 KLog.v(TAG,"db build failed!");
53             }
54         } catch (Exception e) {
55             e.printStackTrace();
56         }
57     }
附数据库文件下载地址:http://download.csdn.net/detail/wofa1648/9564085
(5) 切换城市和手动更新天气
首先在布局中加入切换城市和更新天气的按钮,初始化后再修改WeatherActivity中代码,如下:
 1 public void onClick(View v) {
 2         switch (v.getId()) {
 3             case R.id.switch_city:
 4                 Intent intent = new Intent(this, ChooseAreaActivity.class);
 5                 intent.putExtra("from_weather_activity", true);
 6                 startActivity(intent);
 7                 finish();
 8                 break;
 9             case R.id.refresh_weather:
10                 publishText.setText("同步中...");
11                 new Handler().postDelayed(new Runnable() {
12                     @Override
13                     public void run() {
14                         SharedPreferences prefs = PreferenceManager.getDefaultSharedPreferences(getApplicationContext());
15                         String weatherCode = prefs.getString("weather_code", "");
16                         if (!TextUtils.isEmpty(weatherCode)) {
17                             queryWeatherChangeInfo(weatherCode);
18                         }
19                         else {
20                             publishText.setText("今天" + prefs.getString("publish_time", "") + "发布");
21                         }
22                     }
23                 },3000);
24                 break;
25             default:
26                 break;
27         }
28     }
(6) 后台自动更新天气
首先在service包下新建一个AutoUpdateService继承自Service,代码如下:
 1 public class AutoUpdateService extends Service {
 2     @Nullable
 3     @Override
 4     public IBinder onBind(Intent intent) {
 5         return null;
 6     }
 7
 8     public int onStartCommand(Intent intent, int flags, int startId){
 9         new Thread(new Runnable() {
10             @Override
11             public void run() {
12                 updateWeather();
13             }
14         }).start();
15         AlarmManager manager = (AlarmManager)getSystemService(ALARM_SERVICE);
16         int anHour = 8 * 60 * 60 * 1000; // 这是8小时的毫秒数
17         long triggerAtTime = SystemClock.elapsedRealtime() + anHour;
18         Intent i = new Intent(this,AutoUpdateReceiver.class);
19         PendingIntent pi = PendingIntent.getBroadcast(this,0,i,0);
20         manager.set(AlarmManager.ELAPSED_REALTIME_WAKEUP,triggerAtTime,pi);
21         return super.onStartCommand(intent,flags,startId);
22     }
23
24     /**
25      * 更新天气信息
26      */
27     private void updateWeather(){
28         SharedPreferences prefs = PreferenceManager.getDefaultSharedPreferences(this);
29         String weatherCode = prefs.getString("weather_code","");
30         String address = "http://www.weather.com.cn/adat/cityinfo/" + "weatherCode" + ".html";
31         HttpUtil.sendHttpRequest(address, new HttpCallbackListener() {
32             @Override
33             public void onFinish(String response) {
34                 Utility.handleWeatherResponse(AutoUpdateService.this,response);
35             }
36             @Override
37             public void onError(Exception e) {
38                 e.printStackTrace();
39             }
40         });
41     }
42 }
可以看到,在onStartCommand()方法中先是开启了一个子线程,然后在子线程中调用updateWeather()方法来更新天气,我们仍然会将服务器返回的天气数据交给Utility的handleWeatherResponse()方法去处理,这样就可以把最新的天气信息存储到SharedPreferences文件中,为了保证软件不会消耗过多的流量,这里将时间间隔设置为8小时,8小时后就应该执行到AutoUpdateReceiver的onReceive()方法中了,在receiver包下新建AutoUpdateReceiver继承自BroadcastReceiver,代码如下:
1 public class AutoUpdateReceiver extends BroadcastReceiver {
2     public void onReceive(Context context, Intent intent){
3         Intent i = new Intent(context, AutoUpdateService.class);
4         context.startService(i);
5     }
6 }
这里只是在onReceive()方法中再次去启动AutoUpdateService,就可以实现后台定时更新的功能了。不过我们还需要在代码某处去激活AutoUpdateService这个服务才行,继续修改WeatherActivity代码:
 1 private void showWeather() {
 2         SharedPreferences prefs = PreferenceManager.getDefaultSharedPreferences(this);
 3         cityNameText.setText(prefs.getString("city_name", ""));
 4         temp1Text.setText(prefs.getString("temp1", ""));
 5         temp2Text.setText(prefs.getString("temp2", ""));
 6         weatherDespText.setText(prefs.getString("weather_desp", ""));
 7         publishText.setText("今天" + prefs.getString("publish_time", "") + "发布");
 8         SimpleDateFormat sdf = new SimpleDateFormat("yyyy年MM月dd日");
 9         String date = sdf.format(new java.util.Date());
10         nowTime = date;
11         currentDateText.setText(nowTime);
12         WeatherKind myWeather = weather_kind.get(weatherDesp);
13         if (myWeather != null) {
14             changeBackground(myWeather);
15         } else {
16             changeBackground(WeatherKind.allwt);
17         }
18         currentDateText.setVisibility(View.VISIBLE);
19         weatherInfoLayout.setVisibility(View.VISIBLE);
20         cityNameText.setVisibility(View.VISIBLE);
21         Intent intent = new Intent(this, AutoUpdateService.class);
22         startService(intent);
23     }
最后记得在AndroidManifest.xml中注册新增的服务和广播接收器,如下:
 1 <?xml version="1.0" encoding="utf-8"?>
 2 <manifest xmlns:android="http://schemas.android.com/apk/res/android"
 3           package="com.weather.app.btweather">
 4
 5     <application
 6         android:allowBackup="true"
 7         android:icon="@drawable/logo"
 8         android:label="@string/app_name"
 9         android:supportsRtl="true"
10         android:theme="@style/AppTheme">
11         <activity
12             android:name=".activity.ChooseAreaActivity"
13             android:launchMode="singleTask">
14             <intent-filter>
15                 <action android:name="android.intent.action.MAIN"/>
16
17                 <category android:name="android.intent.category.LAUNCHER"/>
18             </intent-filter>
19         </activity>
20
21         <activity android:name=".activity.WeatherActivity"></activity>
22
23         <service android:name=".service.AutoUpdateService"></service>
24         <receiver android:name=".receiver.AutoUpdateReceiver"></receiver>
25     </application>
26
27     <uses-permission android:name="android.permission.INTERNET"/>
28
29 </manifest>
(7) 优化软件界面
打开软件,我们切换不同城市,发现软件背景都一样感觉好丑,所以我们来修改程序做到可以根据不同的天气情况自动切换背景图,修改WeatherActivity代码,如下:
 1 /**
 2      * 枚举各种天气情况
 3      */
 4     private enum WeatherKind {
 5         cloudy, fog, hailstone, light_rain, moderte_rain, overcast, rain_snow, sand_storm, rainstorm,
 6         shower_rain, snow, sunny, thundershower,allwt;
 7     }
 8
 9     private static Map<String,WeatherKind> weather_kind = new HashMap<String,WeatherKind>();
10     static {
11         weather_kind.put("多云",WeatherKind.cloudy);
12         weather_kind.put("雾", WeatherKind.fog);
13         weather_kind.put("冰雹", WeatherKind.hailstone);
14         weather_kind.put("小雨", WeatherKind.light_rain);
15         weather_kind.put("中雨",WeatherKind.moderte_rain);
16         weather_kind.put("阴",WeatherKind.overcast);
17         weather_kind.put("雨加雪",WeatherKind.rain_snow);
18         weather_kind.put("沙尘暴",WeatherKind.sand_storm);
19         weather_kind.put("暴雨",WeatherKind.rainstorm);
20         weather_kind.put("阵雨",WeatherKind.shower_rain);
21         weather_kind.put("小雪",WeatherKind.snow);
22         weather_kind.put("晴",WeatherKind.sunny);
23         weather_kind.put("雷阵雨",WeatherKind.thundershower);
24         weather_kind.put("晴转阴",WeatherKind.allwt);
25         weather_kind.put("晴转多云",WeatherKind.allwt);
26         weather_kind.put("晴转小雨",WeatherKind.allwt);
27         weather_kind.put("晴转中雨",WeatherKind.allwt);
28         weather_kind.put("晴转大雨",WeatherKind.allwt);
29         weather_kind.put("晴转阵雨",WeatherKind.allwt);
30         weather_kind.put("晴转雷阵雨",WeatherKind.allwt);
31         weather_kind.put("晴转小雪",WeatherKind.allwt);
32         weather_kind.put("晴转中雪",WeatherKind.allwt);
33         weather_kind.put("晴转大雪",WeatherKind.allwt);
34         weather_kind.put("阴转晴",WeatherKind.allwt);
35         weather_kind.put("阴转多云",WeatherKind.allwt);
36         weather_kind.put("阴转小雨",WeatherKind.allwt);
37         weather_kind.put("阴转中雨",WeatherKind.allwt);
38         weather_kind.put("阴转大雨",WeatherKind.allwt);
39         weather_kind.put("阴转阵雨",WeatherKind.allwt);
40         weather_kind.put("阴转雷阵雨",WeatherKind.allwt);
41         weather_kind.put("阴转小雪",WeatherKind.allwt);
42         weather_kind.put("阴转中雪",WeatherKind.allwt);
43         weather_kind.put("阴转大雪",WeatherKind.allwt);
44         weather_kind.put("多云转晴",WeatherKind.allwt);
45         weather_kind.put("多云转阴",WeatherKind.allwt);
46         weather_kind.put("多云转小雨",WeatherKind.allwt);
47         weather_kind.put("多云转中雨",WeatherKind.allwt);
48         weather_kind.put("多云转大雨",WeatherKind.allwt);
49         weather_kind.put("多云转阵雨",WeatherKind.allwt);
50         weather_kind.put("多云转雷阵雨",WeatherKind.allwt);
51         weather_kind.put("多云转小雪",WeatherKind.allwt);
52         weather_kind.put("多云转中雪",WeatherKind.allwt);
53         weather_kind.put("多云转大雪",WeatherKind.allwt);
54         weather_kind.put("小雨转晴",WeatherKind.allwt);
55         weather_kind.put("小雨转阴",WeatherKind.allwt);
56         weather_kind.put("小雨转多云",WeatherKind.allwt);
57         weather_kind.put("小雨转中雨",WeatherKind.allwt);
58         weather_kind.put("小雨转大雨",WeatherKind.allwt);
59         weather_kind.put("中雨转小雨",WeatherKind.allwt);
60         weather_kind.put("中雨转大雨",WeatherKind.allwt);
61         weather_kind.put("大雨转中雨",WeatherKind.allwt);
62         weather_kind.put("大雨转小雨",WeatherKind.allwt);
63         weather_kind.put("阵雨转小雨",WeatherKind.allwt);
64         weather_kind.put("阵雨转中雨",WeatherKind.allwt);
65         weather_kind.put("阵雨转多云",WeatherKind.allwt);
66         weather_kind.put("阵雨转晴",WeatherKind.allwt);
67         weather_kind.put("阵雨转阴",WeatherKind.allwt);
68         weather_kind.put("中雪转小雪",WeatherKind.allwt);
69         weather_kind.put("中雪转大雪",WeatherKind.allwt);
70         weather_kind.put("小雪转大雪",WeatherKind.allwt);
71         weather_kind.put("小雪转中雪",WeatherKind.allwt);
72         weather_kind.put("小雪转晴",WeatherKind.allwt);
73         weather_kind.put("小雪转阴",WeatherKind.allwt);
74         weather_kind.put("小雪转多云",WeatherKind.allwt);
75         weather_kind.put("大雪转小雪",WeatherKind.allwt);
76         weather_kind.put("大雪转中雪",WeatherKind.allwt);
77         weather_kind.put("雾转小雨",WeatherKind.allwt);
78         weather_kind.put("雾转中雨",WeatherKind.allwt);
79         weather_kind.put("雾转大雨",WeatherKind.allwt);
80     }
 1 /**
 2      * 设置对应天气背景图
 3      */
 4     private void changeBackground(WeatherKind weather){
 5         view = findViewById(R.id.weather_background);
 6         switch (weather){
 7             case cloudy:
 8                 view.setBackgroundResource(R.drawable.cloudy);
 9                 break;
10             case fog:
11                 view.setBackgroundResource(R.drawable.fog);
12                 break;
13             case hailstone:
14                 view.setBackgroundResource(R.drawable.hailstone);
15                 break;
16             case light_rain:
17                 view.setBackgroundResource(R.drawable.light_rain);
18                 break;
19             case moderte_rain:
20                 view.setBackgroundResource(R.drawable.moderte_rain);
21                 break;
22             case overcast:
23                 view.setBackgroundResource(R.drawable.overcast);
24                 break;
25             case rain_snow:
26                 view.setBackgroundResource(R.drawable.rain_snow);
27                 break;
28             case sand_storm:
29                 view.setBackgroundResource(R.drawable.sand_storm);
30                 break;
31             case rainstorm:
32                 view.setBackgroundResource(R.drawable.rainstorm);
33                 break;
34             case shower_rain:
35                 view.setBackgroundResource(R.drawable.shower_rain);
36                 break;
37             case snow:
38                 view.setBackgroundResource(R.drawable.snow);
39                 break;
40             case sunny:
41                 view.setBackgroundResource(R.drawable.sunny);
42                 break;
43             case thundershower:
44                 view.setBackgroundResource(R.drawable.thundershower);
45                 break;
46             case allwt:
47                 view.setBackgroundResource(R.drawable.allwt);
48                 break;
49             default:
50                 break;
51         }
52     }
(8) 效果显示


