VNC
配置桌面
# 安装gnome桌面环境
yum groupinstall Desktop -y
# 安装中文语言支持包(可选)
yum groupinstall 'Chinese Support' -y
# 设置系统默认语言为中文(可选)
sed -i '/LANG/cLANG="zh_CN.UTF-8"' /etc/sysconfig/i18n
source /etc/sysconfig/i18n
配置VNC Server
#安装vncserver包
yum install tigervnc tigervnc-server –y
#开启自启动
chkconfig vncserver on
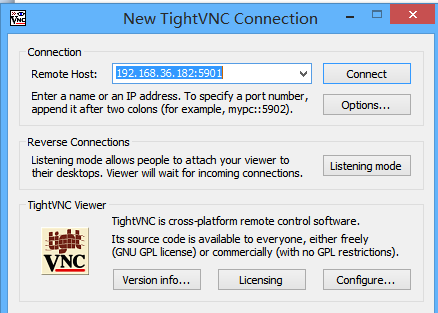
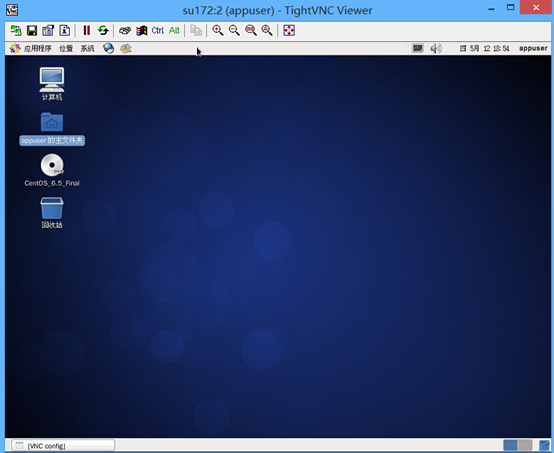
你可以通过UltraVNC Viewer、TigerVNC Viewer或者RealVNC Viewer访问远程桌面了。
#确认vncserver包已经安装
[root@su172 ~]# rpm -qa | egrep -i vnc
tigervnc-server-1.1.0-16.el6.centos.x86_64
[root@su172 ~]#
#确认rpm包配置文件路径
[root@su172 ~]# rpm -ql tigervnc-server-1.1.0-16.el6.centos.x86_64
/etc/rc.d/init.d/vncserver
/etc/sysconfig/vncservers
/usr/bin/Xvnc
/usr/bin/vncconfig
/usr/bin/vncpasswd
/usr/bin/vncserver
/usr/bin/x0vncserver
/usr/share/man/man1/Xvnc.1.gz
/usr/share/man/man1/vncconfig.1.gz
/usr/share/man/man1/vncpasswd.1.gz
/usr/share/man/man1/vncserver.1.gz
/usr/share/man/man1/x0vncserver.1.gz
#root用户启动vncserver
#输入以root用户登录vncserver时的密码
[root@su172 ~]# vncserver
You will require a password to access your desktops.
Password:
Verify:
xauth: (stdin):1: bad display name "su172:1" in "add" command
New 'su172:1 (root)' desktop is su172:1
Creating default startup script /root/.vnc/xstartup
Starting applications specified in /root/.vnc/xstartup
Log file is /root/.vnc/su172:1.log
[root@su172 ~]# cd .vnc/
[root@su172 .vnc]# ls
passwd su172:1.log su172:1.pid xstartup
#普通用户启动vncserver
[appuser@su172 ~]$vncserver
#普通用户需要手工改密码
[appuser@su172 ~]$ vncpasswd
Password:
Verify:
#root验证


#普通user验证


#在Server端进行端口验证
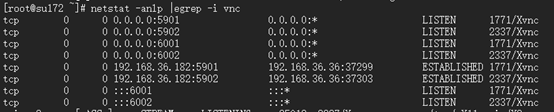
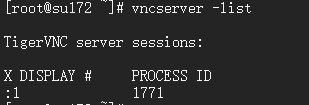
#确认vcn进程

#kill vnc进程验证


#参考
http://www.centoscn.com/image-text/config/2014/1120/4151.html
Teamview
下载
wget https://download.teamviewer.com/download/teamviewer.i686.rpm
安装依赖包
yum install teamviewer_11.0.57095.i686.rpm -y
cd /opt/teamviewer/tv_bin
teamviewer --setup console #设置启动方式为控制台启动
teamviewer --daemon restart #重启teamview服务
teamviewer --info #查看teamview信息
teamviewer --passwd [PASSWD] #设置密码
teamviewer --help #查看帮助
ssh无密码登录
CentOS系统之间有可能需要无密码验证登录,方便拷贝东东,例如oracle rac安装时就有这个东西。所以提前了解很有必要。
node1执行以下步骤:
ssh-keygen -t rsa -P ''
scp /root/.ssh/id_rsa.pub root@192.168.36.182:/root/.ssh/id_rsa.pub181
node2执行以下步骤:
ssh-keygen -t rsa -P ''
scp id_rsa.pub root@192.168.36.181:/root/.ssh/id_rsa.pub182
node1执行:
cat id_rsa.pub182 >>authorized_keys
node2执行
cat id_rsa.pub181 >>authorized_keys
验证
node1验证
ssh 192.168.36.182
node2验证
ssh 192.168.36.181
扩展
-v跟踪
[root@su171 .ssh]# ssh -v 192.168.36.182
OpenSSH_5.3p1, OpenSSL 1.0.1e-fips 11 Feb 2013
debug1: Reading configuration data /etc/ssh/ssh_config
debug1: Applying options for *
debug1: Connecting to 192.168.36.182 [192.168.36.182] port 22.
debug1: Connection established.
debug1: permanently_set_uid: 0/0
debug1: identity file /root/.ssh/identity type -1
debug1: identity file /root/.ssh/identity-cert type -1
debug1: identity file /root/.ssh/id_rsa type 1
debug1: identity file /root/.ssh/id_rsa-cert type -1
debug1: identity file /root/.ssh/id_dsa type -1
debug1: identity file /root/.ssh/id_dsa-cert type -1
debug1: identity file /root/.ssh/id_ecdsa type -1
debug1: identity file /root/.ssh/id_ecdsa-cert type -1
debug1: Remote protocol version 2.0, remote software version OpenSSH_5.3
debug1: match: OpenSSH_5.3 pat OpenSSH*
debug1: Enabling compatibility mode for protocol 2.0
debug1: Local version string SSH-2.0-OpenSSH_5.3
debug1: SSH2_MSG_KEXINIT sent
debug1: SSH2_MSG_KEXINIT received
debug1: kex: server->client aes128-ctr hmac-md5 none
debug1: kex: client->server aes128-ctr hmac-md5 none
debug1: SSH2_MSG_KEX_DH_GEX_REQUEST(1024<1024<8192) sent
debug1: expecting SSH2_MSG_KEX_DH_GEX_GROUP
debug1: SSH2_MSG_KEX_DH_GEX_INIT sent
debug1: expecting SSH2_MSG_KEX_DH_GEX_REPLY
debug1: Host '192.168.36.182' is known and matches the RSA host key.
debug1: Found key in /root/.ssh/known_hosts:1
debug1: ssh_rsa_verify: signature correct
debug1: SSH2_MSG_NEWKEYS sent
debug1: expecting SSH2_MSG_NEWKEYS
debug1: SSH2_MSG_NEWKEYS received
debug1: SSH2_MSG_SERVICE_REQUEST sent
debug1: SSH2_MSG_SERVICE_ACCEPT received
debug1: Authentications that can continue: publickey,gssapi-keyex,gssapi-with-mic,password
debug1: Next authentication method: gssapi-keyex
debug1: No valid Key exchange context
debug1: Next authentication method: gssapi-with-mic
debug1: Unspecified GSS failure. Minor code may provide more information
Cannot determine realm for numeric host address
debug1: Unspecified GSS failure. Minor code may provide more information
Cannot determine realm for numeric host address
debug1: Unspecified GSS failure. Minor code may provide more information
debug1: Unspecified GSS failure. Minor code may provide more information
Cannot determine realm for numeric host address
debug1: Next authentication method: publickey
debug1: Trying private key: /root/.ssh/identity
debug1: Offering public key: /root/.ssh/id_rsa
debug1: Server accepts key: pkalg ssh-rsa blen 277
debug1: read PEM private key done: type RSA
debug1: Authentication succeeded (publickey).
debug1: channel 0: new [client-session]
debug1: Requesting no-more-sessions@openssh.com
debug1: Entering interactive session.
debug1: Sending environment.
debug1: Sending env LANG = en_US.UTF-8
Last login: Thu May 12 23:51:22 2016 from 192.168.36.181
[root@su172 ~]#