想写一个simpleGame的博客,网上有已经有很多了,自己只是做一个备忘。
首先发现D:cocos2d-x-2.2.1cocos2d-x-2.2.1samplesCpp已经有simpleGame的代码,但是我用Vs2010无法打开。
然后我就自己创建一个项目,新的版本推荐使用python创建。
进入 oolsproject-creator ,有一个create_project.py 的脚本。
假如我想新建一个HelloWorld项目,执行create_project.py脚本,进入Doc界面输入下面的命令:
运行脚本,生成HelloWorld项目,命令为:
python create_project.py -project HelloWorld -package com.cocos2d-x.org -language cpp//其中HelloWorld为工程名称,com.cocos2d-x.org为我为android版本取的包标识名。
对应项目生成在:D:cocos2d-x-2.2.1cocos2d-x-2.2.1projectsHelloWorld。
接下来主要参考了子龙山人的cocos2d的博客。
增加一个精灵
在我们增加一个精灵之前,我们需要一些图片。你可以自己去创建一些,或者使用我可爱的妻子为这个项目所创建的图片: a Player image, a Projectile image, and a Target image.
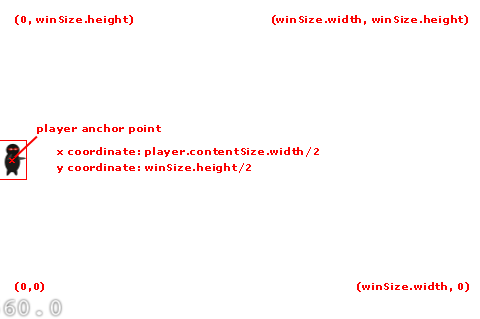
一旦你获得了这些图片,你就可以把它们用鼠标拖到xcode的resource文件夹中去,并且保证“ Copy items into destination group’s folder (if needed)”勾上了。现在,我们拥有自己的图片了,我们先得计算一下,应该把player放在哪里。请注意,cocos2d坐标系的原点在屏幕的左下角,即(0,0)位置在左下角,这与一般的窗口坐标系统在左上角有所区别。x方向往右是正,y方向往上是正。由于项目是landscape(横版)模式,这就意味着右上角的坐标是(480,320)。
还有需要注意的是,当我们设置一个对象的位置的时候,这个位置是相对于所加精灵的中心点来加的。因此,如果我们想让我们的player精灵与屏幕的左边界水平对齐,并且垂直居中的话。
那么对于x轴:我们需要设置为[player sprite's width]/2。y坐标设置为[window height]/2。
下面有一张图,可以更加清楚一些:
好,让他开始射击吧!打开Class文件夹并点击HelloWorldScene.cpp,然后把init方法用下面的代码替换掉:
1         // 2. add your codes below...
2         CCSprite *player = CCSprite::create("Player.png", CCRectMake(0, 0, 27, 40) );
3
4         player->setPosition( ccp(origin.x + player->getContentSize().width/2,
5                                  origin.y + visibleSize.height/2) );
6         this->addChild(player);
关于:CCSprite的创建的方法:这里用的是以一种。第二个参数是图片矩形。关于api的介绍:
static CCSprite* create ( const char * pszFileName,const CCRect & rect )
static CCSprite* create ( const char * pszFileName)
After creation, the rect of sprite will be the size of the image, and the offset will be (0,0).
所以我们也可以用
1 CCSprite *player = CCSprite::create("Player.png" );
来替代上面创建函数
编译并运行,你的精灵这时候应该出现在正确的位置上了。但是,这个前景默认是黑的。对于这张忍者图片来说,白色的背景可能看起来更好一些。在cocos2d里面,有一种非常简单的方式来改变层的背景颜色,那就是使用CCColoredLayer类。好,跟我来吧!点击HelloWorldScene.h,然后把HelloWorld接口声明改成下面这样:
class HelloWorld : public cocos2d::CCLayerColor

//.cpp file
CC_BREAK_IF(! CCLayerColor::initWithColor( ccc4(255,255,255,255) ) );
编译并运行,这时你将看到你的精灵是在一个白色的背景上面了。哈哈,我们的忍者看起来整装待发呢!
移动目标
接下来,我们想增加一些目标怪物来与我们的忍者战斗。为了使事情变得更加有趣,我想让这些目标可以移动--实际上这也并不是很难!因此,让我们先在屏幕的右边靠外一点点创建一些目标,然后设置一个action,并使之从右边移动到左边。
接下来,紧接着上面init函数,添加下面代码:
 1 void HelloWorld::addTarget()
 2 {
 3     CCSprite *target = CCSprite::create("Target.png", CCRectMake(0,0,27,40) );
 4
 5     // Determine where to spawn the target along the Y axis
 6     CCSize winSize = CCDirector::sharedDirector()->getVisibleSize();
 7     float minY = target->getContentSize().height/2;
 8     float maxY = winSize.height -  target->getContentSize().height/2;
 9     int rangeY = (int)(maxY - minY);
10     // srand( TimGetTicks() );
11     int actualY = ( rand() % rangeY ) + (int)minY;
12
13     // Create the target slightly off-screen along the right edge,
14     // and along a random position along the Y axis as calculated
15     target->setPosition(
16         ccp(winSize.width + (target->getContentSize().width/2),
17             CCDirector::sharedDirector()->getVisibleOrigin().y + actualY) );
18     this->addChild(target);
19
20     // Determine speed of the target
21     int minDuration = (int)2.0;
22     int maxDuration = (int)4.0;
23     int rangeDuration = maxDuration - minDuration;
24     // srand( TimGetTicks() );
25     int actualDuration = ( rand() % rangeDuration ) + minDuration;
26
27     // Create the actions
28     CCFiniteTimeAction* actionMove = CCMoveTo::create( (float)actualDuration,
29                                             ccp(0 - target->getContentSize().width/2, actualY) );
30     CCFiniteTimeAction* actionMoveDone = CCCallFuncN::create( this,
31                                             callfuncN_selector(HelloWorld::spriteMoveFinished));
32     target->runAction( CCSequence::create(actionMove, actionMoveDone, NULL) );
33
34
35 }
在这里我将以一种非常啰嗦的形式来介绍,目的是方便大家理解。第一部分需要解释的是我们之前已经讨论过了的:我们做一些简单的计算来决定把对象放在什么位置,然后设置对象的position,然后并把它加在场景上面,就和加载player精灵一样。
这里增加的新的元素就是actions。cocos2d里面提供了许多非常方便的内置的action,你可以使用这样action来让你的精灵动起来。比如move action,jump action,fade action,animation action(就是播放图片序列)等等。这里,我们对目标对象使用了3种类型的action:
· CCMoveTo: 我们使用CCMoveTo action让目标从屏幕右边一直往左移动,直到移出屏幕。注意,这里我们可以指定这个过程要花费多长时间。这里使用了变化的时间间隔2-4秒。
static CCMoveTo* create ( float duration,const CCPoint & position )
第一个参数是动作持续的时间,第二个参数是要去的位置对象。
· CCCallFuncN: 它可以让你为某个执行此action的对象指定一个回调函数。我们指定的回调函数是:spriteMoveFinished---目前并没有,到后面会具体给了来。
static CCCallFuncN* create ( CCObject * pSelectorTarget,SEL_CallFuncN selector )
第一个参数是包涵回调函数的对象,第二个参数是回调函数。
· CCSequence: 它允许我们把一系列的action组成一个action序列,并且这些acton可以按顺序执行。一次执行完所有的action。在上面的例子中,我们让对象首先执行CcMoveTo,等CCMoveTo完成后,马上就会执行CCCallFuncN action。
static CCSequence* create ( CCFiniteTimeAction * pAction1, ... ) helper constructor to create an array of sequenceable actions
接下来, 为CCCallFuncN action增加一个回调函数。你可以在addTarget前面增加下面的代码:
1 void HelloWorld::spriteMoveFinished(CCNode* sender)
2 {
3     CCSprite *sprite = (CCSprite *)sender;
4     this->removeChild(sprite, true);
5
6
7 }
这个函数的目的是当精灵飞出屏幕之后,需要移除出当前的scene。这个非常重要,这样的话我们就不会因为屏幕外面积累太多没有用到的精灵而造成内存泄漏。注意,其实还有其它更好的方式来解决这个问题,比如使用一组可以重用的精灵等。不过,对于初学者来说,我在这篇教程里,尽量简单化。
在我们继续之前,还有最后一件事没做。我们需要调用这个方法来创建我们的目标怪物。而且,为了使事情变得更加有趣,我们会随着时间连续不断地发射一些怪物出来。我们可以使用cocos2d的定时scheduler,并指定一个回调函数来完成此功能。一秒钟调用一次回调函数就可以了。因此,在init函数返回之前,我们再加入下面的代码:
1 this->schedule( schedule_selector(HelloWorld::gameLogic), 1.0 );
然后简单的实现一下这个回调函数,如下:
1 void HelloWorld::gameLogic(float dt)
2 {
3     this->addTarget();
4 }
就这么多!现在编译再运行一下工作,你可以看到怪物在屏幕上面happy地移动了!
发射飞盘
在这里,我们的忍者需要有一些行动了--因此让我们增加一些射击吧!这里有许许多多实现射击的方式,但是在这个游戏里面,我们想让用户触摸一下屏幕,然后飞盘就会从player开始,沿着你触摸的位置发射出来。
我们使用CCMoveTo action来实现这个功能。但是,为了使用这个功能,我们必须首先来做一些数学题。这是因为,CCMoveTo需要我们为飞盘指定目的地。但是我们又不能使用触摸点,因为触摸点仅仅代表飞盘飞的方向。我们实际上想让子弹超过触摸点,然后飞出屏幕之外去。
下面这张图解释了这个问题:
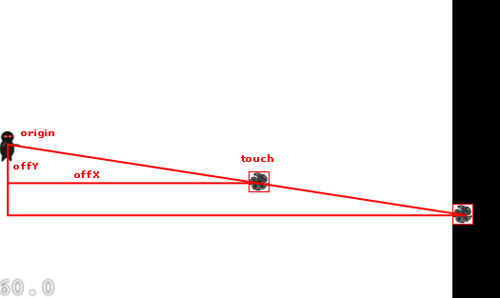
因此,就像你看到的,在触摸点和player之间有一个小的三角形,由origin点,offx和offy组成。我们只需要画一个更大的三角形,同时使用一样的比率就行了。然后我们就可以根据比例算出飞盘飞出屏幕的位置。
好了,让我们看看代码怎么写。首先我们需要让layer能接收touch事件。在你的init方法面添加下面一行代码: this->setTouchEnabled(true);
由于我们激活了layer的touch,因此我们能够接收到touch事件的回调。这里,我们实现ccTouchesEnded方法,这是在用户完成一次touch之后调用的,代码如下:
void ccTouchesEnded(cocos2d::CCSet* touches, cocos2d::CCEvent* event);
 1 void HelloWorld::ccTouchesEnded(CCSet* touches, CCEvent* event)
 2 {
 3     // Choose one of the touches to work with
 4     CCTouch* touch = (CCTouch*)( touches->anyObject() );
 5     CCPoint location = touch->getLocation();
 6
 7     CCLog("++++++++after  x:%f, y:%f", location.x, location.y);
 8
 9     // Set up initial location of projectile
10     CCSize winSize = CCDirector::sharedDirector()->getVisibleSize();
11     CCPoint origin = CCDirector::sharedDirector()->getVisibleOrigin();
12     CCSprite *projectile = CCSprite::create("Projectile.png", CCRectMake(0, 0, 20, 20));
13     projectile->setPosition( ccp(origin.x+20, origin.y+winSize.height/2) );
14
15     // Determinie offset of location to projectile
16     float offX = location.x - projectile->getPosition().x;
17     float offY = location.y - projectile->getPosition().y;
18
19     // Bail out if we are shooting down or backwards
20     if (offX <= 0) return;
21
22     // Ok to add now - we've double checked position
23     this->addChild(projectile);
24
25     // Determine where we wish to shoot the projectile to
26     float realX = origin.x+winSize.width + (projectile->getContentSize().width/2);
27     float ratio = offY / offX;
28     float realY = (realX * ratio) + projectile->getPosition().y;
29     CCPoint realDest = ccp(realX, realY);
30
31     // Determine the length of how far we're shooting
32     float offRealX = realX - projectile->getPosition().x;
33     float offRealY = realY - projectile->getPosition().y;
34     float length = sqrtf((offRealX * offRealX) + (offRealY*offRealY));
35     float velocity = 480/1; // 480pixels/1sec
36     float realMoveDuration = length/velocity;
37
38     // Move projectile to actual endpoint
39     projectile->runAction( CCSequence::create(
40         CCMoveTo::create(realMoveDuration, realDest),
41         CCCallFuncN::create(this,
42                             callfuncN_selector(HelloWorld::spriteMoveFinished)),
43         NULL) );
44
45
46 }
在第一部分,我们选择一个touch来处理,获得它在当前view中的位置,然后获取坐标系
CCPoint getLocation ( ) const : returns the current touch location in OpenGL coordinates
接下来,我们加载飞盘精灵并且设置它的初始位置。然后,我们计算出它需要飞往何处,使用player和touch之间的向量并且根据前面描述的算法计算出来。
注意,这个算法并不完美。我们强迫子弹飞出屏幕x轴的外边--即使在它已经飞出屏幕y轴的外边界了。这里有许多方向来解决这个问题,比如检查飞出屏幕的最短距离,或者使用一个游戏回调函数来检查一个飞盘是否飞出,飞出就移出场景。但是,在这里,我们尽量保持简单。
最后一件事情就是,决定飞盘移动的时间。我们想让子弹以常量速度飞行,不管飞行方向如何。因此,我们不得不再做一点点数学。我们能够使用 Pythagorean Theorem来计算我们移动了多久。记得几何学中,三角形的斜边=两个直角边的平方和再开根号。
一旦我们得到了距离,我们就可以通过除了速度来得到时间。因为速度=距离/时间。换句话说 时间=距离/速度。
余下的部分就和设置我们target一样了。编译并运行,现在忍者可以射击侵犯的敌人了!
碰撞检测
现在,我们可以看到飞镖到处乱飞了!但是,我们的忍者真正想做的,是能够放倒一些怪物。好吧,让我们增加一些代码来检测什么时候我们的飞镖与怪物相撞了。
在cocos2d里面,有许多方法可以解决这个问题,包括使用cocos2d内置的开源物理引擎box2d和chipmunk。然而,为了使事情变得简单一点,在这里我们自己实现了一个简单的碰撞检测。
为了实现这个,我们首先需要当前场景中存在的飞镖和怪物。在HelloWorldScene类里面增加下面的声明:
1 protected:
2     cocos2d::CCArray *_targets;
3     cocos2d::CCArray *_projectiles;
然后在init方法里面初使化这些数组:
1         _targets = new CCArray;
2         _projectiles = new CCArray;
我们还需要在dealloc函数里面做一些清理工作,防止内存泄漏:
 1 HelloWorld::~HelloWorld()
 2 {
 3     if (_targets)
 4     {
 5         _targets->release();
 6         _targets = NULL;
 7     }
 8
 9     if (_projectiles)
10     {
11         _projectiles->release();
12         _projectiles = NULL;
13     }
14
15     // cpp don't need to call super dealloc
16     // virtual destructor will do this
17 }
现在,我们修改addTarget方法,把一个新的target加到targets数组里面,并且为这个target设置一个tag,以便将来使用:
1 target->setTag(1);
2     _targets->addObject(target);
然后,修改ccTouchesEnded方法,同样的,把新增加的projectile加到projectiles数组里面,并为之设置一个tag供后面使用:
1 projectile->setTag(2);
2     _projectiles->addObject(projectile);
最后,修改你的spriteMoveFinished方法,基于tag标签来从正确的数组中移除相应的sprite。
 1 if (sprite->getTag() == 1)  // target
 2     {
 3         _targets->removeObject(sprite);
 4
 5
 6     }
 7     else if (sprite->getTag() == 2) // projectile
 8     {
 9         _projectiles->removeObject(sprite);
10     }
编译并运行程序,确保一切都ok。目前来说,应该没有什么可见的差别。但是,接下来我们就会去实现真正的碰撞检测了。
现在,在HelloWorldScene里面增加如下方法:
 1 void HelloWorld::updateGame(float dt)
 2 {
 3     CCArray *projectilesToDelete = new CCArray;
 4     CCObject* it = NULL;
 5     CCObject* jt = NULL;
 6
 7     // for (it = _projectiles->begin(); it != _projectiles->end(); it++)
 8     CCARRAY_FOREACH(_projectiles, it)
 9     {
10         CCSprite *projectile = dynamic_cast<CCSprite*>(it);
11         CCRect projectileRect = CCRectMake(
12             projectile->getPosition().x - (projectile->getContentSize().width/2),
13             projectile->getPosition().y - (projectile->getContentSize().height/2),
14             projectile->getContentSize().width,
15             projectile->getContentSize().height);
16
17         CCArray* targetsToDelete =new CCArray;
18
19         // for (jt = _targets->begin(); jt != _targets->end(); jt++)
20         CCARRAY_FOREACH(_targets, jt)
21         {
22             CCSprite *target = dynamic_cast<CCSprite*>(jt);
23             CCRect targetRect = CCRectMake(
24                 target->getPosition().x - (target->getContentSize().width/2),
25                 target->getPosition().y - (target->getContentSize().height/2),
26                 target->getContentSize().width,
27                 target->getContentSize().height);
28
29             // if (CCRect::CCRectIntersectsRect(projectileRect, targetRect))
30             if (projectileRect.intersectsRect(targetRect))
31             {
32                 targetsToDelete->addObject(target);
33             }
34         }
35
36         // for (jt = targetsToDelete->begin(); jt != targetsToDelete->end(); jt++)
37         CCARRAY_FOREACH(targetsToDelete, jt)
38         {
39             CCSprite *target = dynamic_cast<CCSprite*>(jt);
40             _targets->removeObject(target);
41             this->removeChild(target, true);
42
43             _projectilesDestroyed++;
44             if (_projectilesDestroyed >= 5)
45             {
46                 GameOverScene *gameOverScene = GameOverScene::create();
47                 gameOverScene->getLayer()->getLabel()->setString("You Win!");
48                 CCDirector::sharedDirector()->replaceScene(gameOverScene);
49             }
50         }
51
52         if (targetsToDelete->count() > 0)
53         {
54             projectilesToDelete->addObject(projectile);
55         }
56         targetsToDelete->release();
57     }
58
59     // for (it = projectilesToDelete->begin(); it != projectilesToDelete->end(); it++)
60     CCARRAY_FOREACH(projectilesToDelete, it)
61     {
62         CCSprite* projectile = dynamic_cast<CCSprite*>(it);
63         _projectiles->removeObject(projectile);
64         this->removeChild(projectile, true);
65     }
66     projectilesToDelete->release();
67 }
上面的代码应该非常清楚。我们仅仅通过遍历projectiles和targets数组,为每个projectile和target创建边界矩形,然后使用CGRectIntersectsRect来检测碰撞。如果发现有碰撞了,我们就从场景中移除精灵,同时也把它移除出数组。注意,我们不得不添加一个toDelete数组,因为我们不能在遍历一个数组的时候去删除数组中的对象。当然,还有许多方式可以实现类似的逻辑,我只不过挑选了简单的方法。
关于如何创建矩形:
define CCRectMake ( x,
y,
width,
height
) CCRect((float)(x), (float)(y), (float)(width), (float)(height))
在你真正完成之前,还差最后一件事情。在你的init方法里面调用下面的函数: this->schedule( schedule_selector(HelloWorld::updateGame) );
添加音效
我们离制作一个可以玩的游戏(但是非常简单)的目标已经越来越近了。我们仅仅需要增加一些音效和背景音乐(试想哪个游戏没有声音呢!),再增加一点点简单的逻辑就更好了。
首先,把一些背景音乐和音效拖到工程的resource文件夹中。你可以使用 cool background music I made 或者我的 awesome pew-pew sound effect,或者自制一些。
然后,在HelloWorldScene.cpp文件里导入下面的头文件:#include "SimpleAudioEngine.h"
在你的init方法里加载背景音乐:
1 CocosDenshion::SimpleAudioEngine::sharedEngine()->playBackgroundMusic("background-music-aac.wav", true);
然后,在你的ccTouchesEnded方法里面添加音效代码:
1 CocosDenshion::SimpleAudioEngine::sharedEngine()->playEffect("pew-pew-lei.wav");
关于音乐格式问题:http://www.ityran.com/archives/3627
在大多数平台上,cocos2d-x调用不同的SDK API来播放背景音乐和音效。CocosDenshion在同一时间只能播放一首背景音乐,但是能同时播放许多音效。
背景音乐
|
平台 |
支持的BGM格式 |
| Android | 在android上CocosDenshion能支持的音频格式是对应于android.media.MediaPlayer所支持的格式。 |
| iOS | 在IOS上面Cocos2d-x的CocosDenshion所支持的格式和Cocos2d-iphone中所支持的是一样,mp3,caf是推荐的格式。 |
| windows | .mid, .wav are supported. Note that mp3 is not supported. |
| Marmalade | mp3 |
Windows mid,wav, mp3都是被支持的。(修改:原文说mp3不被支持)
音效
警告:Samsung i9100 似乎在音频驱动上面有一个bug。它不能同时播放太多音效。所以当你在Samsung i9100中运行你的程序的时候,最好不要调用SimpleAudioEngine::playEffect(const char*filePah)太过频繁。
|
平台 |
支持的音效格式 |
| Android | ogg是最好的选择,对wav的支持不是太好 |
| iOS | IOS 和cocos2d-iphone中cocosDenshion所支持的格式一样。个人建议是苹果的caf格式 |
| windows | * .mid, .wav. |
| Marmalade | 只支持原生 PCM格式(参照 http://www.madewithmarmalade.com/devnet/forum/5459) |
现在,让我们创建一个新的场景,来作为“You Win”或者“You Lose”的标志。
 1 #ifndef _GAME_OVER_SCENE_H_
 2 #define _GAME_OVER_SCENE_H_
 3
 4 #include "cocos2d.h"
 5
 6 class GameOverLayer : public cocos2d::CCLayerColor
 7 {
 8 public:
 9     GameOverLayer():_label(NULL) {};
10     virtual ~GameOverLayer();
11     bool init();
12     CREATE_FUNC(GameOverLayer);
13
14     void gameOverDone();
15
16     CC_SYNTHESIZE_READONLY(cocos2d::CCLabelTTF*, _label, Label);
17 };
18
19 class GameOverScene : public cocos2d::CCScene
20 {
21 public:
22     GameOverScene():_layer(NULL) {};
23     ~GameOverScene();
24     bool init();
25     CREATE_FUNC(GameOverScene);
26
27     CC_SYNTHESIZE_READONLY(GameOverLayer*, _layer, Layer);
28 };
29
30 #endif // _GAME_OVER_SCENE_H_
注意,这里有两个不同的对象:场景和层。场景可以包含任意数量的层,但是此例中只有一个层。这个层只是在屏幕的中间放置了一个label,然后运行了一个action。这个action的作用就是,等待3秒钟,然后调用一个回调函数切换回HelloWorld场景。
最后,让我们增加一些基本的游戏逻辑。首先,让我们来追踪player销毁的飞镖projectiles。接下来,在HelloWorld类里面增加一个成员变量,如下所示:int _projectilesDestroyed;
在HelloWorldScene.m里面,导入我们的GameOverScene类:
在update方法里,增加(销毁的projectile)计数,同时检测游戏胜利的条件。并在targetsToDelete循环里,紧接着removeChild:target的地方添加如下代码:
 1    CCARRAY_FOREACH(targetsToDelete, jt)
 2         {
 3             CCSprite *target = dynamic_cast<CCSprite*>(jt);
 4             _targets->removeObject(target);
 5             this->removeChild(target, true);
 6
 7             _projectilesDestroyed++;
 8             if (_projectilesDestroyed >= 5)
 9             {
10                 GameOverScene *gameOverScene = GameOverScene::create();
11                 gameOverScene->getLayer()->getLabel()->setString("You Win!");
12                 CCDirector::sharedDirector()->replaceScene(gameOverScene);
13             }
14         }
最后,让我们这样设计,只要有一个怪物穿过了屏幕左边,你就输了。修改spriteMoveFinished方法,通过在tag==1里面、removeChild:sprite后面添加下面的代码:
 1 void HelloWorld::spriteMoveFinished(CCNode* sender)
 2 {
 3     CCSprite *sprite = (CCSprite *)sender;
 4     this->removeChild(sprite, true);
 5
 6     if (sprite->getTag() == 1)  // target
 7     {
 8         _targets->removeObject(sprite);
 9
10         GameOverScene *gameOverScene = GameOverScene::create();
11         gameOverScene->getLayer()->getLabel()->setString("You Lose :[");
12         CCDirector::sharedDirector()->replaceScene(gameOverScene);
13
14     }
15     else if (sprite->getTag() == 2) // projectile
16     {
17         _projectiles->removeObject(sprite);
18     }
19 }
继续,编译并运行程序。现在,你的游戏可以实现胜利或者失败的场景了!:)
总结:
1 精灵的创建和添加。
2 精灵的移动,moveTo方法,动作回调,动作序列CCSequence,动作执行runAction。
3 检测碰撞。
4 背景和音效添加。
5 定时scheduler。
6 触摸事件,获取坐标。
7 场景替换:CCDirector::sharedDirector()->replaceScene(gameOverScene);
ps:博客主要是备份作用。
参考:http://www.cnblogs.com/zilongshanren/archive/2011/03/22/1990716.html