1.pom.xml添加依赖


<!--RabbitMq-->
        <dependency>
            <groupId>org.springframework.boot</groupId>
            <artifactId>spring-boot-starter-test</artifactId>
            <scope>test</scope>
        </dependency>
        <dependency>
            <groupId>org.springframework.boot</groupId>
            <artifactId>spring-boot-starter-amqp</artifactId>
        </dependency>
2.application.yml
spring:
  application:
    admin: springboot-rabbitmq
  rabbitmq:
    host: localhost
    port: 5672
    username: guest
    password: guest
    publisher-returns: true
    listener:
      direct:
        acknowledge-mode: manual
      simple:
        acknowledge-mode: manual
3.添加配置类RabbitMqConfig
@Configuration
public class RabbitMqConfig {
    @Autowired
    public ConnectionFactory connectionFactory;

    @Bean
    public RabbitAdmin rabbitAdmin() {
        RabbitAdmin admin = new RabbitAdmin(connectionFactory);
        return admin;
    }
    @Bean
    public Queue kinsonQueue(){//创建队列
        Map<String, Object> arguments = new HashMap<>();
        arguments.put("x-message-ttl", 40000);
        return new Queue("queue1",true,false,false,arguments);
    }
    @Bean
    public FanoutExchange defaultExchange(){//创建交换机
        return new FanoutExchange("exchange-1");
    }
    @Bean
    public Binding binQueueExchange(){//队列绑定交换机
        return BindingBuilder.bind(kinsonQueue()).to(defaultExchange());
    }

}
4.添加生产者
@Component
public class RabbitSender {
    @Autowired
    private RabbitTemplate rabbitTemplate;

    private final Logger log = LoggerFactory.getLogger(this.getClass());
    //回调函数: confirm确认
    final RabbitTemplate.ConfirmCallback confirmCallback = new RabbitTemplate.ConfirmCallback() {
        @Override
        public void confirm(CorrelationData correlationData, boolean ack, String cause) {
            log.info("correlationData: " + correlationData);
            log.info("ack: " + ack);
            if (!ack) {
                log.info("异常处理....");
            }
        }
    };

    //回调函数: return返回
    final RabbitTemplate.ReturnCallback returnCallback = new RabbitTemplate.ReturnCallback() {
        @Override
        public void returnedMessage(org.springframework.amqp.core.Message message, int replyCode,
                                    String replyText, String exchange, String routingKey) {
            log.info("return exchange: {}, routingKey: {}, replyCode: {}, replyText: {}",
                    exchange, routingKey, replyCode, replyText);
        }
    };

    //发送消息方法调用: 构建Message消息
    public void send(String queue, Map<String, Object> properties) throws Exception {
        MessageHeaders mhs = new MessageHeaders(properties);
        Message<Object> msg = MessageBuilder.createMessage("queue1", mhs);
        rabbitTemplate.setConfirmCallback(confirmCallback);
        rabbitTemplate.setReturnCallback(returnCallback);
        rabbitTemplate.convertAndSend(queue, msg);
    }
}
5.添加消费者
@Component
public class RabbitReceiver {
    @RabbitListener(queues = "queue1")
    @RabbitHandler
    public void onMessage(Message message, Channel channel,@Payload String string) throws Exception {
        Long deliveryTag = (Long)message.getHeaders().get(AmqpHeaders.DELIVERY_TAG);
        // 手工ACK
        channel.basicAck(deliveryTag, false);
        System.err.println("消费端: " +message);
    }
}
6.测试
@SpringBootTest
class DemoApplicationTests {

    @Autowired
    private RabbitSender rabbitSender;

    private static SimpleDateFormat simpleDateFormat = new SimpleDateFormat("yyyy-MM-dd HH:mm:ss.SSS");
    @Test
    public void testSender1() throws Exception {
        Map<String, Object> properties = new HashMap<>();
        properties.put("number", "12345");
        properties.put("send_time", simpleDateFormat.format(new Date()));
        rabbitSender.send("queue1", properties);
    }
}
RabbitMQ介绍:
1.交换机:
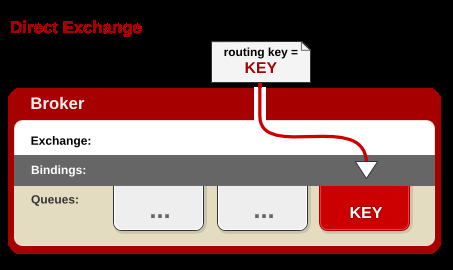
Direct Exchange(直连交换机)
处理路由键
需要将一个队列绑定到交换机上,要求该消息与一个特定的路由键完全匹配。这是一个完整的匹配。如果一个队列
绑定到该交换机上要求路由键 “ dog”,则只有被标记为 “ 的消息才被转发,不会转发 dog.puppy ,也不会转发dog.guard ,只会转发 dog 。
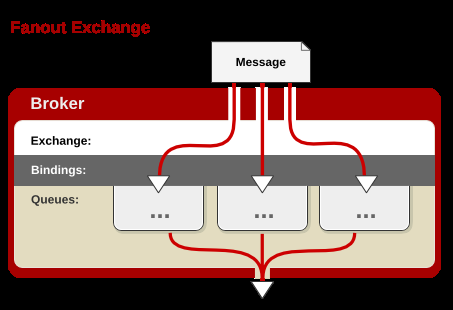
Fanout Exchange(扇型交换机)
不处理路由键
你只需要将队列绑定到交换机上, 发送消息 到交换机都会被转发到与该交换机绑定的所有队列上。
Topic Exchange(主题交换机)
将路由键和某模式进行匹配
此时队列需要绑定要一个模式上。符号“#”匹配一个或多个词,符号“*”匹配一个词。因此“audit.#”能够匹配到“audit.irs.corporate”,但是“audit.*” 只会匹配到“audit.irs”。

Headers Exchanges(头交换机)
不处理路由键
而是根据发送的消息内容中的headers属性进行匹配。在绑定Queue与Exchange时指定一组键值对;当消息发送到RabbitMQ时会取到该消息的headers与Exchange绑定时指定的键值对进行匹配;如果完全匹配则消息会路由到该队列,否则不会路由到该队列。headers属性是一个键值对,可以是Hashtable,键值对的值可以是任何类型。而fanout,direct,topic 的路由键都需要要字符串形式的。
Default Exchange(默认交换机 )
默认交换机实际上是一个由RabbitMQ预先声明好的名字为空字符串的直连交换机(direct exchange)。它有一个特殊的属性使得它对于简单应用特别有用处:那就是每个新建队列(queue)都会自动绑定到默认交换机上,绑定的路由键(routing key)名称与队列名称相同。
Dead Letter Exchange(死信交换机)
在默认情况,如果消息在投递到交换机时,交换机发现此消息没有匹配的队列,则这个消息将被丢弃。为了解决这个问题,RabbitMQ中有一种交换机叫死信交换机。当消费者不能处理接收到的消息时,将这个消息重新发布到另外一个队列中,等待重试或者人工干预。这个过程中的exchange和queue就是所谓的”Dead Letter Exchange 和 Queue”
交换机的属性:
Name:交换机名称
Durability:是否持久化。如果持久性,则RabbitMQ重启后,交换机还存在
Auto-delete:当所有与之绑定的消息队列都完成了对此交换机的使用后删掉它
Arguments:扩展参数
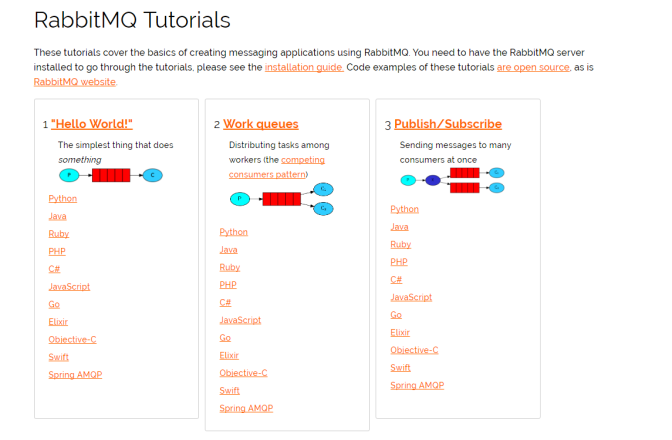
2.六种消息类型
官网 http://www.rabbitmq.com/getstarted.html

3.RabbitMQ配置属性
参考资料: https://docs.spring.io/spring-boot/docs/current/reference/html/common-application-properties.html
基础信息
spring.rabbitmq.host: 默认localhost
spring.rabbitmq.port: 默认5672
spring.rabbitmq.username: 用户名
spring.rabbitmq.password: 密码
spring.rabbitmq.virtual-host: 连接到代理时用的虚拟主机
spring.rabbitmq.addresses: 连接到server的地址列表(以逗号分隔),先addresses后host
spring.rabbitmq.requested-heartbeat: 请求心跳超时时间,0为不指定,如果不指定时间单位默认为妙
spring.rabbitmq.publisher-confirms: 是否启用【发布确认】,默认false
spring.rabbitmq.publisher-returns: 是否启用【发布返回】,默认false
spring.rabbitmq.connection-timeout: 连接超时时间,单位毫秒,0表示永不超时