本篇演示将单实例下的数据库迁移至ASM环境。
一 软件环境
- Oracle VM Virtualbox 5.2.8
- Oracle Linux 6.5
- Oracle 11.2.0.4
二 主机设置
1 创建用户和组
[root@strong ~]# groupadd asmadmin
[root@strong ~]# groupadd asmdba
[root@strong ~]# groupadd asmoper
[root@strong ~]# useradd -g oinstall -G asmadmin,asmdba,asmoper,oper,dba grid
[root@strong ~]# passwd grid
Changing password for user grid.
New password:
BAD PASSWORD: it is too short
BAD PASSWORD: is too simple
Retype new password:
passwd: all authentication tokens updated successfully.
2 修改Oracle用户组
[root@strong ~]# id oracle
uid=500(oracle) gid=500(oinstall) groups=500(oinstall),501(dba),502(oper)
[root@strong ~]# usermod -G dba,asmadmin,asmdba,oper oracle
[root@strong ~]# id oracle
uid=500(oracle) gid=500(oinstall) groups=500(oinstall),501(dba),502(oper),503(asmadmin),504(asmdba)在 /etc/security/limits.conf配置文件增加下面的内容。
[root@strong ~]# vim /etc/security/limits.conf
grid soft nproc 2047
grid hard nproc 16384
grid soft nofile 1024
grid hard nofile 65536 [root@strong ~]# mkdir -p /u01/app/grid
[root@strong ~]# chown -R grid:oinstall /u01/app/grid/
[root@strong ~]# chmod -R 775 /u01/app/grid/5 设置环境变量
[root@strong ~]# su - grid
在.bash_profile增加如下内容。
[grid@strong ~]$ vim .bash_profile
ORACLE_BASE=/u01/app/grid
export ORACLE_BASE
ORACLE_SID=+ASM
export ORACLE_SID

export ORACLE_TERM=xterm
ORACLE_HOME=/u01/app/grid/product/11.2.0/grid
export ORACLE_HOME
PATH=$ORACLE_HOME/bin:$PATH
export PATH
[grid@strong ~]$ . .bash_profile
[grid@strong ~]$ echo $ORACLE_SID
+ASM
三 ASM配置(udev)
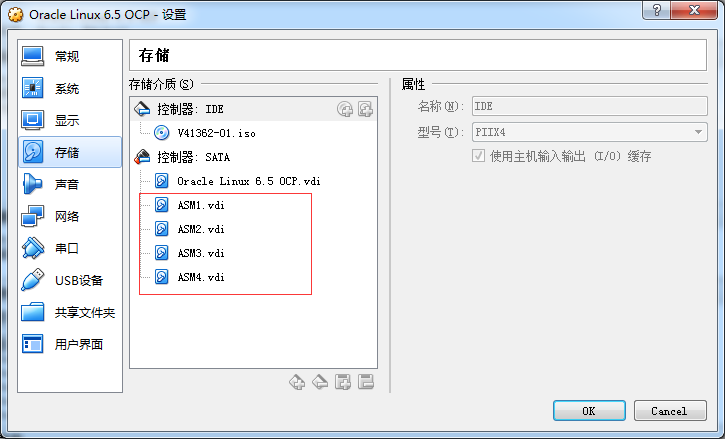
1 Linux系统关闭情况下增加4块磁盘
2 创建分区
[root@strong ~]# fdisk /dev/sdb
Device contains neither a valid DOS partition table, nor Sun, SGI or OSF disklabel
Building a new DOS disklabel with disk identifier 0xc5819521.
Changes will remain in memory only, until you decide to write them.
After that, of course, the previous content won't be recoverable.

Warning: invalid flag 0x0000 of partition table 4 will be corrected by w(rite)

WARNING: DOS-compatible mode is deprecated. It's strongly recommended to
         switch off the mode (command 'c') and change display units to
         sectors (command 'u').

Command (m for help): n
Command action
   e   extended
   p   primary partition (1-4)
p
Partition number (1-4): 1
First cylinder (1-1566, default 1):
Using default value 1
Last cylinder, +cylinders or +size{K,M,G} (1-1566, default 1566):
Using default value 1566

Command (m for help): w
The partition table has been altered!

Calling ioctl() to re-read partition table.
Syncing disks.
[root@strong ~]# 创建完后查看磁盘配置
[root@strong ~]# fdisk -l |grep /dev/sd
Disk /dev/sda: 53.7 GB, 53687091200 bytes
/dev/sda1               1        3917    31457280   83  Linux
/dev/sda2            3917        4439     4194304   82  Linux swap / Solaris
/dev/sda3   *        4439        6528    16776192   83  Linux
Disk /dev/sdb: 12.9 GB, 12884901888 bytes
/dev/sdb1               1        1566    12578863+  83  Linux
Disk /dev/sdc: 12.9 GB, 12884901888 bytes
/dev/sdc1               1        1566    12578863+  83  Linux
Disk /dev/sdd: 12.9 GB, 12884901888 bytes
/dev/sdd1               1        1566    12578863+  83  Linux
Disk /dev/sde: 12.9 GB, 12884901888 bytes
/dev/sde1 1 1566 12578863+ 83 Linux[root@strong ~]# /sbin/scsi_id -g -u /dev/sdb
1ATA_VBOX_HARDDISK_VB570f119a-101734d2
[root@strong ~]# /sbin/scsi_id -g -u /dev/sdc
1ATA_VBOX_HARDDISK_VB9845df4e-dd4ce3ba
[root@strong ~]# /sbin/scsi_id -g -u /dev/sdd
1ATA_VBOX_HARDDISK_VB61473db8-e1b5de18
[root@strong ~]# /sbin/scsi_id -g -u /dev/sde
1ATA_VBOX_HARDDISK_VB73f89770-56738154[root@strong ~]# vim /etc/scsi_id.config
options=-g5 创建规则文件
[root@strong ~]# vim /etc/udev/rules.d/99-oracle-asmdevices.rules

KERNEL=="sd?1", BUS=="scsi", PROGRAM=="/sbin/scsi_id -g -u -d /dev/$parent", RESULT=="1ATA_VBOX_HARDDISK", NAME="asm-disk1", OWNER="grid", GROUP="asmadmin", MODE="0660KERNEL=="sd?1", BUS=="scsi", PROGRAM=="/sbin/scsi_id -g -u -d /dev/$parent", RESULT=="1ATA_VBOX_HARDDISK_VB570f119a-101734d2", NAME="asm-disk1", OWNER="grid", GROUP="asmadmin", MODE="0660"KERNEL=="sd?1", BUS=="scsi", PROGRAM=="/sbin/scsi_id -g -u -d /dev/$parent", RESULT=="1ATA_VBOX_HARDDISK_VB9845df4e-dd4ce3ba", NAME="asm-disk2", OWNER="grid", GROUP="asmadmin", MODE="0660"KERNEL=="sd?1", BUS=="scsi", PROGRAM=="/sbin/scsi_id -g -u -d /dev/$parent", RESULT=="1ATA_VBOX_HARDDISK_VB61473db8-e1b5de18", NAME="asm-disk3", OWNER="grid", GROUP="asmadmin", MODE="0660"
KERNEL=="sd?1", BUS=="scsi", PROGRAM=="/sbin/scsi_id -g -u -d /dev/$parent", RESULT=="1ATA_VBOX_HARDDISK_VB73f89770-56738154", NAME="asm-disk4", OWNER="grid", GROUP="asmadmin", MODE="0660"[root@strong ~]# /sbin/partprobe /dev/sdb1
[root@strong ~]# /sbin/partprobe /dev/sdc1
[root@strong ~]# /sbin/partprobe /dev/sdd1
[root@strong ~]# /sbin/partprobe /dev/sde17 查看所有者和权限
[root@strong ~]# ll /dev/asm-disk*
brw-rw----. 1 grid asmadmin 8, 17 May 25 21:51 /dev/asm-disk1
brw-rw----. 1 grid asmadmin 8, 33 May 25 21:51 /dev/asm-disk2
brw-rw----. 1 grid asmadmin 8, 49 May 25 21:51 /dev/asm-disk3
brw-rw----. 1 grid asmadmin 8, 65 May 25 21:51 /dev/asm-disk4
四 Oracle ASM安装
1 上传并解压Grid软件
[grid@strong ~]$ cd /u01/app/grid/
[grid@strong grid]$ mkdir soft
[grid@strong grid]$ cd soft/
[grid@strong soft]$ ll
total 1177008
-rw-r--r--. 1 grid oinstall 1205251894 May 25 21:55 p13390677_112040_Linux-x86-64_3of7.zip
[grid@strong soft]$ unzip p13390677_112040_Linux-x86-64_3of7.zip
2 切换到软件目录进行安装
安装过程略
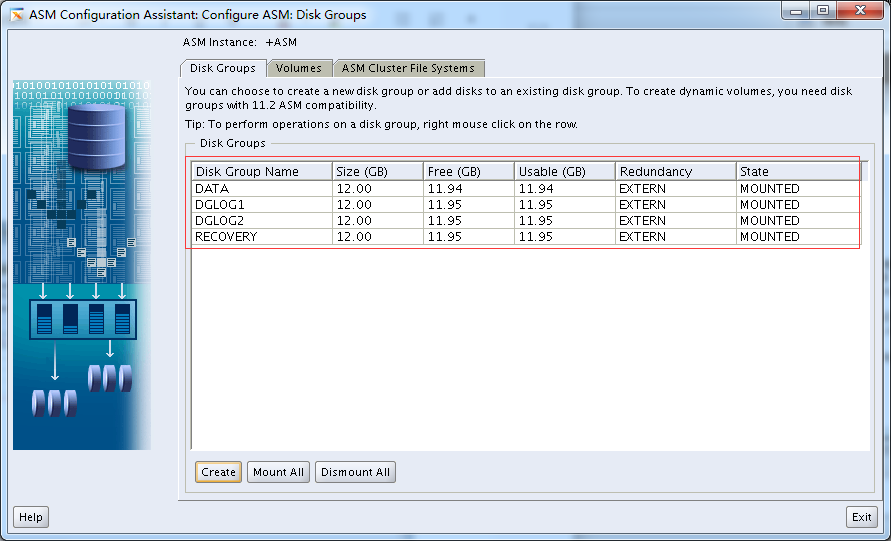
3 安装完成使用asmca创建磁盘
五 使用RMAN迁移数据库至ASM实例
1 查看数据文件
[oracle@strong ~]$ ls /u01/app/oracle/oradata/orcl/
control01.ctl  example01.dbf  redo01.log  redo02.log  redo03.log  sysaux01.dbf  system01.dbf  temp01.dbf  undotbs01.dbf  users01.dbf
2 备份数据库(数据库处于归档模式)
[oracle@strong ~]$ rman target /

Recovery Manager: Release 11.2.0.4.0 - Production on Fri May 25 22:28:04 2018

Copyright (c) 1982, 2011, Oracle and/or its affiliates.  All rights reserved.

connected to target database: ORCL (DBID=1503138684)

RMAN> backup as copy database format '+DATA';

Starting backup at 25-MAY-18
using target database control file instead of recovery catalog
allocated channel: ORA_DISK_1
channel ORA_DISK_1: SID=34 device type=DISK
channel ORA_DISK_1: starting datafile copy
input datafile file number=00001 name=/u01/app/oracle/oradata/orcl/system01.dbf
output file name=+DATA/orcl/datafile/system.258.977092105 tag=TAG20180525T222821 RECID=3 STAMP=977092171
channel ORA_DISK_1: datafile copy complete, elapsed time: 00:01:15
channel ORA_DISK_1: starting datafile copy
input datafile file number=00002 name=/u01/app/oracle/oradata/orcl/sysaux01.dbf
output file name=+DATA/orcl/datafile/sysaux.259.977092177 tag=TAG20180525T222821 RECID=4 STAMP=977092223
channel ORA_DISK_1: datafile copy complete, elapsed time: 00:00:55
channel ORA_DISK_1: starting datafile copy
input datafile file number=00005 name=/u01/app/oracle/oradata/orcl/example01.dbf
output file name=+DATA/orcl/datafile/example.260.977092233 tag=TAG20180525T222821 RECID=5 STAMP=977092258
channel ORA_DISK_1: datafile copy complete, elapsed time: 00:00:35
channel ORA_DISK_1: starting datafile copy
input datafile file number=00003 name=/u01/app/oracle/oradata/orcl/undotbs01.dbf
output file name=+DATA/orcl/datafile/undotbs1.261.977092267 tag=TAG20180525T222821 RECID=6 STAMP=977092277
channel ORA_DISK_1: datafile copy complete, elapsed time: 00:00:15
channel ORA_DISK_1: starting datafile copy
copying current control file
output file name=+DATA/orcl/controlfile/backup.262.977092283 tag=TAG20180525T222821 RECID=7 STAMP=977092285
channel ORA_DISK_1: datafile copy complete, elapsed time: 00:00:03
channel ORA_DISK_1: starting datafile copy
input datafile file number=00004 name=/u01/app/oracle/oradata/orcl/users01.dbf
output file name=+DATA/orcl/datafile/users.263.977092287 tag=TAG20180525T222821 RECID=8 STAMP=977092286
channel ORA_DISK_1: datafile copy complete, elapsed time: 00:00:01
channel ORA_DISK_1: starting full datafile backup set
channel ORA_DISK_1: specifying datafile(s) in backup set
including current SPFILE in backup set
channel ORA_DISK_1: starting piece 1 at 25-MAY-18
channel ORA_DISK_1: finished piece 1 at 25-MAY-18
piece handle=+DATA/orcl/backupset/2018_05_25/nnsnf0_tag20180525t222821_0.264.977092287 tag=TAG20180525T222821 comment=NONE
channel ORA_DISK_1: backup set complete, elapsed time: 00:00:01
Finished backup at 25-MAY-18[oracle@strong ~]$ sqlplus /nolog
SQL*Plus: Release 11.2.0.4.0 Production on Fri May 25 22:32:14 2018
Copyright (c) 1982, 2013, Oracle. All rights reserved.
SQL> conn / as sysdba
Connected.
SQL> alter system set db_create_file_dest='+DATA' scope=both;
System altered.
SQL> alter system set db_recovery_file_dest='+RECOVERY' scope=both;
System altered.
SQL> alter system set db_recovery_file_dest_size=4G;
System altered.
SQL> alter system set db_create_online_log_dest_1='+DGLOG1' scope=both;
System altered.
SQL> alter system set db_create_online_log_dest_2='+DGLOG2' scope=both;
System altered.- db_create_file_dest:该参数指定了数据文件、控制文件、重做日志文件以及临时文件的默认创建位置;如果没有db_create_online_log_dest_n参数,还会在该参数指定的磁盘组中创建重做日志文件和控制文件;
- db_recovery_file_dest:该参数指定了RMAN备份、闪回日志以及归档日志的存储位置;如果没有db_create_online_log_dest_n参数,还会在该参数指定的目录下创建一路重做日志文件;
- db_recovery_file_dest_size:设置快闪恢复区的大小;
- db_create_online_log_dest_n:存储重做日志和控制文件的副本,实现多路复用;
4 迁移控制文件到ASM
首先通过spfile创建pfile,目的是修改pfile中控制文件的参数,然后创建spfile,这样就达到了修改spfile参数的目的。
SQL> create pfile='/home/oracle/initorcl.ora' from spfile;

File created.SQL> shutdown immediate
Database closed.
Database dismounted.
ORACLE instance shut down.
SQL> create spfile from pfile='/home/oracle/initorcl.ora';
File created.
SQL> startup nomount;
ORACLE instance started.
Total System Global Area 839282688 bytes
Fixed Size 2257880 bytes
Variable Size 545262632 bytes
Database Buffers 289406976 bytes
Redo Buffers 2355200 bytes
SQL> [oracle@strong ~]$ rman target /
Recovery Manager: Release 11.2.0.4.0 - Production on Fri May 25 22:38:37 2018
Copyright (c) 1982, 2011, Oracle and/or its affiliates. All rights reserved.
connected to target database: ORCL (not mounted)
RMAN> restore controlfile from '/u01/app/oracle/oradata/orcl/control01.ctl';
Starting restore at 25-MAY-18
using target database control file instead of recovery catalog
allocated channel: ORA_DISK_1
channel ORA_DISK_1: SID=22 device type=DISK
channel ORA_DISK_1: copied control file copy
output file name=+DGLOG1/orcl/controlfile/current.256.977092733
output file name=+DGLOG2/orcl/controlfile/current.256.977092735
Finished restore at 25-MAY-185 数据文件转到ASM磁盘
RMAN> alter database mount;

database mounted
released channel: ORA_DISK_1

RMAN> switch database to copy;

datafile 1 switched to datafile copy "+DATA/orcl/datafile/system.258.977092105"
datafile 2 switched to datafile copy "+DATA/orcl/datafile/sysaux.259.977092177"
datafile 3 switched to datafile copy "+DATA/orcl/datafile/undotbs1.261.977092267"
datafile 4 switched to datafile copy "+DATA/orcl/datafile/users.263.977092287"
datafile 5 switched to datafile copy "+DATA/orcl/datafile/example.260.977092233"
6 恢复并打开数据库
RMAN> recover database;

Starting recover at 25-MAY-18
allocated channel: ORA_DISK_1
channel ORA_DISK_1: SID=22 device type=DISK

starting media recovery
media recovery complete, elapsed time: 00:00:03

Finished recover at 25-MAY-18

RMAN> alter database open;

database opened
7 迁移重做日志至ASM磁盘
1)确认日志文件位置
SQL> set linesize 200
SQL> col member for a50
SQL> select group#,member from v$logfile;

    GROUP# MEMBER
---------- --------------------------------------------------
	 3 /u01/app/oracle/oradata/orcl/redo03.log
	 2 /u01/app/oracle/oradata/orcl/redo02.log
	 1 /u01/app/oracle/oradata/orcl/redo01.log
2)迁移日志至ASM磁盘
SQL> alter database add logfile member '+DGLOG1','+DGLOG2' to group 1;

Database altered.

SQL> alter database add logfile member '+DGLOG1','+DGLOG2' to group 2;

Database altered.

SQL> alter database add logfile member '+DGLOG1','+DGLOG2' to group 3;

Database altered.
3)查看日志文件
SQL> select group#,status,member from v$logfile;

    GROUP# STATUS  MEMBER
---------- ------- --------------------------------------------------
	 3	   /u01/app/oracle/oradata/orcl/redo03.log
	 2	   /u01/app/oracle/oradata/orcl/redo02.log
	 1	   /u01/app/oracle/oradata/orcl/redo01.log
	 1 INVALID +DGLOG1/orcl/onlinelog/group_1.257.977093411
	 1 INVALID +DGLOG2/orcl/onlinelog/group_1.257.977093415
	 2 INVALID +DGLOG1/orcl/onlinelog/group_2.258.977093433
	 2 INVALID +DGLOG2/orcl/onlinelog/group_2.258.977093435
	 3 INVALID +DGLOG1/orcl/onlinelog/group_3.259.977093475
	 3 INVALID +DGLOG2/orcl/onlinelog/group_3.259.977093477

9 rows selected.
4)删除基于文件系统的日志
SQL> alter system switch logfile;

System altered.

SQL> alter database drop logfile member '/u01/app/oracle/oradata/orcl/redo01.log';

Database altered.

SQL> alter database drop logfile member '/u01/app/oracle/oradata/orcl/redo02.log';

Database altered.

SQL> alter system switch logfile;

System altered.

SQL> alter database drop logfile member '/u01/app/oracle/oradata/orcl/redo03.log';

Database altered.
5)查看迁移后的日志
SQL> select group#,status,member from v$logfile;

    GROUP# STATUS  MEMBER
---------- ------- --------------------------------------------------
	 1	   +DGLOG1/orcl/onlinelog/group_1.257.977093411
	 1	   +DGLOG2/orcl/onlinelog/group_1.257.977093415
	 2	   +DGLOG1/orcl/onlinelog/group_2.258.977093433
	 2	   +DGLOG2/orcl/onlinelog/group_2.258.977093435
	 3	   +DGLOG1/orcl/onlinelog/group_3.259.977093475
	 3	   +DGLOG2/orcl/onlinelog/group_3.259.977093477

6 rows selected.
8 ASM磁盘组中创建临时文件
1)查看临时文件信息
SQL> col name for a50
SQL> select file#,ts#,name from v$tempfile;

     FILE#	  TS# NAME
---------- ---------- --------------------------------------------------
	 1	    3 /u01/app/oracle/oradata/orcl/temp01.dbf
2)创建临时文件
SQL> alter tablespace temp add tempfile size 2048m;

Tablespace altered.

SQL> select file#,ts#,name from v$tempfile;

     FILE#	  TS# NAME
---------- ---------- --------------------------------------------------
	 2	    3 +DATA/orcl/tempfile/temp.265.977094205
	 1	    3 /u01/app/oracle/oradata/orcl/temp01.dbf
3)删除旧的临时文件
SQL> alter tablespace temp drop tempfile '/u01/app/oracle/oradata/orcl/temp01.dbf';

Tablespace altered.

SQL> select file#,ts#,name from v$tempfile;

     FILE#	  TS# NAME
---------- ---------- --------------------------------------------------
	 2	    3 +DATA/orcl/tempfile/temp.265.977094205
六 验证迁移
启动数据库,查看各文件状态。
1 查看控制文件参数
SQL> show parameter control

NAME				     TYPE	 VALUE
------------------------------------ ----------- ------------------------------
control_file_record_keep_time	     integer	 7
control_files			     string	 +DGLOG1/orcl/controlfile/curre
						 nt.256.977092733, +DGLOG2/orcl
						 /controlfile/current.256.97709
						 2735
control_management_pack_access	     string	 DIAGNOSTIC+TUNING
2 查看文件信息
SQL> col file_name for a50
SQL> select file_name,file_id,tablespace_name,status,online_status from dba_data_files;

FILE_NAME					      FILE_ID TABLESPACE_NAME		     STATUS    ONLINE_
-------------------------------------------------- ---------- ------------------------------ --------- -------
+DATA/orcl/datafile/users.263.977092287 		    4 USERS			     AVAILABLE ONLINE
+DATA/orcl/datafile/undotbs1.261.977092267		    3 UNDOTBS1			     AVAILABLE ONLINE
+DATA/orcl/datafile/sysaux.259.977092177		    2 SYSAUX			     AVAILABLE ONLINE
+DATA/orcl/datafile/system.258.977092105		    1 SYSTEM			     AVAILABLE SYSTEM
+DATA/orcl/datafile/example.260.977092233		    5 EXAMPLE			     AVAILABLE ONLINE
3 查看日志信息
SQL> select group#,member from v$logfile;

    GROUP# MEMBER
---------- --------------------------------------------------
	 1 +DGLOG1/orcl/onlinelog/group_1.257.977093411
	 1 +DGLOG2/orcl/onlinelog/group_1.257.977093415
	 2 +DGLOG1/orcl/onlinelog/group_2.258.977093433
	 2 +DGLOG2/orcl/onlinelog/group_2.258.977093435
	 3 +DGLOG1/orcl/onlinelog/group_3.259.977093475
	 3 +DGLOG2/orcl/onlinelog/group_3.259.977093477

6 rows selected.
4 查看控制文件信息
SQL> select name from v$controlfile;

NAME
--------------------------------------------------
+DGLOG1/orcl/controlfile/current.256.977092733
+DGLOG2/orcl/controlfile/current.256.977092735
至此,迁移完成。