Unix和Linux平台下的常见Web服务器有:
1. apache
2. nginx
3. lighttpd
4. tomcat
5. Ibm websphere
其中最广泛的是nginx,在windows平台上最常用的是微软的IIS(internet information server)是windows系统
默认的web服务程序。
Apache
apache是世界主流的web服务器,世界上大多著名网站都是apache搭建,优势在于开放源代码,开发维护团队
强大,支持跨平台(unix,linux,windows),强大的移植性等优点。
apache属于重量级产品,功能以模块化定制,消耗内存较高,性能稍弱于其他轻量级web服务器。
lighttpd
lighttpd是一款高安全性,快速,且灵活的web服务器产品,专为高性能环境而设计,相比其他web服务器,内存
占用量小,能够有效管理cpu负载,支持(FastCGI,SCGI,auth,输出压缩,url重写,别名)
等重要功能,是Nginx的重要对手之一。
Tomcat
Tomcat是一个开源,运行基于java的web应用软件的容器,Tomcat server根据sevlet和JSP规范执行,但是tomcat
对于平台文件,高并发处理较弱,要使用tomcat需要对java的应用部署有足够的了解。
IBM WebSphere Application Server
IBM WebSphere Application Server 是一种强大的Web应用服务器,基于Java的应用环境,建立,部署和管理网站应用。
Microsoft IIS
微软的IIS是一种灵活,安全易管理的web服务器,从流媒体到web应用程序,IIS提供了图形化的管理界面,用于配置
和管理网络服务。
IIS 是一整套web组件,包含了web服务器,FTP服务器,SMTP服务器等常用的网页浏览,文件传输,邮件新闻等功能。
缺点是只能运行在Windows平台,还得购买商业化的操作系统。
Nginx
Nginx以高效的epoll,kqueue,eventport作为网络IO模型,在高并发场景下,Nginx能够轻松支持5W并发连接数,
并且消耗的服务器内存,CPU等系统资源却很低,运行非常稳定。
国内著名站点,新浪微博,网易,淘宝,豆瓣,迅雷,等大型网站都在使用Nginx作为Web服务器,或者反向代理服务器。
Nginx资源消耗低/性能强
apache使用的是网络I/O模型中传统的select模型,nginx使用的是epoll模型。
nginx成本低
nginx优势:
1. 配置文件简单易读。
2. 支持rewrite重写,根据域名,url不同,转发http请求到不同的后端服务器组。
3. 高可用性,稳定性,宕机几率很低。
4. 节省资源,支持GZIP压缩静态资源。
5. 支持热部署,可以7*24小时不间断运行,数月时间可不重启,在不kill进程的情况下对软件修改。
网络I/O模型
http://book.luffycity.com/linux-book/%E4%BC%81%E4%B8%9A%E7%BA%A7%E8%B4%9F%E8%BD%BD%E5%9D%87%E8%A1%A1%E5%AE%9E%E6%88%98/Nginx.html#%E7%BD%91%E7%BB%9Cio%E6%A6%82%E5%BF%B5%E8%AF%B4%E6%98%8E
Nginx架构组成
Nginx安装配置
nginx.com  商业版
nginx.org  开源版
https://tengine.taobao.org/
【环境准备】
操作系统:CentOS Linux release 7.3.1611 (Core)
GCC编译环境:yum install -y gcc gcc-c++ autoconf automake make
模块依赖性:Nginx支持的功能模块需要有第三方的库支持,例如gzip的zlib库,rewrite重写
需要的pcre库,HTTPS需要的openssl库等等。
yum install zlib zlib-devel openssl openssl-devel pcre pcre-devel wget httpd-tools
vim

系统基础开发环境:yum groupinstall "Development Tools" "Basic Web Server"

确保防火墙关闭  iptables -F
关闭selinux
yum源配置正确
网络连接状态正常
【Nginx下载】
1.下载Nginx源代码  nginx.org官网
[root@chaogelinux Learn_Nginx]# wget nginx.org/download/nginx-1.14.0.tar.gz

2.解压缩Nginx源代码
[root@chaogelinux Learn_Nginx]# tar -zxf nginx-1.14.0.tar.gz

3.复制Nginx默认提供的vim语法插件
[root@chaogelinux nginx-1.14.0]# mkdir ~/.vim
[root@chaogelinux nginx-1.14.0]# cp -r contrib/vim/* ~/.vim/

4.Nginx源代码目录介绍
auto 检测系统模块
CHANGES nginx更改记录文件
conf 存放nginx配置文件
configure 释放编译文件的定制脚本
contrib 提供了perl与vim插件
html 存放标准html页面语法
src 存放nginx源码

5.开始编译Nginx,扩展编译模块
#列出Nginx的编译选项,如制定安装路径,配置文件、日志文件等路径,指定开启模块功
能等
[root@chaogelinux nginx-1.14.0]# ./configure --help

#编译Nginx初步,
[root@chaogelinux nginx-1.14.0]# ./configure --
prefix=/home/Learn_Nginx/nginx/ --with-http_ssl_module  --with-
http_flv_module --with-http_gzip_static_module --with-
http_stub_status_module  --with-threads  --with-file-aio

6.执行make编译
make

7.首次编译安装,生成Nginx的可执行命令
make install

8.检查Prefix指定的安装目录
[root@chaogelinux nginx-1.14.0]# ls /home/Learn_Nginx/
nginx  nginx-1.14.0  nginx-1.14.0.tar.gz

9.Nginx的程序目录
[root@chaogelinux nginx]# pwd
/home/Learn_Nginx/nginx
[root@chaogelinux nginx]# ls
conf  html  logs  sbin

依次是配置文件,静态文件,日志,二进制命令目录

10.创建nginx的环境变量文件,修改如下,创建/etc/profile.d/nginx.sh脚本文件便于以
后维护
[root@chaogelinux ~]# cat /etc/profile.d/nginx.sh
export PATH=/home/Learn_Nginx/nginx/sbin:$PATH

11.退出会话,重新登录终端,此时可以正常使用nginx
[root@chaogelinux ~]# echo $PATH
/home/Learn_Nginx/nginx/sbin:/usr/local/sbin:/usr/local/bin:/usr/sbin:/usr/bin
:/root/bin

12.检查nginx的编译模块信息
[root@chaogelinux ~]# nginx -V
nginx version: nginx/1.14.0
built by gcc 4.8.5 20150623 (Red Hat 4.8.5-39) (GCC)
built with OpenSSL 1.0.2k-fips  26 Jan 2017
TLS SNI support enabled
configure arguments: --prefix=/home/Learn_Nginx/nginx114/ --with-
http_ssl_module --with-http_flv_module --with-http_gzip_static_module --
with-http_stub_status_module --with-threads --with-file-aio
【nginx.conf指令注释】
######Nginx配置文件nginx.conf中文详解#####

#定义Nginx运行的用户和用户组
user www www;

#nginx进程数,建议设置为等于CPU总核心数。
worker_processes 8;

#全局错误日志定义类型,[ debug | info | notice | warn | error | crit ]
error_log /usr/local/nginx/logs/error.log info;

#进程pid文件
pid /usr/local/nginx/logs/nginx.pid;

#指定进程可以打开的最大描述符:数目
#工作模式与连接数上限
#这个指令是指当一个nginx进程打开的最多文件描述符数目,理论值应该是最多打开文件
数(ulimit -n)与nginx进程数相除,但是nginx分配请求并不是那么均匀,所以最好与
ulimit -n 的值保持一致。
#现在在linux 2.6内核下开启文件打开数为65535,worker_rlimit_nofile就相应应该填
写65535。
#这是因为nginx调度时分配请求到进程并不是那么的均衡,所以假如填写10240,总并发
量达到3-4万时就有进程可能超过10240了,这时会返回502错误。

[root@m01 ~]# tail -5 /etc/security/limits.conf
* soft nofile 65535     # open file
* hard nofile 65535

* soft nproc 65535     # open user processes
* hard nproc 65535

worker_rlimit_nofile 65535;


events
{
    #参考事件模型,use [ kqueue | rtsig | epoll | /dev/poll | select | poll ]; epoll
模型
    #是Linux 2.6以上版本内核中的高性能网络I/O模型,linux建议epoll,如果跑在
FreeBSD上面,就用kqueue模型。
    #补充说明:
    #与apache相类,nginx针对不同的操作系统,有不同的事件模型
    #A)标准事件模型
    #Select、poll属于标准事件模型,如果当前系统不存在更有效的方法,nginx会选择
select或poll
    #B)高效事件模型
    #Kqueue:使用于FreeBSD 4.1+, OpenBSD 2.9+, NetBSD 2.0 和 MacOS X.使
用双处理器的MacOS X系统使用kqueue可能会造成内核崩溃。
    #Epoll:使用于Linux内核2.6版本及以后的系统。
    #/dev/poll:使用于Solaris 7 11/99+,HP/UX 11.22+ (eventport),IRIX
6.5.15+ 和 Tru64 UNIX 5.1A+。
    #Eventport:使用于Solaris 10。 为了防止出现内核崩溃的问题, 有必要安装安全补
丁。
    use epoll;

    #单个进程最大连接数(最大连接数=连接数*进程数)
    #根据硬件调整,和前面工作进程配合起来用,尽量大,但是别把cpu跑到100%就行。
每个进程允许的最多连接数,理论上每台nginx服务器的最大连接数为。
    worker_connections 65535;

    #keepalive超时时间。
    keepalive_timeout 60;

    #客户端请求头部的缓冲区大小。这个可以根据你的系统分页大小来设置,一般一个请求
头的大小不会超过1k,不过由于一般系统分页都要大于1k,所以这里设置为分页大小。
    #分页大小可以用命令getconf PAGESIZE 取得。
    #[root@web001 ~]# getconf PAGESIZE
    #4096
    #但也有client_header_buffer_size超过4k的情况,但是client_header_buffer_size该值必须设置为“系统分页大小”的整倍数。
    client_header_buffer_size 4k;

    #这个将为打开文件指定缓存,默认是没有启用的,max指定缓存数量,建议和打开文
件数一致,inactive是指经过多长时间文件没被请求后删除缓存。
    open_file_cache max=65535 inactive=60s;

    #这个是指多长时间检查一次缓存的有效信息。
    #语法:open_file_cache_valid time 默认值:open_file_cache_valid 60 使用字
段:http, server, location 这个指令指定了何时需要检查open_file_cache中缓存项目的
有效信息.
    open_file_cache_valid 80s;

    #open_file_cache指令中的inactive参数时间内文件的最少使用次数,如果超过这个数
字,文件描述符一直是在缓存中打开的,如上例,如果有一个文件在inactive时间内一次没
被使用,它将被移除。
    #语法:open_file_cache_min_uses number 默认值:open_file_cache_min_uses
1 使用字段:http, server, location  这个指令指定了在open_file_cache指令无效的参数
中一定的时间范围内可以使用的最小文件数,如果使用更大的值,文件描述符在cache中总是打开状态.

    open_file_cache_min_uses 1;

    #语法:open_file_cache_errors on | off 默认值:open_file_cache_errors off 使用
字段:http, server, location 这个指令指定是否在搜索一个文件是记录cache错误.
    open_file_cache_errors on;
}


#设定http服务器,利用它的反向代理功能提供负载均衡支持
http
{
    #文件扩展名与文件类型映射表
    include mime.types;

    #默认文件类型
    default_type application/octet-stream;

    #默认编码
    #charset utf-8;

    #服务器名字的hash表大小
    #保存服务器名字的hash表是由指令server_names_hash_max_size 和
server_names_hash_bucket_size所控制的。参数hash bucket size总是等于hash表
的大小,并且是一路处理器缓存大小的倍数。在减少了在内存中的存取次数后,使在处理器
中加速查找hash表键值成为可能。如果hash bucket size等于一路处理器缓存的大小,那
么在查找键的时候,最坏的情况下在内存中查找的次数为2。第一次是确定存储单元的地
址,第二次是在存储单元中查找键 值。因此,如果Nginx给出需要增大hash max size 或
 hash bucket size的提示,那么首要的是增大前一个参数的大小.
    server_names_hash_bucket_size 128;

    #客户端请求头部的缓冲区大小。这个可以根据你的系统分页大小来设置,一般一个请求
的头部大小不会超过1k,不过由于一般系统分页都要大于1k,所以这里设置为分页大小。
分页大小可以用命令getconf PAGESIZE取得。
    client_header_buffer_size 32k;

    #客户请求头缓冲大小。nginx默认会用client_header_buffer_size这个buffer来读取
header值,如果header过大,它会使用large_client_header_buffers来读取。
    large_client_header_buffers 4 64k;

    #设定通过nginx上传文件的大小
    client_max_body_size 8m;

    #开启高效文件传输模式,sendfile指令指定nginx是否调用sendfile函数来输出文件,
对于普通应用设为 on,如果用来进行下载等应用磁盘IO重负载应用,可设置为off,以平衡
磁盘与网络I/O处理速度,降低系统的负载。注意:如果图片显示不正常把这个改成off。
    #sendfile指令指定 nginx 是否调用sendfile 函数(zero copy 方式)来输出文件,对
于普通应用,必须设为on。如果用来进行下载等应用磁盘IO重负载应用,可设置为off,以
平衡磁盘与网络IO处理速度,降低系统uptime。
    sendfile on;

    #开启目录列表访问,合适下载服务器,默认关闭。
    autoindex on;

    #此选项允许或禁止使用socke的TCP_CORK的选项,此选项仅在使用sendfile的时候
使用
    tcp_nopush on;

    tcp_nodelay on;

    #长连接超时时间,单位是秒
    keepalive_timeout 120;

    #FastCGI相关参数是为了改善网站的性能:减少资源占用,提高访问速度。下面参数看
字面意思都能理解。
    fastcgi_connect_timeout 300;
    fastcgi_send_timeout 300;
    fastcgi_read_timeout 300;
    fastcgi_buffer_size 64k;
    fastcgi_buffers 4 64k;
    fastcgi_busy_buffers_size 128k;
    fastcgi_temp_file_write_size 128k;

    #gzip模块设置
    gzip on; #开启gzip压缩输出
    gzip_min_length 1k;    #最小压缩文件大小
    gzip_buffers 4 16k;    #压缩缓冲区
    gzip_http_version 1.0;    #压缩版本(默认1.1,前端如果是squid2.5请使用1.0)
    gzip_comp_level 2;    #压缩等级
    gzip_types text/plain application/x-javascript text/css application/xml;    #压
缩类型,默认就已经包含textml,所以下面就不用再写了,写上去也不会有问题,但是会有
一个warn。
    gzip_vary on;

    #开启限制IP连接数的时候需要使用
    #limit_zone crawler $binary_remote_addr 10m;


    #负载均衡配置
    upstream pythonav.cn {

        #upstream的负载均衡,weight是权重,可以根据机器配置定义权重。weigth参数
表示权值,权值越高被分配到的几率越大。
        server 192.168.80.121:80 weight=3;
        server 192.168.80.122:80 weight=2;
        server 192.168.80.123:80 weight=3;

        #nginx的upstream目前支持4种方式的分配
        #1、轮询(默认)
        #每个请求按时间顺序逐一分配到不同的后端服务器,如果后端服务器down掉,能
自动剔除。
        #2、weight
        #指定轮询几率,weight和访问比率成正比,用于后端服务器性能不均的情况。
        #例如:
        #upstream bakend {
        #    server 192.168.0.14 weight=10;
        #    server 192.168.0.15 weight=10;
        #}
        #2、ip_hash
        #每个请求按访问ip的hash结果分配,这样每个访客固定访问一个后端服务器,可以
解决session的问题。
        #例如:
        #upstream bakend {
        #    ip_hash;
        #    server 192.168.0.14:88;
        #    server 192.168.0.15:80;
        #}
        #3、fair(第三方)
        #按后端服务器的响应时间来分配请求,响应时间短的优先分配。
        #upstream backend {
        #    server server1;
        #    server server2;
        #    fair;
        #}
        #4、url_hash(第三方)
        #按访问url的hash结果来分配请求,使每个url定向到同一个后端服务器,后端服务
器为缓存时比较有效。
        #例:在upstream中加入hash语句,server语句中不能写入weight等其他的参数,
hash_method是使用的hash算法
        #upstream backend {
        #    server squid1:3128;
        #    server squid2:3128;
        #    hash $request_uri;
        #    hash_method crc32;
        #}

        #tips:
        #upstream bakend{#定义负载均衡设备的Ip及设备状态}{
        #    ip_hash;
        #    server 127.0.0.1:9090 down;
        #    server 127.0.0.1:8080 weight=2;
        #    server 127.0.0.1:6060;
        #    server 127.0.0.1:7070 backup;
        #}
        #在需要使用负载均衡的server中增加 proxy_pass http://bakend/;

        #每个设备的状态设置为:
        #1.down表示单前的server暂时不参与负载
        #2.weight为weight越大,负载的权重就越大。
        #3.max_fails:允许请求失败的次数默认为1.当超过最大次数时,返回
proxy_next_upstream模块定义的错误
        #4.fail_timeout:max_fails次失败后,暂停的时间。
        #5.backup: 其它所有的非backup机器down或者忙的时候,请求backup机器。
所以这台机器压力会最轻。

        #nginx支持同时设置多组的负载均衡,用来给不用的server来使用。
        #client_body_in_file_only设置为On 可以讲client post过来的数据记录到文件中
用来做debug
        #client_body_temp_path设置记录文件的目录 可以设置最多3层目录
        #location对URL进行匹配.可以进行重定向或者进行新的代理 负载均衡
    }


    #虚拟主机的配置
    server
    {
        #监听端口
        listen 80;

        #域名可以有多个,用空格隔开
        server_name www.w3cschool.cn w3cschool.cn;
        index index.html index.htm index.php;
        root /data/www/w3cschool;

        #对******进行负载均衡
        location ~ .*.(php|php5)?$
        {
            fastcgi_pass 127.0.0.1:9000;
            fastcgi_index index.php;
            include fastcgi.conf;
        }

        #图片缓存时间设置
        location ~ .*.(gif|jpg|jpeg|png|bmp|swf)$
        {
            expires 10d;
        }

        #JS和CSS缓存时间设置
        location ~ .*.(js|css)?$
        {
            expires 1h;
        }

        #日志格式设定
        #$remote_addr与$http_x_forwarded_for用以记录客户端的ip地址;
        #$remote_user:用来记录客户端用户名称;
        #$time_local: 用来记录访问时间与时区;
        #$request: 用来记录请求的url与http协议;
        #$status: 用来记录请求状态;成功是200,
        #$body_bytes_sent :记录发送给客户端文件主体内容大小;
        #$http_referer:用来记录从那个页面链接访问过来的;
        #$http_user_agent:记录客户浏览器的相关信息;
        #通常web服务器放在反向代理的后面,这样就不能获取到客户的IP地址了,通过
$remote_add拿到的IP地址是反向代理服务器的iP地址。反向代理服务器在转发请求的
http头信息中,可以增加x_forwarded_for信息,用以记录原有客户端的IP地址和原来客
户端的请求的服务器地址。
        log_format access '$remote_addr - $remote_user [$time_local] "$request" '
        '$status $body_bytes_sent "$http_referer" '
        '"$http_user_agent" $http_x_forwarded_for';

        #定义本虚拟主机的访问日志
        access_log  /usr/local/nginx/logs/host.access.log  main;
        access_log  /usr/local/nginx/logs/host.access.404.log  log404;

        #对 "/" 启用反向代理
        location / {
            proxy_pass http://127.0.0.1:88;
            proxy_redirect off;
            proxy_set_header X-Real-IP $remote_addr;

            #后端的Web服务器可以通过X-Forwarded-For获取用户真实IP
            proxy_set_header X-Forwarded-For $proxy_add_x_forwarded_for;

            #以下是一些反向代理的配置,可选。
            proxy_set_header Host $host;

            #允许客户端请求的最大单文件字节数
            client_max_body_size 10m;

            #缓冲区代理缓冲用户端请求的最大字节数,
            #如果把它设置为比较大的数值,例如256k,那么,无论使用firefox还是IE浏览
器,来提交任意小于256k的图片,都很正常。如果注释该指令,使用默认的client_body_buffer_size设置,也就是操作系统页面大小的两倍,8k或者16k,问题就出
现了。
            #无论使用firefox4.0还是IE8.0,提交一个比较大,200k左右的图片,都返回
500 Internal Server Error错误
            client_body_buffer_size 128k;

            #表示使nginx阻止HTTP应答代码为400或者更高的应答。
            proxy_intercept_errors on;

            #后端服务器连接的超时时间_发起握手等候响应超时时间
            #nginx跟后端服务器连接超时时间(代理连接超时)
            proxy_connect_timeout 90;

            #后端服务器数据回传时间(代理发送超时)
            #后端服务器数据回传时间_就是在规定时间之内后端服务器必须传完所有的数据
            proxy_send_timeout 90;

            #连接成功后,后端服务器响应时间(代理接收超时)
            #连接成功后_等候后端服务器响应时间_其实已经进入后端的排队之中等候处理
(也可以说是后端服务器处理请求的时间)
            proxy_read_timeout 90;

            #设置代理服务器(nginx)保存用户头信息的缓冲区大小
            #设置从被代理服务器读取的第一部分应答的缓冲区大小,通常情况下这部分应答
中包含一个小的应答头,默认情况下这个值的大小为指令proxy_buffers中指定的一个缓冲
区的大小,不过可以将其设置为更小
            proxy_buffer_size 4k;

            #proxy_buffers缓冲区,网页平均在32k以下的设置
            #设置用于读取应答(来自被代理服务器)的缓冲区数目和大小,默认情况也为分
页大小,根据操作系统的不同可能是4k或者8k
            proxy_buffers 4 32k;

            #高负荷下缓冲大小(proxy_buffers*2)
            proxy_busy_buffers_size 64k;

            #设置在写入proxy_temp_path时数据的大小,预防一个工作进程在传递文件时
阻塞太长
            #设定缓存文件夹大小,大于这个值,将从upstream服务器传
            proxy_temp_file_write_size 64k;
        }


        #设定查看Nginx状态的地址
        location /NginxStatus {
            stub_status on;
            access_log on;
            auth_basic "NginxStatus";
            auth_basic_user_file confpasswd;
            #htpasswd文件的内容可以用apache提供的htpasswd工具来产生。
        }

        #本地动静分离反向代理配置
        #所有jsp的页面均交由tomcat或resin处理
        location ~ .(jsp|jspx|do)?$ {
            proxy_set_header Host $host;
            proxy_set_header X-Real-IP $remote_addr;
            proxy_set_header X-Forwarded-For $proxy_add_x_forwarded_for;
            proxy_pass http://127.0.0.1:8080;
        }

        #所有静态文件由nginx直接读取不经过tomcat或resin
        location ~ .*.
(htm|html|gif|jpg|jpeg|png|bmp|swf|ioc|rar|zip|txt|flv|mid|doc|ppt|
        pdf|xls|mp3|wma)$
        {
            expires 15d;
        }

        location ~ .*.(js|css)?$
        {
            expires 1h;
        }
    }
}
######Nginx配置文件nginx.conf中文详解#####

nginx.conf详解
【Nginx 命令行】
nginx -s stop
nginx -s reload
nginx
nginx帮助命令
[root@chaogelinux nginx114]# nginx  -h
nginx version: nginx/1.14.0
Usage: nginx [-?hvVtTq] [-s signal] [-c filename] [-p prefix] [-g directives]

Options:
  -?,-h         : this help   #帮助信息
  -v            : show version and exit        #显示版本
  -V            : show version and configure options then exit #显示编译信息与版本
  -t            : test configuration and exit    #测试配置文件语法
  -T            : test configuration, dump it and exit    #测试语法且输出内容
  -q            : suppress non-error messages during configuration testing
  -s signal     : send signal to a master process: stop, quit, reopen, reload #发送信
号,stop立即停止,quit优雅停止,reload重读配置文件,reopen重新记录日志
  -p prefix     : set prefix path (default: /home/Learn_Nginx/nginx114//)
  -c filename   : set configuration file (default: conf/nginx.conf) #使用指定配置文件
  -g directives : set global directives out of configuration file #覆盖默认参数
【配置文件重读】
在不停止服务的情况下,更新配置文件。
1.修改nginx.conf
worker_processes  3; #定义nginx工作进程数的

2.重载配置文件
nginx -s reload

3.检查linux进程
[root@chaogelinux nginx114]# vim conf/nginx.conf
[root@chaogelinux nginx114]#
[root@chaogelinux nginx114]# ps -ef|grep nginx
root      6191     1  0 10:33 ?        00:00:00 nginx: master process nginx
nobody    6213  6191  0 10:33 ?        00:00:00 nginx: worker process
nobody    6214  6191  0 10:33 ?        00:00:00 nginx: worker process
nobody    6215  6191  0 10:33 ?        00:00:00 nginx: worker process
root      6345  5283  0 10:38 pts/0    00:00:00 grep --color=auto nginx
【nginx-master信号】
信号由ngx_signal_hander函数处理
1.master不处理请求,而是分配worker进程,负责重启,热部署,重载等功能。
2.master根据worker_processes 定义开始的workers数量
3.worker运行后,master处于挂起状态,等待信号
4.可以发送kill,或者nginx -s 参数发出信号
【信号集】
| nginx -s 对应参数 | 信号 | 含义 | English |
| stop | TERM | 强制关闭整个服务 | Shut down quickly |
| null | INT | 强制关闭整个服务 | Shut down quickly |
| quit | QUIT | 优雅地关闭整个服务 | Shut down gracefully |
| reopen | USR1 | 重新打开日志记录 | Reopen log files |
| reload | HUP | 重新读取配置文件,并且优雅地退出老worker | Reload configuration,start the new worker process with a new configuration,and gracefully shut down old worker processes |
| null | USR2 | 平滑升级到新版本 |
Upgrade the nginx executable on the fly |
| null | WINCH | 优雅地关闭worker(在热更新的时候必用) | Shut down worker processes gracefully |
【热部署】
热部署指的是在不重启或关闭进程情况下,新应用直接替换掉旧应用
热部署大致流程
1.备份旧的二进制文件
2.编译安装新的二进制文件,覆盖旧的二进制文件
3.发送USR2信号给旧master进程
4.发送WINCH信号给旧master进程
5.发送QUIT信号给旧master进程
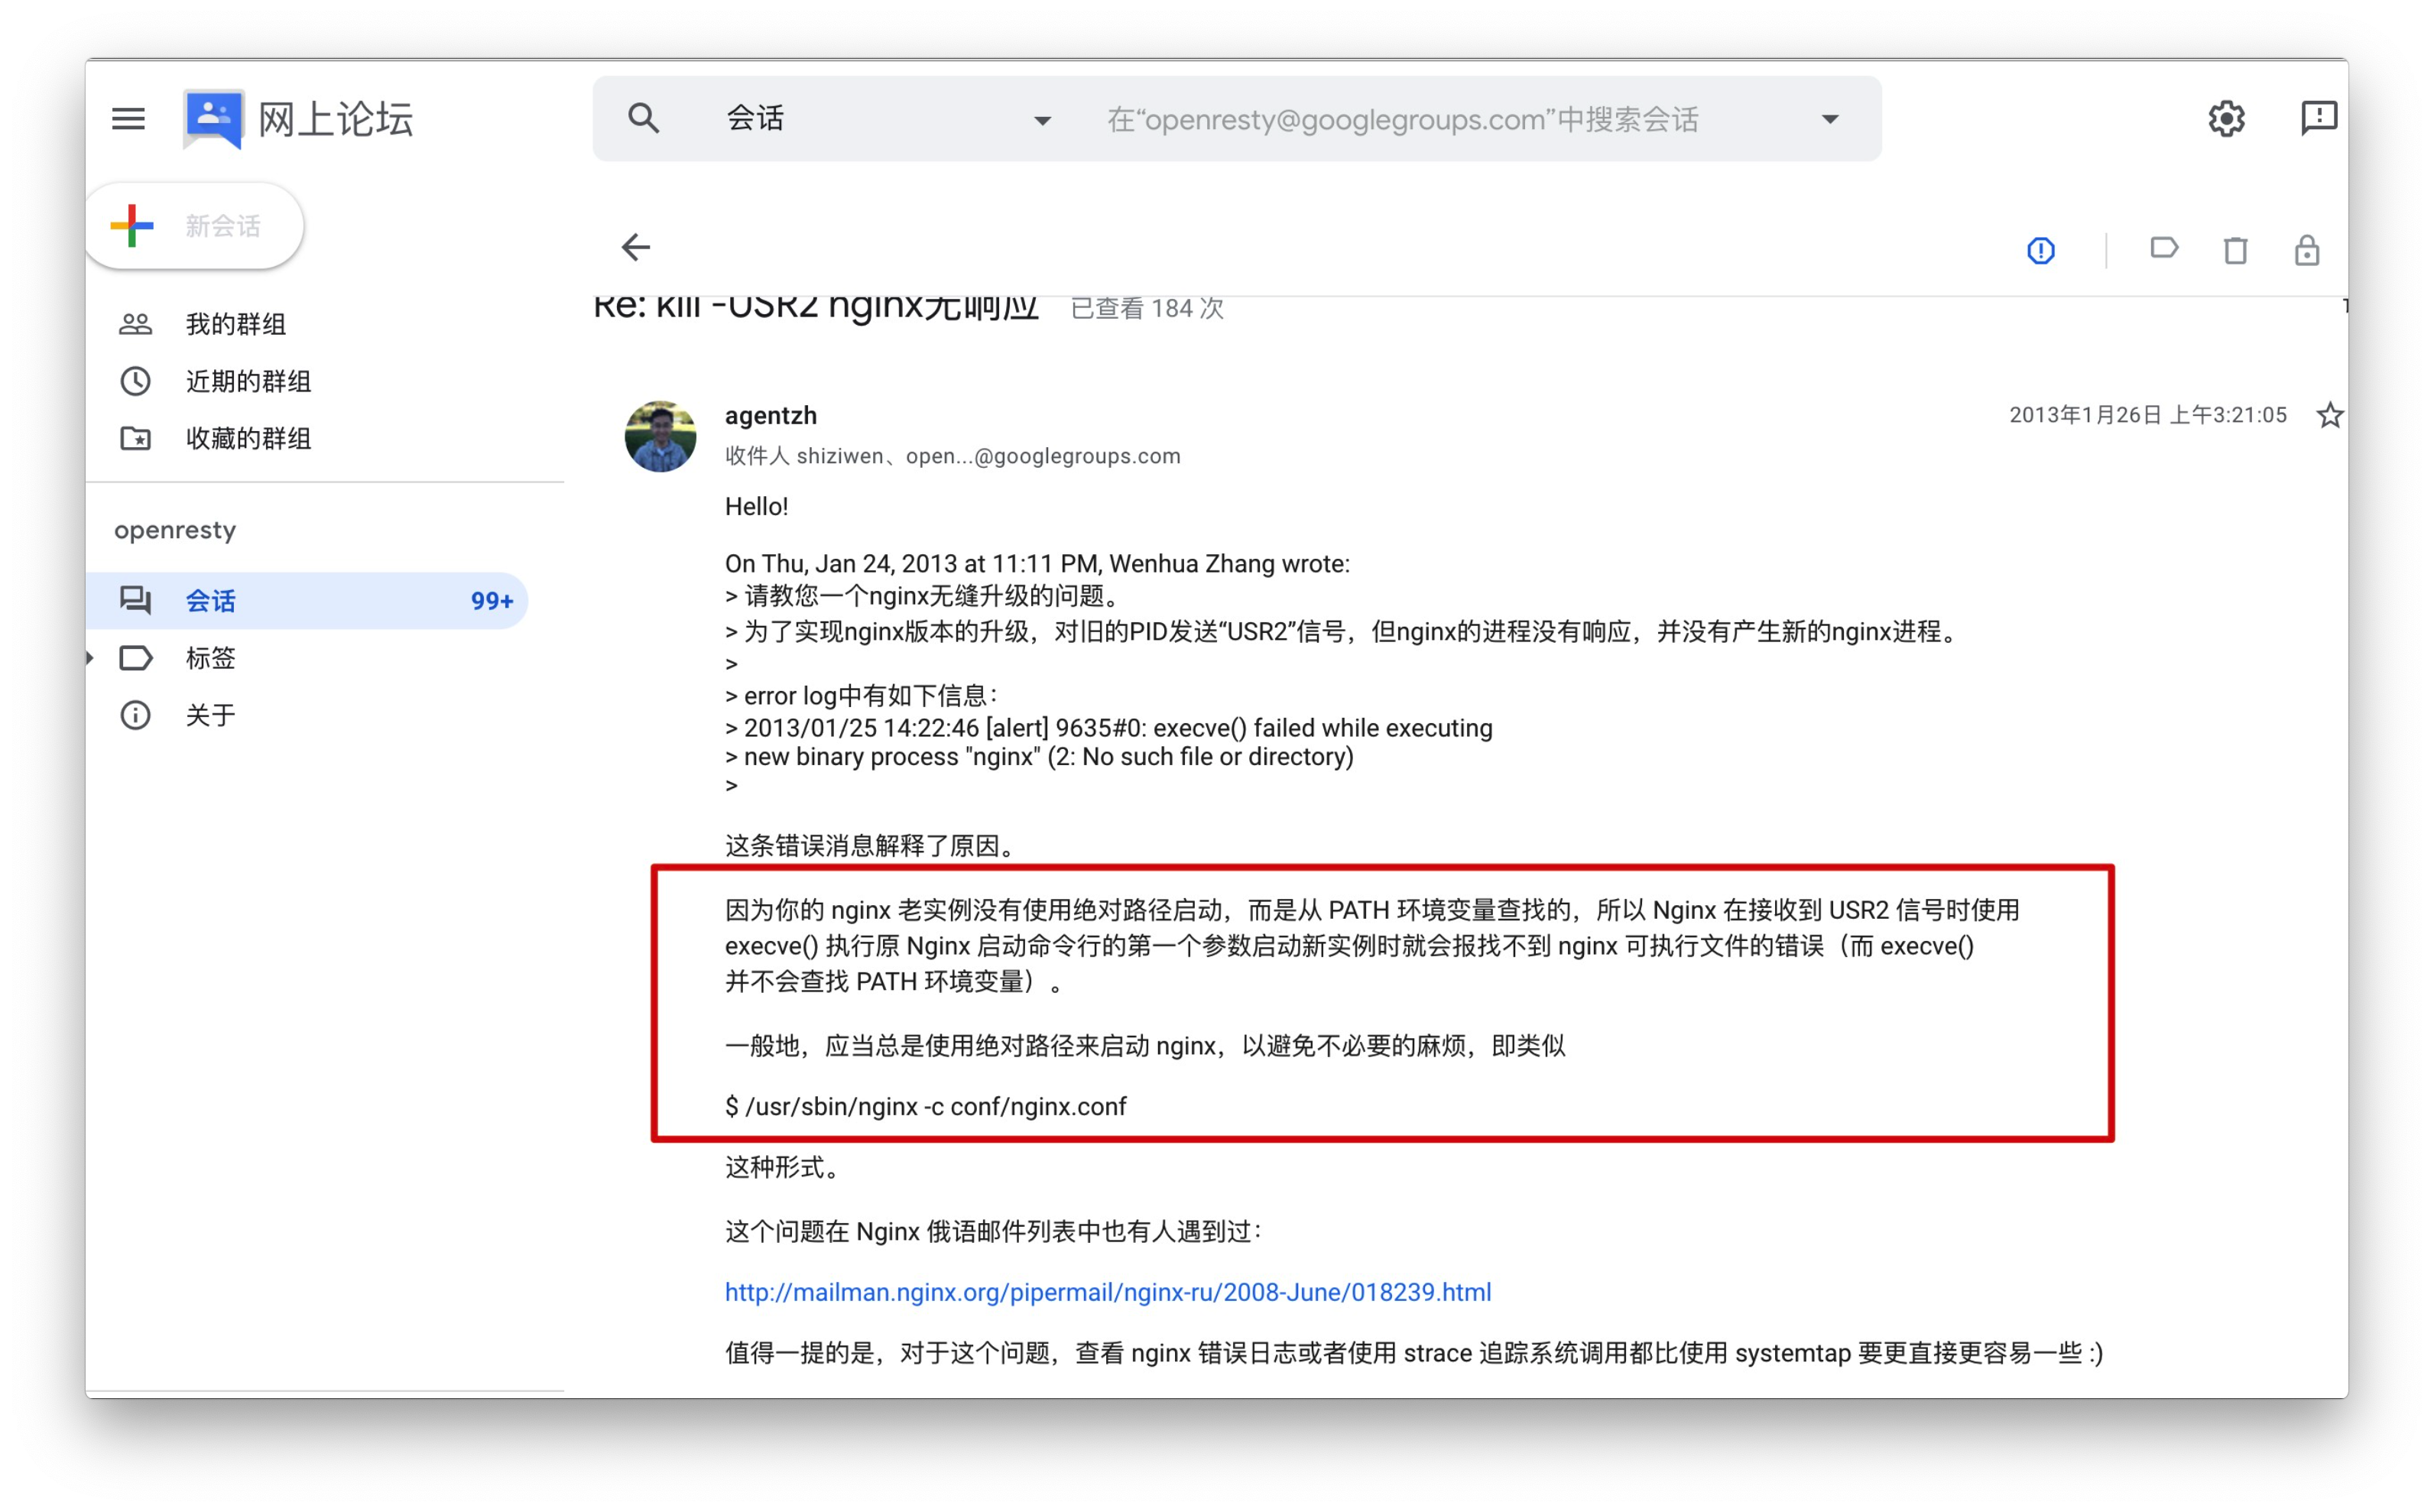
【热部署时的坑】
nginx必须使用绝对路径启动,
nginx支持reload重载仅仅时nginx的master进程,检查配置文件发育是否正确,错则返回错误,正确也不会改变
已经建立连接的worker,只得等待worker处理完毕请求之后,杀死旧配置文件的worker,启动新配置文件的worker。
但是nginx这里提供了热部署功能,就是在不影响用户体验下,进行软件版本升级,也就是不主动杀死worker,替换
软件的二进制文件。
1.目前运行的是旧的nginx版本,如下检查
[root@chaogelinux sbin]# ps -ef|grep nginx
root     20311     1  0 15:12 ?        00:00:00 nginx: master process nginx
nobody   20312 20311  0 15:12 ?        00:00:00 nginx: worker process
root     20314 13589  0 15:12 pts/0    00:00:00 grep --color=auto nginx
[root@chaogelinux sbin]#
[root@chaogelinux sbin]#
[root@chaogelinux sbin]# curl 127.0.0.1/123  #访问错误页面,返回nginx版本了
<html>
<head><title>404 Not Found</title></head>
<body bgcolor="white">
<center><h1>404 Not Found</h1></center>
<hr><center>nginx/1.14.0</center>
</body>
</html>
【热部署具体操作】
1.备份旧版本的nginx二进制文件
[root@chaogelinux sbin]# pwd
/home/Learn_Nginx/nginx/sbin
[root@chaogelinux sbin]# mv nginx nginx.old
[root@chaogelinux sbin]# ls
nginx.old

2.检查旧版本nginx的编译参数
[root@chaogelinux Learn_Nginx]# nginx.old -V
nginx version: nginx/1.14.0
built by gcc 4.8.5 20150623 (Red Hat 4.8.5-39) (GCC)
built with OpenSSL 1.0.2k-fips  26 Jan 2017
TLS SNI support enabled
configure arguments: --prefix=/home/Learn_Nginx/nginx/ --with-http_ssl_module --with-http_flv_module --with-http_gzip_static_module --with-http_stub_status_module --with-threads --with-file-aio

3.编译安装新版本nginx
#下载新nginx源码
[root@chaogelinux Learn_Nginx]# wget http://nginx.org/download/nginx-1.17.8.tar.gz
#编译安装新版本nginx
[root@chaogelinux Learn_Nginx]# tar -zxf nginx-1.17.8.tar.gz
#开始编译
[root@chaogelinux Learn_Nginx]# cd nginx-1.17.8/
[root@chaogelinux nginx-1.17.8]#
[root@chaogelinux nginx-1.17.8]# ./configure --prefix=/home/Learn_Nginx/nginx/ --with-http_ssl_module --with-http_flv_module --with-http_gzip_static_module --with-http_stub_status_module --with-threads --with-file-aio
#编译安装
[root@chaogelinux nginx-1.17.8]# make && make install

4.此时发现已存在2个版本nginx程序
[root@chaogelinux sbin]# ls
nginx  nginx.old

5.替换旧的nginx可执行文件
[root@chaogelinux sbin]# cp -a /home/Learn_Nginx/nginx-1.17.8/objs/nginx /home/Learn_Nginx/nginx/sbin/
cp:是否覆盖"/home/Learn_Nginx/nginx/sbin/nginx"? y

5.1检查旧的nginx进程,请注意,这里用绝对路径启动nginx
请注意,这里用绝对路径启动nginx
请注意,这里用绝对路径启动nginx
例如
/home/Learn_Nginx/nginx/sbin/nginx


注意这里的PID和PPID(pid是当前进程的id号,ppid是启动该进程的pid,也就是父ID,可知该pid由谁启动)
[root@chaogelinux sbin]# ps -ef|grep nginx
root     20311     1  0 15:12 ?        00:00:00 nginx: master process nginx
nobody   20312 20311  0 15:12 ?        00:00:00 nginx: worker process
root     20314 13589  0 15:12 pts/0    00:00:00 grep --color=auto nginx

6.发送USR2信号给旧版本主进程,使得nginx旧版本停止接收请求,切换为新nginx版本

[root@chaogelinux sbin]# kill -USR2 `cat ../logs/nginx.pid `

7.检查此时的nginx进程
nginx-master首先会重命名pid文件,在文件后面添加.oldbin后缀
然后会再启动一个新的master进程以及worker,且使用的是新版Nginx
nginx能够自动将新来的请求,过度到新版master进程下,实现平滑过度

#可以发现新的master进程由旧master启动,由PPID可看出
[root@chaogelinux sbin]# ps -ef|grep nginx
root     20311     1  0 15:12 ?        00:00:00 nginx: master process nginx
nobody   20312 20311  0 15:12 ?        00:00:00 nginx: worker process
root     20335 20311  0 15:13 ?        00:00:00 nginx: master process nginx
nobody   20336 20335  0 15:13 ?        00:00:00 nginx: worker process
root     20338 13589  0 15:13 pts/0    00:00:00 grep --color=auto nginx

[root@chaogelinux sbin]# ls ../logs/
access.log        error.log         nginx.pid         nginx.pid.oldbin

8.发送WINCH信号给旧master进程,优雅的关闭旧worker进程
[root@chaogelinux sbin]# kill -WINCH `cat ../logs/nginx.pid.oldbin`

#再次检查进程情况,旧master的worker已经关闭了,旧master不会自己退出,用作版本回退:kill -HUP 拉起进程,
[root@chaogelinux sbin]# ps -ef|grep nginx
root     20311     1  0 15:12 ?        00:00:00 nginx: master process nginx
root     20335 20311  0 15:13 ?        00:00:00 nginx: master process nginx
nobody   20336 20335  0 15:13 ?        00:00:00 nginx: worker process
root     20607 13589  0 15:25 pts/0    00:00:00 grep --color=auto nginx

9.如果你觉得没问题了,可以关闭旧master进程
[root@chaogelinux sbin]# ps -ef|grep nginx
root     20335     1  0 15:13 ?        00:00:00 nginx: master process nginx
nobody   20336 20335  0 15:13 ?        00:00:00 nginx: worker process
root     20665 13589  0 15:28 pts/0    00:00:00 grep --color=auto nginx
【日志切割】
1.查看当前nginx日志
[root@chaogelinux logs]# ll
总用量 12
-rw-r--r-- 1 root root 1645 2月  11 15:30 access.log
-rw-r--r-- 1 root root 2370 2月  11 15:30 error.log
-rw-r--r-- 1 root root    6 2月  11 15:13 nginx.pid

#大致看下日志内容
[root@chaogelinux logs]# tail -2  access.log
192.168.178.12 - - [11/Feb/2020:15:32:22 +0800] "GET / HTTP/1.1" 304 0 "-" "Mozilla/5.0 (Macintosh; Intel Mac OS X 10_15_3) AppleWebKit/537.36 (KHTML, like Gecko) Chrome/79.0.3945.130 Safari/537.36"
192.168.178.12 - - [11/Feb/2020:15:32:23 +0800] "GET / HTTP/1.1" 304 0 "-" "Mozilla/5.0 (Macintosh; Intel Mac OS X 10_15_3) AppleWebKit/537.36 (KHTML, like Gecko) Chrome/79.0.3945.130 Safari/537.36"

2.给文件重命名,注意用mv而不是cp(涉及到文件inode知识)
[root@chaogelinux logs]# mv access.log access.log$(date +"%Y-%m-%d--%H:%M:%S")
[root@chaogelinux logs]# ll
总用量 16
-rw-r--r-- 1 root root 4630 2月  11 15:32 access.log2020-02-11--15:43:49
-rw-r--r-- 1 root root 2370 2月  11 15:30 error.log
-rw-r--r-- 1 root root    6 2月  11 15:13 nginx.pid

3.发送USR1信号给nginx-master,重新打开日志记录,生成新的日志文件
nginx -s reopen  #等同于 Kill -USR1 nginx.pid

4.注意,在以上的nginx重命名日志切割,不要着急立即对文件修改,且要sleep 等待1秒
由于nginx的工作模式,master下发指令给worker只是做了标记,当业务量大的时候,这个修改操作可能会慢一点,不会理解生效

5.在生产环境下,主要以crontab形式,执行cut_nginx_log.sh脚本的

[root@bogon sbin]# pwd
/opt/nginx/sbin
[root@bogon sbin]# cat cut_nginx_log.sh
#!/bin/bash
# 脚本写入crontab,每天0点执行,这是一个nginx日志切割脚本

#nginx日志存放点
logs_path="/opt/tngx232/logs/"
mkdir -p ${logs_path}$(date -d "yesterday" +"%Y")/$(date -d "yesterday" +"%m")
mv ${logs_path}access.log ${logs_path}$(date -d "yesterday" +"%Y")/$(date -d "yesterday" +"%m")/access_$(date -d "yesterday" +"%Y-%m-%d").log

kill -USR1 `cat /opt/tngx232/logs/nginx.pid`

6.写入crontab
crontab -l
0 0 * * * /bin/bash /opt/nginx/sbin/cut_nginx_log.sh